Honeywell RTH2410 Series Programmable Thermostat
Identify System Type
This Honeywell RTH2410 Programmable Thermostat is compatible with the following systems:
- Gas, oil, or electric furnace
- Central air conditioner
- Hot water system with or without a pump
- Millivolt system
- Central heating and cooling system
- Heat pump without auxiliary/backup heat
- Heat pump with auxiliary/backup heat
Advanced Features
If you’re looking for advanced features, check out the Honeywell RTH8500 Thermostat Guide.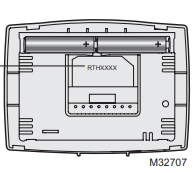
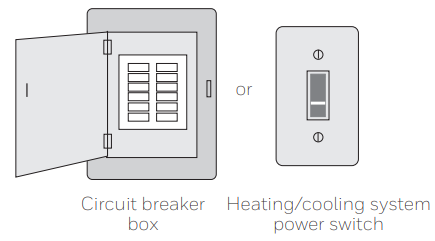
Turn Off the Power to the Heating/Cooling System
Remove Old Thermostat
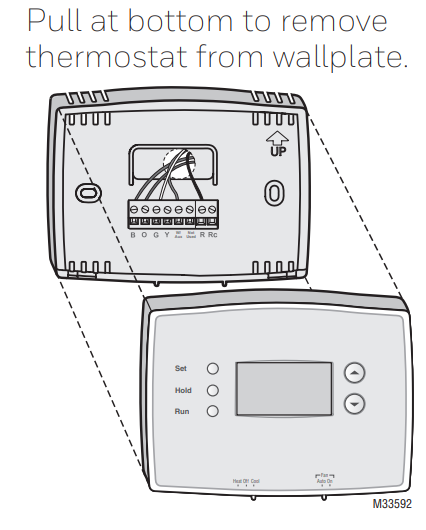
Remove the old thermostat, but leave the wallplate with wires attached.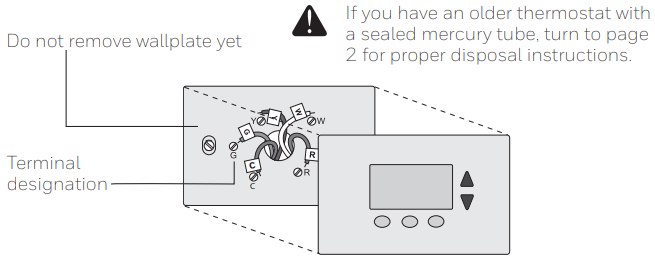
Label Wires with Tags
Label the wires using the supplied wire labels as you disconnect them.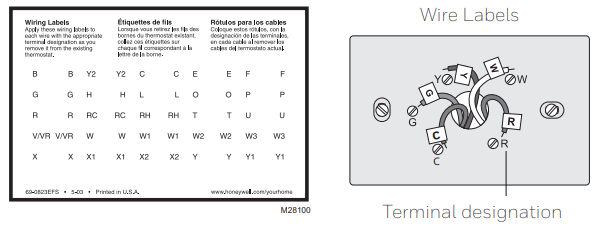
Separate Wallplate from New Thermostat
Remove the wallplate from the new thermostat and mount it onto the wall.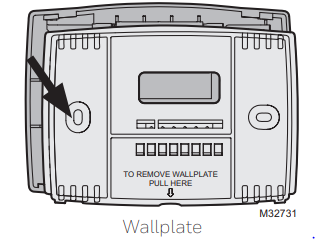
Mount Wallplate
Mount the new wallplate using the included screws and anchors.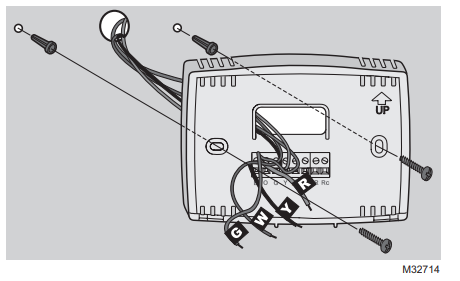
Drill 3/16-in. Holes for drywall
Drill 3/32-in. holes for plaster
Connect Wires
Simply match wire labels. If labels do not match letters on the thermostat, check “Alternate Wiring (Conventional Systems)” on page 6 and connect to the terminal as shown (see notes below).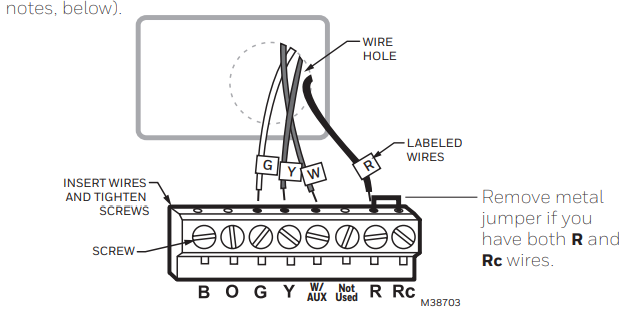
Maximum load: 1 A @ 24 Vac, 50/60Hz per output. We are here to help. Call 1-800-468-1502 for wiring assistance.
Alternate Wiring (Conventional Systems)
If labels do not match letters on the thermostat, check the chart below and connect to the terminal as shown here (see notes below).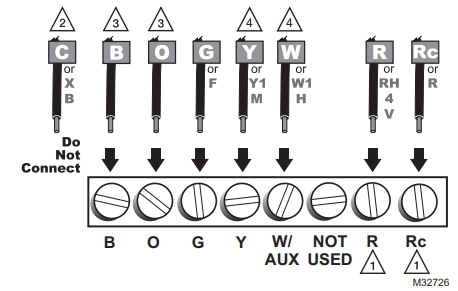
- If wires are connected to both R and Rc terminals, remove the metal jumper.
- Do not use C or X. Wrap the bare end of the wire with electrical tape.
- If you have a heat pump without auxiliary/backup heat, connect O or B, not both.
Alternate Wiring (Heat Pump)
If the labels do not match the letters on the thermostat
Alternate wiring (for heat pumps with auxiliary or backup heat only)
If labels do not match letters on the thermostat, check the chart below and connect to the terminal as shown here (see notes below).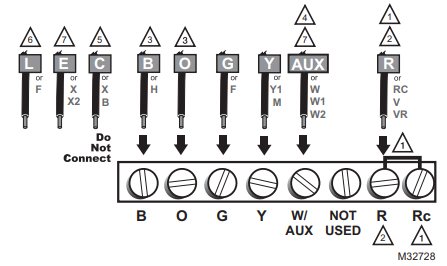
When wiring your Honeywell RTH2410 Programmable Thermostat:
- Leave the metal jumper in place, connecting R & Rc terminals.
- If your old thermostat had both V and VR wires, stop now and contact a qualified contractor for help.
- If your old thermostat had separate O and B wires, wrap the B wire in electrical tape and do not connect.
- If your old thermostat had Y1, W1, and W2 wires, stop now and contact a qualified contractor for help.
- Do not use C or X wire. Do not use the B wire if you already have the O wire. Wrap the bare end of the wire with electrical tape.
- Do not use the L wire. Wrap the bare end of the wire with electrical tape.
If your old thermostat had E and Aux wires (or alternate wires), connect both wires to the Aux terminal.
The Honeywell RTH2300 Thermostat also works with similar systems.
Install Batteries
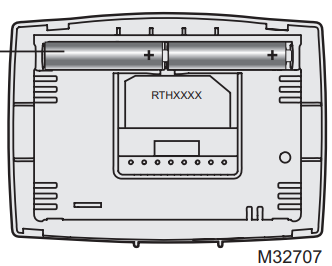
Install two AAA alkaline batteries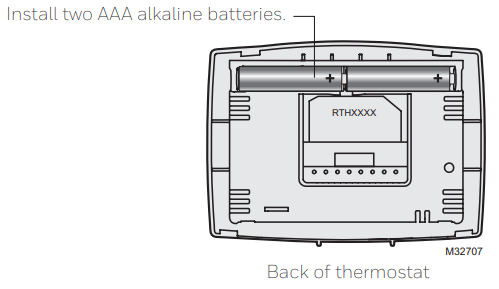
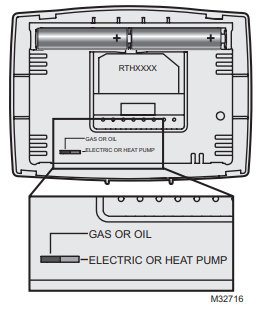
Set Fan Operation Switch
Move the switch to the proper setting:
- Gas or Oil: For gas or oil heating systems, leave the fan operation switch in this factory-set position (for systems that control the fan in a call for heat).
- Electric or Heat Pump: Change the switch to this setting for heat pump or electric heat systems. (This setting is for systems that allow the thermostat to control the fan in a call for heat, if a fan wire is connected to the G terminal.)

Install Thermostat Onto Wallplate
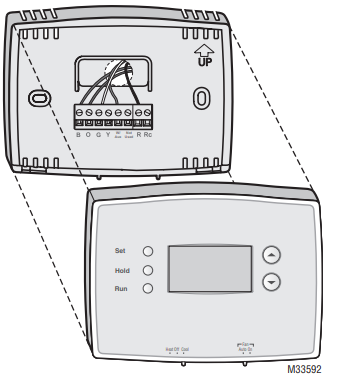
Turn Power Back On
Turn the power back on to the heating/cooling system.
System Type
- Single Stage Heat and Cool
- Heat Only or Cool Only
- Heat Pump* with Backup Heat. Continue with Advanced Installation to match your thermostat to your system type.
- Heat Pump—an air conditioner that provides cooling in the summer, and also runs in reverse in the winter to provide heating.
- This thermostat works on 24-volt or 750 mV systems. It will NOT work on multistage conventional systems.
Advanced Installation
Enter System Setup
To enter system setup, press and hold both the s and t buttons until the display changes (approximately 5 seconds).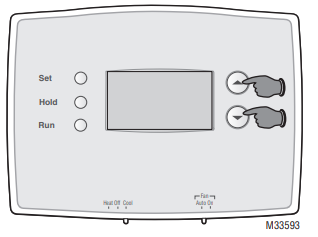
Changing Settings
- Press the s or t button to change the setting.
- Press the s and t buttons simultaneously for one second to advance to the next function.
- Press the RUN button to exit and save settings.

If you prefer a touchscreen model, the Honeywell TH9320WF Wi-Fi Thermostat offers easy setup.
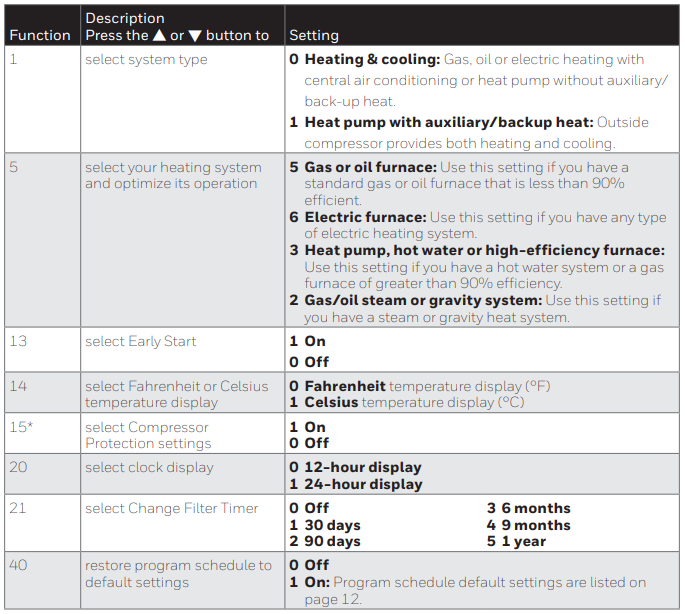
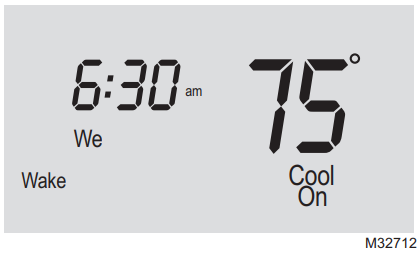
Compressor Protection: This feature forces the compressor to wait approximately 5 minutes before restarting, to prevent HVAC system damage. During the wait time, the message “Cool On” or “Heat On” is displayed on screen.
New Thermostat
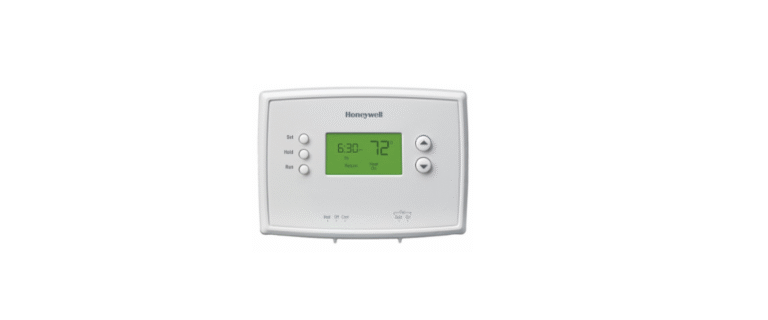
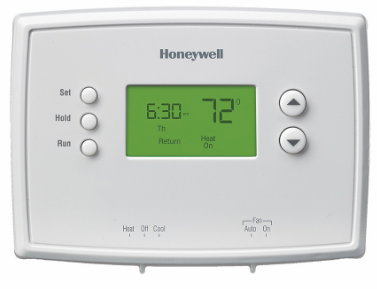
Your new Honeywell RTH2410 programmable thermostat has been designed to give you many years of reliable service and easy-to-use, push-button climate control.
- The backlit display is easy to read.
- Displays ambient (measured) temperature at all times
- One-touch access to setpoint temperature
- Preset program settings
- Temporary and permanent override of the schedule
- Early start ensures the right temperature at the right time
- Built-in compressor protection feature
Thermostat Controls
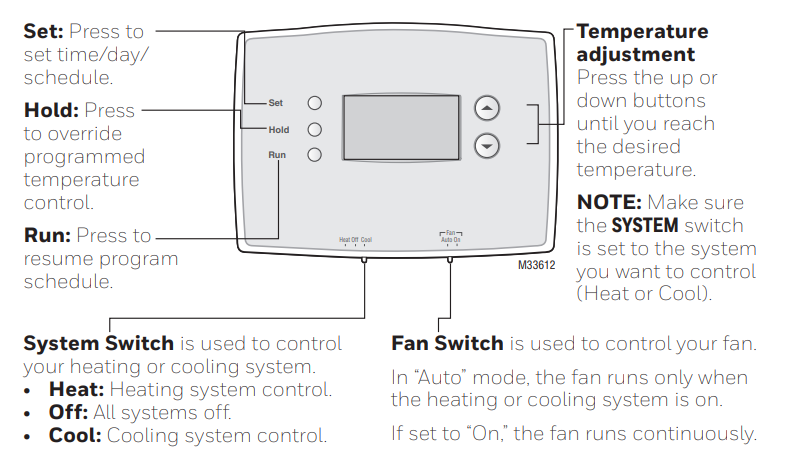
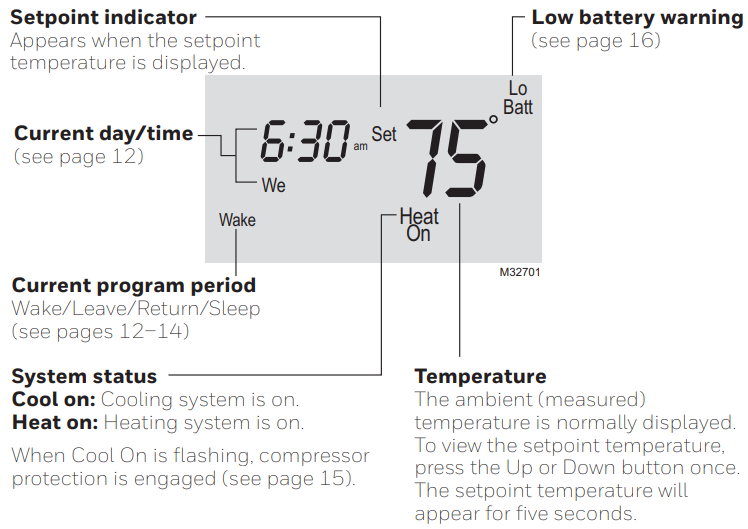
Display Screen
Set the Time and Day
- Press the SET button, then press s or t to set the clock time.
- Press the SET button, then press s or t to select the day of the week.
- Press RUN to save & exit.

Program Schedule
You can program four time periods each day, with different settings for
weekdays and weekends. We recommend the preset settings (shown in the
table below), since they can reduce your heating/cooling expenses.
- Wake – Set to the time you awaken and the temperature you want during the morning, until you leave for the day.
- Leave – Set to the time you leave home and the temperature you want while you are away (usually an energy-saving level).
- Return – Set to the time you return home and the temperature you want during the evening, until bedtime.
- Sleep – Set to the time you go to bed and the temperature you want overnight (usually an energy-saving level).
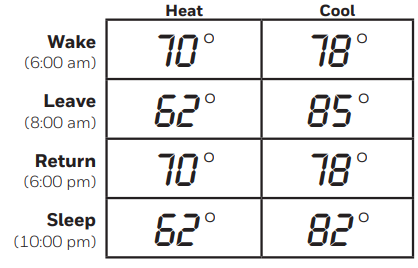
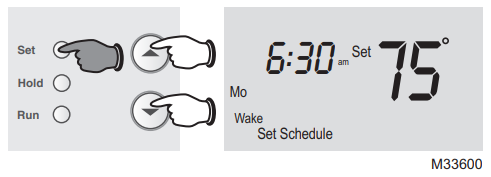
Program Schedules (RTH2510)
- Press SET until Set Schedule is displayed.
- Press s or t to set your Wake time for the day displayed, then press SET.
- Press S or T to set the temperature for this period, then press SET.
- Set time and temperature for the next period (Leave). Repeat steps 2 and 3 for each day.
- Press RUN to save & exit.
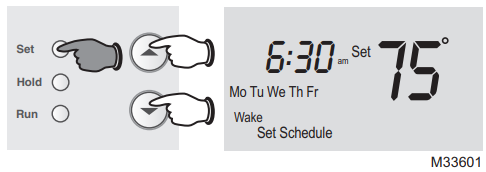
Schedules (RTH2410)
- Press SET until Set Schedule is displayed.
- Press s or t to set your weekday Wake time (Mo-Fr), then press SET.
- Press S or T to set the temperature for this period, then press SET.
- Set time and temperature for the next period (Leave). Repeat steps 2 and 3 for each weekday period.
- Press SET to set weekend time periods (Sa & Su), then press RUN to save & exit.
Program Schedule Override (Temporary)
Press s or t to immediately adjust the temperature. This will temporarily override the temperature setting for the current period. “Temporary” will appear on the display, and the current program period will flash.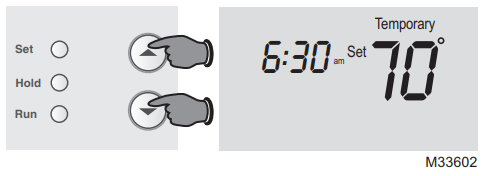
The new temperature will be maintained only until the next programmed period begins (see page 12). To cancel the temporary setting at any time, press RUN.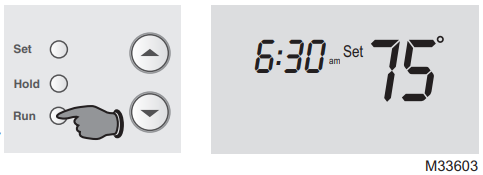
Program Schedule Override (Permanent)
Press HOLD to permanently adjust the temperature. This will override the temperature settings for all periods.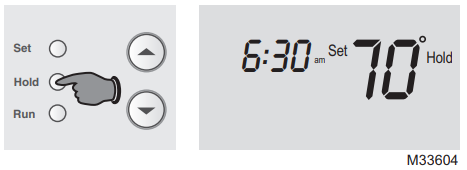
The “Hold” feature turns off the program schedule and allows you to adjust the thermostat manually, as needed.
Whatever temperature you set will be maintained 24 hours a day, until you manually change it, or press RUN to cancel “Hold” and resume the program schedule.

Built-In Compressor Protection
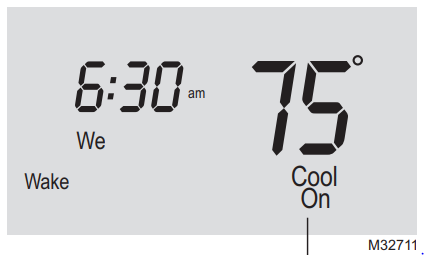
The Honeywell RTH2410 Programmable Thermostat includes a built-in safety feature that helps prevent damage to the compressor in your HVAC system, air conditioning, or heat pump. Damage can occur if the compressor is restarted too soon after shutdown. To protect your system, the thermostat forces the compressor to wait 5 minutes before restarting. During this time, the display will flash the message Cool On (or Heat On if you have a heat pump). Once the safe wait time has passed, the message stops flashing and the compressor turns back on.
Early Start
This Honeywell RTH2410 programmable thermostat feature allows the heating or cooling to turn on before the program start time, so the desired temperature is reached at the time you set. For example: Set the Wake time to 6 am, and the temperature to 70°. The heat will come on before 6 am, so the temperature is 70° by the time you wake at 6. The next period is displayed when the system is activated before a scheduled period, improving energy efficiency and comfort control.
Change Filter
If the filter reminder is turned on during installation, the words Change Filter will flash on the screen when the filter needs to be replaced. After you replace the air filter, press and hold the RUN button for 3 seconds to reset the alert.
Battery Replacement
Install two fresh AAA batteries when LowBatteryyshes on the screen. Lo Batt appears for 60 days before the batteries are depleted. Replace batteries once a year, or when you will be away for more than a month. Most settings are stored in nonvolatile (permanent) memory. Only the clock and the day must be set after you replace the batteries.
 Set the System switch to Off before removing the batteries. Otherwise, the heating/cooling system could remain activated even when batteries are removed.
Turn the thermostat over, insert fresh AAA alkaline batteries, then reinstall the thermostat.
Troubleshooting
If you have difficulty with your thermostat, please try the following suggestions. Most problems can be corrected quickly and easily.
- Make sure fresh AAA alkaline batteries are correctly installed.
- Set the system switch to Heat. Honeywell RTH2410 Series.
- Make sure the temperature is
set higher than the Inside temperature. - Set the system switch to Cool. Make sure the temperature is
set lower than the Inside temperature. - Wait 5 minutes for the system to respond.
Make sure heating and cooling temperatures in the Honeywell RTH2410 Series are set to acceptable ranges:
- Heat: 40° to 90°F (4.5° to 32°C).
- Cool: 50° to 99°F (10° to 37°C).
- The compressor protection feature is the Honeywell RTH2410 Series.
- Wait 5 minutes for the system to restart safely, without damage to the compressor.
- Set the System switch to Heat, and set the temperature level above the current room temperature.
- Set the System switch to Cool, and set the Honeywell RTH2410 Series temperature level below the current room temperature.
1-Year Limited Warranty
Resideo warrants this product, excluding battery, to be free from defects in workmanship or materials, under normal use and service, for one (1) year from the date of first purchase by the original purchaser. If the product is de redefectivern returnwith a bill of sale or other dated proof of purchase to the place from which you purchased it.
This warranty does not cover removal or reinstallation costs. This warranty shall not
apply if it is shown by Resideo that the defect was caused by damage that occurred while the product was in the possession of a consumer. Resideo’s sole responsibility for Honeywell RTH2410 Programmable Thermostat shall be to repair or replace the product within the terms stated above.
Some states do not allow the exclusion or limitation of Honeywell RTH2410 Programmable Thermostat’s incidental or consequential damages, so this limitation may not apply to you.
🔎 Looking for other Honeywell thermostat options? Explore our detailed guides on the RTH8500, RTH9585WF, or T9 Smart Thermostat.
Customer Support
- Website: resideo.com
- Tell: 1-800-633-3991.
2019 Resideo Technologies, Inc.
Frequently Asked Questions
Q. What systems are compatible with the Honeywell RTH2410 Series thermostat?
The Honeywell RTH2410 works with gas, oil, or electric furnaces, central air conditioners, hot water systems, millivolt systems, and heat pumps with or without backup heat.
Q. How do I install the Honeywell RTH2410 thermostat?
Turn off the power, remove the old thermostat, label wires, mount the new wallplate, connect wires, install batteries, and snap the thermostat onto the wallplate. Then restore power.
Q. Does the Honeywell RTH2410 require a C wire?
No, the Honeywell RTH2410 does not require a C wire. It runs on two AAA batteries for power.
Q. How do I program the Honeywell RTH2410 thermostat?
You can set weekday and weekend schedules with four periods each day: Wake, Leave, Return, and Sleep. Use the SET button to adjust time and temperature.
Q. Why is my Honeywell RTH2410 screen blank?
If the display is blank, the batteries may be dead. Replace them with fresh AAA batteries and check that they are installed correctly.
Q. How do I troubleshoot the Honeywell RTH2410 thermostat?
Make sure the system switch is set to Heat or Cool, check that the temperature is set correctly, wait 5 minutes for compressor protection, and replace batteries if needed.
Q. How often should I replace the batteries in my Honeywell RTH2410?
Replace the batteries once a year or when the “Low Batt” warning appears on the screen.
Q. Can I use the Honeywell RTH2410 with a heat pump system?
Yes, it works with heat pumps, including models with auxiliary or backup heat.



2 Comments
Pingback: Honeywell RTH9585WF Thermostat Guide | Setup & Wi-Fi
Pingback: Honeywell MN1CFS8 Portable Air Conditioner Manual & Guide