


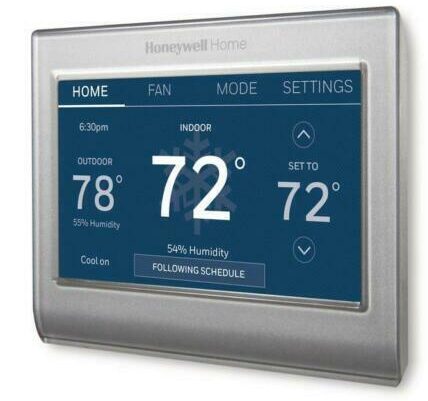
Honeywell RTH9585WF Touchscreen Thermostat
Quick Start Guide
Smart Color Touchscreen Programmable Thermostat
Welcome
Getting set up and ready is simple. Read before installing your Honeywell RTH9585WF thermostat.
- Install your smart thermostat.
- Connect your home Wi-Fi thermostat network.
- Register online for remote thermostat access.
Before You Begin
View the installation video at wifithermostat.com support
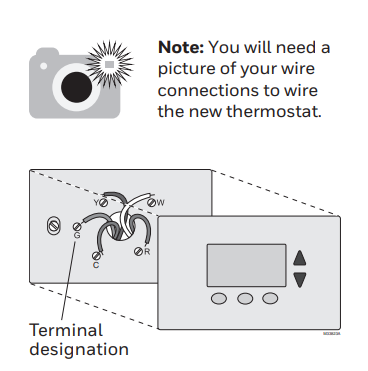
You will need your camera to take a picture of your old wire connections.
Looking for other Honeywell AC or thermostat manuals? Check out the Honeywell MN1CFS8 Portable AC Manual or the Honeywell RTH2410 Thermostat Guide.
You will also need
- Small screwdriver
- Pen
- Your home Wi-Fi
network password
Installation
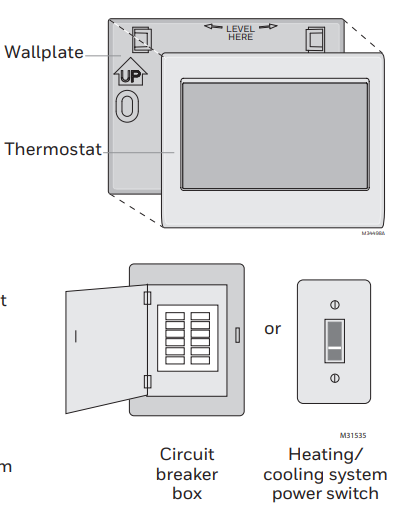
Switch OFF the power to your heating/cooling system. Important! To protect your equipment, switch the owner to your heating/cooling system at the breaker box or the system switch. Confirm power is OFF. Try to turn on the heating/ cooling equipment by changing the temperature on your old thermostat. Your power is OFF if your system does not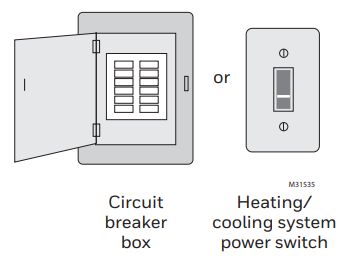
The Honeywell RTH9585WF Thermostat works with common 24-volt systems such as forced air, hydronic, heat pump, oil, gas, and electric. However, the Honeywell RTH9585WF will not work with millivolt systems like gas fireplaces or with 120/240-volt systems such as baseboard electric heat.
Remove the LD thermostat faceplate and leave the wires connected. Take a picture of the wire connections for later reference. If no wire is connected to a terminal labeled C or no C terminal exists on the old thermostat, view the Alternate Wiring videos at wifithermostat.com/videos. Important! A C wire is required and is the power source for your thermostat. Without a C wire, your thermostat will not power up.
If you have an older thermostat with a sealed mercury tube, see the warning page for proper disposal instructions.
Label wires
Do not label by wire color. Use the supplied sticky tags to label each wire as you disconnect it. Label wires according to old thermostat terminal designations, not by wire color.
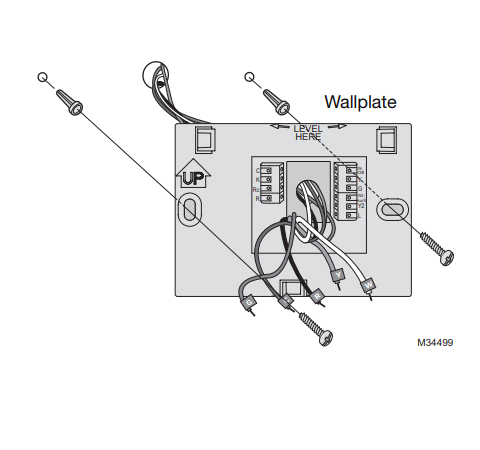
Remove wallplate
Remove the old wallplate from the wall after all wires are labeled and disconnected.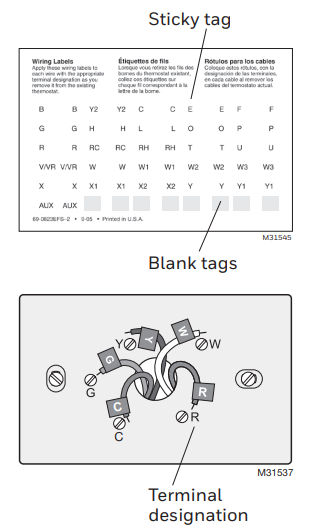
Mount the wallplate for the thermostat. Mount your new wallplate using the screws and anchors included with the thermostat. If necessary:
- Drill 3/16-in holes for drywall
- Drill 7/32-in holes for plaster

Electrical Ratings
Terminal Voltage (50/60Hz) Max. Current Rating
- W-O/B 20-30 Vac 1.0 A
- W2 (Aux/E) 20-30 Vac 1.0 A
- Y Cooling 20-30 Vac 1.0 A
- Y2 Cooling 20-30 Vac 1.0 A
- G Fan 20-30 Vac 0.5 A
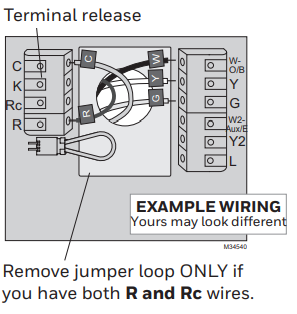
Connect wires. Important! A C wire connection is required and is the thermostat’s power source. Without a C wire, your Honeywell smart thermostat will not power up. See the C Wire Addendum document for more information. View the Alternate Wiring video at Honeywell RTH9585WF thermostat support.
Starting with the C Wire, match the sticky tag on the wire to the terminal labels. 1.6b Straighten the wire and gently slide it into the terminal hole until it clicks into place. (If you need to remove a wire, use a pen tip to press the terminal release and then pull the wire out.) Note: Refer to the wiring picture you took in Step.
Don’t match or have a heat pump system? See User Guide.
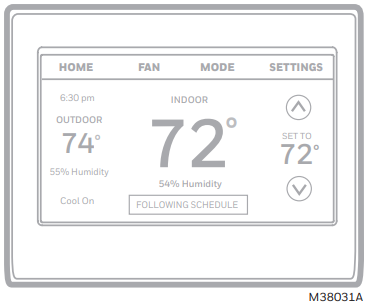
In the image on the right, check the box next to each connection. You will use this checklist in Step Verify wire is firmly secured by gently pulling on the wire. Repeat steps a–d for all other wires. f Push any excess wire back into the wall opening after all wires are installed. Note: The L terminal on the lower right is used only for Heat Pump systems.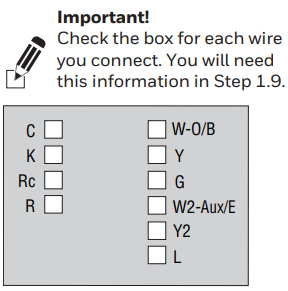
Don’t match or have a heat pump system? See User Guide.
Attach the thermostat to the wallplate. Align the thermostat with the wallplate and snap it into place.
Before you begin M34498A 1.8 Switch heating/cooling system.
1.8a Verify that the C wire connection is secure at the thermostat and the HVAC system wiring.
1.8b Make sure the heating and cooling system panel is firmly secured.
1.8c Switch power back ON for your smart thermostat system at the breaker box or its power switch.
Setup
Select setup. Before connecting to your Wi-Fi network, you need to set initial thermostat options to define your heating/cooling system:
- Language
- Home or business
Follow prompts on the screen to select appropriate options.
Touch the language you want the thermostat to display, then touch Next. 1.9b Select Home or Business application, then touch Next.
Touch Next or name the thermostat location—touch THERMOSTAT and follow the rest of the instructions
Select what your thermostat will control, and the Honeywell RTH9585WF touch Next. Select your system type and touch Next. The system type determines other selections for completing the initial setup. Use the checklist from Step 1.6 when making selections. 1.9f Touch Next after making selections on each screen. Touch Done on the last screen. The thermostat displays an option to connect to your Wi-Fi network.
Connect to your Wi-Fi network.
Connect to the Wi-Fi network. After touching Done on the final screen of the initial setup, the Honeywell RTH9585WF Wi-Fi thermostat displays an option to connect to your home wireless network. Touch Yes to connect the thermostat to your Wi-Fi network. The screen displays the message “Honeywell RTH9585WF smart thermostat searching for wireless networks. Please wait…” after which it displays a list of all available networks it can find. Note: If you cannot complete this step now, touch I’ll do it later. The thermostat will display the home screen. Complete this process by selecting MENU > Wi-Fi Setup. Continue with Step.

Touch the name of the network you want to use. Honeywell RTH9585WF The thermostat displays a password page. Using the keyboard, touch the characters that spell out your home network password. Touch Done. The thermostat displays “Connecting to your network. Please wait…” then shows a “Connection Successful” screen. Note: If your home network is not shown on the list, touch Rescan, Touch OK to display the registration information screen.
If you’re setting up another thermostat model, see the Honeywell RTH8500 Thermostat Guide.

Getting Help
If you get stuck while setting up your Honeywell RTH9585WF Thermostat, restart the device by removing it from the wallplate, waiting for 5 seconds, and snapping it back into place. From the home screen, go to SETTINGS > Wi-Fi Setup > Choose a Network to continue the process. Need more help? Find additional information in the Honeywell RTH9585WF User Guide.
Register online for remote access.
To register your thermostat, follow the instructions on Step 3.1.
- MAC ID
- MAC CRC

The Total Connect Comfort free app is available for Apple® devices, including iPhone®, iPad®, and iPod touch® at iTunes®, and for all Android™ devices at Google Play®. The Honeywell RTH9585WF Thermostat works with common 24-volt systems such as forced air, hydronic, heat pump, oil, gas, and electric. However, the RTH9585WF does not work with millivolt systems, like gas fireplaces, or with 120/240-volt systems such as baseboard electric heat.
Having Wi-Fi or touchscreen setup issues? The Honeywell TH9320WF Thermostat Installation Guide and Honeywell T9 Smart Sensor Instructions can help with related models.
Customer Support
- Website: resideo.com
- Visit: HoneywellHome.com
- Tell: 1-800-633-3991.
2019 Resideo Technologies, Inc.
Frequently Asked Questions
Q. What is the Honeywell RTH9585WF thermostat?
The Honeywell RTH9585WF is a smart color touchscreen thermostat that lets you control your home heating and cooling.
Q. Does the Honeywell RTH9585WF work with Wi-Fi?
Yes. It connects to your Wi-Fi so you can control it with your phone, tablet, or computer.
Q. Do I need a C wire for the Honeywell RTH9585WF?
Yes. A C wire is required to power the thermostat. Without it, the unit will not work.
Q. Can I use the Honeywell RTH9585WF without Wi-Fi?
Yes. You can still use it to control your heating and cooling system even if Wi-Fi is not connected.
Q. How do I connect the Honeywell RTH9585WF to Wi-Fi?
Go to MENU > Wi-Fi Setup on the thermostat screen. Select your home Wi-Fi, enter your password, and connect.
Q. Does the Honeywell RTH9585WF work with Alexa or Google Assistant?
Yes. It works with Amazon Alexa, Google Assistant, and other smart home systems.
Q. Can I program a schedule on the Honeywell RTH9585WF?
Yes. You can set daily or weekly schedules directly on the thermostat or through the app.
Q. How do I register my Honeywell RTH9585WF thermostat?
Go to mytotalconnectcomfort.com, create an account, and enter the MAC ID and MAC CRC from your thermostat.
Q. What should I do if my Honeywell RTH9585WF won’t connect to Wi-Fi?
Restart the thermostat, check your Wi-Fi password, or move the router closer. If needed, reset Wi-Fi in SETTINGS.
Q. Does the Honeywell RTH9585WF work with all HVAC systems?
It works with most 24-volt heating and cooling systems. It does not work with millivolt or 120/240-volt systems.
6 Comments
Pingback: Honeywell TH9320WF Thermostat Installation & Setup Guide
Pingback: Honeywell RTH2300 Series Programmable Thermostat Guide
Pingback: Honeywell RTH2410 Programmable Thermostat | Manual & Setup
Pingback: Honeywell RTH8500 Series Programmable Thermostat Guide
Pingback: Honeywell Touchscreen Thermostat Manual | Step by Step User Guide
Pingback: Honeywell MN1CFS8 Portable Air Conditioner Manual & Guide