
Hisense WMS017M6XBE Use & Care Refrigerator
Safety Instructions
- Avoid connecting the refrigerator to a Ground Fault Interruptor (GFI) circuit.
- Do not use an extension cord or adapter plug.
- Never unplug the refrigerator by pulling on the power cord.
- Always grip the plug firmly and pull straight out from the receptacle to prevent damaging the power cord.
- Unplug the refrigerator before cleaning to avoid electrical shock.
- The appliance contains a small quantity of refrigerant (R600a), which is environmentally friendly but potentially flammable in the refrigerant circuit.
- Keep all packaging away from children to avoid the risk of suffocation.
- If you are discarding your old appliance, pull the plug out of the socket, and cut the connection cable (as close to the appliance as you can). Cut off the main plug and discard it.
- Break off any old locks or latches as a safeguard and remove the door to prevent children from playing from suffering an electric shock or from closing themselves inside it.
Installation
- Position the appliance away from sources of heat such as stoves, radiators, direct sunlight, ht etc.
- Maximum performance and safety are guaranteed by maintaining the correct indoor temperature for the class of unit concerned, as specified on the rating plate. This appliance performs well from 12.8 to 43°C3 °C 110°F0).
- The appliance may not work properly if it is left for a longer period at a temperature above or below the indicated range.
- Open the refrigerator door and remove all fittings inside the door. Remove the upper hinge cover.
- Remove the two screws༄ ĸ that connect the upper hinge on the right side of the cabinet top.
- Carefully lift the door and place it on a padded surface to prevent scratching.
- Remove the screw hole cover and transfer it to the uncovered hole on the right side of the unit. Be sure to press the button firmly into the hole.
- Remove the two screwsĻhat hold the lower hinge on the right side of the cabinet.
- Remove the bottom feet༉and transfer it to the right side of the cabinet.
- Set the door into its new place, making sure the pin enters the bushing at the lower frame section (hole) previously removed in step 5 on the left side of the unit.
- Loosely secure the lower hinge and do not tighten the bolts until the door is in the closed position and leveled.
- Replace the upper hinge cover
- Turn the door upright again.
- Open the door and attach all fittings.
Description of the appliance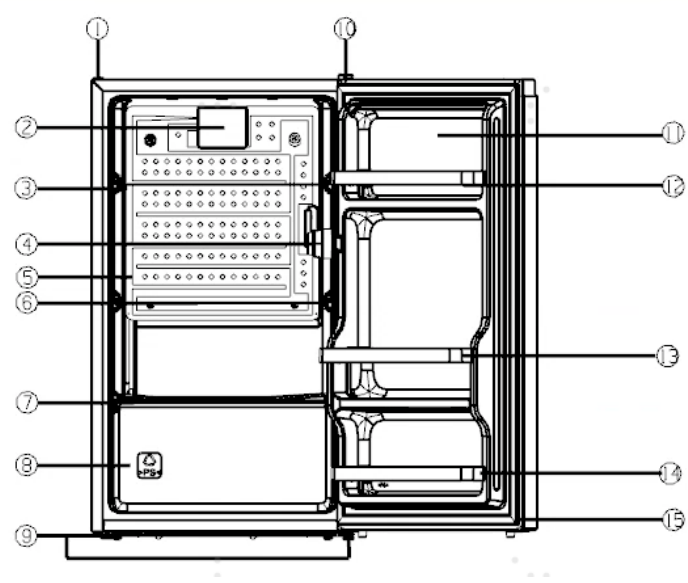
- Screw hole cover
- Cabinet hole cover plate
- Upper glass shelf
- Temperature controller
- Roll bond evaporator
- Middle glass shelf
- Lower glass shelf
- Cabinet
- Bottom feet
- Upper hinge cover
- Refrigerator door
- Upper shelf
- Middle shelf
- Lower shelf
- Gasket part
Reversing the Door
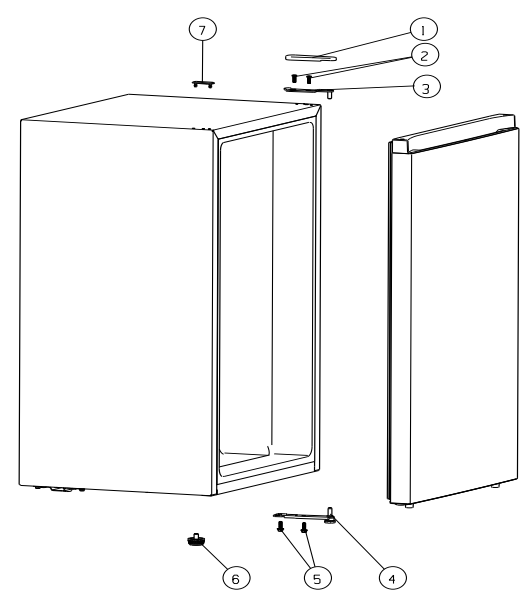
- Upper hinge cover
- Special flange and self-tapping screw
- Upper hinge
- Lower hinge
- Special flange and self-tapping screw
- Bottom feet
- Screw cover hole
Temperature Control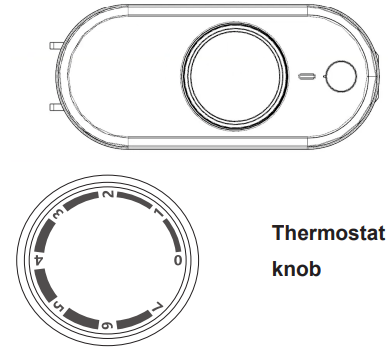
Starting up and temperature regulation
- Insert the plug of the connection Hisense WMS017M6XBE Use & Care Refrigerator lead into the plug socket with a protective grounding contact.
- The temperature selector knob is located on the RH side of the refrigerator compartment.
- Clockwise rotate the knob to turn on the appliance.
- Highest temperature, warmest setting.
- Setting “7” (end-stop) means: Lowest temperature, coldest setting.
If the appliance will not be used for several months
- Remove all food.
- Unplug the power cord.
- Clean and dry thoroughly.
- Leave the door open slightly to prevent odor and mold growth.
Cleaning & Care
- Wash any removable parts of the refrigerator interior and exterior with mild detergent and warm water. Wipe dry. Do not use harsh cleaners on these surfaces.
- Do not use razor blades or other sharp instruments, which can scratch the appliance’s surface when removing adhesive labels.
- Any glue left from the tape can be removed with a mixture of warm water and mild detergent, or touch the residue with the sticky side of tape already removed. Do not remove the serial plate.
Defrosting
Why defrosting
Water contained in food or getting into Hisense WMS017M6XBE Use & Care Refrigerator the air inside the fridge, such as when opening doors, may form a frost layer inside. It will weaken the refrigeration when the frost is thick. While it is more than 10mm thick, you should defrost it.
Energy Saving
- Do not place warm foods into the appliance. Allow warm foods to cool first.
- Do not install the appliance near cookers, radiators, or other sources of warmth.
- High ambient temperatures cause longer, more frequent operation of the compressor.
- When the product works, please do not open the door too often or leave the door open any longer than necessary.
- Do not set the temperature any colder than necessary.
- The direct cooling refrigerator (with a freezer) needs to be defrosted when necessary.
- This will improve the cold transfer and reduce energy consumption.
- The sketch map shows the right combination of the shelves that can lead to more energy efficiency.
- If users adjust the combination, it may result in more energy consumption.
- Store food logically. Do not exceed.
Troubleshooting
| Problem | Possible | Cause Solution |
| The appliance does not work. | The appliance is not switched on. | Switch on the appliance. |
| The main plug is not plugged in or is loose. | Insert the main plug. | |
| Fuse has blown or is defective. | Check the fuse, replace if necessary. | |
| The socket is defective. | Electrical malfunctions are to be corrected by an electrician. | |
| The appliance cools too much. | The temperature is set too cold. | Turn the temperature regulator to a warmer setting temporarily. |
| The food is too warm. | The temperature is not properly adjusted. | Please look in the
“temperature control” section. |
| The door was open for an extended period. | Open the door only as long as necessary. | |
| A large quantity of warm food was placed in the appliance within the last 24 hours. | Turn the temperature regulation to a colder setting temporarily. | |
| The appliance is near a heat source. | Please look in the
“installation” section. |
|
| Heavy build-up of frost, possibly also on the door seal. | The door seal is not air-tight (possibly after reversing the door). | Carefully warm the leaking sections of the door seal with a hair dryer (on a cool setting). At the same time, shape the warmed door seal by hand such that it sits correctly. |
| Unusual noises | The appliance is not level. | Re-adjust the feet. |
| The appliance is touching the wall or other objects. | Move the appliance slightly. | |
| A component, e.g., a pipe, on the rear of the appliance is touching another part of the appliance or the wall. | If necessary, carefully bend the component out of the way. | |
| The compressor does not start immediately after changing the temperature setting. | This is normal; no error has occurred. | The compressor starts after some time. |
Disposal
- Child entrapment and suffocation are not the only problems of the past. Junked or abandoned refrigerators are still dangerous – even if they are sitting “for just a few days”. If you are getting rid of your old refrigerator, please follow the instructions below to help prevent accidents.
- Remove doors.
- Leave shelves in place so children may not easily climb inside. Have refrigerant removed by a qualified service technician.
Disposal of the appliance
Packaging materials: Packaging materials Hisense WMS017M6XBE Use & Care Refrigerator with the recycling symbol are recyclable. Dispose of the packaging in a suitable waste collection container to recycle it.
Before disposal of the appliance
- Pull out the main plug from the main socket.
- Cut off the power cord and discard the main plug.
Customer Service
- Website: https://global.hisense.com/
- Tel: 0191 387 0804
- Opening hours: Monday to Friday 9.00 am – 6.00 pm Saturday 9.00 am – 5.00 pm
FAQs
Q: What type of refrigerator is the Hisense WMS017M6XBE?
Ans: A small single-door refrigerator, the Hisense WMS017M6XBE, is perfect for offices, dorm rooms, small kitchens, or as a backup refrigerator. It is made to run quietly and with minimal energy use.
Q: What is the total storage capacity of this model?
Ans: With a total size of roughly 1.7 cubic feet, the Hisense WMS017M6XBE provides a small but useful area for necessities, drinks, and snacks.
Q: Does this refrigerator include a freezer compartment?
Ans: Yes, it has a tiny chiller section that is ideal for keeping things cold or temporarily storing frozen goods; it is not a full freezer. For long-term freezing it is not designed.
Q: How do I set or adjust the internal temperature?
Ans: Utilise the unit’s internal mechanical temperature control dial. Usually, settings fall between 1 (warmest) and 5 (coldest). It is advised to set it to 3 for everyday use.
Q: How long does it take to cool after first plugging in?
Ans: Before putting food inside, let the machine cool for at least two to three hours. Allow it to run empty for four hours to stabilise the temperature for optimal performance.
Q: Is this refrigerator energy-efficient?
Ans: Indeed. Because of its low energy consumption and Energy Star rating, the WMS017M6XBE can help you save money on your electricity bill.
Q: Can I adjust or remove the shelves?
Ans: Indeed. You can adjust the storage height for larger objects, such as bottles or containers, because the glass shelf is detachable.
Q: Is the door reversible?
Ans: Indeed. Because the door is reversible, you can change the hinge to either side based on how much space you have. The user manual includes instructions for simple reversing.