

Blink IQ 200 Electric Charging Station

Introduction
This Instruction Manual describes how to properly install the Blink Model IQ-200 EVSE Charger, referred to
as the “Blink Charger” throughout this document. Contact the Blink Support Center at 1-888-998-BLINK for troubleshooting and more detailed technical questions. Unauthorized modification to the Blink equipment voids the manufacturer’s warranty.
The Blink Level 2 EVSE Charger specified in this document is designed for the U.S. market to charge plug-in
electric vehicles (PEVs) and battery electric vehicles (BEVs). It provides AC Level 2 charging that effectively shortens charging time for typical EVs, when compared to a Level 1 cordset EVSE unit.
Product View
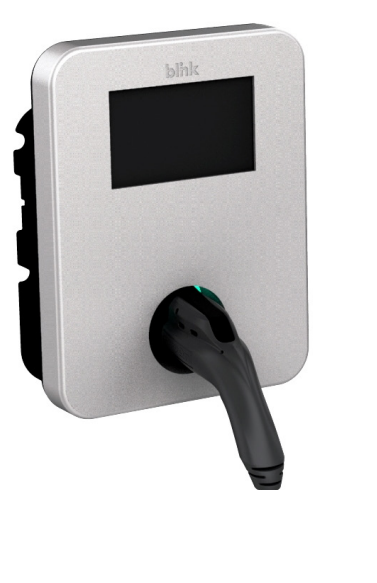
- Blink IQ 200 – Advanced
Model
- IQW2-80U-M1-R2-N-25 (80A)
- IQW2-32U-M1-R2-N-25 (32A)
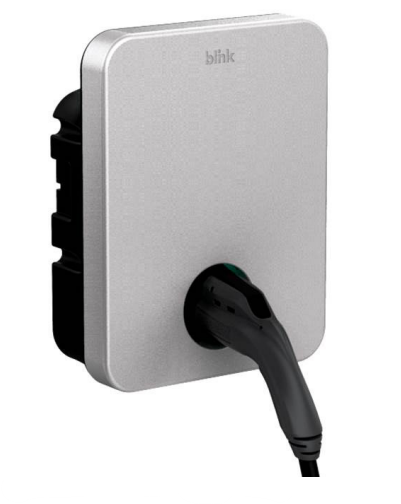
- Blink IQ 200 – Smart
- Model #: IQW2-80U-W1-N1-N-25
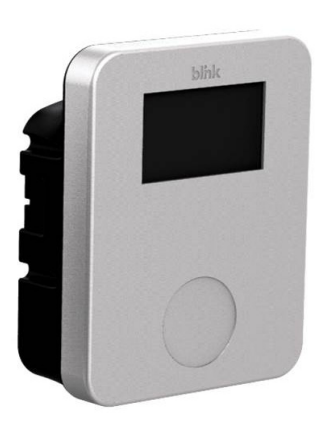
- Blink IQ 200 – Kiosk
- Model #: IQW2-00U-M1-R2-N-00
Installation
Before Installation
The Blink Charger should be installed only by a licensed contractor, and/or a licensed electrician, in accordance with all applicable state, local, and national electrical codes and standards. Before installing the Blink Charger, review this manual carefully and consult with a licensed contractor, licensed electrician, and trained installation expert to ensure compliance with local building practices, climate conditions, safety standards, and state and local codes. Use appropriate protection when connecting to the main power distribution cable. Use tools as outlined in the section “Tools Required for Installation”.
Tools & Parts Required for Installation
| Tool | Size | Supplier |
| EVSE Mounting Bracket | N/A | Model Accessories |
| Torx Bolts (4each) – used to secure the EVSE to the mounting bracket | T20 (On the Model) | Model Accessories |
| Terminal tube | Color: Red, Black, Green | Model Accessories |
| Terminal | Model Accessories | |
| Conduit – used for power wire | 1” | Commercially available |
| Bolts (4 each) – used to secure the main body mounting bracket on the wall | M8x18 lag bolts with lock washers | Commercially available |
| Torx Driver | T20 | Commercially available |
| Slotted Screwdriver | Commercially available | |
| Philips Screwdriver | PH3 | Commercially available |
| Bolts (for masonry) | M8, expansion | Commercially available |
| Torque Wrench | Commercially available | |
| Wire, Copper | No. 8 AWG, 75°C or 90°C | Commercially available |
Install the Charger
- Drill bolt holes in the wall for the mounting bracket.
Follow applicable accessibility requirements for the mounting Blink IQ 200 Electric Charging Station position. The unit shall be mounted at a sufficient height from the ground such that the height of the storage means for the coupling device is located between 24 inches (600 mm) and 4 feet (1.2 m) from the ground per NEC Article 625.

Secure the main body mounting bracket to the wall with appropriate bolts, as follows:
- a. For masonry walls, use M8 expansion bolts.
- b. For finished walls supported by wood studs, use M8x18mm lag bolts with lock washers.
Getting Started
Web Portal Login Instructions
Firstly, connect a computer to the charge point using a Blink IQ 200 Electric Charging Station Ethernet cable. There is an Ethernet RJ-45 port in the Blink Charger for connecting.
Secondly, set up a Static IP Address on your computer (except 169.254.63.255, cause it’s the default IP of the Blink Charge.r
Log In
Open a web browser (Internet Explorer, er for example), Blink IQ 200 Electric Charging Station, and enter the default IP of the Blink Charger (169.254.63.255) in the address field of the browser and press enter. http://169.254.63.255 Now you should see the login screen:
To be able to configure the charge PO, you should enter “admin” in the username box. The default password for each unit should be different to enhance security. It will be an 11-character format (YYWW-SSSSS) subtracted from ChargePointSerialNumber. e.g. 1627-000001
Configuration
Factory Settings
Clicking on the “Configuration” and then “Factory Settings” link will bring up the following screen:
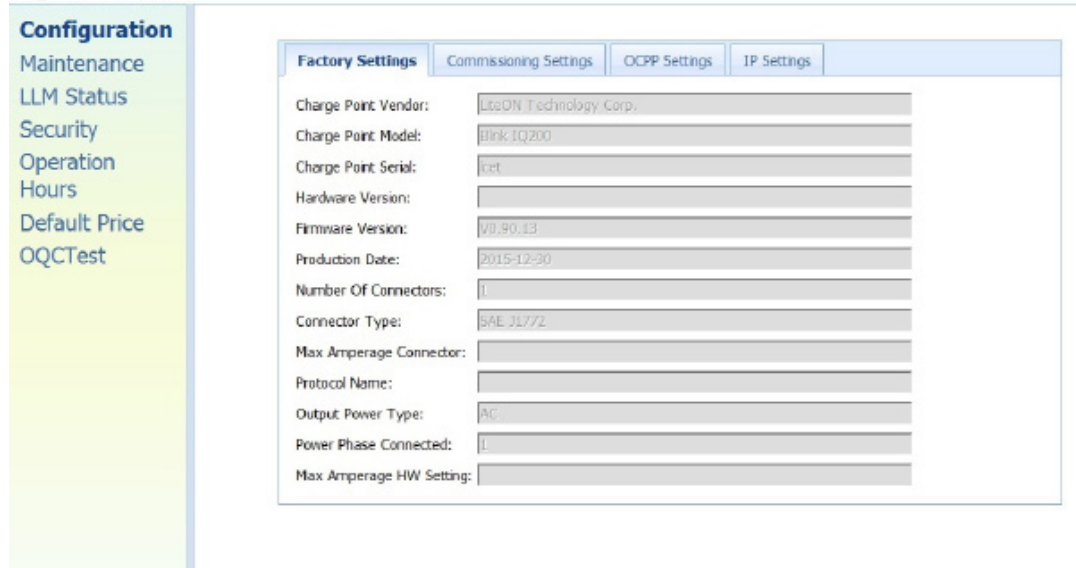
| Charge Point Vendor | The name of the charge point vendor. |
| Charge Point Model | The model of the charge point. |
| Charge Point Serial | The unique serial number of the charge point. |
| Hardware Version | The hardware version of the charge point. |
| Firmware Version | The software version of the charge point. |
| Production Date | The date when the charge point is made. |
| Number Of Connectors | Number of connectors of the charge point. |
| Connector Type | Type of the output cable connector. |
| Max Amperage Connector | The maximum current output for the charge point. |
| Protocol Name | The communication protocol between the charge point and BOS. |
Operations
About the Charger
| Charger Plug LED Indicator | DESCRIPTION | DEFINITION |
| Not illuminated | Charger is powered OFF. | |
| Steady Green | Charger is powered ON / Ready for charging / Charge Complete. | |
| Flashigreeneen (Fast) | Flashing green (Fast) = Vehicle Connected / Ready for charging. | |
| Flashing Blue (Slow) | Flashing blue (Slow) = Charging in process. | |
| Flashing Red | Warning / Fault. | |
| Steady Yellow | Charger booting. | |
| Flashing Yellow | Firmware Upgrading. |
Charging an Electric Vehicle (EV)
Release the charging plug from the charger holster, Blink IQ 200 Electric Charging Station, and connect it to the EV. Remove the Charging Plug from the Charger Holster
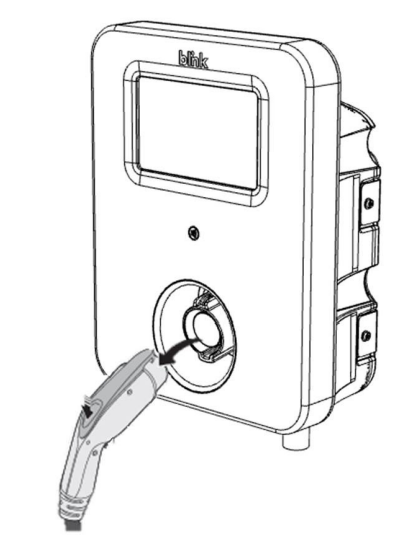 Remove the Charging Plug from the Charger Holster
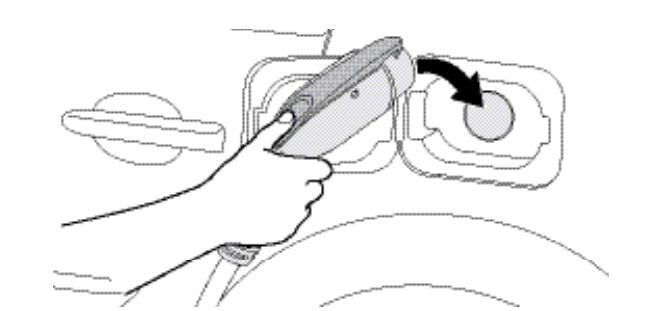
- Insert the charging plug into the EV.
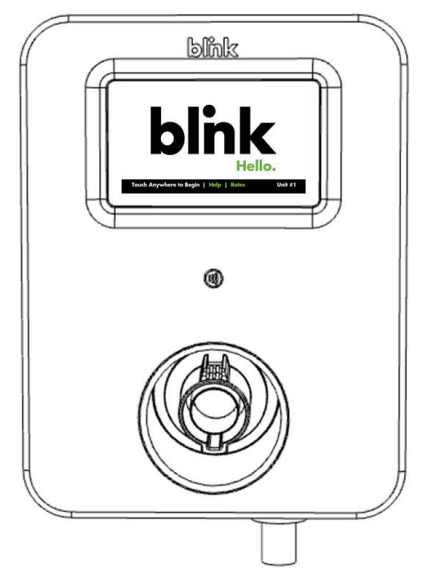
- Go to Blink Charger, and follow the instructions shown on the screen
Specifications
| Item | Specification | ||||||||||
| Kiosk | Advanced (80A) | Smart | Advanced (32A) | ||||||||
| Power Input | Input Rating | 120/208/240 V~, single phase, 60 Hz. | 208/240 V~, single phase, 60 Hz. | ||||||||
| 0.22 A maximum. | 80 A maximum. | 32 A maximum. | |||||||||
| Connections & Wiring | Uncorded, Hard-Wired, L1, L2, and GND. | ||||||||||
| Standby Power | < 10 W. | < 10 W. | < 5 W. | < 10 W. | |||||||
| Power Output | Onput Rating | 120/208/240 V~, single phase, 60 Hz. | 208/240 V~, single phase, 60 Hz. | ||||||||
| No output. | 80 A maximum, 19.2 kW maximum. | 32 A maximum, 7.68 kW maximum. | |||||||||
| Cold-Load Pickup | Randomized delay between 120 and 720 seconds before the charge resumes after a power failure. | ||||||||||
| Protection | Internal Residual Current Detection | CCID 20, 20 mA CCID per UL 2231, Automatic and Manual Reset Feature. | |||||||||
| Upstream Breaker | 2-pole 100 A (max.) breaker on dedicated circuit, Non-GFCI type. | ||||||||||
| Plug-Out Protection | Power output is de-energized when a charging connector is disconnected from an EV. | ||||||||||
| Electrical Protection | Over Current, Short Circuit, Over Voltage, Under Voltage, Ground Fault, Surge Protection, Over Temperature. | ||||||||||
| Communication
| Local Area Network (LAN) | 10/100 Base T Ethernet LAN. | |||||||||
| Wireless Local Area Network (WLAN/ WiFi) | 802.11 b/g/n | ||||||||||
| Cellullar | CDMA/UMTS Cellular.
| None. | CDMA/UMTS Cellular. | ||||||||
| Item | Specification | ||||||||||
| Kiosk | Advanced (80A) | Smart | Advanced (32A) | ||||||||
| User Interface & Control | Charger Status Indicators – LDE Status Indicator | None. | LED Status Indicator: Steady Green = Power On/Ready To Charge. Flashing Green (Fast) = Vehicle Connected/Ready To Charge. Flashing Blue (Slow) = Charging. Flashing Red = Warning/Fault. Steady Green = Charging Complete. | ||||||||
| Display | LCD w/Touch Panel. | None. | LCD w/Touch Panel. | ||||||||
| Card Reader | RFID/NFC/SCC Reader. | None. | RFID/NFC/SCC Reader. | ||||||||
Troubleshooting
If an error message is displayed during the charging process, follow the associated instructions outlined in below troubleshooting table below.
| SITUATION | Screen Displayed | ACTION |
| Out Of Service (Station Disable) | 1. Station Disabled. 2. Please call 1-888-998-BLINK (2546) for assistance. | |
| Out Of Service (Internal Maintenance) | 1. Internal Maintenance. 2. Please call 1-888-998-BLINK (2546) for assistance. | |
| Not Within Hours of Operation | 1. Wait until the Station opens at the Time which is displayed on the top right of the screen. 2. Touch “Hours of Operations” for more information on the Hours of Operation. 3. You could refer to the next Item. | |
| Display “Hours of Operation” screen | 1. Display the detailed Hours of Operation on the screen. |
General Care
The exterior of the Charger is designed to be waterproof and dustproof. To ensure proper maintenance of the charger, follow these guidelines:
- Despite the water resistance of the enclosure, when cleaning it is preferred not to direct streams of water at the unit. Clean with a soft, damp cloth.
- Make sure the charging plug is put back in the holster after charging to avoid damage.
- Ensure the power cable is stored on the charger after use to avoid damage.
- If the power cable or the charging plug is damaged, contact Customer Support.
Customer Support
This document is the Property of Blink and should not be copied, reproduced, or ordered on he bbasismof oromanufacturing manufacturing apparatus without the written permission of Blink. For any support on installation and commissioning.
- Ph: 888-998-2546
- Timings: 12 hours from 9:00 AM to 1:00 AM
- Website: support@blinkcharging.com
FAQs
What types of vehicles are compatible with the Blink IQ 200?
All plug-in hybrids and electric cars (EVs) that have a J1772 connector and can accept Level 2 AC charging can use the Blink IQ 200. A J1772 adapter can be used to charge Tesla automobiles.
How long does it take to charge a vehicle?
The onboard charger and battery capacity of your car determine how quickly it charges. The IQ 200 has a 20–30 mile range per hour of charge and supports Level 2 charging (up to 9.6 kW).
Do I need a special electrical setup to install the station?
The onboard charger and battery capacity of your car determine how quickly it charges. The IQ 200 has a 20–30 mile range per hour of charge and supports Level 2 charging (up to 9.6 kW).
Can I monitor charging remotely?
Indeed. You can monitor energy consumption in real time, start and stop charging, and get alerts about charging issues or status using the Blink app.
Is there a warranty for the Blink IQ 200?
Indeed. A standard limited warranty covering material and workmanship defects is included with the IQ 200. For information on duration and coverage, see the manual’s warranty section.
Can multiple vehicles charge at the same time?
No, the IQ 200 is only intended for charging a single vehicle. Every vehicle needs its own dedicated charging station in order to charge several at once.
Can I schedule charging sessions?
Indeed. To benefit from off-peak electricity pricing, you can plan charging for particular periods using the Blink app. The IQ 200 will handle charging automatically if you just choose the start and stop times that you want.