
Bosch PNK6B.K4.A Built-In Gas Hob
Safety Instructions
This cooktop is approved for use with Natural Gas and Universal LPG. Leave these instructions with the owner.
- The appliance can only be used safely if it is correctly installed according to the safety instructions.
- The installer is responsible for ensuring that the appliance works perfectly at its installation location.
- This appliance is for cooking purposes only.
- Only use this appliance:
- In accordance with these instructions for installation and use.
- For cooking purposes.
- Under supervision. Never leave the appliance unattended when cooking for short periods.
- In a private household and in a domestic environment.
- Up to an altitude of max. 2000 m above sea level.
Safe Installation
- Read the installation instructions carefully.
- Do not connect the appliance to an exhaust gas system for combustion products.
- This appliance is not suitable for use in a marine craft, caravan, or mobile home.
- The warranty applies only when using the appliance as intended.
- Before installing the appliance, check that the local conditions of the supplier are compatible with the appliance settings specified on the rating plate (type of gas and pressure, power, voltage).
- Secure the power cord to the cabinet to prevent it from touching hot parts of the oven or cooktop.
- Connect the appliance to the power supply using the earth.
- Do not make any changes to the inside of the appliance. If required, contact our technical customer service.
Risk of Explosions
- Immediately shut off the gas supply or close the gas cylinder valve.
- Immediately extinguish all naked flames and cigarettes.
- Do not operate any light switches or appliance switches.
- Do not pull any plugs out of any sockets.
- Do not use any telephones or mobile phones within the building.
- Open windows and ventilate the room.
- Call the after-sales service or the gas supplier.
- If you cannot reach your gas supplier, call the fire department.
Installation Instructions
- Manufacturer’s Installation Instructions
- Local Gas Fitting Regulations
- Municipal Building Codes
- Refer to AS/NZS 5601.1 for Gas Installations
- S.A.A. Wiring Code
- Local Electrical Regulations
- Any other statutory regulations
Preparing to Install
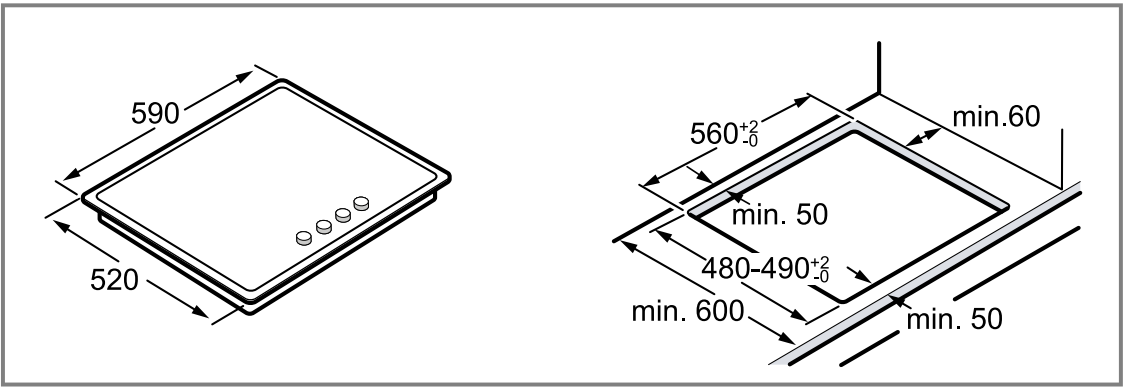
These built-in cooktops are intended to be inserted in a worktop cutout.
- Make a cut-out in the worktop with the required dimensions.

- Seal the cut surfaces of wooden work surfaces with a special glue seal to protect them from moisture.
- Any adjoining vertical wall surface situated within 200 mm from the edge of any cooktop burner must be a suitable non-combustible material for the entire length of the cooktop, in accordance with clause 6.10.1.2 of AS/NZS 5601.1.
Clearances
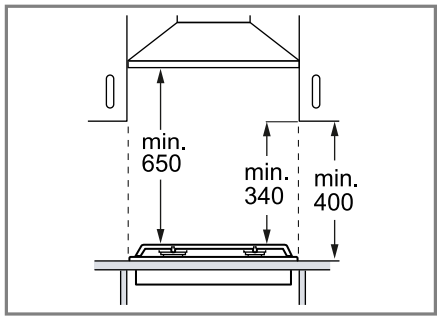
- A range hood fitted above the top must be installed according to the installation instructions for the range hood.
- A minimum distance of 650 mm is required for a range hood and 750 mm for an exhaust fan.
- Any combustible construction above the cooktop must be at least 650 mm above the top of the trivet, and no construction shall be within 340 mm above the top of the burner.
- Height of the pan support above the worktop surface: up to 60 mm.
- A minimum depth of 50 mm from the top of the worktop surface must be provided for the appliance.
Shield
If the base of the hotplate can be touched, fit a protective shield.
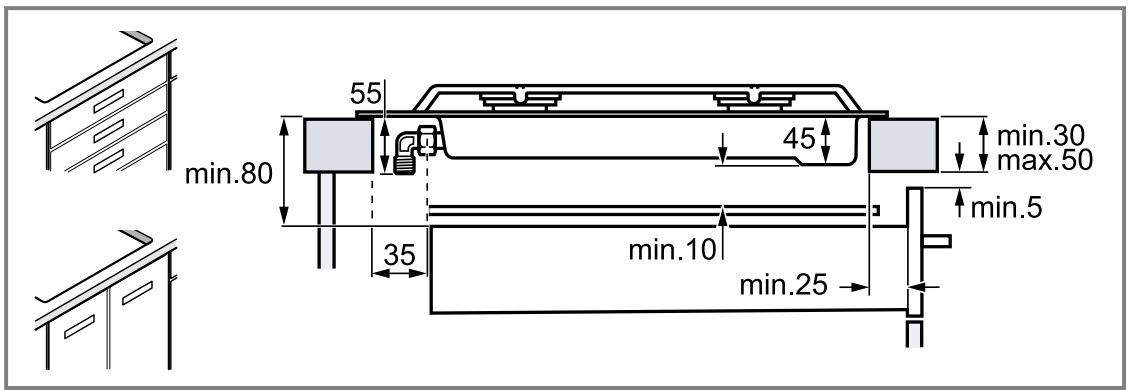
- The shield must be at least 10 mm from the lowest part of the hotplate and must be capable of withstanding the appliance temperatures. Minimum thickness of worktop is 30 mm.
- The shield material must be MDF or similar with a minimum thickness of 12 mm. The shield’s overall dimensions must be 560 mm wide x 480 mm deep.
- Provide a cutout in the right-hand side of the shield of 80 mm wide x 80 mm deep, to provide for a gas regulator / LPG connection fitting.
- After installation of the shield, the clearance around the top and sides of the shield will allow adequate ventilation. Ensure the side and top clearances are not obstructed.
Positioning the Appliance
Do not use silicone to bond the appliance to the worktop.
- Position the cooktop with the upper side facing down on a flat, stable surface.
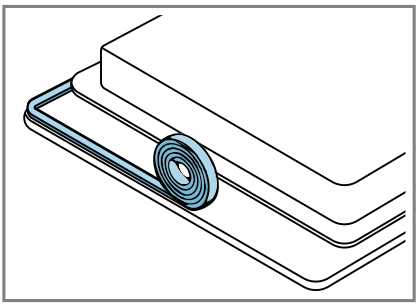
- Apply the adhesive seal supplied to the lower edge of the cooktop. The adhesive seal prevents the penetration of liquids.
- Screw the brackets supplied into the specified position so that they can turn freely.
- Turn the brackets and tighten them fully.
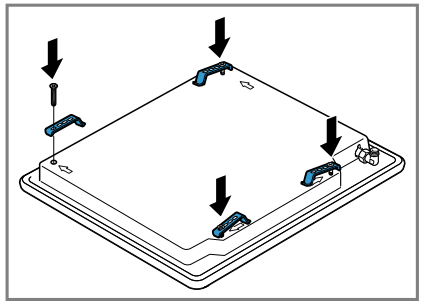
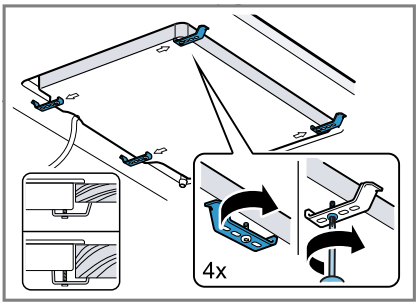
The position of the brackets depends on the worktop thickness.
Electrical Connection
Follow the instructions for the electrical connection.
- An electrical 10-amp socket needs to be within 1 m of the hotplate to allow electrical connection.
- The socket must remain accessible after installation of the appliance.
- This appliance is connected to the mains (240 VAC) by means of the connecting lead.
- The connecting lead must be fixed to the kitchen unit to prevent it from coming into contact with hot parts of the cooktop or an oven installed underneath, and remain accessible after installation of the cooktop.
- This appliance must be earthed. When connecting the cooktop, ensure that the earth wire is connected first and that all wires are connected to the correct terminals.
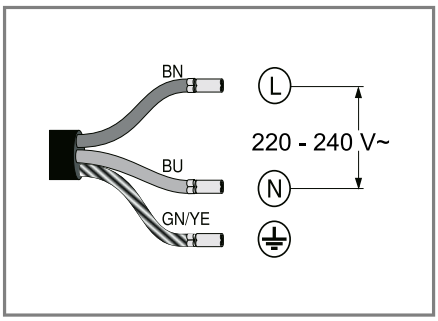
Wiring Diagram
Observe the wiring diagram.
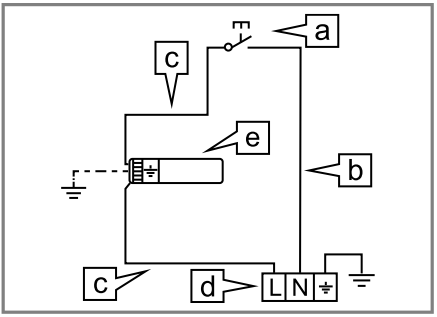
- Switch
- Blue wire
- Brown wire
- Terminal
- Ignition module
Gas Connection
Only an officially authorised technician should connect the appliance. Observe any special conditions imposed by local suppliers (utilities).
- During the planning stage, consider the position of supply connections.
- The cooktop must be connected to the gas supply with h upstream connection of an isolation valve in accordance with the respective regulations.
- We recommend that the isolation valve be fitted before the cooktop to enable isolation of the cooktop from the gas supply. The valve must be easily accessible at all times. Position of the inlet connection
- Check whether the local connection conditions (gas type) are compatible with the unit’s setting. The specifications of this cooktop are stated on the data label located on the bottom of the cooktop base.
- A duplicate data label is supplied for adhesion to an accessible location near the hotplate if the data label on the base of the hotplate cannot be accessed when the hotplate is installed.
Gas connection R 1/2
- Fit a regulator (N.G.) or a test point (Universal LPG) directly to the R 1/2 connection.
- The direction of gas flow is indicated on the rear of the regulator.
- Pressure test point
Connecting the unit to the gas line
The supply connection point shall be accessible with the appliance installed.
- Refer to AS/NZS 5601.1 for piping size details.
- Remove the plastic cap from the gas supply line before installation.
There are two ways to carry out the connection to the main gas line:
- Connect with rigid pipe as specified in AS/NZS 5601.1.
- Connect with a flexible hose. The hose assembly must comply with AS/NZS 1869, 10 mm ID, class B or D, no more than 1.2 m long, and installed in accordance with AS/NZS 5601.1.
Before Leaving
It should be expressly noted that we cannot accept any liability for direct or indirect damage caused by wrong connection, leakage, or improper installation.
- Check all connections for gas leaks with soap and water.
- DO NOT use a naked flame for detecting leaks.
- Ignite all burners both individually and concurrently to ensure the correct operation of gas valves, burners, and ignition.
- Turn gas taps to low flame position and observe stability of the flame for each burner individually and all together.
- Adhere the duplicate data plate to an accessible location near the hotplate.
- When satisfied with the hotplate, instruct the user on the correct method of operation.
- In case the appliance fails to operate correctly after all checks have been carried out, refer to the authorised service provider in your area.
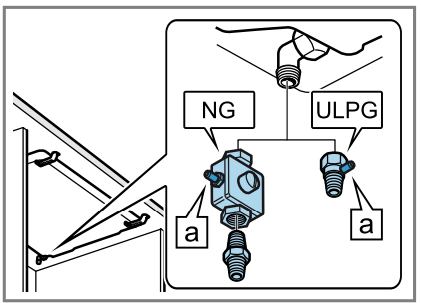
Converting the cooktop from Natural Gas to ULPG
All work involved in installation, setting, and adaptation to a different gas type must be carried out by a licensed gas fitter and must comply with current regulations and the conditions laid down by the local gas company. Before conversion, the cooktop must be disconnected from the electricity, and the gas valves must be turned to the OFF position.
Adjusting the Taps
- Turn the rotary knobs to the minimum power position and pull them out.
- With the tip of the screwdriver, push down on the flexible rubber holder to access the bypass screw. If you cannot access the bypass screw, remove the upper side of the appliance. Never remove the sealing ring. The sealing rings prevent liquids and dirt from finding their way into the appliance and impairing its ability to function properly.
- Adjust the bypass screws.
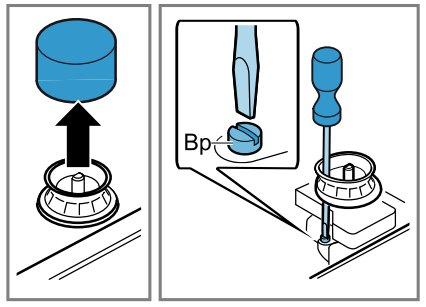 Never remove the sealing ring. The sealing rings prevent liquids and dirt from finding their way into the appliance and impairing its ability to function properly.
For ULPG
- The screw must be fully tightened clockwise.
For Natural Gas
- Replace the control knob onto the spindle, light the gas, and turn the control knob to the small flame position.
- Screw the adjustment screw anti-clockwise to establish a minimum stable flame position.
- The flame should remain alight and not burn back to the injector when the valve is turned quickly from ‘Full On’ to the “Minimum flame” position and back a few times.
Injectors
Request change-over injectors from our customer servicdepartmentnt. Refer injector chart below for sizes.
| Burner | NG Hourly gas consumption (MJ) | NG Injector mark | ULPG Hourly gas consumption (MJ) | ULPG Injector mark |
| Economy burner | 4.00 | 88 | 3.20 | 50 |
| Standard-output burner | 6.85 | 116 | 5.50 | 66 |
| Mini-wok multi-crown burner | 13.60 | 168 | 10.50 | 91 |
Replacing the Injectors
- Remove all pan supports, burner c, ap APSnd distributors.
- Replace the nozzles using the appropriate wrench and tighten them carefully to guarantee the seal.
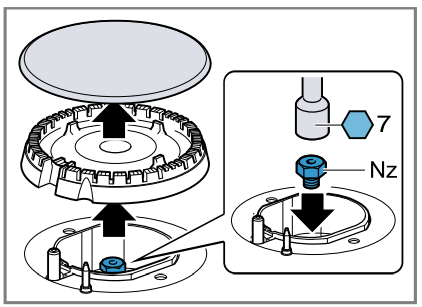
Ensure that the nozzle does not become detached during removal or fastening.
Removing the outer glass plate
- Remove the pan supports, burner caps, distributors, and rotary knobs.
- Undo the screws on the burners.
- Carefully remove the glass plate.
Reinstalling the appliance
- Install the appliance components in reverse order.
Checking if the equipment is working
- Check that turning the rotary knob between the position for maximum power and the position for minimum power does not cause the burner to go out or result in backfire.
If the gas flow from the burner is not correct
- Check whether the nozzle is correct. “Injectors”, Page 10
- Tighten or loosen the bypass screw until the gas flow from the burner is correct.
Documenting the gas type conversion
- Attach the sticker showing the new gas type R to the rating plate.
Preventing Material Damage
- Open a window or switch on an extractor hood leading to the outside.
- A build-up of heat may damage the appliance.
- Do not use two burners or heat sources to heat one single item of cookware.
- Do not use griddle plates, clay pots, etc., for a long time at full power.
- Do not use large pots or heavy weights that can bend the pan support or deflect flame onto the cooktop.
- Do not remove the pan support and enclose the burner with a wok stand, as this will concentrate and deflect heat onto the cooktop.
- Do not place anything, for example, a flame tamer or asbestos mat, between the pan and the pan support, as serious damage to the appliance may result.
- A build-up of heat may damage the controls.
- Do not use a large item of cookware on burners that are close to the control knobs.
- If a control knob is in the wrong position, this could lead to malfunctions.
- Always turn the control knob to the “Off” position when the appliance is not being used.
- Handling the cookware roughly may damage the surface of the appliance. Handle the cookware on the cooktop carefully.
- Moving the cookware may scratch the glass. Lift the cookware when moving it.
- Damage may occur if hard or pointed objects fall on the cooktop.
- Do not let hard or pointed objects fall onto the cooktop.
- Do not bump into any of the edges of the cooktop. Salt, sugar, or sand that may fall from the vegetables will scratch the glass.
- Do not use the cooktop as a work surface or storage space.
Environmental Protection and Saving Energy
If you follow these instructions, your appliance will use less energy. Choose a burner roughly the same size as your pan. Centre the cookware on the hob.
- Cookware manufacturers often give the upper diameter of the saucepan. It is often larger than the base diameter.
- Cooking without a lid consumes considerably more energy. Lift lids as infrequently as possible.
- When you lift the lid, a lot of energy escapes. Use a glass lid.
- You can see into the pan through a glass lid without having to lift it. Use cookware that is suitable for the quantity of food.
- Large items of cookware containing little food need more energy to heat up. Cook with only a little water.
- The more water there is in the cookware, the more energy is required to heat it. Turn down to a lower power level early on.
- If you use an ongoing power level that is too high, you will waste energy.
Disposing of packaging
- The packaging materials are environmentally compatible and can be recycled.
- Sort the individual components by type and dispose of them separately.
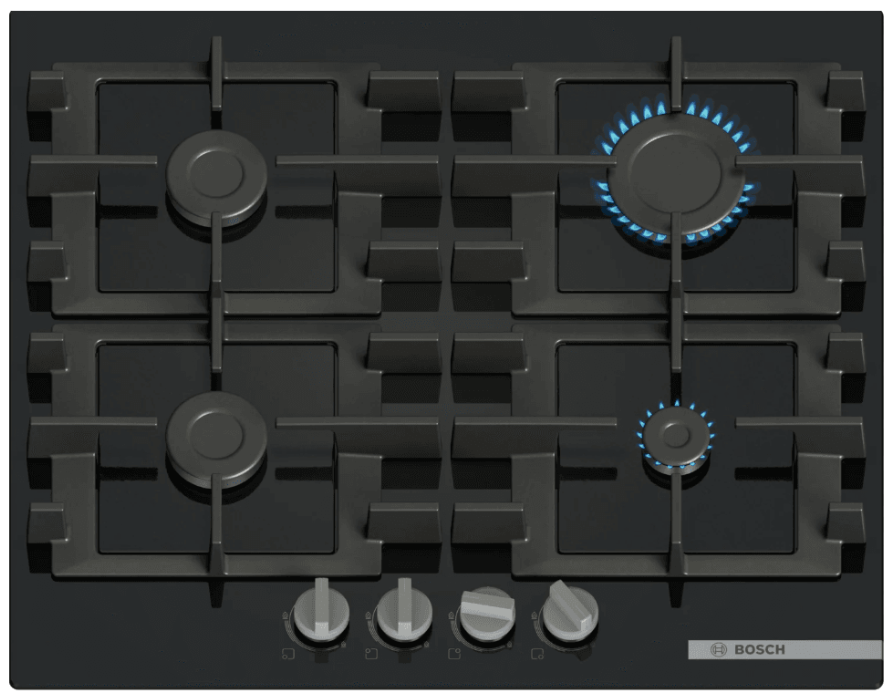
Familiarising
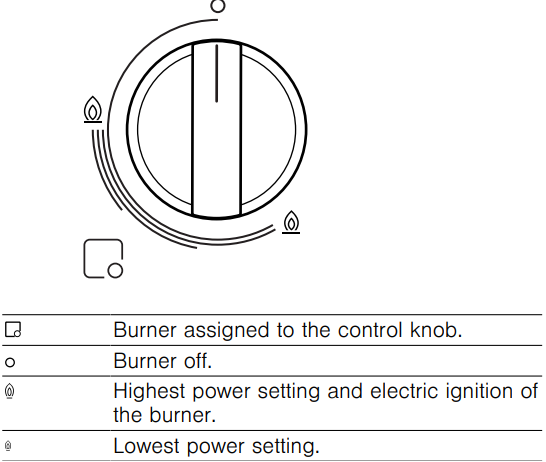
- Control knob: Use the control knobs to set the flame size incrementally.
- Pan supports
Insert the pan supports correctly. Never place the cookware directly on the burner. Always carefully remove the pan supports. When moving a pan support, the pan supports next to it may also move. - Burner
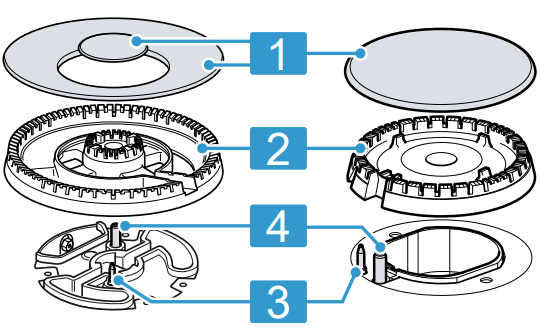
You can find an overview of the parts of the burner here.- Burner cover
- Burner cup
- Thermocouple for flame monitoring
- Ignition plug
Accessories
You can buy accessories from the after-sales service, from specialist retailers, or online. Only use original accessories, as these have been specifically designed for your appliance. Accessories vary from one appliance to another. When purchasing accessories, always use Bosch PNK6B.K4.A Built-In Gas Hob quote the exact product number (E no.) of your appliance.
- Additional work grid
- Only use on the multi-crown burner.
- Always use for cookware with a rounded Bosch PNK6B.K4.A Built-In Gas Hob base.
- Recommended to extend the service life of the appliance.
- Additional espresso maker grid
- Only use on the burner with the lowest power setting.
- Use with cookware with a diameter smaller than 12.
- Simmer plate: Use for cooking on a low heat.
- Place it on the pan support with the bumps facing up – never place it directly on the burner.
- Use the economy burner or the standard output burner. If you have multiple standard output burners, use the rear burner.
Basic Operation
- Igniting a gas burner
The cooktop has automatic ignition of the burners. - Safety system
The safety system (thermocouple) prevents the Bosch PNK6B.K4.A Built-In Gas hob has a flow of gas if the flames accidentally go out. To ignite the burner, you must activate the system that enables the gas flow.- Ignite the burner without releasing the control knob. The flame ignites.
- Press and hold the control knob for a further four seconds.
- Igniting a gas burner manually
- In the event of a power cut, you can light the burners manually.
- Press the control knob for the selected burner and turn it counterclockwise to the highest level.
- Hold a lighter or a flame (lighter, match, etc.) against the burner.
- Switching off a burner
- Turn the control knob clockwise to.
- Normal behaviour during operation
This behaviour is normal for the appliance:- Slight hissing noise from the ignited burner.
- Release of odours when using the appliance for the first time. These odours disappear after a short time.
- An orange flame is normal. This is due to dust in the environment, spilled liquids, etc.
Cookware
This information has been provided to help you save energy and avoid damaging your cookware.
- Suitable cookware
Only use cookware with a suitable diameter. The cookware must not protrude over the edge of the hob. Never use small cookware on large burners. The flames must not touch the sides of the cookware.
| Burner | Minimum diameter of the cookware base (cm) | Maximum diameter of the cookware base (cm) |
| Wok multi-crown burner | 22 | 30 |
| Mini-wok multicrown burner | 22 | 28 |
| Standard output burner | 14 | 22 |
| Economy burner | 12 | 20 |
Only use cookware with a concave base on the multicrown burner.
- The hob must have a multi-crown burner and an additional wok grid.
- The additional work grid must be correctly inserted.
Using cookware
- The selection and positioning of the cookware affect the safety and energy efficiency of your appliance.
- Maintain a distance of at least 50 mm between the cookware and flammable objects.
Recommended settings for cooking
The cooking times and power levels may vary depending on the type of food, its weight and quality, ohe kind of gas used, and the material from which the cookware is made.
| Burner Highest/high heat setting | Medium power level | Lowest power level |
| Mini-wok multi-crown burner Cooking, grilling, browning, paella, Asian dishes (wok) | Warming up and keeping warm: Ready-to-eat meals, prepared meals | Warming up and keeping warm: Ready-to-eat meals, prepared meals |
| Standard-output burner Steamed potatoes, fresh vegetables, stews, pasta | Warming up ready-to-eat meals and keeping them warm, and cooking fine stews | Warming up ready-to-eat meals and keeping them warm, and cooking fine stews |
| Economy burner Cooking: Stews, rice pudding, caramel | Defrosting and slow cooking: Pulses, fruit, frozen products | Preparing/melting: Butter, chocolate, gelatine |
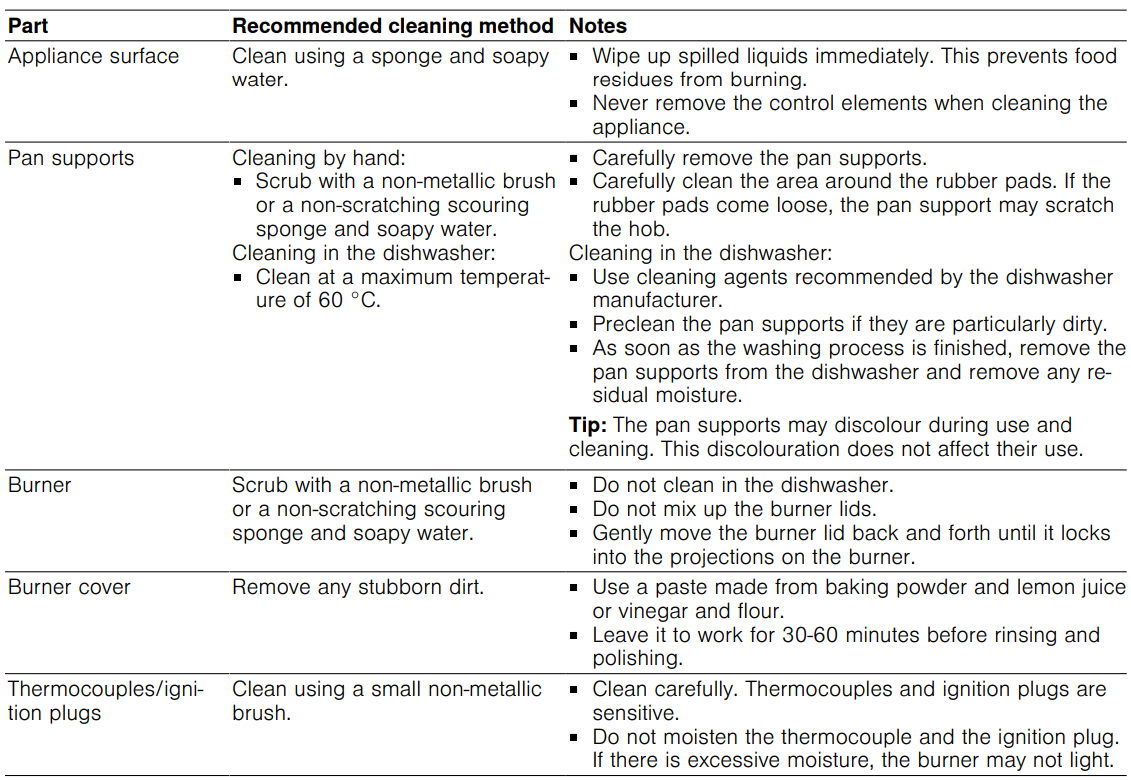
Cleaning and Servicing
To keep your appliance working efficiently for a long time, it is Bosch PNK6B.K4.A Built-In Gas hob is important to clean and maintain carefully.
- Do not use harsh or abrasive detergents.
- Do not use any industrial soap or cleaning agents.
- Do not use steel wool or scouring sponges.
- Do not use a knife or sharp objects to remove dried-on food remnants from the cooktop.
- Do not use a knife or sharp objects to clean the connection between the glass and the burner panels, the metal frame, or the glass/aluminium plates for cleaning.
- Do not use steam-cleaning appliances.
Cleaning recommendations
Clean all parts of the appliance after each use. Note: Read the Bosch PNK6B.K4.A Built-In Gas Hob provides information on the cleaning agents. “Cleaning product”, Page 13
General Information
- Allow the appliance to cool down before cleaning.
- After cleaning, dry all parts of the appliance completely using a soft cloth. Surface damage may occur if there are still drops of water or residual moisture at the beginning of the cooking process.
- Reattach the appliance parts ce properlensuringure that the surfaces are not damaged.
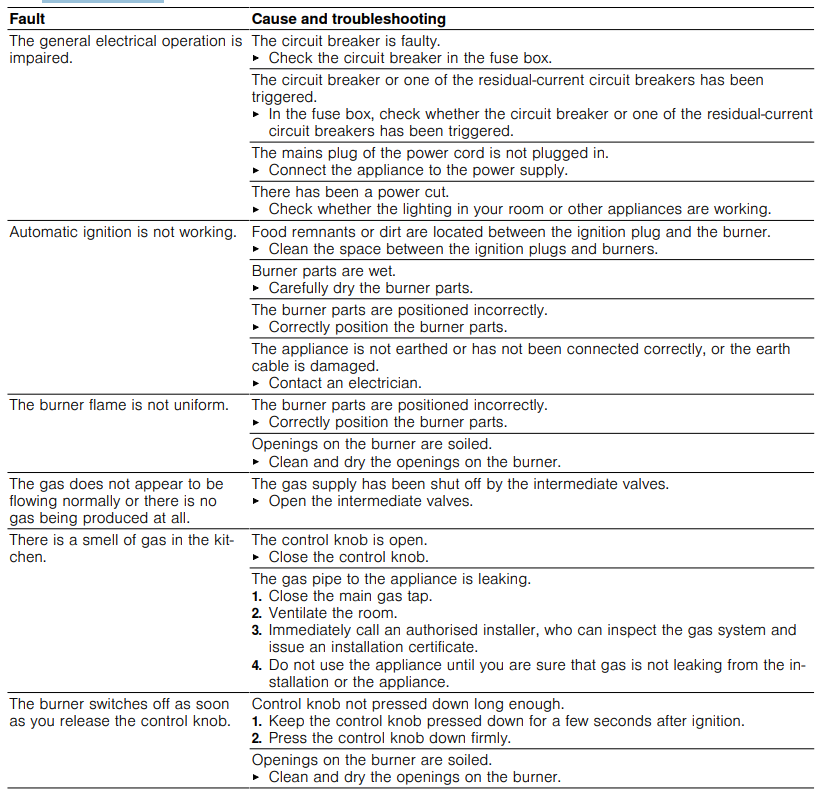
Troubleshooting
You can rectify minor faults on your appliance yourself. Read the troubleshooting information before contacting after-sales service. This will avoid Bosch PNK6B.K4.A Built-In Gas hob has unnecessary costs.
Service
DO NOT MODIFY THIS APPLIANCE. Only Bosch PNK6B.K4.A Built-In Gas Hob, authorized personnel from the Service Centre are qualified to work on the appliance.
- Yellow tipping of the cooktop burner flame.
- Sooting up of cooking utensils.
- Burners not lighting properly.
- Gas valves, which are difficult to turn.
- In case the appliance fails to operate correctly, contact the authorised service provider in your area.
Disposal
- Unplug the appliance from the mains.
- Cut through the power cord.
- Close the main gas tap.
- Dispose of the appliance in an environmentally friendly manner. Information about current disposal methods is available from your specialist dealer or local authority.
The guideline determines the framework for the return and recycling of used appliances as applicable throughout the EU.
Customer Service
- Website: www.bosch-home.com/welcome
- Timings: Monday to Friday 8 am to 8 pm,
- Ph: +49 (0)89 69 339 339
FAQs
Q: Can the hob handle large cookware?
Indeed. PNK6B.K4.A can accommodate pots and pans of all sizes, including woks and large saucepans, thanks to its wide burner spacing and strong pan supports.
Q: How do I replace or convert the hob for a different gas type?
There are conversion kits available to transition between LPG and natural gas.
Q: Can I use a wok on this hob?
Indeed. Wok cooking is supported by the hob, particularly on burners with higher heat output, but always make sure the wok is stable on the pan support.
Q: Can the hob be installed on laminated countertops?
Yes, but to avoid heat damage to the countertop, make sure you have the right insulation and clearances according to the installation manual.
Q: Can the hob be installed above an oven?
Yes, as long as there is adequate ventilation and clearance for the installation. For accurate measurements and safety specifications, refer to the Bosch installation instructions