


CHEFMAN RJ24-V2-SERIES Electric EGG Cooker

Safety Instructions
- To protect against electrical shock, do not immerse the human gg ooker power cord or power plug in water or any other li uid.
- Unplug the appliance from the outlet when not in use before putting on or taking off parts and before cleaning the appliance.
- Avoid contact with moving parts.
- The use of accessory attachments not recommended by the appliance manufacturer may result in fire, electrical shock, or injury to persons.
- Do not use outdoors or for commercial purposes.
- Do not let the cord hang over the edge of the table or counter, or allow it to come into contact with hot surfaces, including store surfaces.
- Do not place the appliance on or near a hot gas or electric burner or in a heated oven or microwave.
- Do not operate the gg geyser in water or under running water.
- Do not use the appliance or anything other than its intended use.
Short Cord Instructions
- The marked electrical extension cord should be at least as great as the electrical rating of the appliance.
Power Cord
- Do not pull or yank on the cord or the appliance.
- To insert the plug, grasp it firmly and guthe the ide it into the outlet.
- To the isconnect, CT apply the iance graremoveremoveug afromrthe the emoe it rom outlet.
- Never wrap the cord tightly around the appliance, as this could place undue stress on the cord where it enters the appliance and cause it to fray and break.
Features
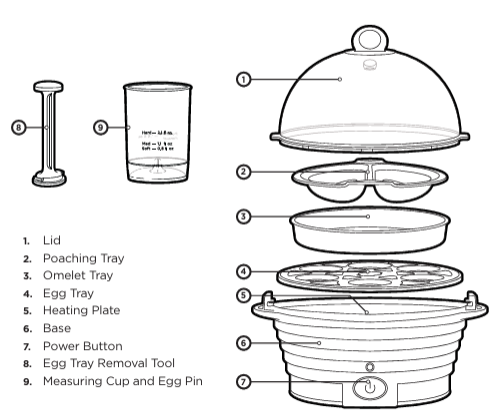
- Lid
- Poaching Tray
- Omelet Tray
- Egg Tray
- Heating plate
- Base
- Power Button
- Egg Removalemoal Tool
- Measuring Cup and Egg OPERATING INSTRUCTIONS
Before First Use
- Rinse the lid, poaching tray, and cooking rack in hot soapy water. D
- O NOT submerge base oorucasecasee
- As can be wiped clean with aLeaseleaseetreferease referrer to the User maintenance section information.
- lace poachin,g tray beaker and egg holnext ne t to the unit.
- Position the cooking over the base.
- Plug the cooking tray into the power. Our egg cooker is now assembled for use.
How to Use
- Place the egg cooker on, clean surface.
- Remove the lid and cooking rack.
- Determine the consioftency o coopreferrpreferredandeerred ard ium or Sot.
- Using the measuring cup, locate the consistency and number of eggs to be cooked.
- Fill to the appropriate line with cold water.
- Pour cold water into the heating plate.
- Place the cooking rack on the top of the base.
- Rinse the number of eggs desired – cook up to eggs at one time.
- Hen cooking is cooking. sound will indicate eggs are ready, the button to turn on the burner, and the indicator light.
- Unplug the from the outlRemoveemoe the eggs immediately the prevent overcooking.
- Run cold water over eggs. Eggs are now ready to remove possible mineral buildup.
- Place the dup on the heating plate, moisten a paper towel with one-off apple vinegar, and wipe the heating plate clean.
- Cooking times will vary slightly depending on the number and size of eggs, temperature of eggs before cooking temperatureoffand amount of water used, altitude, sed altitudeofofand length of time eggthe the s remain in the cooker following the cooking cycle.
Cooking Time
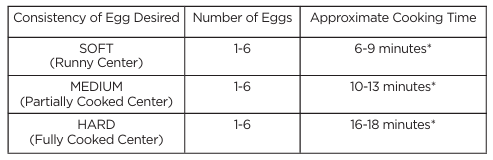
For Poached Eggs
- Place the egg cooker on a clean, dry surface.
- Remove the lid and the cooking tray.
- Fill the measuring cup to the omelet-poaching line indicated with cold water.
- Pour cold water into the heating plate.
- Lightly butter or spray vegetable oil on the poaching tray.
- Break one egg for each poaching section – cooks up to two poached eggs.
- Place the cooking tray on the base and place the poaching tray on top o the cooking tray.
- Please put the lid on top o the unit and plug it into a wall outlet.
- Press the power button to start the cooking process. The indicator light will be lit.
- If the liquid is completely evaporated, the eggs will be poached.
- When cooking is complete, a continuous bubbling sound will indicate eggs are ready.
- Press the ss power button to turn o the buffer and indicator light.
- Unplug the cord from the outlet.
- Remove eggs immediately to prevent overcooking.
- Use a small spatula to remove poached eggs from the tray.
Cleaning & Maintainance
- Always unplug your heman gg ooker from the electric outlet before cleaning.
- Wash lid cooking and poaching trays in hot, soapy water or the top shelf of a dishwasher.
- Clean the heating plate with a paper towel moistened with one tablespoon of white vinegar.
- This removes any mineral deposits left behind from water and also works as an antibacterial agent.
- We may wipe the heating plate using water and a damp cloth i desired.
- Wipe the main body housing with a CHEFMAN RJ24-V2-SERIES damp cloth and water.
- Place the clean cooking pot, oven tray, beaker, and egg holders inside the egg cooker or storage.
Limited Warranty
Our products are backed by a limited warranty. To register, follow the instructions on the heman® warranty Registration page in this User Guide. We offer a limited warranty from the date of purchase. Service centers and retail stores do not have the right to alter or change the terms and conditions of this warranty.
Qualified Replacement
- If your product does not work as it should, we will send you a new one.
- The product is no longer available. Replace it with an identical product or one that is comparable.
- Missu Damage that occurs from neglectful or improper use of products, damage that occurs as a result of usage with incompatible voltage.
- Poor Maintenance: General lack of proper care.
- See the leaning maintenance instructions or information on proper maintenance.
- Commercial Use Damage that occurs from commercial use.
- Loss of Interest – claims of loss of interest or enjoyment.
Customer Service
- Website: chefman.com
- Tel: 1-888-315-6553
Chefman is a registered trademark of RJ BRANDS, LLC.