
Clarke 6502130 Sanding Belt Bench Grinder

Introduction
Thank you for purchasing this CLARKE Bench Grinder with sanding belt. Before attempting to use this product, please read this manual thoroughly and follow the instructions carefully. In doing so, you will ensure the safety of yourself and that of others around you, and you can look forward to your purchase giving you long and satisfactory service.
Safety Instructions
- Keep the work area clean, tidy, and well-lit. Cluttered and dark areas invite accidents.
- Keep children and bystanders away while operating a power tool. Distractions can cause you to lose control.
- ALWAYS check for any damage or condition that could affect the grinder’s operation. Any damaged part should be properly repaired.
- NEVER use the grinder if it is defective or operating abnormally.
- NEVER abuse the mains cable. Never yank the cable to disconnect it from the socket. Keep the cable away from sharp edges/hot surfaces.
- NEVER carry out any alterations or modifications to this product.
- NEVER wipe the machine clean with solvents. Wipe plastic parts with a soft cloth, slightly dampened with soapy water.
- NEVER attempt any repairs yourself. If you have a problem with this product, contact your local CLARKE dealer.
- ALWAYS use the table to support the workpiece.
- ALWAYS check to ensure the attachments are secure before starting.
- ALWAYS maintain a suitable clearance between the able and the sanding belt.
- ALWAYS hold the workpiece firmly so that it cannot be torn from your hands
- ALWAYS sand pieces that cannot be held firmly by hand.
Electrical Connection
- Before switching the product on, make sure that the voltage of your electricity supply is the same as that indicated on the rating plate. This product is designed to operate on 230VAC 50Hz. Connecting it to any other power source may cause damage.
- This product may be fitted with a non-rewireable plug. If it is necessary to change the fuse in the plug, the fuse cover must be refitted. If the fuse cover becomes lost or damaged, the plug must not be used until a suitable replacement is obtained.
- If the plug has to be changed because it is not suitable for your socket, or due to damage, it should be cut off and a replacement fitted, following the wiring instructions shown below. The old plug must be disposed of safely, as insertion into a mains socket could cause an electrical hazard.
- If the colours of the wires in the power cable of this product do not correspond with the markings on the terminals of your plug, proceed as follows.
- The Blue wire must be connected to the terminal marked N or coloured Black.
- The Brown wire must be connected to the terminal marked L or coloured Red.
- The Yellow and Green wires must be connected to the terminal marked E or coloured Green.

We strongly recommend that this machine be connected to the mains supply via a Residual Current Device (RCD). If in any doubt, consult a qualified electrician. DO NOT attempt any repairs yourself.
Overview

| No | Description | No | Description | |
| 1 | Eye Shield | 9 | Dust Extract Port | |
| 2 | Flexible Lamp | 10 | Dust Collector/Belt guard | |
| 3 | Grinding Wheel Dresser | 11 | Mounting Bolt Location | |
| 4 | Belt Tracking Adjustment Knob | 12 | On/Off Switch | |
| 5 | Belt Tension Knob | 13 | Tool Rest | |
| 6 | Sanding Belt | 14 | Grinding Wheel | |
| 7 | Side Guard Release Screw | 15 | Spark Deflector |
Assembly
Inventory
The machine is supplied with the following items. If any items are missing or damaged, please contact the dealer where you purchased the product.
- 1 x Eye Guard
- 2 x Tool Rests (1x grinding/ 1 x sanding)
- 1 x Spark Deflector
- 1 x Grinding Wheel (fitted)
- 1 x Sanding Belt (fitted)
- 1 x Wheel Dresser
- 1 x Wrench
Mounting 
- Using the base of the machine as a template, mark and drill the workbench at the positions of the mounting holes in the base.
- Bolt the bench grinder to the bench with suitable bolts, washers, and nuts (not supplied).
Grinding Wheel
- Fix the tool rest to the bench grinder with the wingnut as shown.
- The tool rest is adjustable and should be positioned as close as possible to the grinding wheel.
- Ensure that the tool rest is firmly fixed and horizontal.
Spark Deflector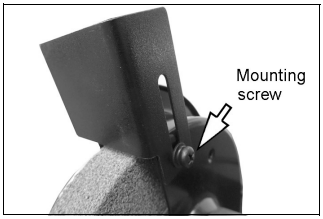
- Fit the spark deflector to the grinding wheel guard using the screw and washers provided.
Eye Sheild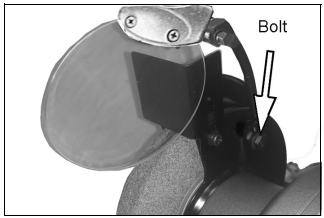
- Fit the eyeshield to the grinding wheel guard using the support arm, bolt, and washers provided.
Sanding Work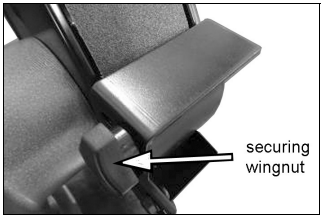
- Fit the work rest to the sanding belt guard using the plastic wingnut, nut, and washer provided.
Dressing Tool
- Mount the dressing wheel on the bracket on top of the machine.
Use
Deflector & Eye Sheild
- Slacken the spark arrestor securing screw and position the arrester so that the bottom edge is adjacent to the wheel, with a clearance of approximately 2 mm. Tighten the screw to secure it in position.
- Secure the eye shield in position. The eye shield should be a tight enough fit on its mounting that it does not move under operational vibration, but loose enough so that it may easily be positioned by hand.
- Check the grinding wheel guard and make any adjustments necessary before use.
Tool Rest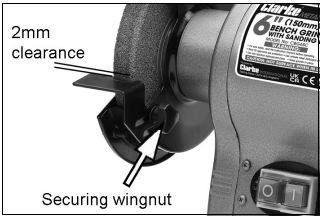
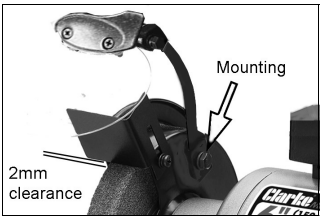
- Slacken the tool rest securing knob and position the rest so that it is adjacent to the grinding wheel with a clearance of approximately 2 mm. Tighten the bolt to secure it in position.
- NEVER attempt to grind a piece of metal that is thinner than the gap between the tool rest and the grinding wheel.
Wheel
- Turn the grinding wheel by hand to ensure it is free, then switch it ON by pushing the switch so that the ‘I’ is depressed. To switch OFF, push the switch so that the “0” is depressed.
- Press the workpiece to be ground evenly onto the grinding stone and move the workpiece sideways across the stone. Make sure that at least half the width of the workpiece always presses on the grinding stone at any time to avoid damage to the stone.
- Allow the machine to do the work. DO NOT apply excessive pressure on the tool when grinding or to the belt when sanding.
- The clearance between the grinding wheel and tool rest should be maintained. If the clearance gap is greater than the thickness of the metal being ground, there is a danger that the force of grinding will cause the workpiece to be pulled into the gap, which is potentially dangerous. An incorrect gap could also cause “chatter,” which could result in damage to the wheel.
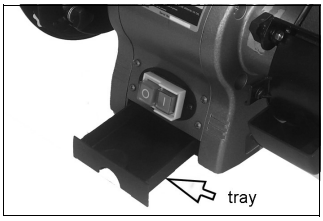
- The plastic tray can be used to contain coolant for use during grinding.
SharpeningScissor
 Scissor
- If possible, take the scissors apart to make the sharpening operation easier and safer. Remove material only from the outside surface and work from the handle end of the blade towards the tip.
Knives
- Remove metal equally from both faces, working from the handle end of the blade towards the tip.
Built-In
- The built-in light will come on whenever the machine is switched on. The arm can be adjusted to set the light in the most suitable position.
Setting
Slacken the wingnut that secures the work rest in place and position the rest so that it is adjacent to the belt edge and at 90 degrees to the belt’s surface with approximately 2 mm clearance. Tighten the wingnut to secure it in position.
- Switch the motor ON by pushing the switch so that the “I” is depressed, and allow the machine to reach full speed. To switch the motor OFF, push the switch so that the “0” is depressed.
- Hold the workpiece firmly on the work rest and apply slight pressure to the sanding belt, allowing the machine to do the work.
Installation
To renew or change the grinding wheels, proceed as follows.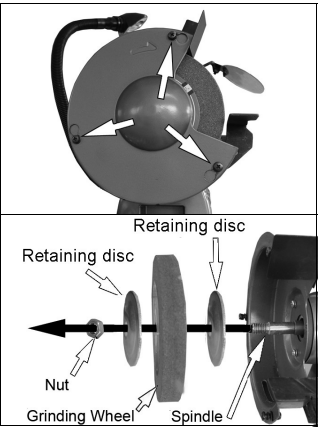
- Switch off and unplug from the power supply. Remove the grinding wheel cover by loosening the three retaining screws and twisting the guard anti-clockwise to Clarke 6502130 Sanding Belt Bench Grinder disengage it from the machine.
- Hold or jam the sanding belt roller to stop the drive shaft from rotating and remove the nut and retaining disc securing the grinding wheel, remembering that the nut has a LEFT-HAND THREAD.
- Remove the used wheel and replace it with a new one.
- DO NOT overtighten the wheel retaining nut.
- Refit the grinding wheel cover and re-adjust the tool rest and spark arrester brackets to suit the new wheel.
- Switch the machine on and allow it to rotate freely for at least one minute.
Dressing Tone
New grinding stones are frequently not true, or in time can become grooved, glazed (built-up), out of round, or otherwise misshapen. To correct these defects, a grinding stone Clarke 6502130 Sanding Belt Bench Grinder dresser is supplied with the machine. Further items are available from your CLARKE dealer.
- ET125 Grinding Wheel Dresser – Part No:1700225
- ET154 ½ Carat Diamond Tip Wheel Dresser – Part No:1700329
- If the grinding stone is new, allow it to spin for a minute with no load. Check that it is spinning straight and true. If not, it will require dressing before use.
- Stand to the side of the stone and hold the dresser handle firmly. Place the dresser on the tool support so that its wheels can move freely (i.e, the exposed part of the wheel should be facing up). Run the stone and apply the dresser to the surface of the stone.
- When the abrasive wheel starts to become clogged with debris, Clarke 6502130 Sanding Belt Bench Grinder use the dresser tool supplied to clean (dress) it.
Changing Belt
To renew or change the sanding belt, proceed as follows: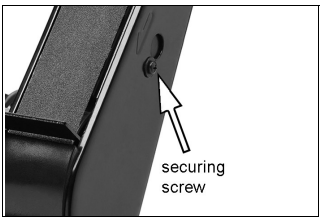
- Unplug from the power supply. Remove the sander side cover by unscrewing the securing screw.
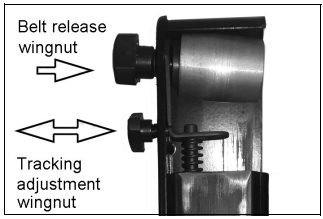
- Slacken the top roller securing wingnut, allowing the top roller to move slightly off its axis as shown.
- Slide the belt off and replace it with a new one, ensuring it lies centrally on the top and bottom rollers.
- Re-tighten the top roller securing wingnut till it becomes firm but NOT too tight. The belt should now be fairly taught and positioned centrally on the rollers.
- Replace the sanding belt cover.
- Rotate the belt by hand whilst screwing the Tracking Adjustment screw in or out to ensure the belt runs centrally on the rollers. Turn the screw anticlockwise to move the belt outwards (towards the outer cover), or clockwise to move inwards.
- When satisfied, plug the machine into the power supply Clarke 6502130 Sanding Belt Bench Grinder and switch on. Make fine adjustments with the Tracking Adjustment screw if necessary.
Maintainance
- Make sure that all components are tight and secure. ALWAYS have any damaged or worn parts repaired or replaced by qualified service personnel. DO NOT attempt to repair the bench grinder unless you are qualified to do so.
- The drive motor and bearings are sealed units and require no regular maintenance. Should you require assistance, contact your service agent.
- The grinding stone will wear down with use and may well go out of true. Use the dressing wheel or stone grader to correct the trueness and to remove worn, glazed areas from the stone.
- The stone will have a finite life expectancy dependent Clarke 6502130 Sanding Belt Bench Grinder upon the nature of the work being done. Periodically, make a note of the wheel diameter and replace the (150mm dia) wheel if it reduces to as little as (130mm) in diameter.
Cleaning & Storage
Clean the exterior of the machine if required, using a mild detergent or mild solvent. NEVER immerse the machine in water. To reduce any fire hazard, keep any cooling vents clear. If not bolted to a workbench, store the grinder in a clean, dry location, out of reach of children.
Accessories
Description/Part No
- Grinding Wheel – Fine (1/2” bore) 6501043
- Grinding Wheel – Medium (1/2” bore) 6501044
- Grinding Wheel – Coarse (1/2” bore) 6501045
- Sanding Belts – Fine (pack of 5) 6502115
- Sanding Belts – Medium (pack of 5) 6502120
- Sanding Belts – Coarse (pack of 5) 6502125
- Wire Wheel – 6”, 150mm 6501052
- Polishing Kit – 6”, 150mm 3052015
- Bench Grinder Stand BGS1 6501140
- Bench Grinder Stand CBGS2 6501142
- Diamond Tip Wheel Dresser ET154 1700329
- Emery Wheel Dresser No. 0 ET125 1700225
Component Parts
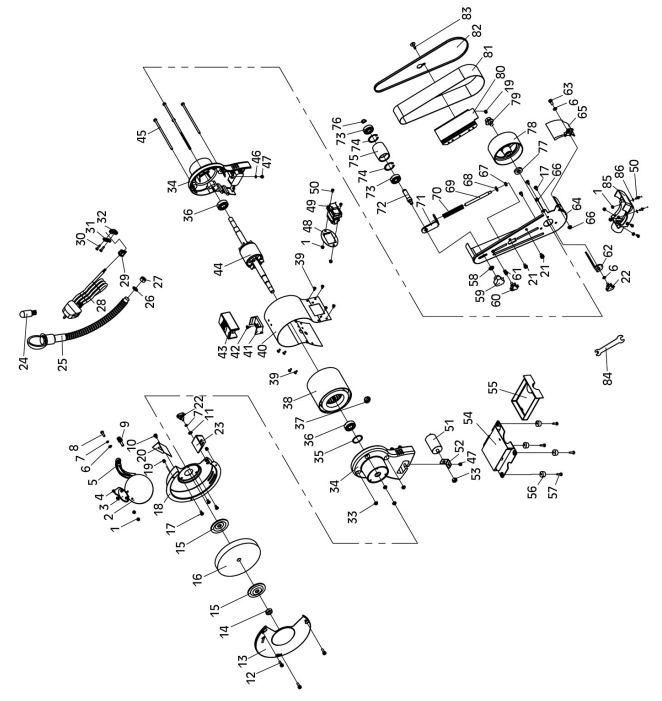
Components Parts
| No | Description | No | Description | |
| 1 | Nut M4 with flange | 31 | Cable clamp backing plate | |
| 2 | Eye shield | 32 | Cable clamp plate | |
| 3 | Shield mounting plate | 33 | Hex nut M5 with flange | |
| 4 | Screw M4x11 | 34 | End cover | |
| 5 | Eye shield support | 35 | Wave spring D35 | |
| 6 | Washer | 36 | Bearing 6202-2RZ | |
| 7 | Spring washer | 37 | Cable gland | |
| 8 | Bolt M5x16 | 38 | Stator | |
| 9 | Bolt M6x30 & spring washer | 39 | Screw M4x8 | |
| 10 | Screw M5x8 & spring washer/ washer | 40 | Motor housing | |
| 11 | Washer | 41 | Dressing tool holder | |
| 12 | Screw M5x18 & spring washer | 42 | Screw M5x8 | |
| 13 | Left shield cover plate | 43 | Dressing tool | |
| 14 | Nut M12 | 44 | Rotor | |
| 15 | Retaining disc | 45 | Long bolt and washer M5x131 | |
| 16 | Grinding stone | 46 | External teeth lockwasher | |
| 17 | Screw M5x10 & spring washer | 47 | Screw M4x7 & springwashers | |
| 18 | Inner hood guard | 48 | Switch baseplate | |
| 19 | Lock nut M5 | 49 | On/off switch | |
| 20 | Spark baffle | 50 | Screw M4x8 | |
| 21 | Screw M5x10 & springwasher | |||
| 22 | Bracket locking knob M5x10 | |||
| 23 | Tool rest (grindstone) | |||
| 24 | Lightbulb -12V/10W | |||
| 25 | Spiral lamp assembly | |||
| 26 | Washer | |||
| 27 | Thin nut M10x1 | |||
| 28 | Power cable | |||
| 29 | Cable grommet | |||
| 30 | Screw M4x16 |
Specifications
| Feature | Value |
| Overall Dimensions (mm) | 390 (L) x 290 (W) x 350 (H) |
| Weight | 10.25 kg |
| IP Rating | IP20 |
| Grinding Stone | |
| Dimensions | 150mm dia x 20mm thickness (12.7mm bore) |
| Grit | 36, Extra Coarse |
| Rated Speed | 2850rpm |
| Sanding Belt | |
| Dimensions | 686mm x 50mm |
| Grit | P80, Medium |
| Rated Speed | 936m per minute (15.6m/s) |
| Worklight | |
| Length | 420mm |
| Bulb | E14, Flexible Halogen |
| Operating Voltage | 12V – 10W |
| Motor | |
| Rated Voltage / Frequency | 230V / 50Hz |
| Motor Wattage | 250W |
| Plug Fuse Rating | 5A |
| Duty Cycle Classification | S2 (30 minutes) – plus thermal protector |
| Environmental | |
| Sound Pressure Level | 82.3dB |
| Sound Power Level | 91.5dB |
Associated Products
| Fine Grinding Wheel | Medium Grinding Wheel | Coarse Grinding Wheel |
| •Diameter: 6”, 150mm •Width: 3/4”, 20mm •Bore: 1/2”, 12.7mm •Part No: 6501043 | •Diameter: 6”, 150mm •Width: 3/4”, 20mm •Bore: 1/2”, 12.7mm •Part No: 6501044 | •Diameter: 6”, 150mm •Width: 3/4”, 20mm •Bore: 1/2”, 12.7mm •Part No: 6501045 |
| Fine Sanding Belt | Medium Sanding Belt | Coarse Sanding Belt |
| •Length: 27”, 686mm •Width: 2”, 50mm •Grit: P120 •Part No: 6502115 | •Length: 27”, 686mm •Width: 2”, 50mm •Grit: P80 •Part No: 6502120 | •Length: 27”, 686mm •Width: 2”, 50mm •Grit: P60 •Part No: 6502125 |
Troubleshooting
| Problem | Possible Cause | Action |
| The motor doesn’t start | a) ON/OFF switch damaged b) Switch cable damaged c) ON/Off relay damaged d) Fuse blown e) Motor burnt out | a-d) Replace all damaged parts before using the machine. e) Contact your service centre to have the machine repaired by a skilled technician |
| The machine gets slower during work | Too much pressure on the workpiece | Reduce pressure on the workpiece |
| The sanding belt comes off the drive pulleys | The belt does not run straight | Reset the tracking and tensioner |
| Wood gets burnt during sanding | a) The sanding belt is dirty b) Excessive pressure on the workpiece | a) Replace the belt b) Reduce pressure on work piece |
Environmental Protection
Do not dispose of this product with general household waste. Through the purchase of this product, the customer is taking on the obligation to deal with the WEEE by the WEEE regulations about the treatment, recycling & recory and environmentally sound disposal of the WEEE.
Guarantee
This product is guaranteed against faulty manufacture for 12 months from the date of purchase. Please keep your receipt, which will be required as proof of purchase. This Clarke 6502130 Sanding Belt Bench Grinder guarantee is invalid if the product is found to have been abused or tampered with in any way, or not used for the purpose for which it was intended. Faulty goods should be returned to their place of purchase; no product can be returned to us without prior permission. This guarantee does not affect your statutory rights.
Customer Service
- Tel: 0208 988 7400
- Website: parts@clarkeinternational.com
- Visit: service@clarkeinternational.com
FAQs
What type of tool is the Clarke 6502130?
For shaping, sharpening, deburring, and smoothing metal, wood, and plastic, the bench-mounted Clarke 6502130 combination tool with a sanding belt and a grinding wheel is perfect.
What materials can I work on with this bench grinder?
The benchtop Clarke 6502130 combination tool with a grinding wheel and sanding belt is ideal for shaping, sharpening, deburring, and smoothing metal, wood, and plastic.
Can I run the sanding belt and grinding wheel at the same time?
However, it’s advisable to only operate one side at a time for safety and accuracy.
What power supply does the Clarke 6502130 require?
230V AC is the usual operating voltage (UK standard). Make sure that the device is connected to a grounded outlet that has the right kind of circuit protection.
How do I align or track the sanding belt properly?
When the belt is running, turn the tracking adjustment knob on the unit’s side. To get the belt to run centred on the rollers, turn it slightly.
Can I use wet grinding with this machine?
No, only dry grinding and sanding are intended uses for the Clarke 6502130 machine. Water damage and electrical risks can result from its introduction.
What’s the typical motor power rating?
Depending on the model version, the motor’s typical power range is between 370W and 500W. This is enough for sanding and grinding in a general-purpose workshop.