
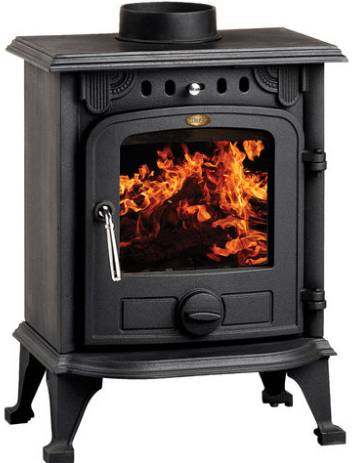
Clarke DL06 Chesterford Cast Iron Stove
Introduction
Before attempting to operate the stove, you must read this Manual thoroughly and carefully follow all instructions given. In doing so, you will ensure the safety of yourself and that of others around you, and you can also look forward to the product giving you long and satisfactory service.
Safety Instructions
- ALWAYS read and understand the manual before installing and commissioning the stove.
- ALWAYS check for damage before using the stove.
- Check for breakage of parts and any other condition that may affect the stove’s performance.
- ALWAYS keep children and visitors at a safe distance from the stove.
- NEVER direct any kind of liquid onto the stove, particularly when it is hot.
- NEVER use gasoline or other flammable liquids for fire starting.
- NEVER use the stove to incinerate materials other than recommended fuels.
- NEVER carry out any modifications to this product. If experiencing difficulty of any kind, consult your local CLARKE dealer.
- The installation of the stove and chimney MUST comply with all National, European, and local building regulations.
- It is the responsibility of the owner and the installer to ensure that the installation complies.
Control of Emissions
https://www.gov.uk/smoke-control-area-rule.
Your local authority is responsible for implementing the Clean Air Act 1993, including the designation and supervision of smoke control areas, and you can contact them for details of Clean Air Act requirements. The Chesterford stove has been recommended as suitable for use in smoke control areas when burning wood logs. The appliance has a factory-fitted modification to prevent closure of the secondary air control beyond the 50% open position.
Unpacking & Assembly
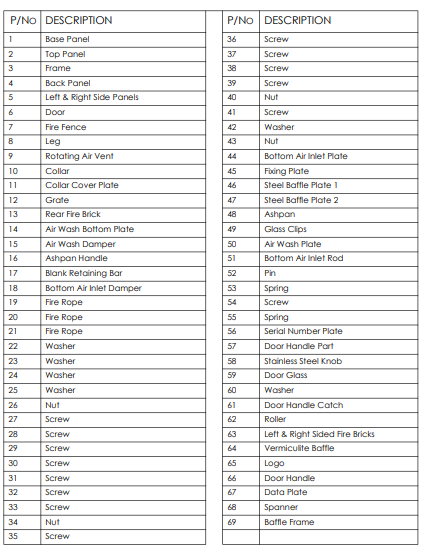
The stove is supplied with various loose components, including the lining panels, baffle plate, the grate with the retainer, ash pan, and operation tool for fitting by the owner. Unpack the stove and remove packing materials. Open the door and remove the loose items from inside the stove. Before assembling, please check contents against the following list and advise your CLARKE dealer immediately if any parts are missing. Refer also to parts list & diagram on pages 28 & 29
- 1 x Stove
- 1 x Ashpan handle tool
- 1 x Flue adaptor
- 1 x Fixings kit
- 1 x Ash pan
- 2 x Hex keys (4mm/2mm)
- Door handle with fixing bolt
- Spare leg/foot, bolt & washer
- Heat-resistant mitt
TOOLS REQUIRED
- CLARKE Fire Cement
- Open spanners
A full range of flue pipes and fire cement is available from your CLARKE dealer.
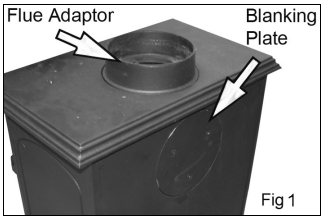
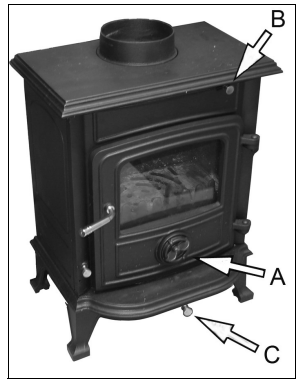
- Attach the flue adaptor as shown in Fig. 1 using the screws supplied. Ensure the fireproof gasket is correctly seated in the base of the flue adaptor.
- Install the blanking plate in the rear of the stove when the normal flue exit is required.
- If the rear mounting flue configuration is to be used, the blanking plate will be fitted to the top of the stove and the flue adaptor to the rear panel..
- Check that the firebricks and grate have not been dislodged during transit.
- The rear firebrick panel is already fitted.
- Remove any packaging and position the side firebricks at the sides of the stove, sloping down towards the rear. The third loose firebrick forms part of the baffle and sits on top of the side bricks.
- Fit the door handle grip to the door handle shank, using the bolt supplied.
- Fit the log retainer into the slots at the front of the stove.

- An ashpan handle is supplied for when the stove is in use.
- Place the stove in the desired location as shown in POSITIONING AND INSTALLATION on page. Take care not to damage the floor surface..e
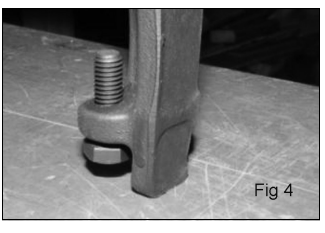
- Adjust the stove levelling bolts on each of the feet until the stove is level. Check that it is evenly supported and does not rock on an uneven floor. Take care not to damage the floor surface.
- If there are any gaps between any of the cast iron panels or flue components, these should be filled with CLARKE fire cement. This is necessary to prevent smoke or any other emissions.

- CLARKE fire cement can be overpainted with CLARKE stove paint.
- CLARKE fire cement can be overpainted with CLARKE stove paint.
Positioning & Installation
In England and Wales, there are only two routes to legally install a domestic solid fuel wood-burning appliance. In other parts of the UK, there are variations in legislation and processes.
- Stoves under 20kW rated output, which burn smokeless or low volatile fuels, require a minimum flue size of 125mm diameter (or rectangular flues having the same cross-sectional area and a minimum dimension not less than 100mm for straight flues or 125mm for flues with bends or offsets.
- Stoves of up to 30kW rated output burning any fuel require a 150mm diameter (or rectangular flues having the same cross-sectional area and a minimum dimension not less than 125mm. Liners should be installed according to their manufacturer’s instructions. Appropriate components should be selected to form the flue without cutting and to keep joints to a minimum.
Components

Parts Diagram
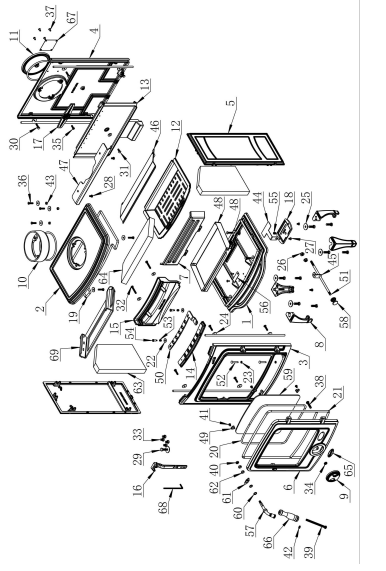
Part List
Flue Height
The chimney height and the position of the chimney should conform to the Building Regulations Approved Document “J”. Flues should be high enough to clear the products of combustion. The height necessary for this will depend on the type of stove, the height of the building, the type of flue and the number of bends in it, and an assessment of local wind patterns. However, a minimum flue height of 4.5m could be satisfactory if the guidance in paragraphs 2.10 to 2.12 of the Building Regulations Approved Document “J” is adopted.
External flue pipes should be “twin wall”. These retain the heat, enabling it to rise and disperse from the chimney.. As an alternative approach, the calculation procedure within BS EN 13384-1 (2005) can be used as the basis for deciding whether a chimney design will provide sufficient draught.
If in doubt, consult the Building Regulations. Approved Document “J” The outlet from a flue should be above the roof of the building in a position where the products of combustion can discharge freely and will not present a fire hazard, whatever the wind conditions.
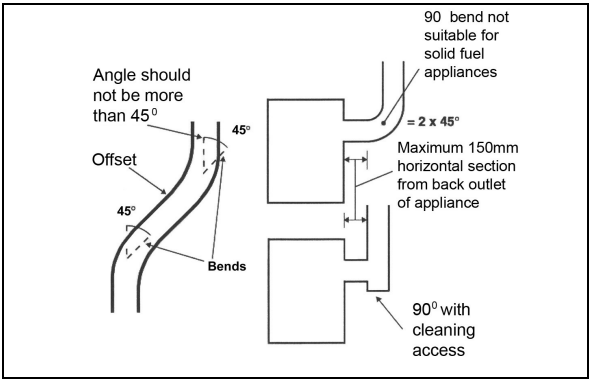
Bend In Flyes
- The chimney system shall have no more than 4 bends in total; 2 bends in the chimney and 2 bends in the flue pipe connection.
- The offset shall provide a change of direction no more than 45 degrees from the vertical.
- The run of the chimney between bends shall not exceed 20% of the total chimney length.
- The maximum length of horizontal flue must not exceed 150mm (6”)
The fitting of an extractor fan to either of these rooms is not permitted.

External Air
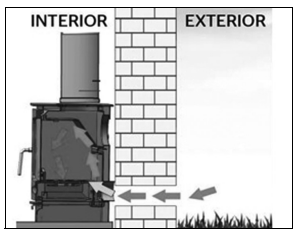
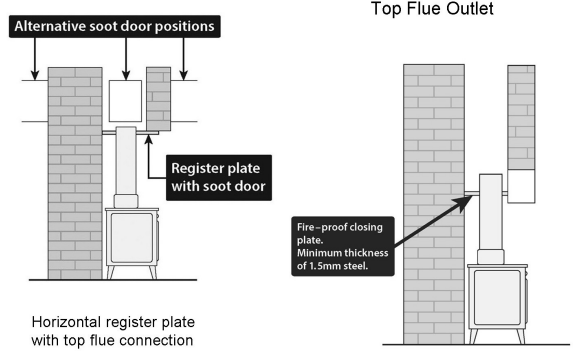 A non-combustible register plate, minimum 1.5 mm thick, should be fitted to all installations between the flue and the building structure. Its suitability and fit should be checked by a qualified stove installation engineer against the current Building Regulations Approved Document ‘J’.
Cleaning
Access for cleaning the flue should be incorporated in the system other than through the appliance (e.g., a soot door or access through a register plate). Purpose-made soot doors and inspection lengths are available from the CLARKE range.
- Open doors and windows to ventilate the room.
- Let the fire out or eject and safely dispose of fuel from the stove.
- Check for flue/chimney blockage and clean if required.
- DO NOT attempt to re-light the fire until the cause has been identified and corrected.
If necessary, seek professional advice.
Carbon Monoxide Alarms
The carbon monoxide alarm should be located in the same room as the stove:
- On the ceiling at least 300mm from any wall or, if located on a wall, as high up as possible (above any doors and windows) but not within 150mm of the ceiling and:
- Between 1m and 3m horizontally from the stove. NOTE: Further guidance on the installation of carbon monoxide alarms is available in BS EN 50292 and from manufacturers’ instructions.The provision of an alarm should not be regarded as a substitute for correct installation and regular servicing.
Using Stove

Initial Seasoning
- Light a small fire in the middle of the stove, well away from the sides. Allow the stove to warm up slowly and evenly with the air controls almost closed, avoiding intense flames.
- Keep the fire burning for three hours or so, gradually increasing the size of the fire using larger logs, which will burn naturally but slowly, keeping the stove on a low setting.
- After a couple of days of burning at this level, increase the brightness. The intensity of the fire gradually increased over the next 10 days.
Solid Fuel
- Open the air controls.
- Lay firelighters or rolled-up newspapers in the Clarke DL06 Chesterford Cast Iron Stove stove with a reasonable
quantity of dry kindling wood. Place a small quantity of solid fuel on top. - Light the newspaper or firelighters using a long taper and close the door.
- When the fire is burning strongly, add further fuel.
- When the stove is hot, reduce the opening of the air control.
- The burn rate can be reduced by partially closing the air control.
Lightning With Fuel
- Open the air control.
- Lay firelighters or rolled-up newspapers on the grate with a reasonable
quantity of dry kindling wood. Place 2 or 3 small logs on top. - Light the newspaper or firelighters using a long taper and close the door.
- When the fire is burning strongly, add further logs up to 10mm in diameter.
- When the stove is hot, close the air control as required. Ensure there
are lasting flames until the wood becomes charcoal.
Refueling
- Always open the door slowly to avoid a sudden rush of intake air and smoke escaping into the room and adding fuel.
- Open the air controls and leave them open for a few minutes to allow the gases in the wood to burn before closing the air controls.
- The rate of refuelling and heat available depend on individual requirements based on the user’s experience. When reloading, it is normally necessary to burn the stove fast initially, to drive off any gases and moisture, before closing the air vents to control the burn rate.
- Any gases or moisture as usual, following a full charge of fuel and then closing the air vents fully. Experience will indicate the optimum setting.
- However, by reducing the burn rate to such a level that the fire is still burning the following day, the burning process creates heavy, tarry chemicals that will become deposited on the inside of the flue or chimney.
- This is an inefficient process that greatly increases Clarke DL06 Chesterford Cast Iron Stove the risk of a chimney fire and makes it necessary to sweep the chimney more often.
Maintainance
The inside of the stove may require regular cleaning, especially during periods of peak use, the frequency of this being indicated by experience. It is advisable to wear a dust mask, protective gloves, and safety glasses when cleaning.
Use a stiff brush and an industrial-type vacuum cleaner to dislodge and remove as much material as possible, starting at the top of the stove and working down to the bottom. A CLARKE CVAC Ash Can Filter and vacuum cleaner is ideal for this process..
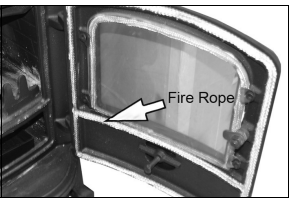
Fire Rope
Check the rope around the door and glass. If the rope is becoming detached, replace it with a rope approved for this purpose. Inspect the fireproof door seal where fitted, to ensure there is an effective seal around the door, and re-fix it if loose using stove rope adhesive. If in poor condition, it should be replaced.
Glass Panel
Clean any glass panel when cool, avoiding abrasive substances which could scratch the glass and make subsequent cleaning more difficult. Wet logs against a heated glass, a badly aimed poker, or heavy slamming of the door could crack the glass panel. The glass will not fracture with heat. Never replace any broken glass with glass NOT approved for use with stoves. Take Clarke DL06 Chesterford Cast Iron Stove care to tension these evenly, or there is a risk of breaking the new glass pane.

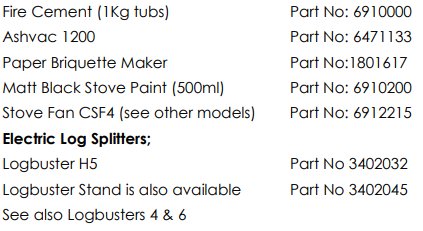
Accessories
Refer to the CLARKE website www.clarkeinternational.com for a full range of Flue Pipes & Cowls for use with this classic cast iron stove. See also the following accessories;
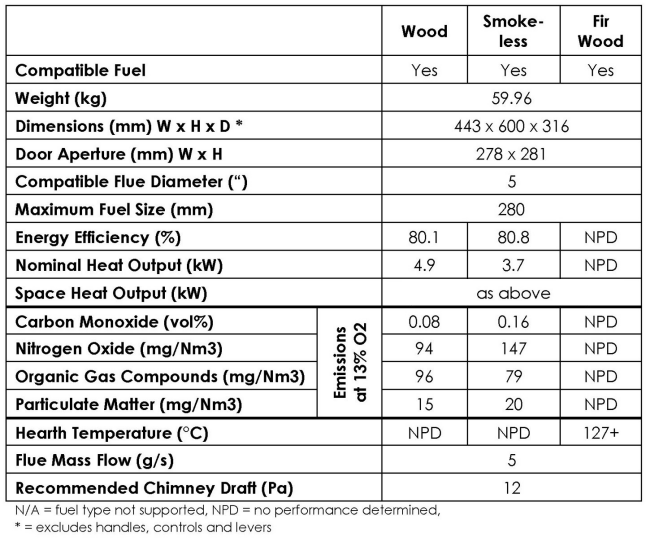
Specifications
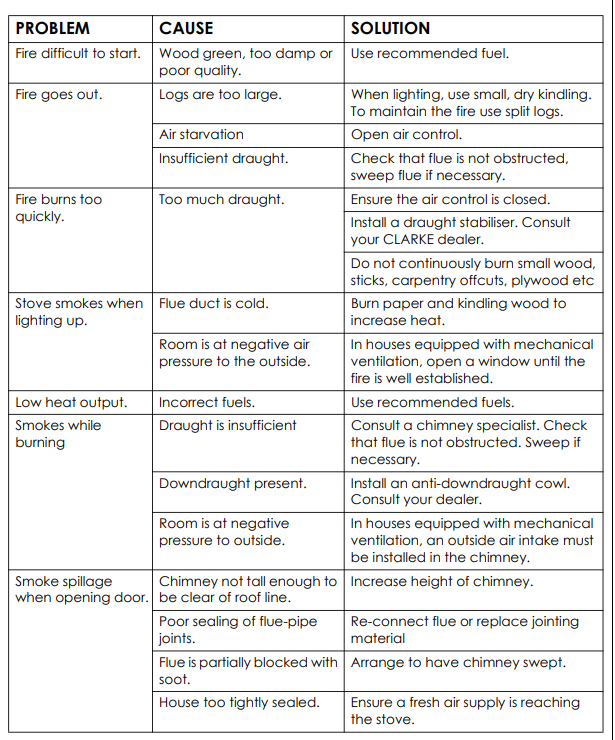
Troubleshooting
Guarantee
This CLARKE product is guaranteed against faulty Clarke DL06 Chesterford Cast Iron Stove manufacture for a period of 12 months from the date of purchase. Please keep your receipt as proof of purchase. This guarantee does not affect your statutory rights.
Customer Service
- Tel: 0208 988 7400
- Website: parts@clarkeinternational.com
- Visit: service@clarkeinternational.com
FAQs
What type of fuel can I use in the Clarke DL06 Chesterford stove?
For maximum effectiveness and the least amount of smoke, always use dry, seasoned wood.
How do I properly light the stove for the first time?
Completely open the air vents, place small pieces of wood and kindling inside, start the fire sparingly, and wait for the fire to settle before adding larger logs.
How do I control the heat output?
To control airflow, adjust the primary and secondary air vents.
What is the recommended chimney type and size?
Use a chimney made of steel or masonry that is between 125 and 150 mm (5 and 6 inches) in diameter, making sure that the draft is adequate and adhering to local construction codes.
How often should I clean the stove and chimney?
To avoid soot accumulation and chimney fires, clean the ash from the firebox every day or as needed, and have the chimney professionally cleaned at least once a year.
What maintenance is required to keep the stove in good condition?
Remove ashes regularly, check gaskets and seals, use the proper cleaners to clean the glass door, and look for cast iron fractures or corrosion.
How do I replace the stove door glass if it gets damaged?
Purchase replacement glass from authorised dealers or Clarke. To safely remove the door, replace the glass, and correctly reseal, according to the directions in the manual.