
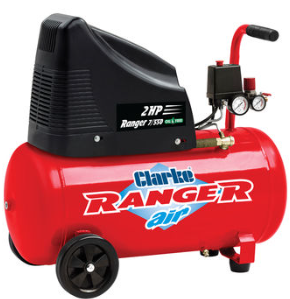
Clarke DL07 XE RANGE Air Compressor
Imtroduction
Before attempting to use this product, please read this manual thoroughly and follow the instructions carefully. In doing so, you will ensure the safe operation of the compressor. Please note, these compressors are for indoor use only.
Safety Instructions
- DO NOT operate your air compressor with any guards removed.
- DO NOT leave pressure in the air receiver overnight or when transporting.
- Take care when transporting the machine to avoid tipping the machine over.
- DO NOT operate in a wet/damp environment.
- Locate your air compressor on a firm, flat surface with AVMs and ensure an adequate supply of clean air is available to the pump unit.
- The cylinder head and delivery pipes of your compressor become quite hot during operation.
- DO NOT touch. After switching off, remember to leave an adequate cool-down period before touching.
- Ensure that any equipment/tool used in conjunction with your compressor has a safe working pressure exceeding the output pressure of the machine.
- NEVER let people use it unless they have had the necessary training.
Installation
- Select a firm and level site and use of floor mountings for stationary compressors with anti-vibration pads. (Do not bolt machines directly to the floor.)
- Select a dust and damp-free environment.
- Allow adequate ventilation for:• The air intake for the compressor pump.
- Cooling air for the compressor pump and electric motor.
- Allow sufficient access for servicing. A minimum clearance of 500mm must be allowed around the machine.
- The power cable from the main power supply must be adequate to carry the starting and running load of the electric motor. This is particularly relevant if the compressor is some distance from the source of the supply.
Electrical Connection
Connect the mains power lead through a suitably fused isolator to a 230 Volt (50Hz) electrical supply with a fuse rating as listed in the table below. See the wiring label on the power cable.
- All models must be run from the power supply stated below.
- Both XE29/270 and XE37/270 are supplied with a sequential direct online starter.
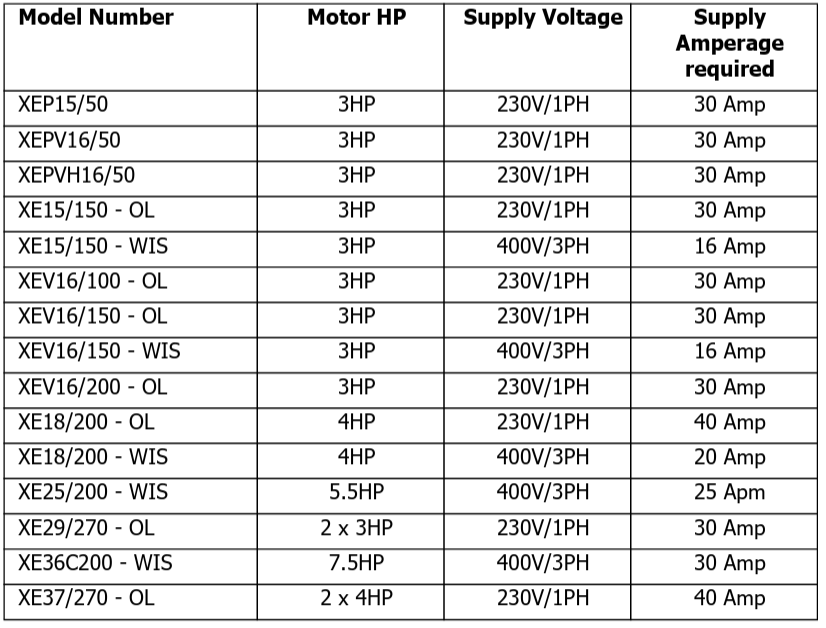
- WIS = Wired in starter
- OL = overload protection
Before Starting
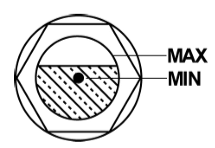
- Check the compressor pump oil level using (a) a dipstick (to the level marked) or (b) the sight glass.
- For lubrication of the pump, use Clarke compressor oil as indicated on the machine data plate.
- Check the Automatic Control:- Pressure switch ON/OFF switch is in the OFF position.
Starting the Compressor
- Switch on the mains power supply.
- Switch on the pressure switch (lift the knob or twist the switch).
- Check the rotation (Flywheel/Fan blows air over the pump)
- Check that the pressure does not exceed the maximum working pressure (stamped on the n machine data plate).
- If the pressure exceeds the maximum working pressure stated, stop the machine (see below), vent the system, and contact the Clarke Service Department.
Stopping Compressor
- Switch off at the pressure switch (Push the knob down or turn the switch).
- Isolate from the power supply.
- Drain the air receiver (release the drain tap).
General Arrangement
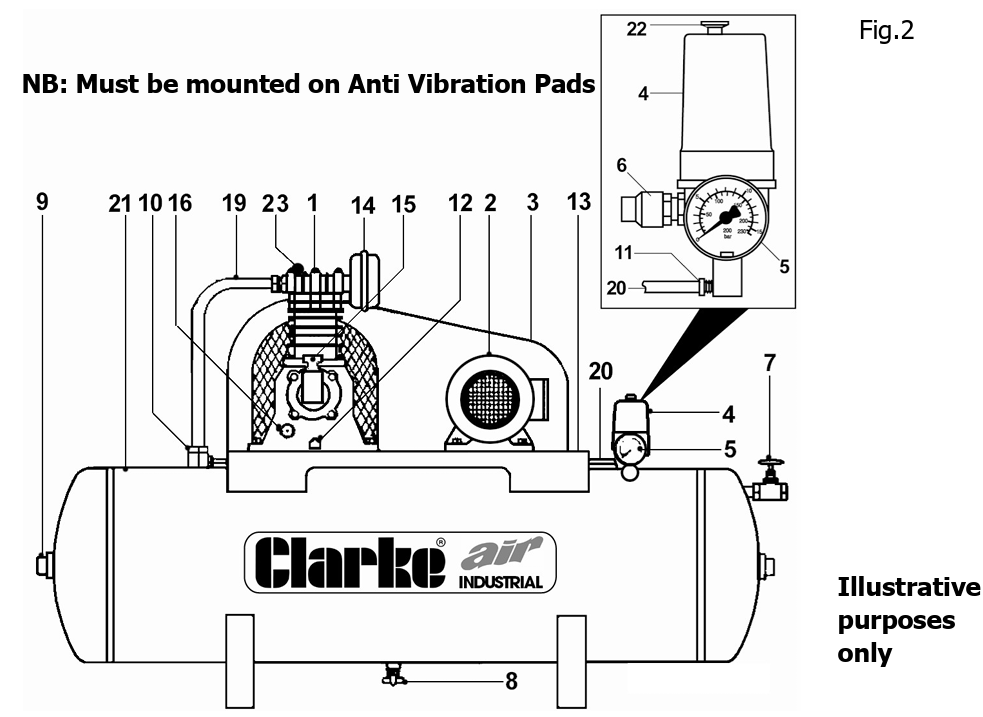
- Air Compressor Pump
- Electric Motor
- Wire Guard
- Pressure Switch
- Pressure Gauge
- Safety Valve
- Ball Valve
- Drain Tap
- Inspection Plug
- Non-return Valve
- Air Bleed Valve
- Oil Drain Plug
- Saddle
- Air Intake Filter
- Oil Filler/Breather
- Oil Level Sight Glass
- N/A
- N/A
- Air Delivery
- Air Bleed Pipe
- Air Receiver
- On/Off switch
- Auto Air Bleed
Pressure Adjustment
Portable Compreesors
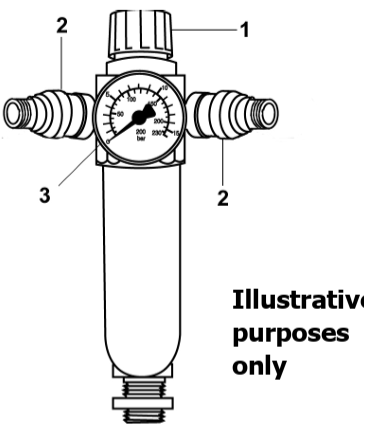
- Pressure-adjusting knob
- Outlet taps
- Pressure gauge
Adjust the Pressure
To increase pressure – turn the knob (1) clockwise. To decrease pressure – turn the knob (1) anti-clockwise. Outlet taps – slide the knurled section (2) away from the body to open and push towards the body to close.
Stationary Compressor
These machines are not supplied with the facility to adjust outlet pressure. A comprehensive range of airline accessories is available from your local CLARKE stockist.
Overload Button
The electric motor is fitted with an automatic overload detector, which will stop the motor if an overload is detected.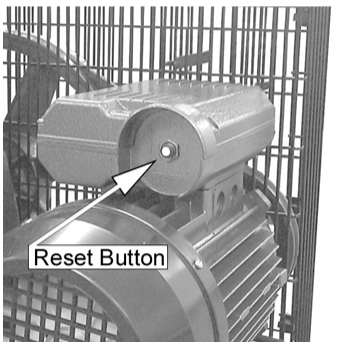
- SWITCH OFF THE PRESSURE SWITCH (Push the knob down or turn the switch off).
- Allow the compressor to cool down for 5-10 minutes.
- Press the Reset button shown on the right.
- Switch on the pressure switch (lift knob or twist switch).
If the overload trips repeatedly, it may indicate a fault with the compressor. In this cas,e you should contact the Clarke service department.
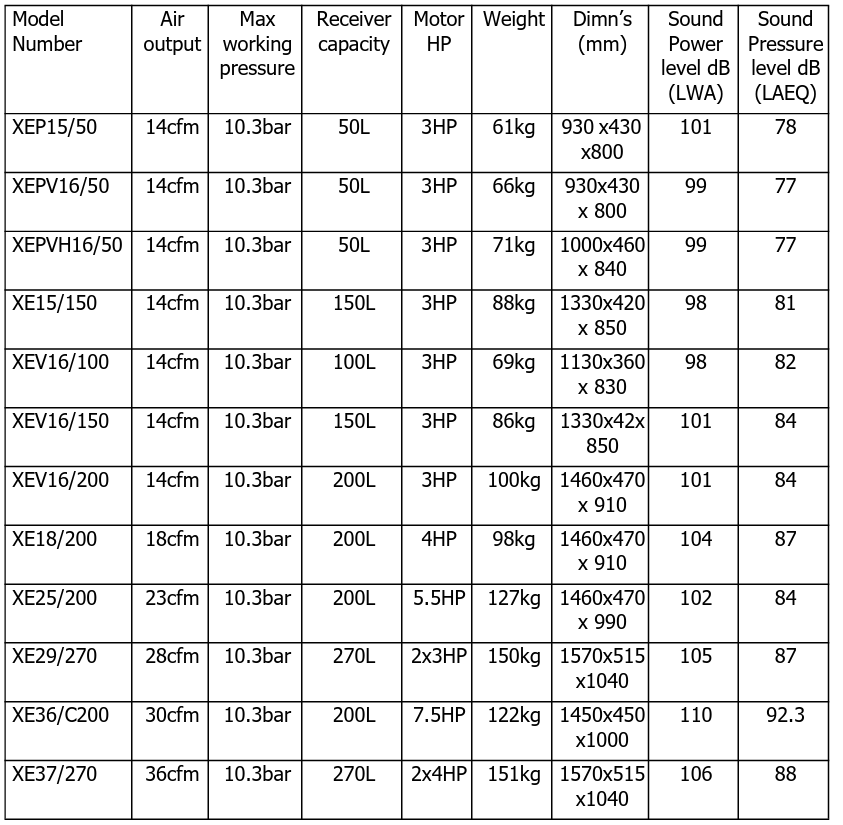
Models Covered
Residual Risk
Although this manual contains extensive safety warnings and information on the safe operation of your compressor, every tool does have certain residual risks that cannot be completely excluded with warnings or safety devices. This compressor must therefore always be operated with caution.
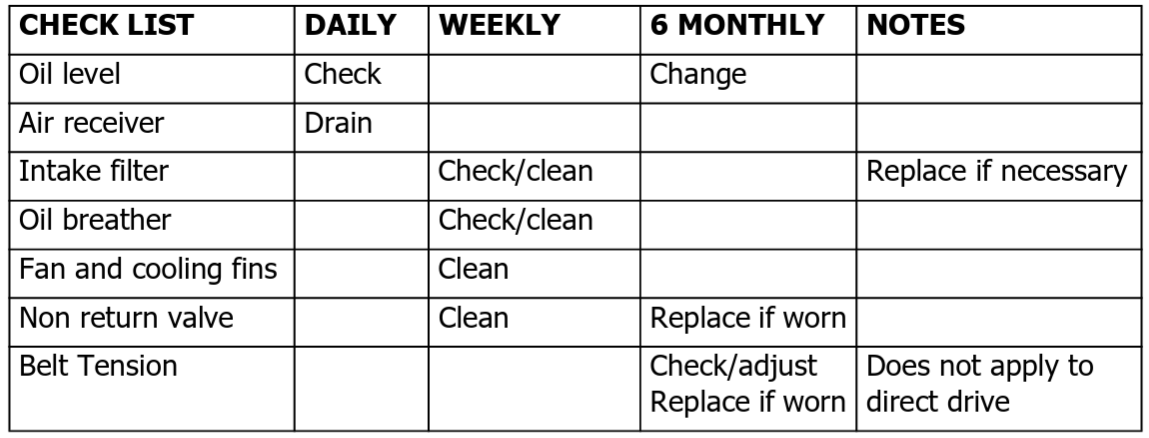
Maintainance
Other Products
In addition to Air Compressors from 3–40 cfm, we offer a vast range of air tools and airline equipment. Please ask your local dealer for details of our range or a copy of our Power Products Catalogue.
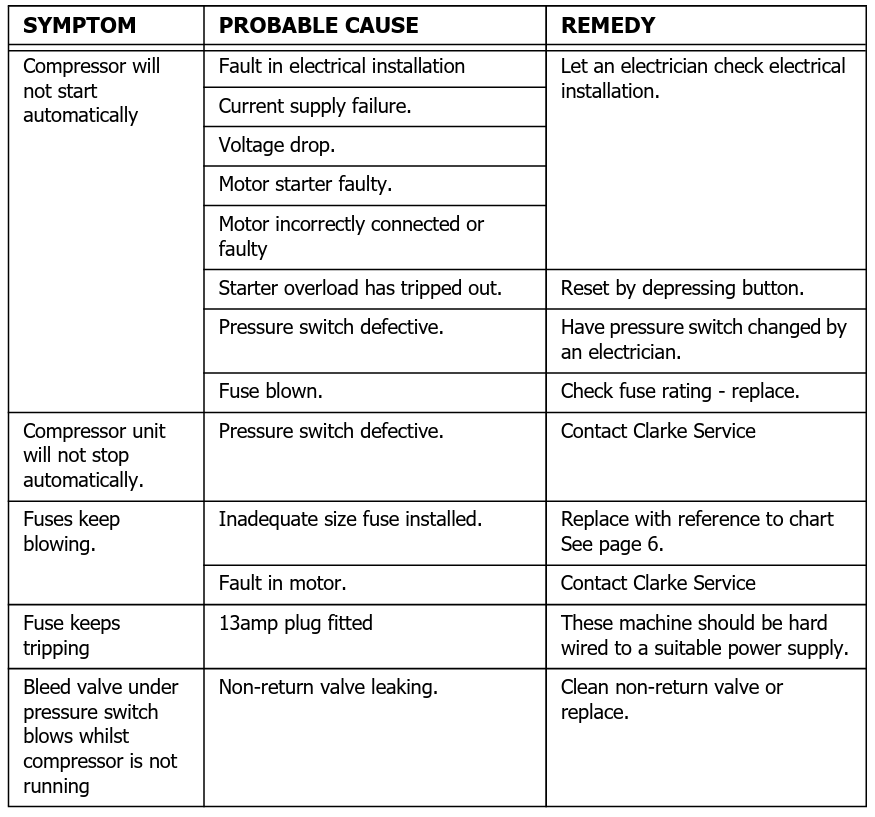
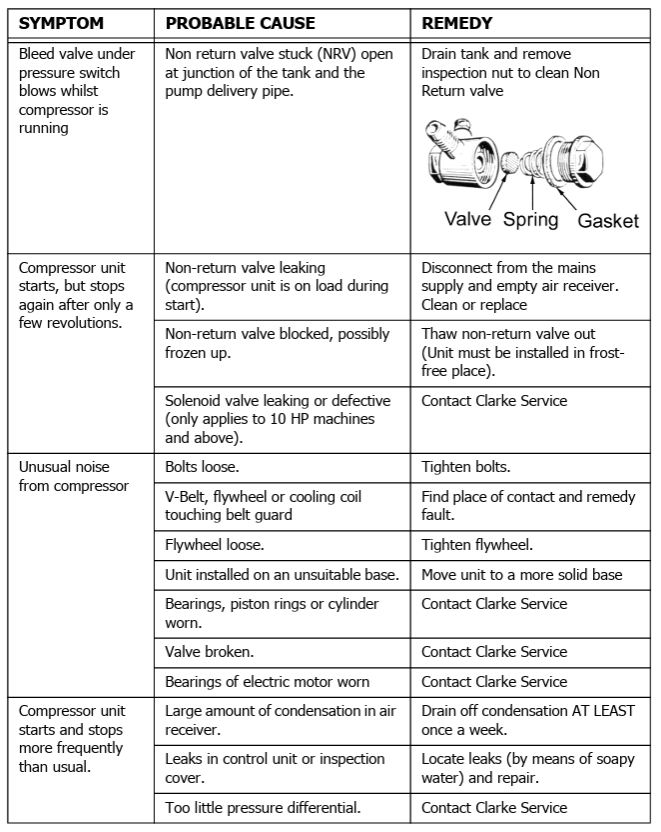
Troubleshooting
- Any remedial work that may be required must be carried out by a qualified electrician/engineer.
- Disconnect from the mains power supply before removing any parts from the compressor.
- Empty the air receiver of air before dismantling any part of the compressor unit’s pressure system.
- If your compressor develops a fault, do not use e until the fault has been rectified.
Guarantee
This product is guaranteed against faulty manufacture for a period of 12 months from the date of purchase. Please keep your receipt, which will be required as proof of purchase. This guarantee is invalid if the product is found to have been abused or tampered with in any way, or Clarke DL07 XE RANGE Air Compressor not used for the purpose for which it was intended. Faulty goods should be returned to their place of purchase; no product can be returned to us without prior permission. This guarantee does not affect your statutory rights.
Environmental Protection
Through the purchase of this product, the customer is taking on the obligation to deal with the WEEE in accordance with the WEEE regulations in relation to the treatment, recycling & recovery and environmentally sound disposal of the WEEE.
Customer Service
- Tel: 0208 988 7400
- Website: parts@clarkeinternational.com
- Visit: service@clarkeinternational.com
FAQs
What is the power rating of the Clarke DL07 XE RANGE air compressor?
With a typical motor output of 2 to 3 HP, the DL07 XE RANGE is appropriate for a variety of industrial and workshop air tools.
What is the tank capacity of this compressor?
Depending on the specific model, the tank size of this model ranges from 50 to 100 litres, offering consistent storage of compressed air.
What kind of maintenance does the compressor require?
Check and replace the compressor oil regularly, drain the tank of condensation every day, examine and clean the air filter, and make sure the safety valves are operating correctly.
How often should I drain the moisture from the tank?
To keep the air clean and stop rust, empty the tank every day or after every usage.
What type of oil should I use for this compressor?
Use premium compressor oil, usually SAE 10W-30 or similar, as advised by the handbook to guarantee optimum performance and longevity.
How do I check the pressure settings on the compressor?
Keep an eye on the unit’s tank and controlled output pressure gauges. To set the output pressure you want for your tools, turn the regulator knob.