
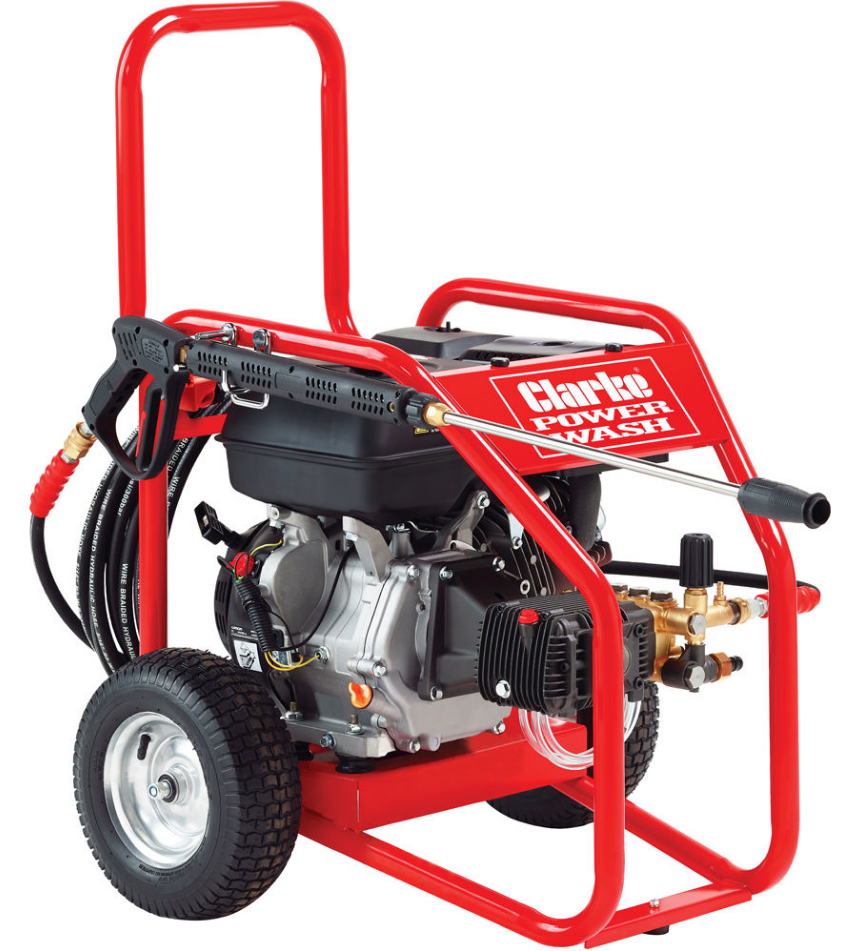
Clarke PLS265B Petrol Power Washer
Introduction
Thank you for purchasing this CLARKE Petrol Power Washer. Before attempting to use this product, please read this manual thoroughly and follow the instructions carefully. In doing so, you will ensure the safety of yourself and that of others around you, and you can look forward to your purchase giving you long and satisfactory service.
Safety Instructions
- DO NOT point the spray at other people, animals, electrical equipment or the machine itself.
- DO NOT hold your finger over the high-pressure nozzle.
- DO NOT let children or untrained personnel use this machine.
- DO NOT try to repair this machine. Always refer to your CLARKE service department for all repairs.
- DO NOT supply any liquid other than water to the water inlet.
- DO NOT use the detergent pickup facility to introduce flammable liquids/solvents, e.g. paint thinners, petrol, oil, as there is a risk of explosion.
- ALWAYS release the remaining pressure in the system; turn off the water supply and operate the trigger before you remove hoses or accessories.
- ALWAYS keep the machine dry and away from the water spray.
- ALWAYS use protective clothing and safety glasses. Loose particles and other items can be propelled at high speed by the water spray.
- ALWAYS hold the gun securely & expect it to ‘kick’ when you pull the trigger.
- ALWAYS respect the requirements of the local water company. Pressure washers may only be connected to the mains water supply if a system separator (also known as a backflow preventer) is installed in the supply hose.
- ALWAYS disconnect from the water supply, and make sure that you drain the system when not in use. Keep in a cool, dry location.
Unpacking
Unpack your power washer and check to ensure the following items are present. Contact your Clarke dealer immediately if any parts are missing or damaged.
- Petrol Driven Power Washer
- Delivery Hose c/w fittings
- Suction Hose c/w fittings
- Detergent Hose c/w Filter
- Gun/Lance Assembly
- 2 x Axles c/w fixings Assemblies
- Hose/Lance Storage Bracket c/w fixings
- 2 x Rubber Feet c/w fixings
- Gun Assembly
- Spark Plug Box Spanner
- Spark Plug Box Spanner
- Tommy Bar
- Instruction Manual
- Engine User Manual
- 2 x Wheels/ Pneumatic Tyre
Symbols

Overview
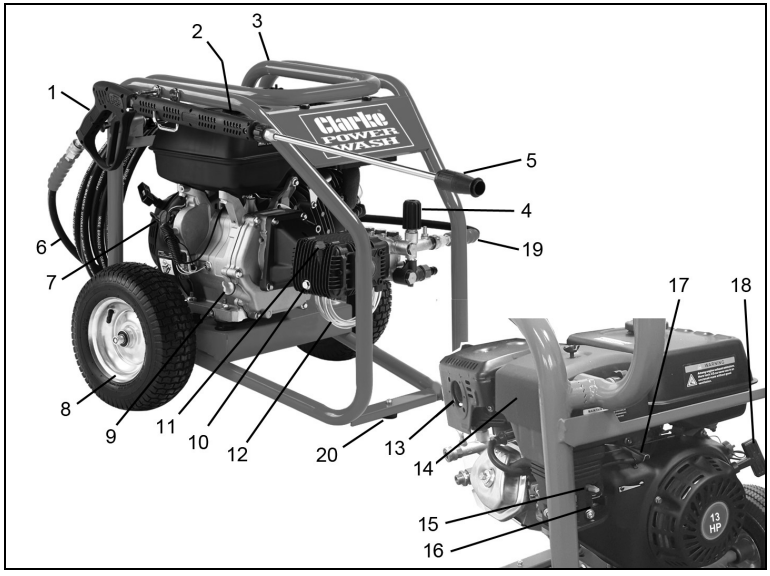
Description
- Gun/lance
- Fuel Filler
- Foldable handle
- Pressure regulator
- Adjustable nozzle
- High-pressure delivery hose
- On/Off Switch
- Wheel/tyre assembly
- Engine oil filler
- Pump oil drain
- Pump oil filler
- Chemical (detergent) hose
- Exhaust muffler
- Air filter housing
- Fuel Shut-off Valve
- Choke
- Throttle
- Engine starter
- Suction (feed) hose
- Rubber foot
ASSEMBLY
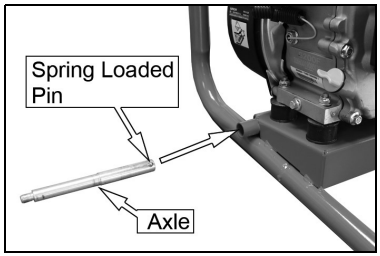
The Wheels
- Insert the axle as shown.
- Rotate the axle so that the spring-loaded pin pops through the hole on the frame.
- Fit the wheels to the axles and secure with the locking nut supplied.

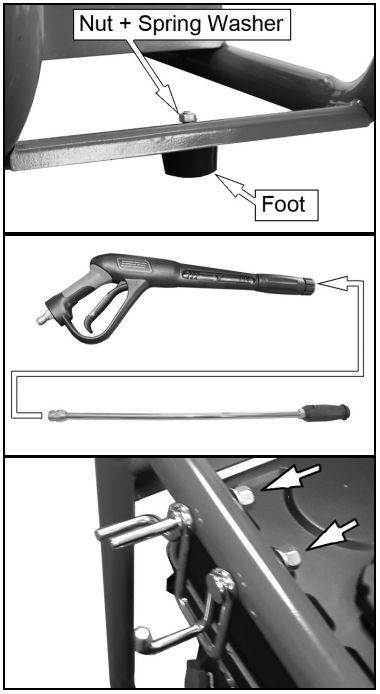
Rubber Foot
- Fit the rubber foot as shown.
- Secure with the nut and spring washer supplied.
The Lance
- Connect the spray wand to the lance and tighten securely.
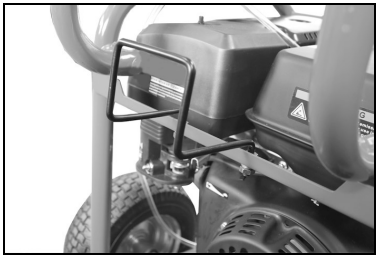
Storage Bracket
- Fit the bracket into the position shown and secure using the washers and nuts supplied.
High-Pressure Hose
- Slide the connector on the hose backwards.
- Push the gun into the connector.
- Release the connector.
- Make sure the connection is secure.

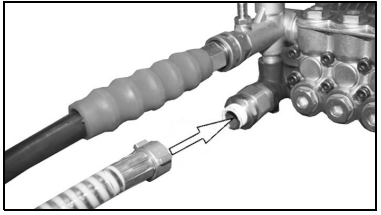
Power Pressure
- Slide the connector on the power washer towards the machine.
- Push the hose into the connector.
- Release the connector.

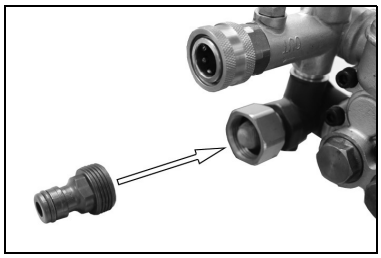
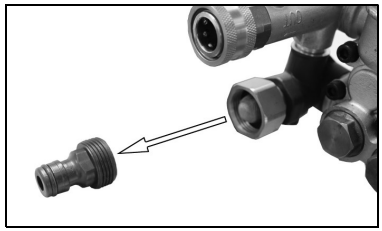
Inlet Water
- Remove the travel cap if fitted.
- Fit the hose adaptor as shown.
- Connect the water supply hose to the hose adaptor.
Hose Bracket
- Screw a nut and washer onto each leg of the hose bracket.
- Fit the hose bracket in place and secure using a washer, spring washer and nut.

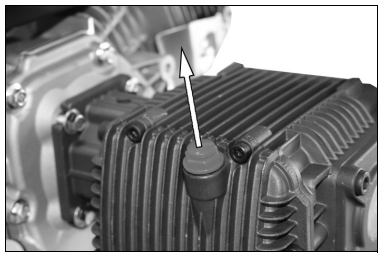
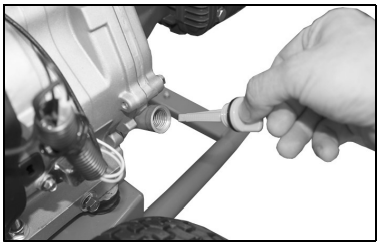
Remove the Plug
- Use a 17mm spanner to remove the red travel plug.
- Inside the small bag attached is an oil breather plug, which needs to be fitted in its place.
- The oil breather plug must only be inserted hand-tight.
- The oil breather plug must only be inserted hand-tight.
Before Use
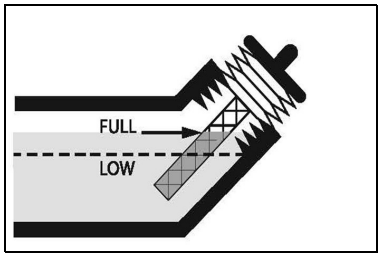
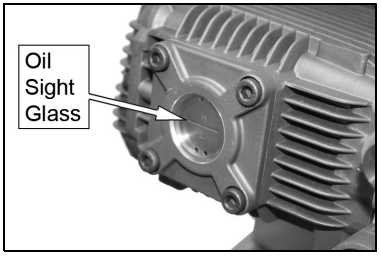
Oil Level
- Look at the sight glass on the pump to check the oil level inside.
- The oil should be halfway up the sight glass.
- Top up if required. See “Changing the Pump Oil” on page 16.
- We recommend the use of 10WSAE30 oil in this pump.

Checking Level
- Turn the oil filler cap/dipstick anticlockwise and remove it from the oil filler tube.
- Wipe the oil filler cap/dipstick with a clean cloth.
- Insert the oil filler cap/dipstick back into the oil filler tube and then remove it again. DO NOT screw it in when doing this.
- If the oil is low, fill the oil reservoir to the edge of the oil filler hole.
- We recommend the use of 10WSAE30 oil in the engine.
- Replace the oil filler cap.
Fuel Level
- To check the fuel level, remove the fuel tank cap.
- Just inside the fuel tank is a fuel strainer. Check this filter periodically and remove any contaminants which may have accumulated.
- Refuel in a well-ventilated area before starting the engine. If the engine has been running, allow it to cool. Refuel carefully to avoid spilling fuel. DO NOT fill above the fuel strainer shoulder.
- After refuelling, replace the fuel filler cap securely.
Recommended Fuel
Use unleaded petrol with an octane rating of 86 or higher. DO NOT overfill.
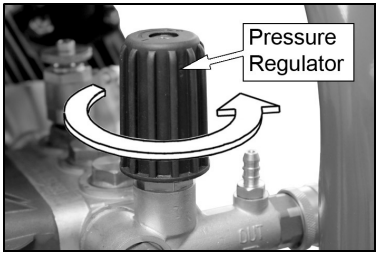
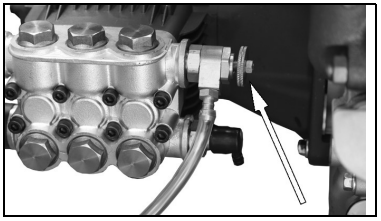
Pressure Regulator
When supplied, the pressure regulator may be set to a minimum. Turn the pressure regulator on the pump fully clockwise to allow water pressure to build up when the pressure washer is running. If you find the pressure is too high, you can adjust this later by turning the regulator counterclockwise.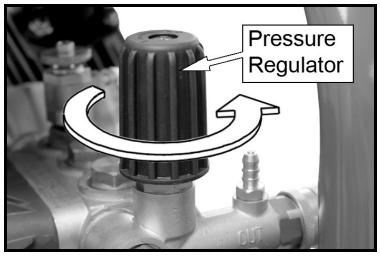
Design Features
Bypass mode: In bypass mode, the pump recirculates the water because the trigger of the spray gun is not being pulled. If the unit is left in bypass mode for more than two minutes, the water temperature will rise to a dangerous level and could damage internal components of the pump.
Thermal Relief Valve: In an effort to prevent damage, pumps are equipped with a thermal relief valve. This valve will open when the temperature inside the pump becomes too high. The valve will then release a gush of water to lower the temperature inside the pump. Immediately after this occurs, the valve will close.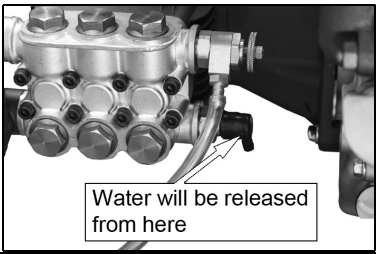
Getting Started
Prior to starting, refer to your engine manual for proper starting procedures for your engine type.
- Make sure the engine has sufficient fuel.
- Check the engine oil level.
- Turn the water supply on.
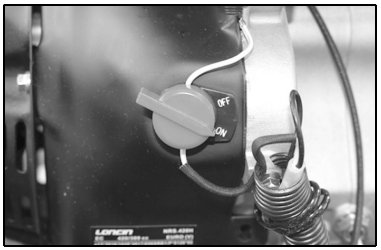
- Set the engine switch to ‘ON’.
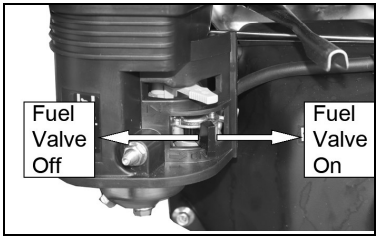
- Set the fuel valve lever to the ‘ON’ position.
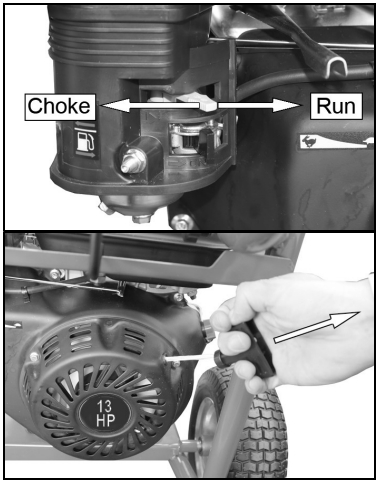
- If you are starting the power washer ‘cold’, set the choke lever to the CHOKE position (left). If the power washer is warm, skip this step.
- Set the throttle to the 1/3rd of the way towards the fast setting.
- Pull the starting handle lightly until you start to feel resistance, and then pull up sharply to start the power washer.
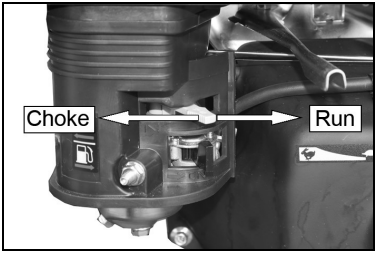
- Once the engine has warmed up, set the choke lever to the ‘RUN’ (right) position. If the engine does not start after two pulls, pull the trigger on the gun to relieve the pressure.
Power Washer
- Pull the trigger on the gun to start the water flow.
- Stand on a stable surface and grip the gun/spray wand firmly with both hands.
- Expect the gun to kick when the trigger is pulled.
- Release the trigger to stop water flow.
Adjusting the Spray
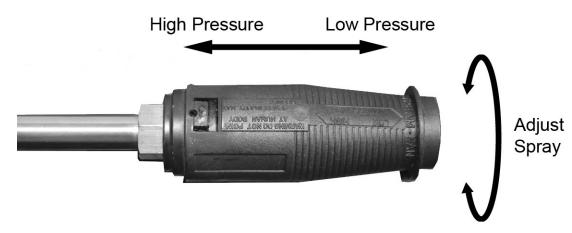
The nozzle is adjustable to allow you to change the spray from a narrow jet of water to a wide spray. To adjust the nozzle, proceed as follows.
- Hold the shaft of the spray wand in one hand.
- Twist the nozzle with the other hand.
- To vary the spray between narrow and wide, turn the nozzle counter-clockwise through a half-turn.
- Slide the nozzle forward for low pressure and backwards for high pressure.
Adjusting the Pressure
There are 4 ways to adjust the pressure.
- Adjust the pressure regulator on the pump. Turn the pressure regulator knob counterclockwise to lower the pressure.
- Once you have finished using your power washer, return the pressure regulator to its original position.
- Back away from the surface to be cleaned. The further away you are, the less the pressure will be on the surface being cleaned.
- Reduce the speed of the engine (RPM). Slow the engine down, and the water pressure will also go down.
- Adjust the spray to a wider angle.
- Slide the nozzle forward for low pressure and backwards for high pressure.
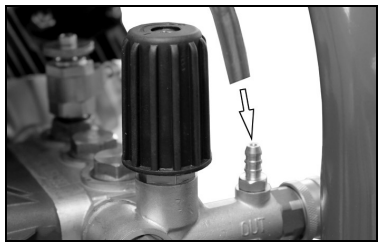
Applying the Detergents
- Push the detergent hose onto the ridged fitting as shown.
- Place the other end of the detergent hose with the filter on it into a container holding the chemical/ cleaning solution.
- Slide the nozzle forward for low-pressure operation.
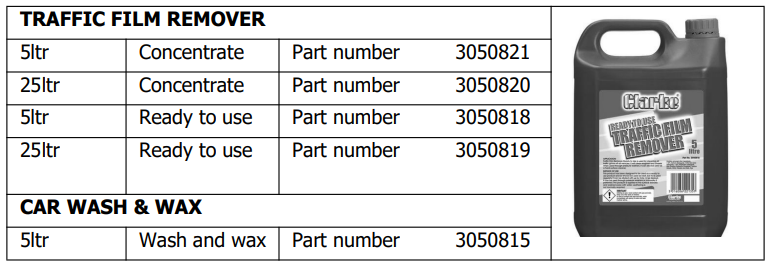
- The following products are available from your CLARKE dealer.
Water Connection
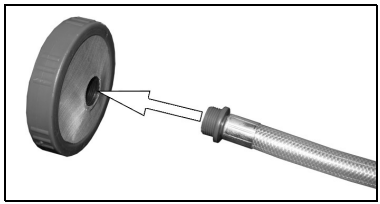
This machine can draw its water, meaning you can use water not under pressure, such as rainwater collected in a water butt. To do this, you must carry out the following procedure.
- Attach the filter to the end of the pipe supplied.
- Place the filter into the water butt.
- Remove the hose adaptor and replace it with the inlet connector supplied.
- Connect the pick-up pipe to the pressure washer as shown.
- Tighten securely.
- Twist open the suction valve shown.
- Start the power washer.
- Water is ejected from the nozzle.
- When the water spray being ejected is consistent Clarke PLS265B Petrol Power Washer and at high pressure, close the suction valve.
- Use the pressure washer as normal. DO NOT let the pressure washer run dry
Shutting Down
- After each use, if you have applied detergents, place the detergent hose into a container of clean water and run clean water through the detergent injection system to flush the system thoroughly.
- Set the engine switch to ‘OFF’.
- Turn the water supply off.
- Pull the trigger on the spray gun to relieve any water pressure.
- See the storage section in this manual for proper storage procedures on page 20.

MAintainace
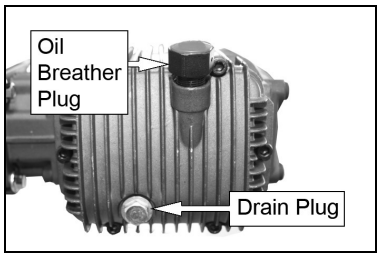
The oil should be changed after the first 30 hours of use and then every 100 hours.
- Unscrew and remove the oil filler cap/breather plug.
- Place an oil collection tray (not supplied) under the drain plug.
- Unscrew the drain plug and allow the used oil to drain from the crankcase into the oil collection tray.
- Replace the drain plug and its ring seal.
- With the power washer in a level position, fill to Clarke PLS265B Petrol Power Washer the centre of the sight-glass with the recommended oil.
- Replace the oil filler cap.
Changing Oil
- Refer to the information in the engine user manual supplied.
Cleaning
If the nozzle becomes partially clogged or restricted by dirt or other foreign material, excess pump pressure may develop. Clean the nozzle immediately by following the instructions below.
- Shut off the power washer and turn off the water supply.
- Pull the trigger on the gun handle to relieve Clarke PLS265B Petrol Power Washer any water pressure.
- Disconnect the lance from the gun.
- Remove any obstructions and back-flush with clean water.
- Direct the water supply into the spray wand end for 30 seconds to back flush loosened particles.
- Reconnect the spray wand to the gun and turn on the water supply.
Water Inlet
- The water filter should be checked regularly and cleaned if necessary.
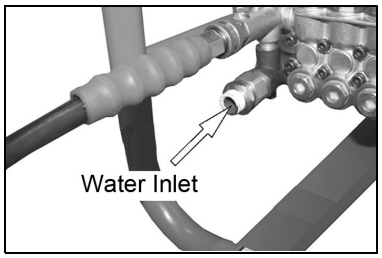
- Remove any fittings from the water inlet.
- Remove the water filter from the water inlet.
- Clean the filter by flushing it with water on both sides
- Replace the water filter.

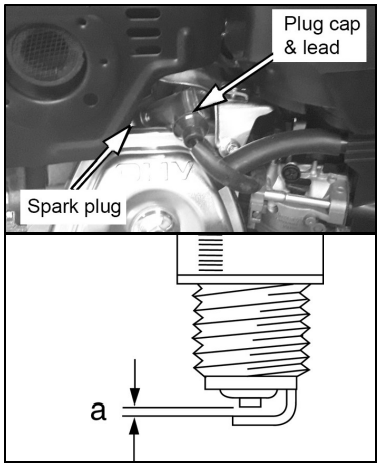
Spark Plug
- Remove the spark plug cap from the spark plug.
- Use the supplied spark plug spanner to remove the spark plug.
- Remove any carbon that has accumulated around the electrode.
- Check the spark plug gap (a) and adjust if necessary.
- It should be between 0.7 and 0.8 mm.
- Check the overall condition of the spark plug and replace it if poor.
- Reinstall the spark plug and refit the spark plug cap.
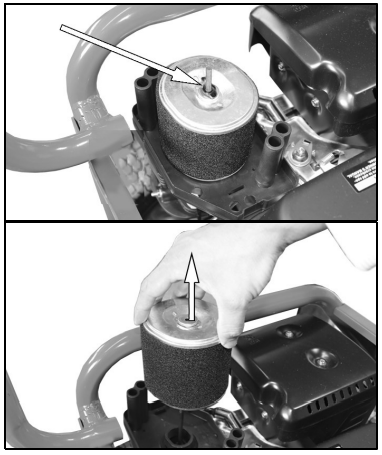
Air Filter
- Remove the wingnut and remove the air filter cover.
- Remove the second wingnut shown.
- Remove the air filter element.
- Make sure that the air filter is clean and not damaged.
- If the air filter is damaged, contact the CLARKE spare parts department for a replacement.
- If the filter is dirty, wash it in a solution of warm water Clarke PLS265B Petrol Power Washer and mild detergent and rinse thoroughly.
- Leave the filter to dry completely before immersing Clarke PLS265B Petrol Power Washer the filter in clean engine oil and squeezing the filter to remove excess oil.
- Replace the filter and the air filter cover.

Storage
- Drain all water from the high-pressure hose, coil it and store it on the hose holder on the rear of the power washer.
- Drain all water from the spray gun and spray lance by holding the gun/lance vertically with the nozzle pointing down and pulling the trigger. Store in the holder on the side of the power washer.
- Store all other parts so that they are Clarke PLS265B Petrol Power Washer protected from damage.
- Protect the power washer from freezing conditions to prevent damage to the hoses, valves and pump.
Specifications
| Model Number | PLS265B |
| Part Number | 7330367 |
| Engine Model & Type | G390F, Petrol Air Cooled |
| Engine Power & Capacity | 13HP, 8.2kW, 3600rpm, 389cc |
| Starting System | Recoil |
| Fuel Capacity (Maximum) | 6.5 Litre |
| Emissions (CO, HC, NOx, HC+NOx, CO2) | 426.08, 4.88, 1.63, 6.51, 728.44 (g/kWh) |
| Max. Permissible Pressure | 225bar / 3263psi |
| Working Pressure (From Mains Supply) | 207bar / 3002psi |
| Working Pressure (From Barrel) | 200bar / 2900psi |
| Water Inlet Pressure Range | 3 – 6bar / 43 – 87psi |
| Max. Flow Rate (From Mains Supply) | 16.5L/min / 990L/hr |
| Working Flow Rate (From Mains Supply) | 16.5L/min / 990L/hr |
| Max. Flow Rate (From Barrel) | 15.1L/min / 906L/hr |
| Working Flow Rate (From Barrel) | 13.5L/min / 810L/hr |
| Water Type | Clean Cold Water |
| Ambient Operating Temperature | 400C (1040F) |
| Input Water Temperature | 10C (340F) – 600C (1400F) |
| Water Supply Hose Diameter | Suitable Snap Connector – 1/2” or 3/4” Hose |
| Water Supply Suction Depth | Less Than 1m |
| Detergent Hose Length | 1.5m |
| High-Pressure Hose Length | 10m |
| Sound Pressure Level (LPA) | 93dB |
| Sound Power level (LWA) | 107dB |
| Guaranteed sound power level (LWA) | 108dB |
| Sound Uncertainty Factor K | 1.3dB |
| Vibration (Main Handle/Support Handle) | Less than 2.5m/s2 |
| Uncertainty Factor | 1.5m/s2 |
| Max. Dimensions (L x W x H) | 1050mm x 700mm x 978mm |
| Weight | 62.75kg |
Component Parts
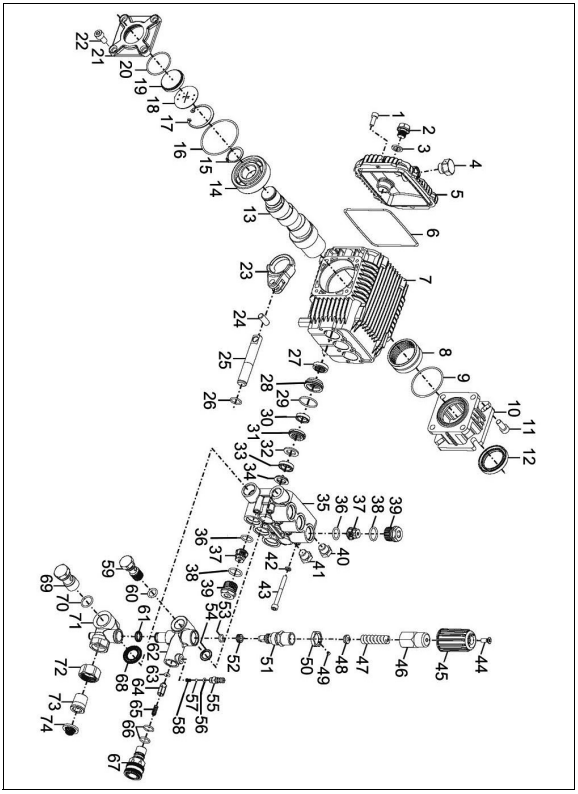
Part List
| 1 | Bolt M6x16 | 38 | O-ring (valve cap) | |
| 2 | Oil Drain Plug | 39 | Check valve cap | |
| 3 | O-ring | 40 | Manifold outlet plug | |
| 4 | Vented Oil Cap | 41 | Thermal relief valve | |
| 5 | Crankcase Cover | 42 | Washer | |
| 6 | Gasket | 43 | Socket bolt M6x55 | |
| 7 | Crankcase | 44 | Screw | |
| 8 | Needle Bearing | 45 | Regulator hand grip | |
| 9 | O-ring | 46 | Regulator adjusting knob | |
| 10 | Flange | 47 | Spring | |
| 11 | Bolt | 48 | Spring seat | |
| 12 | OIl Seal | 49 | Screw, jam nut | |
| 13 | Crankshaft | 50 | Jam nut | |
| 14 | Ball Bearing | 51 | Valve body | |
| 15 | Scrap ring | 52 | Valve seat | |
| 16 | O-ring | 53 | O-ring | |
| 17 | Circlip | 54 | Gasket | |
| 18 | Oil Level Plate | 55 | Detergent injector fitting | |
| 19 | Oil Sightglass | 56 | O-ring -injector fitting | |
| 20 | O-ring | 57 | Ball – injector fitting | |
| 21 | Crankshaft cover | 58 | Spring – injector fitting | |
| 22 | Bolt M8 x16 | 59 | Water outlet banjo bolt | |
| 23 | Connecting rod | 60 | O-ring | |
| 24 | Pin | 61 | O-ring | |
| 25 | Ceramic-coated plunger | 62 | Unloader valve housing | |
| 26 | O-ring | 63 | O-ring | |
| 27 | Oil seal | 64 | Outlet checking valve | |
| 28 | Locating ring | 65 | Spring – outlet checking valve | |
| 29 | Locating O-ring | 66 | O-ring – outlet fitting | |
| 30 | Low-pressure water seal | 67 | Quick disconnect outlet fitting | |
| 31 | Compression ring | 68 | Gasket – bypass housing | |
| 32 | Compression Seal | 69 | Water inlet banjo bolt | |
| 33 | High-pressure water seal | 70 | O-ring – inlet banjo bolt | |
| 34 | Supporting ring | 71 | Bypass housing | |
| 35 | Manifold | 72 | Swivel nut – inlet connector | |
| 36 | O-ring (check valve) | 73 | Body – inlet connector | |
| 37 | Check valve | 74 | Filter washer – inlet connector |
Frame & Accessory Parts
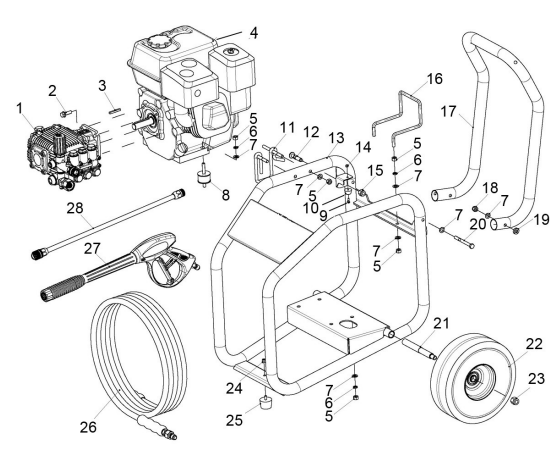
- Pump assembly
- Bolt
- Key
- Engine assembly
- Nut
- Spring washer
- Plain washer
- Rubber foot (engine)
- Bolt
- Rubber Pad
- Lance support bracket
- Pull Pin
- Frame
- Nut
- Nut
- Hose support bracket
- Handle
- Nut
- Spring washer
- Bolt
- Axle
- Wheel
- Nut
- Nut
- Rubber foot – (frame)
- High-Pressure Hose
- Gun
- Lance
Troubleshooting
If the following does not solve your problem, please contact the CLARKE service department.
| PROBLEM | CAUSE | SOLUTION |
| The engine will not start (see engine manual for further engine troubleshooting | No fuel | Add fuel. See page 10. |
| Low oil | Add oil. See page 16. | |
| Pressure builds up after two pulls on the recoil starter or after initial use | Squeeze the gun trigger to relieve the pressure | |
| Spark plug wire not attached correctly | Attach the spark plug wire | |
| The engine switch is in the OFF position | Set the engine switch to the ON position | |
| The choke lever is set to the choke position with the engine warm | Set the choke lever to the NO CHOKE position | |
| Fuel valve closed | Open the fuel valve | |
| Lack of pressure (initial use) | The water supply is not adequate | Make sure your water supply can deliver 5 gallons per minute at 20psi |
| Leak in the high-pressure hose fitting | Tighten the fitting, use sealant tape if required | |
| The nozzle is obstructed | Clear the nozzle | |
| The water filter screen is clogged | Remove and clean the filter | |
| Defective E-Z start valve | Have it replaced by your dealer | |
| Air in the supply hose | Turn off the engine Turn off the water supply, Disconnect the water supply from the pump inlet and turn on the water to expel the air from the hose. When all the air has been removed, turn off the water supply and reconnect the hose. Turn on the water supply and pull the trigger to expel any air in the gun/wand. |
Guarantee
This product is guaranteed against faulty manufacture for 12 months from the date of purchase. Please keep your receipt, which will be required as proof of purchase. This guarantee is invalid if the product is tampered with in any way or not used for the purpose for which it was intended. Faulty goods should be returned to their place of purchase; no product can be returned Clarke PLS265B Petrol Power Washer to us without prior permission. This guarantee does not affect your statutory rights.
Environmental Recycling
One of the most damaging sources of environmental pollution is oil products. Never throw away used oil with domestic refuse or flush it down a sink or drain. Collect any oil in a leak-proof container and take it to your local waste disposal site. Should any components become Clarke PLS265B Petrol Power Washercompletely unserviceable and require disposal, plastic and metal should be disposed of according to local regulations.
Customer Service
- Tel: 0208 988 7400
- Website: parts@clarkeinternational.com
- Visit: service@clarkeinternational.com
FAQs
What type of engine powers the Clarke PLS265B power washer?
Without requiring an electrical outlet, the PLS265B’s gasoline-powered 4-stroke engine provides excellent mobility and cleaning capabilities.
What is the maximum pressure output of the PLS265B?
With a maximum pressure of 2650 PSI (pounds per square inch), this power washer is ideal for difficult cleaning tasks, including cars, patios, decks, and driveways.
Can I use the PLS265B with hot water?
No, the PLS265B is only intended for use with cold water. The internal seals and pump parts may sustain damage if hot water is used.
What kind of fuel should I use?
Only clean, unleaded gasoline (gasoline) with an octane level of at least 87 should be used. Ethanol blendsof more than 10% (E10) should not be used since they could damage the engine.
How often should I change the engine oil?
After the first five hours of use (the break-in time), then every 25 to 50 hours, or at least once a season, change the oil.
Does the PLS265B have a detergent tank or a soap applicator?
Yes, it has a mechanism that uses suction to apply cleaning agents. Adhere to dilution instructions and use only detergents that are safe for pressure washing.
How do I adjust the spray pattern or pressure?
Control the spray pattern and intensity by adjusting the supplied quick-connect nozzle tips, which are normally 0°, 15°, 25°, 40°, and soap. For sensitive surfaces, use broader angles.
Can I run the power washer continuously?
Steer clear of extended continuous operation. To prolong the life of the motor and pump, operate in cycles and let the engine cool down in between uses.