
Clarke VE15C150 Vertical Air Compressor
 Introduction
Thank you for purchasing this CLARKE Vertical Air Compressors. Read this manual fully before use and follow the instructions carefully. In doing so, you will ensure the safety of yourself and those around you, and you can look forward to your purchase giving you long and satisfactory service.
Safety Instructions
- Compressed air is dangerous. DO NOT point a jet of air at persons or animals, and DO NOT discharge compressed air against the skin.
- DO NOT operate your compressor with the guard removed.
- DO NOT leave pressure in the receiver overnight, or when transporting.
- DO NOT adjust or tamper with the safety valves. The maximum pressure is factory-set and marked on the compressor.
- DO NOT operate in wet conditions. Keep the compressor dry at all times. Similarly, clean air will allow the compressor to work efficiently. DO NOT use in dusty or otherwise dirty locations.
- Some of the metal parts can become quite hot during operation. DO NOT touch/ remove these until the compressor has cooled down.
- ALWAYS set the pressure regulator to the recommended setting for the tool.
- When spraying flammable materials, e.g. cellulose paint, ensure that there is sufficient airflow and keep clear of any source of ignition.
- Before spraying any material, always consult the paint manufacturer’s instructions for safety and usage.
- Protect yourself. Goggles will protect your eyes from flying particles. A face mask will protect you against paint spray and fumes.
- Ensure that all individuals using the compressor have received the necessary training and have read and fully understood these operating instructions.
- Make sure that any equipment or tool used in conjunction with your compressor has a safe working pressure exceeding that of the compressor.
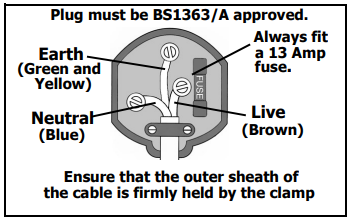
Electrical Connection
The BLUE wire must be connected to the terminal marked ‘N’ or coloured black.
- The BROWN wire must be connected to the terminal which is marked L or coloured red.
- The YELLOW AND GREEN wire must be connected to the terminal which is marked E or coloured green.
Before Use
- Set the ON/OFF switch to the OFF position (pushed down).
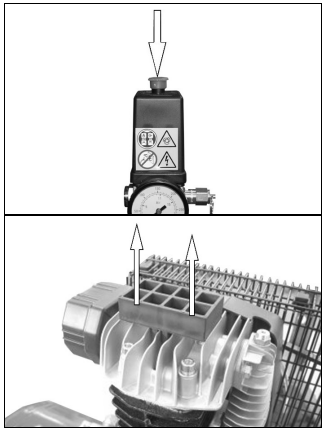
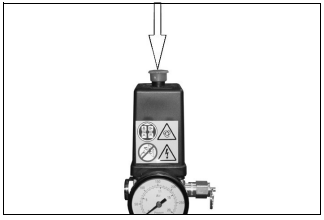
- If fitted, remove the protective plastic moulding from the top of the cylinder head.
- Make sure that the supply voltage matches the voltage shown on the data label.
- Make sure that the compressor is on firm level ground.
- This compressor must be secured to the ground through the feet using suitable bolts and washers.
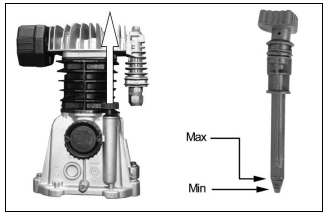
Oil Level
- Remove the dipstick from the oil reservoir.
- Ensure the oil level is between the min and max marks on the dipstick.
- Only use SAE30 compressor oil, available from your CLARKE dealer, Part No. 3050801
- Take care not to exceed the maximum mark.
Operation
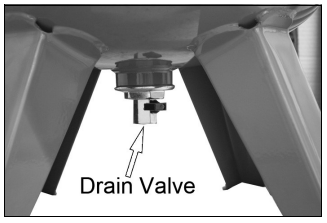
If the compressor has not been used for more than 24 hours, open the drain valve (on the bottom of the reservoir) and drain any condensate which has collected. See page 10.
Air Compressor
- Stop the compressor and disconnect it from the power supply before you move it.
- Always get assistance when lifting or moving this compressor, as its design means it is top-heavy.
- Do not lift by (or put strain on) valves or hoses.
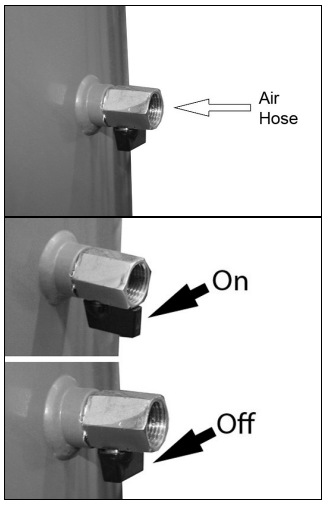
Air Tools
- Attach the air hose to the outlet valve.
- Attach the air tool to the other end of the air hose.
- Turn the outlet valve tap to the On position.
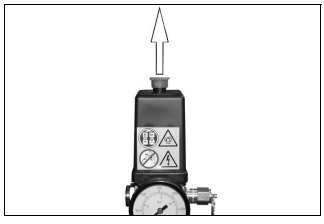
Compressor ON
- Plug the compressor into the power supply.
- Lift the On/Off button.
- The compressor will operate until the reservoir is fully pressurised. It will then shut down.
- The compressor will start up again when the pressure in the reservoir decreases.
Safet Valve
To make sure that the safety valve works correctly
- Pull on the ring attached.
- Air will be released when you pull on the ring and stop when you release it.
- If the valve does not operate in this way, do not use the compressor. The compressor must be repaired by a qualified service agent.
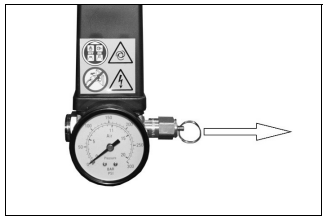
DO NOT REMOVE OR TRY TO ADJUST THE SAFETY VALVE.
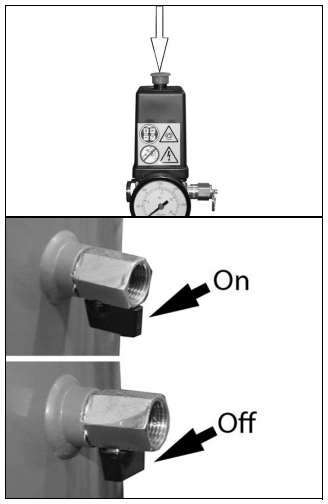
Removing Tools
- Push down on the On/Off button to stop the compressor.
- Turn the outlet valve handle to the off position.
- Operate the tool to depressurise the air hose.
- Disconnect the tool from the hose.
Compressor OFF
- Follow steps 1-4 in “Removing Tools From The Air Hose” above.
- Disconnect the compressor from the power supply.
- Slowly open the outlet valve to depressurise the reservoir.
- You will hear a hissing sound as the reservoir depressurises.
- Do not leave the compressor unattended if the reservoir is pressurised.
Draing The Reservoir
- Turn the compressor off and disconnect it from the power supply.
- Put a container below the drain valve to collect the condensate.
- The drain valve is located at the bottom of the reservoir
- Open the drain valve slowly.
- Condensation will drain from the Clarke VE15C150 Vertical Air Compressor reservoir.
- Close the drain valve when the reservoir has fully drained.
Reset
This compressor has a thermal overload device. 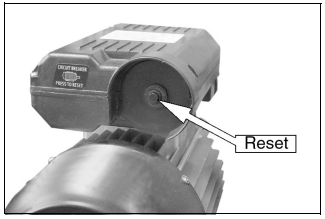
Maintainance
Ensure the oil level is between the min and max marks on the dipstick. See “Check the Oil level” on page 6 and top-up if necessary – (use Clarke SAE30 compressor oil, available from your local dealer).
After use, always open the drain valve to make sure that any condensate is drained off.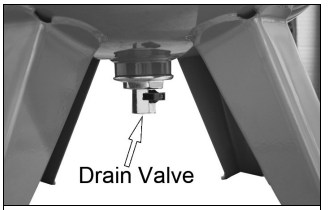
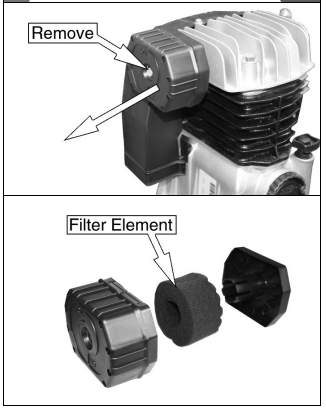
- Remove the securing bolt and pull the filter housing from the compressor.
- Unclip the front and rear of the filter and pull out the filter element.
- Clean the filter using a soft brush.
- Rinse and let the filter dry completely Clarke VE15C150 Vertical Air Compressor before refitting.
- Reassemble the filter and refit it to the compressor using the securing bolt.
Replacing the Oil
After the first 100 hours of use, replace the oil using Clarke SAE30 compressor oil. Then replace the oil after every 500hours of operation or every 6 months. To empty the oil from the machine, remove the oil drain plug from the crankcase.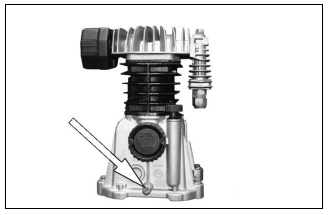
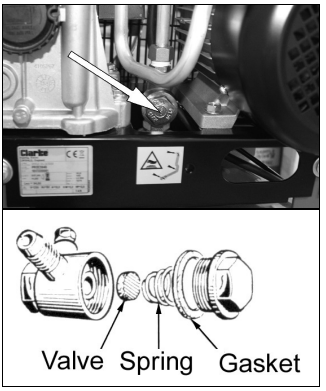
CHECK THE NON-RETURN VALVE (EVERY 6 MONTHS)
If the reservoir pressure decreases for no apparent reason, the nonreturn valve may be leaking. To check this:
- Make sure that the reservoir is not under Clarke VE15C150 Vertical Air Compressor pressure and the compressor is switched OFF.
- Examine the non-return valve, and replace the gasket and valve if necessary.
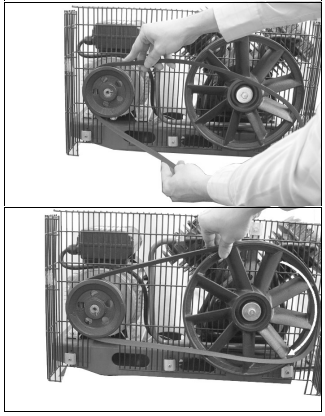
Drive Belt
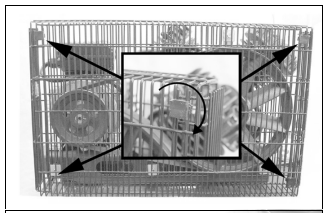
- Rotate the clips on the front of the safety cage.
- Remove the front of the cage and take out the worn or broken drive belt.
- Place the new drive belt over the small wheel.
- Position the part of the drive belt over the large belt wheel as shown.
- Rotate the large belt wheel by hand in a clockwise direction whilst guiding the belt onto it.
- Take care to avoid trapping your fingers between the wheel and belt.
- Replace the cage and secure it before use.
Specifications
- Part Number: 2226005
- Voltage: 230V AC@50 Hz
- Max. Operating Pressure: 10 bar/145 psi
- Min. Operating Pressure: 8 bar/116 psi
- Air Displacement: 14 cfm
- Receiver Capacity: 150 L
- Sound Pressure Level: 71.5 dB LpA
- Sound Power Level: 91.5 dB LwA
- Guaranteed Sound Power Level: 94 dB LwA
- Uncertainty Factor: 2.1 K
- Dimensions: (L x W x H) 620x500x1630 mm
- Weight: 82 kg
Troubleshooting
| PROBLEM | PROBABLE CAUSE | SOLUTION |
| The compressor has stopped and will not start. | Bad electrical connections. | 1. Check electrical connections. 2. Clean and tighten if necessary. |
| The thermal overload cutout switch has tripped. | 1. Switch off and wait approximately 5 minutes. 2. Press the reset button and switch on again. | |
| Motor windings burnt out. | 1. Contact your Clarke dealer for a replacement motor. | |
| The compressor does not reach the set pressure and overheats easily. | Compressor head gasket blown or valve broken. | 1. Return the machine to your nearest service agent. |
| The compressor does not start. | The reservoir has already been fully pressurised. | 1. Open the drain valve to expel air. The compressor should start again when the pressure reduces. |
| Air is leaking from the non-return valve when the compressor is not running. | Faulty non-return valve. | 1. Drain the receiver completely of air. 2. Remove the valve end plug, 3. Carefully clean the valve seat and the gasket. 4. Reassemble. |
| Air pressure from the regulator will not adjust. | The diaphragm within the regulator body is broken. | 1. Replace the regulator. |
| The compressor is very noisy and makes a metallic knocking sound. | The compressor is damaged and needs an overhaul. | 1. Return the machine to your nearest service agent. |
Customer Service
- Tel: 0208 988 7400
- Website: parts@clarkeinternational.com
- Visit: service@clarkeinternational.com
FAQs
How do I start and operate the compressor safely?
Before using, connect to an appropriate power source, check the oil level, open the air exit valve, turn on the power and let the compressor create pressure.
What maintenance is required to keep the compressor running smoothly?
To avoid dust accumulation, clean the unit, check and replace the compressor oil regularly, drain the tank of moisture after each use, and examine the air filters.
How often should I drain the moisture from the air tank?
To avoid rust and preserve the integrity of the tank, drain it after each use or every day if it is used frequently.
What kind of oil should I use for the compressor pump?
As advised by the handbook, use premium compressor oil, usually SAE 30 or comparable. Do not use motor oil.
Can the Clarke VE15C150 be used for spray painting?
Yes, you can use it for spray painting, but make sure the air requirements of the spray gun don’t go above the compressor’s output capacity.
What tools can I use with this compressor?
Within its pressure and flow constraints, it can accommodate pneumatic tools such as blow guns, impact wrenches, nail guns, airbrushes and tyre inflators.
Is the compressor noisy?
It makes a considerable amount of noise when operating, just like the majority of oil-lubricated compressors.