
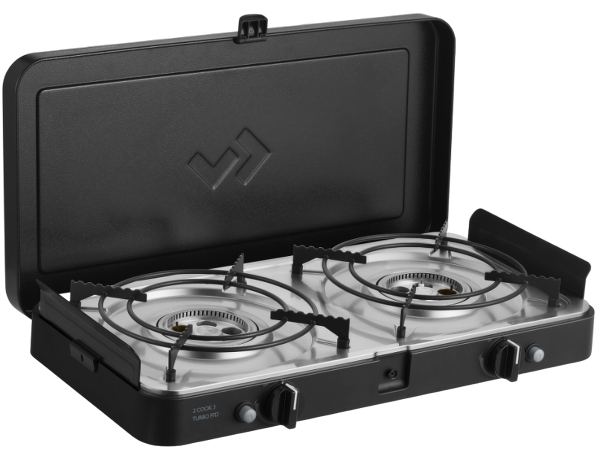
Dometic 203F2 2 Cook Turbo FFD Stove
Safety instructions
- Do not use the device when it is defective.
- Disconnect the device from the power supply if Here is a malfunction due to a technical defect.
- Do not modify this product.
- Do not remove or replace any components of this product.
- Do not store items on the cooking surfaces.
- Keep a fire extinguisher or other means suitable to extinguish a flame ready.
- Connect the device to a circuit that has a circuit breaker that ensures complete disconnection from the power supply.
- Do not cook unattended with fat or oil on the cooktop.
- Never try to extinguish a fire with water. Switch off the appliance.
- Cover the flame with a lid or a fire blanket.
- After use, switch off the cooktop and do not rely on the protection mechanism.
- The appliance and its accessible parts become hot during use.
- Keep your hands, face, and hair away from burners.
- Keep children and pets safely away.
- Monitor all activity around the device to avoid burns or other injuries.
- Let the device cool down to ambient temperature before you touch it with your bare hands.
- Do not use the device as a work or storage surface.
Explanation of Symbols
- Safety instruction: Indicates a hazardous situation that, if not avoided, could result in death or serious injury.
- Safety instruction: Indicates a hazardous situation that, if not avoided, could result in minor or moderate injury.
- Indicates a situation that, if not avoided, can result in property damage.
- Supplementary information for operating the product.
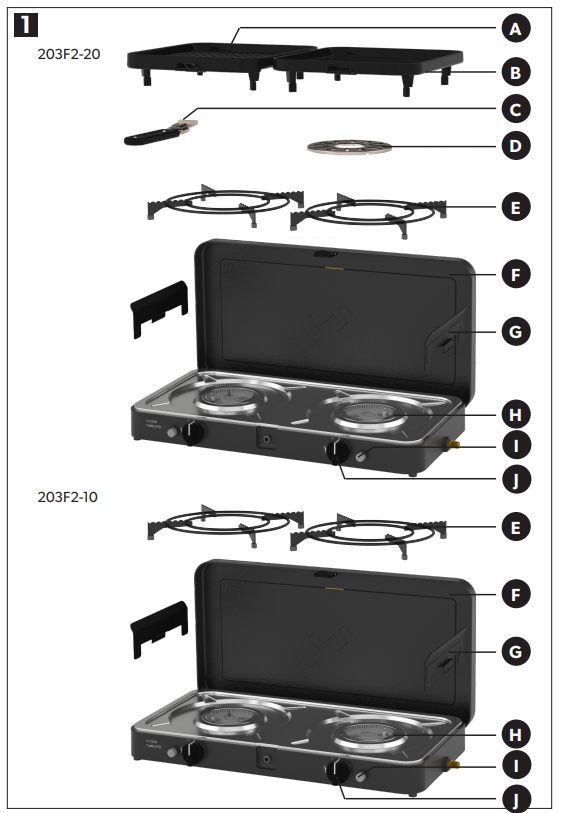
Scope of delivery
| Component | Quantity |
| Cooktop | 1 |
| Fixing kit | 1 |
| Installation and operating manual | 1 |
Assembly and Use 
- Do not use the appliance if it has damaged or worn seals.
- Do not use an appliance that is leaking, damaged, or that does not operate properly.
- Handle the appliance with care; do not drop it.
- Always operate the appliance on a firm level surface.
- Ensure that the assembled product is stable and does not rock.
- This appliance is not suitable for installation or connection to a reticulated gas supply.
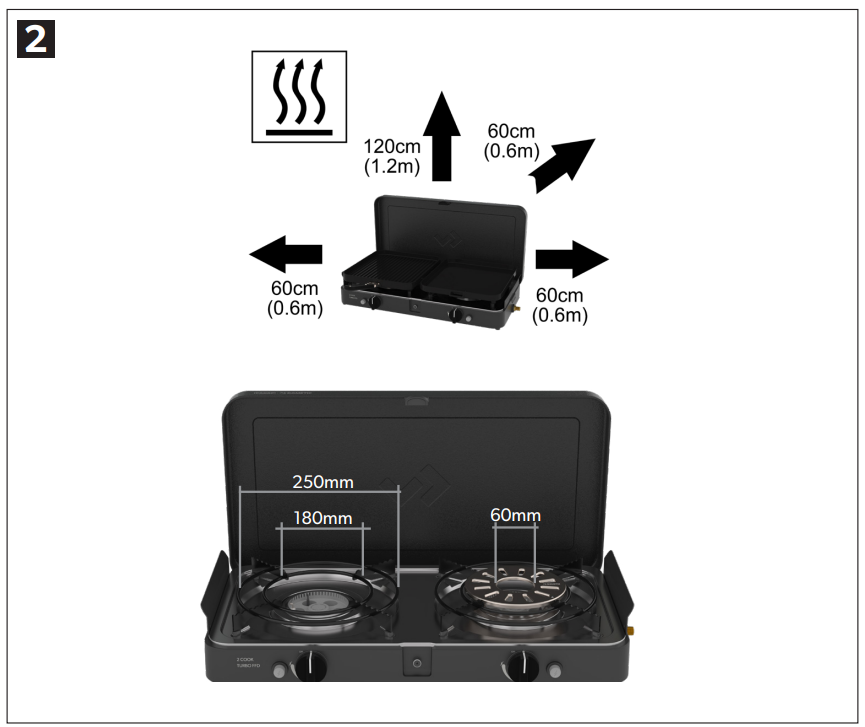
- This appliance must be kept away from flammable materials during use. Minimum safe distances are: Above the appliance, 120cm. At the rear and sides, 60cm.
- When using a pot, the minimum recommended pot size is 180mm, and the maximum recommended size is 250mm. The minimum pot size when using the coffee pot stand is 60mm.
- Do not use any cooking surface or pot that is larger than the recommended size. Our cooking surfaces have been specifically designed to allow gas combustion to escape, and the closure of this space could affect the performance of this appliance.
Gas Container
- Gas is supplied to the unit via a hose and regulator.
- The hose and regulator can be connected to a gas cylinder or a Power Pak, which is a unit that takes two or more gas cartridges.
- This appliance must only be used with an approved hose and regulator.
- Only to be used with a gas cylinder that does not exceed 500mm in height (not including the regulator) and 400mm in width.
- Keep gas containers away from heat and flame. Do not place on a stove or any other hot surface.
- Do not try to remove the gas container whilst the appliance is in operation.
- The valve of the gas container must be kept in a closed position, and the container must be disconnected from the appliance after use or when in storage.
Light back
- In the event of a light back (where the flame burns back and ignites inside the burner or venturi housing), immediately turn off the gas supply by firstly closing the control valve on the gas cylinder and then the appliance valve.
- After the flame is extinguished, remove the regulator and check the condition of the seal; replace the seal if in doubt. Re-light the appliance.
- Should the flame persistently light back, return the product to your authorized repair agent.
Leaks
- If there is a gas leak on your appliance (smell of gas), immediately turn off the gas supply by turning the control knob clockwise to the OFF “•” position and take it to a flame-free location where the gas leak may be detected and stopped.
- If you wish to check for gas leaks on your appliance, do it outside. Do not try to detect gas leaks using a flame; use soapy water.
How to Check
- It is important that all gas connections are correctly connected to prevent any gas leaks.
- The correct way is to smear the joint, i.e., where the gas container connects to the appliance, with soapy water. Turn the appliance control knob slightly anti-clockwise to turn the gas on. If bubbles form, then there is a gas leak. Immediately turn the gas off and disconnect the gas supply from the appliance. Check that all the connections are properly fitted. Check that the seal is in place and in good condition before connecting the gas supply. Re-check with soapy water after refitting the gas supply.
- If a gas leak persists, return the product to your local dealer for inspection/repair.
Parts
Fitting and changing the gas supply
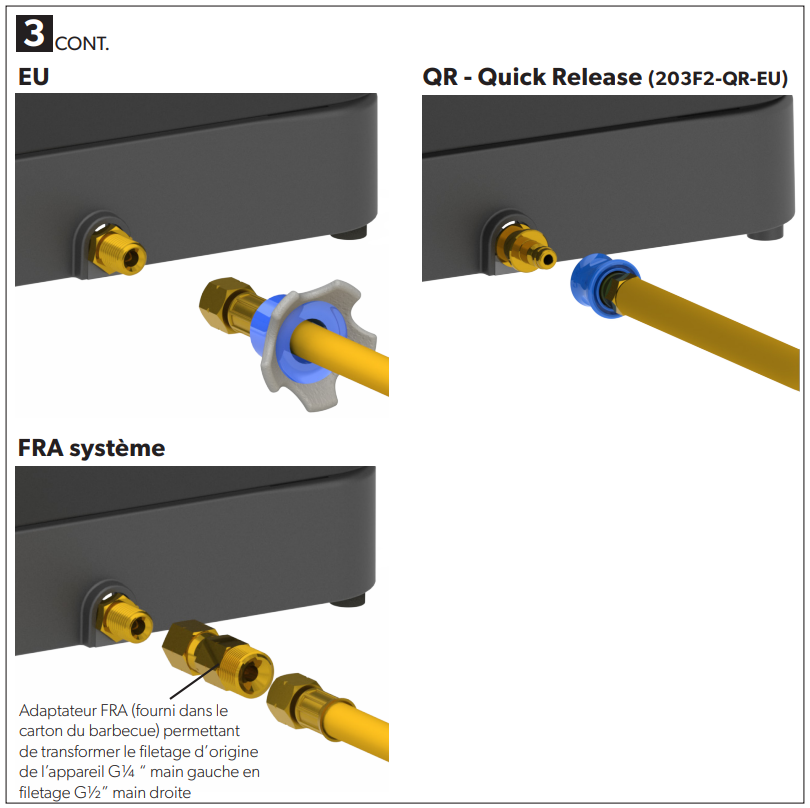
Connecting the Gas Supply
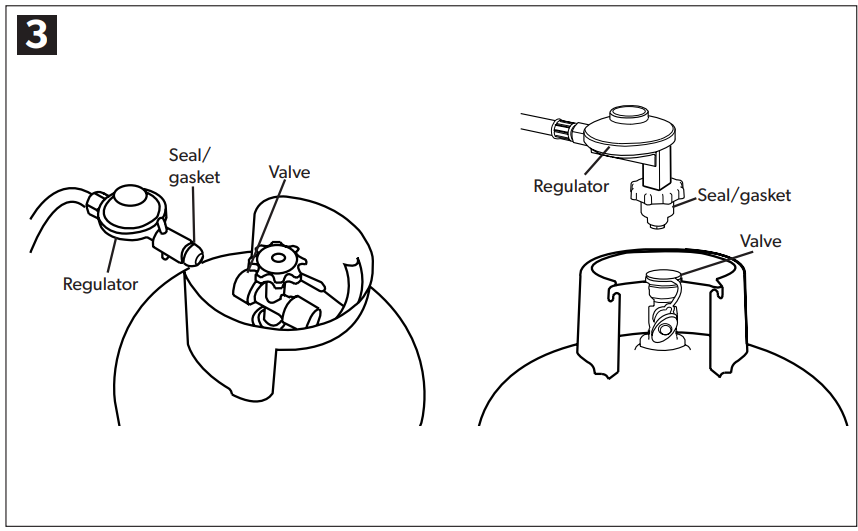
- Before connecting the appliance to a gas supply, ensure that the rubber seal on the regulator is in position and in good condition.
- Before connecting the hose and regulator to the appliance, check that the appliance control knob is in the OFF “•” position.
- Carry out this check each time you fit the appliance to a gas cylinder.
- Blow out any dust from the gas supply opening to prevent possible blockage of the jet.
- Fit an approved hose and regulator to the appliance.
- Ensure that the gas supply (gas cylinder/gas cartridge) is fitted in a well-ventilated location away from any source of ignition, such as naked flames and away from other people.
- Do not twist or pinch the hose. Ensure that it is routed away from the stove body to prevent deterioration/damage to the hose caused by heat.
- Make sure that the gas cylinder is kept upright at all times, and connect to the cylinder by screwing on the cap and tightening it until fully engaged.
- Ensure that a complete gas seal has been made (check for the smell of gas around the connection joint). Do not check for leaks with a naked flame. Use warm, soapy water only, applied to the joints and connections of the appliance. Any leakage will show up as bubbles around the leakage area.
- If you cannot rectify the gas leak, do not use the appliance. If you are in doubt, contact your nearest stockist.
Disconnecting and changing the gas supply
- After use, turn the appliance control knob to the OFF “•” position and close the gas supply.
- When you need to replace your empty cylinder, make sure that the gas is closed at the cylinder valve.
- Do not smoke while changing the cylinder.
- Remove the regulator from the empty cylinder.
- Attach the regulator to the full cylinder. Refer to the instructions above on how to connect the gas supply.
- Apply the same care and checking procedures as if fitting a new gas cylinder.
How to check if your gas cylinder is empty
- The easiest way to check if you are low on gas is by picking up your gas cylinder.
- If you think your gas cylinder is feeling a little lighter than you’d like, weighing the bottle is a great way to see how much gas is left. Most cylinders will have the empty weight stamped on either the neck or foot ring, and if the weight indicated on the stamp and the weight of your cylinder are the same, you’re out of gas. You can then approximate the amount of gas you have left by the difference in weight.
Operating the appliance
- When operating this appliance, please take care to ensure that all parts are in good working order and that you have checked for any gas leaks before lighting the appliance with every use.
- Cooking surfaces can simply be placed and are ready to use. No assembly required.
- The appliance is designed for use with cooking vessels of not less than 180mm in diameter and not greater than 250mm in diameter.
- Use this appliance only on a firm level surface.
- After prolonged storage, inspect the appliance for any insects and webs, which may affect gas flow.
Accessories
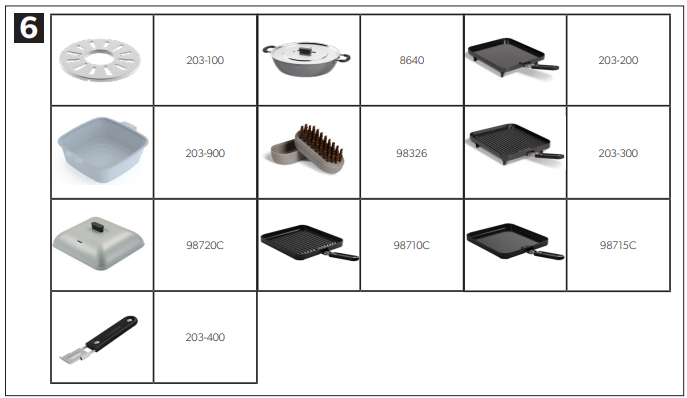
A variety of compatible accessories are available. Contact your local supplier for availability.
Spares
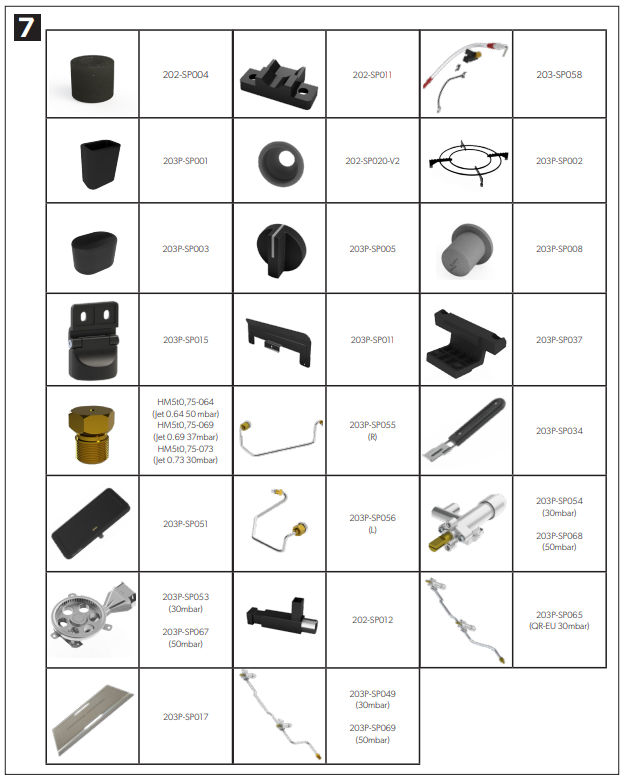
Always use genuine spares as they have been designed to give optimum performance. Contact your local supplier for assistance.
Lighting the Appliance
- It is recommended to remove any cooking surfaces when trying to light the appliance.
- This way, it will be easy to see the burner when it is lit.
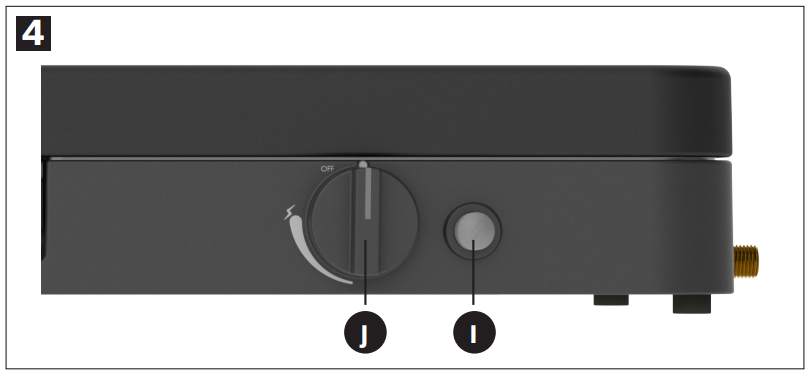
- To light up the appliance using the piezo igniter, push in and turn the control knob 90° in an anti-clockwise direction, then press the piezo button to ignite the gas.
- If the gas does not ignite on the first spark, turn the control knob back to its “•” position.
- Try again, by pushing and turning the control knob anti-clockwise and pushing the piezo button to ignite the gas.
- If the gas has not ignited in the first two to three seconds, you should close the control valve by turning the control knob back to its “•” position.
- Do not hold the piezo button or control knob for more than 15 seconds.
- If after 15 seconds the burner has not lit, stop operating the device and wait at least 1 minute, allowing accumulated gas to escape, before attempting further ignition of the burner.
- Repeat the above process if necessary until the flame ignites.
- The flame should normally light up within the first one to two seconds.
- In the event of the burner flames being accidentally extinguished, turn the control knob to the OFF “•” position and do not attempt to re-ignite the burner for at least 1 minute.
General
- Once the appliance is lit, the flame intensity may be adjusted by turning the control knob counterclockwise to reduce the flame or clockwise to increase the flame.
- When cooking food with a high fat content, flaring may occur if the selected heat setting is too high. Should this happen, turn the heat down until the flaring ceases.
- Do not move the appliance when in use. It is an unsafe practice to move the appliance whilst lit and may cause flaring.
- After use, first close the control valve on the gas cylinder (where applicable). When the flame has extinguished, close the control valve on the appliance.
Green Grill cooking
- Most CADAC | Dometic cooking surfaces have our GreenGrill coating. This ceramic coating is completely PFOA-free; it contains no toxic substances and guarantees healthier cooking!
Preparation and Use
- Seasoning before using the cooking surface for the first time, you can season it to give the cooking surface a thin protective layer that prevents food from sticking.
- It is not required, but we do recommend it. It’s very easy: lightly rub cooking oil on the surface and then place it over medium heat for 2 – 3 minutes.
- When it cools, wash the cooking surface with soapy water before use and grease it lightly with some oil (cooking oil of your choice, e.g., sunflower oil). It’s ready to go!
- Never leave the cooking surface on the heat source without oil. Apply a thin layer of oil with a kitchen paper towel or a brush before placing the cooking surface on the heat source. Make sure you have oiled all parts, so with e.g. a BBQ grill, I’d include the raised edges as well.
- We recommend frying in sunflower oil or rapeseed oil because of the high burning point.
- Olive oil can have a relatively low burning point, which can cause the ingredients to stick to the pan or burn. We therefore do not recommend using olive oil.
- Always use silicone and/or wooden utensils so that the Green Grill coating is not damaged. Never use metal utensils, as this can damage the coating.
Cleaning your cooking surfaces
- Always allow cooking surfaces to cool completely before immersing them in water.
- The GreenGrill coating is ‘Easy Clean’. Warm soapy water with a soft sponge is sufficient for cleaning the cooking surfaces with GreenGrill coating. Avoid scouring pads or steel wool.
- For stubborn stains or residues, you can try the ‘vinegar method’: pour a layer of vinegar into the pan and heat the pan slightly.
- The vinegar does not have to boil and should certainly not evaporate completely.
- Pour the vinegar out of the pan, clean the pan with soapy water, and the pan is as good as new.
- The CADAC | Dometic Soft Soak (sold separately) is the ideal companion product to facilitate soaking.
- When using the Soft Soak, we recommend placing the cooking surface face down, which allows for maximum soaking and also uses less water.
- Any stubborn stains that remain after soaking can be loosened and brushed away using the CADAC | Dometic Soft Soak Brush (sold separately.
Maintenance
- We recommend adding a little oil to the cooking surface after cleaning and spreading it with kitchen paper.
- The oil seals the surface from the outside air and moisture. It also ensures that the food does not burn into the surface.
- Place the cooking surface in a plastic bag before you put it into its storage bag so you are ensured the storage bag remains clean and oil-free.
Cleaning the appliance
- It is recommended to clean your appliance after every use. This will prolong the life of your appliance.
- Allow the appliance to cool down before you clean it.
- Use a damp cloth wrung out in a solution of soapy water to clean exterior surfaces.
- To clean the stove body, simply wipe with a damp cloth using a little detergent, if necessary.
- DO NOT IMMERSE IN WATER, as this will allow water to get into the burner tube, causing the appliance to malfunction.
- Make sure that no water gets onto the burners or pilot/light area. Wipe the appliance completely dry before use.
- Do not use abrasive cleaners as they may damage the surfaces.
- Clean the appliance after each use. After cleaning, recondition the cooking surface with a light wipe of oil.
- Do not use any high-pressure steam equipment or a water jet to clean the appliance.
- Note: For stubborn stains, CADAC oven cleaner may be used.
Storage
Always allow the unit to cool down and be cleaned before storing.
- Turn off the gas supply to the appliance, disconnect, and remove the gas supply from the appliance.
- Never store an appliance with the gas supply conn;cted, this is an unsafe practice.
- Store the appliance and gas supply in a well-ventilated area away from combustible material. Storage of cylinders should preferably be outdoors and must NOT be in a basement.
Troubleshooting
- If you clean and maintain your appliance regularly, the life of your appliance will be extended, and the possibility of
problems will decrease. - We recommend the service of your appliance to be every twelve (12) months by a service agent to ensure continued efficient
operation. - This appliance must only be serviced by an authorized person.
- Check your gas hose and connections regularly for any signs of leaks, and every time the gas cylinder is re-filled or fitted to the
appliance with every use. - Clean your burner ports in case of an over spill.
- We recommend cleaning or replacing the jets every six (6) months to ensure continued efficient operation of your appliance.
- Should the appliance operate abnormally after storage and all checks have not isolated the problem, the jet may be blocked.
- Under these circumstances, it will be necessary to remove and check, and thoroughly clean out any foreign matter that may have gathered in the appliance.
- Alternatively, you may purchase new jets from your local store. Do not attempt to clean the jet mechanically.
Replacing a Blocked Jet: (IMAGE SECTION 5)
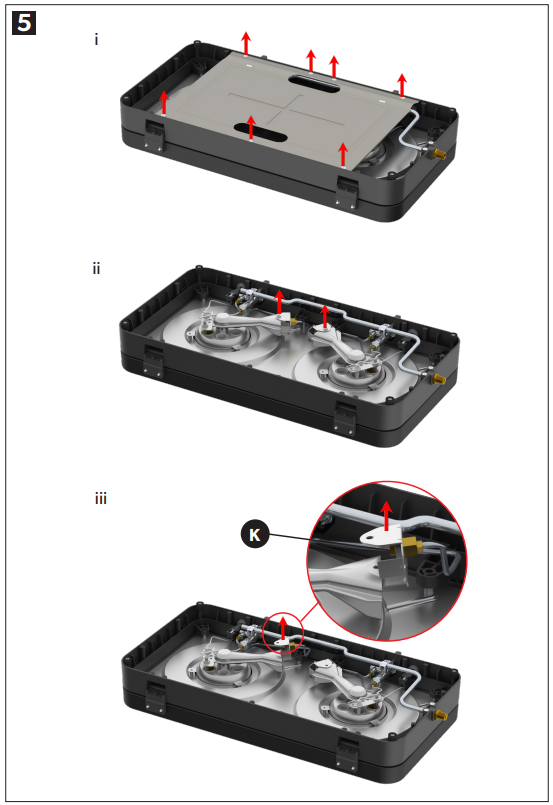
- Should the hole in the jet become blocked, this may result in a small flame or no flame at all.
- Do not attempt to clean the jet with a pin or other such device, Dometic 203F2 2 Cook Turbo FFD Stove as this may damage the orifice, which could make the appliance unsafe.
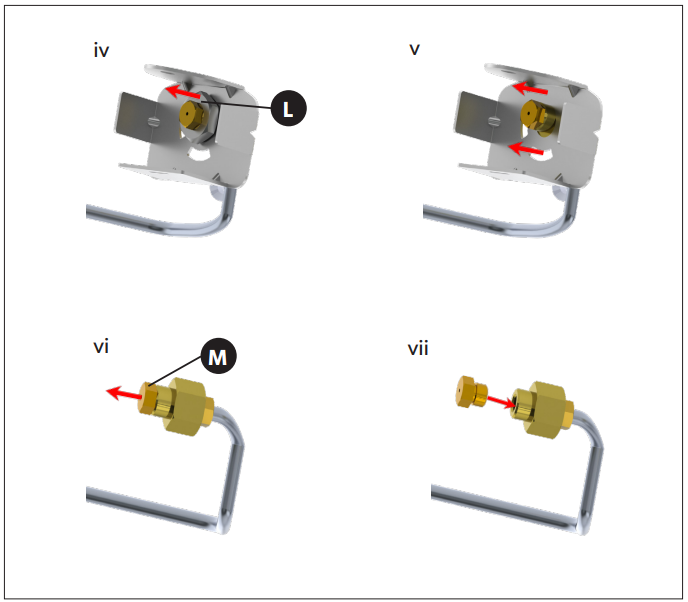
- To replace the jet: Remove any cooking surfaces, close the l, id and turn the appliance upside down.
- Gently unscrew the bottom panel by removing the screws as indicated.
- Unscrew the screw for the affected burner(s).
- To access the jet, lift the cover (K) I indicated
- Carefully loosen the hex nut (L) and remove the air vent cover to expose and access the jet (M).
- Remove the jet using a suitable spanner. Do not use pliers on the jet, as this may damage the jet, making it unusable or impossible to remove.
- Screw the new jet into the valve. Do not over-tighten as this Dometic 203F2 2 Cook Turbo FFD Stove may damage the jet. Reverse the above steps to reassemble the appliance.
Warranty
Dometic Mobile Cooking Netherlands B.V. (Dometic Mobile Cooking UK Ltd. for the UK only) hereby warrants to the ORIGINAL PURCHASER of this appliance for 2 years, that it will be free of defects in material and workmanship from the date of purchase.
Before returning any parts, contact the customer service representative in your region using the contact information provided with your manual. If Dometic Mobile Cooking Netherlands B.V. confirms the defect and approves the claim, Dometic Mobile Cooking Netherlands B.V. will elect to replace such parts without charge. Dometic Mobile Cooking Netherlands B.V. will return parts to the purchaser, freight or postage prepaid.
This Limited Warranty does not cover any failures or operating difficulties due to accident, abuse, misuse, alteration, misapplication, vandalism, improper installation or improper maintenance or service, or failure to perform normal maintenance, including but not limited to damage Dometic 203F2 2 Cook Turbo FFD Stove caused by insects within the burner tubes, as set out in this owner’s manual. Some regions do not allow limitations on how long an implied warranty lasts, so this limitation may not apply to you.
Dometic Mobile Cooking Netherlands B.V. is not liable for any special, indirect, or consequential damages. Some regions do not allow the exclusion or limitation of incidental Dometic 203F2 2 Cook Turbo FFD Stove or consequential damages; this limitation or exclusion may not apply to you. Dometic Mobile Cooking Netherlands B.V. does not authorize any person or company to assume for it any obligation or liability in connection with the sale, installation, use, removal, return, or replacement of its equipment; and no such representations are binding on Dometic Mobile Cooking Netherlands B.V.. This Warranty applies only to products sold at retail. To enjoy and ensure the longevity of your product, please refer to the cleaning and maintenance section of the user manual.
Disposal
Place the packaging material in the appropriate recycling waste bins, wherever possible. Consult a local recycling center or specialist dealer for details about Dometic 203F2 2 Cook Turbo FFD Stove how to DOMETIC SB27150 90 Degree Bezel Kit Installation dispose of the product in accordance with the applicable disposal regulations.
Customer Service
SPAIN
- Address: Dometic Spain S.L. Avda. Sierra del Guadarrama, 16 E-28691 Villanueva de la Cañada Madrid
- Call: 8 +34 900 100 245.
- Email: info@dometic.es
GERMANY
- Address: Dometic WAECO International GmbH Hollefeldstraße 63 • D-48282 Emsdetten
- Call: 9 +49 (0) 2572 879-195
- Email: info@dometic-waeco.de
FRANCE
- Address: Dometic SAS ZA du Pré de la Dame Jeanne B.P. 5 F-60128 Plailly
- Call: +33 344633518
- Email: vehiculesdeloisirs@dometic.fr
AUSTRALIA
- Address: Dometic Australia Pty. Ltd. 1 John Duncan Court • Varsity Lakes QLD 4227
- Call: 8 +61 7 55076001|
- Email: sales@dometic-waeco.com.au
FAQs
What type of stove is the Dometic 203F2?
The 203F2 is a forced-flame-turbine (FFD) gas stove with two burners that is ideal for small kitchens, yachts, and recreational vehicles.
What fuels are compatible with this stove?
The cooker is appropriate for off-grid and mobile cooking because it runs on liquid propane (LP) gas.
How does the forced-flame turbo (FFD) technology benefit cooking?
Faster cooking and better fuel economy are the results of FFD technology’s increased combustion efficiency, which produces more potent and uniform flames.
How do I light the burners?
The integrated piezo ignition system, or a match or lighter, can be used to manually light burners.
What maintenance is required?
Safe operation depends on routinely cleaning drop trays and burner ports, inspecting gas connections for leaks, and making sure vents stay free.
Can the stove be installed in different orientations?
The manual specifies the precise clearance needed for the stove’s horizontal installation.