


GEVI GECMD008-U 4-Cup Drip Coffee Machine User Manual
 Safety Instructions
- Close supervision is necessary when the machine is used by or near any children.
- Do not use outdoors. For household use only.
- Do not let the cord hang over the edge of the table or counter, or touch hot surfaces.
- Do not place on or near a hot gas or electric burner, or in a heated oven.
- Do not use the machine for anything other than its intended use.
- Scalding may occur if the lid is removed during brewing cycles.
- Be careful not to get burned by the steam.
- It must never be used on the range top.
- The container is designed for use with this machine. It must never be used on a range top.
- Do not set a hot container on a wet or cold surface.
- Do not use a cracked container or a container having a loose or weakened handle.
- Do not clean the container with cleansers, steel wool pads, or other abrasive material.
- Avoid contact with moving parts.
- Do not place cloth beneath the machine or otherwise restrict airflow.
- Use only the Gevi filter with this unit. Other filters may cause the machine to overflow.
- Do not let the coffee machine operate without water.
- There would be potential injury from misuse.
- Be careful of the residual heat of the heating element after use.
Polarized Plug
- This machine has a polarized plug(one blade wider than the other).
- As a safety feature to reduce the risk of electrical shock, this plug is intended to fit in a polarized outlet only one way.
- If the plug does not fit fully in the outlet, reverse the plug. If it still does not fit, contact a qualified electrician.
- Do not attempt to defeat this safety feature or modify the plug in any way.
- If the plug fits loosely into the AC outlet or if the AC outlet feels warm, do not use that outlet.
Power Cord
A short power-supply cord (or detachable power-supply cord) may be provided to reduce risks resulting from becoming entangled in or tripping over a longer cord.
Longer detachable power supply cords or extension cords are available and may be used if care is exercised in their use. If a long detachable power-supply cord or extension cord is used:
- The marked electrical rating of the detachable power-supply cord or extension cord should be at least as great as the electrical rating of the machine.
- If the machine is of the grounded type, the extension cord should be a grounding type cord.
- The longer cord should be arranged so that it will not drape over the countertop or table top, where it can be pulled on by children or tripped over unintentionally
- Do not pull, twist, or otherwise abuse the power cord.
Overview

Know Your Product
- Model: GECMD008-U
- Electrical Parameters: 120V~ 60Hz 600W

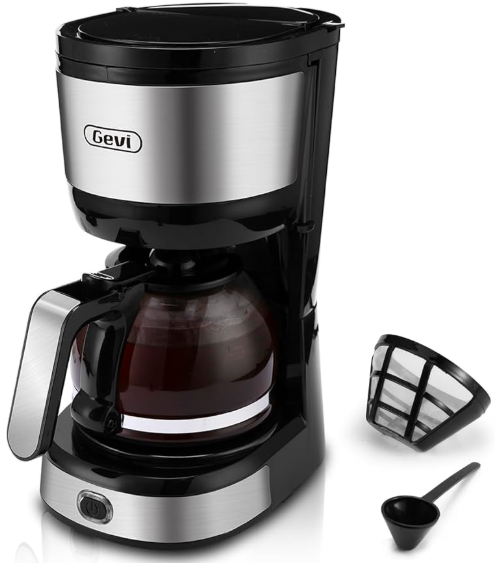
| ❶ | Permanent Filter | Using our permanent filter may allow some fine coffee grounds to fall into and appear as sediment in the carafe. |
| ❷ | Filter InserWith Dripip Stop | Holds a paper filter or a permanent filter. |
| ❸ | Filter Basket | Used to fix the filter insert. |
| ❹ | Coffee Carafe | The easy-pour and dripless carafe is available for making coffee for 2 to 4 cups. |
| ❺ | Warming Plate | Scratch-resistant with a nonstick coating. After brewing, the coffee can be kept warm. |
| ❻ | One-piece Cover | The cover can be easily opened for adding water and coffee powder. |
| ❼ | Showerhead | Steam can more evenly spill on the surface of coffee powder. |
| ❽ | Water Tank | A big tank is enough for 2 to 4 cups of coffee. |
| ❾ | Water Level Gauge | Easier for you to fill water and monitor the water level. |
| ❿ | ON/OFF Button | Click the ON/OFF button to start, pause, or exit the brewing. |
| ⓫ | Spoon | Used to spoon coffee powder. |
Before First Use
- Remove all protective films and other packaging material from the coffee machine.
- Place the coffee machine on a flat, stable surface and ensure a minimum of 10cm of free space around the coffee machine. This coffee machine is not suitable for installation in a cabinet or for outside use.

- Hold the handle and take the coffee carafe out of the coffee machine.
- Hold the coffee machine and open the one-piece cover.
- Hold the handle of the filter insert with your hand and take out the filter insert together with the permanent filter.
- Take out the permanent filter from the filter insert.

- Rinse thoroughly with warm water or clean in a dishwasher.
- Dry with a clean cloth.
- Wipe the filter basket with a damp and soft cloth.
- Use a clean cloth to scrub the warming plate.

- Use a clean cloth to scrub the coffee machine.
Install Accessories

- Insert the permanent filter into the filter insert.
- Install the filter insert by aligning its handle with the groove on the filter basket.

- Fill the glass carafe with fresh and clean water. Do not exceed the marking.
- Pour the water from the carafe into the water tank.
- Close the one-piece cover securely.
- Hold the handle and place the glass carafe onto the warming plate.

- Insert the power plug into a 120V AC power outlet.
- Press the ON/OFF button to the “ I ” position to switch on the coffee machine, and the ON/OFF indicator will illuminate.
- After all water has passed through, press the ON/OFF button again to the “ O ” position to turn off the coffee machine.
- Take the coffee carafe out of the coffee maker

- Pour away the water to empty the carafe. Repeat 1-9 for 2 times to clean the flow channel.
The Quest For Perfect Coffee
Filling Water
Every time to use water and ensure that the water has removed chlorine, bad tastes, and odors, for the purest coffee flavor, every time you brew.
- Coffee is 98% water. The quality of that water is as important as the quality of your coffee.
- If water doesn’t taste good from the tap, it won’t taste good in your coffee.
- Do not pour hot water, milk, ground coffee, or tea into the water tank.
- Do not let foreign objects enter the water tank.
- We recommend using pure water.
- The numbers(cup quantity) marked on the carafe correspond to those on the water tank.
- You can add water to the carafe and then fill it in the water tank.
- Do not add more than a maximum of 4 cups of water into the water ta; otherwise, the water will leak from the overflow hole of the water tank.
Roast Degree of Coffee Beans
- We recommend using light or medium roasted coffee beans or pre-ground coffee for making drip coffee.
- There are many types of beans on the market. To ensure the best grinding results, high-quality beans are recommended.
- Buildup of oils may occur more frequently if dark-roasted coffee beans are used.
- Clean the coffee machine and filter more often when using oily beans.
- Buy in small batches to reduce the storage time by using freshly roasted coffee beans with a roasted on date to maximize flavor, not a use-by or best before date.
- Store coffee beans in a dark, cool, and dry place. Vacuum seal if possible.
Grind Size
- We recommend medium-sized coffee grinds.
- If the coffee grinds are too fine, overextraction and bitterness will result.
- Too fine coffee grinds may also clog the filter and even flow into the carafe to affect the taste.
- If the coffee grinds are too coarse, under extraction will occur, and the flavor will be weak.
Grind Dose
- We recommend 10g of coffee grinds for one cup, but do not add more than 40g of grinds to the filter.
- Use the supplied measuring spoon for measuring coffee amounts.
- Refer to the following table for your required amounts:
| Recommended Amounts Of Coffee | |
| 2 CUPS | 20g (4 Tablespoons) |
| 3 CUPS | 30g (6 Tablespoons) |
| 4 CUPS | 40g (8 Tablespoons) |
Choosing Filter
- You can use either the permanent filter we provided or a disposable paper filter for making coffee, but do not use them together to avoid blockage.
- After choosing the filter, assemble it closely with the filter insert, and ensure they are installed into the filter basket properly.
Water Volume
The amount of water added to the water tank should correspond to the cup quantity of coffee grinds. For example, if you add 20g of coffee grinds and you should add 2 cups of water; otherwise, the machine will finish boiling all the water in the water tank, which will make the coffee weak. If you want a bold coffee, you can add 1.5 cups of water.
Closing the Cover
- Firmly close the one-piece cover to prevent steam from escaping to avoid scalding.
Placing Carafe
- Close the lid of the carafe and make sure the lid is up against the filter insert’s drip stop.
Operation Guide

- Hold the handle and take the coffee carafe out of the coffee machine.
- Fill the glass carafe with fresh and clean water. Do not exceed the marking.
- Hold the coffee machine and open the one-piece cover.
- Pour the water from the carafe into the water tank.

- Add your desired amount of coffee powder into the filter, but do not exceed 40g.
- Close the one-piece cover securely.
- Hold the handle and place the glass carafe onto the warming

- Insert the power plug into a 120V AC power outlet.
- The coffee machine will begin the brewing cycle.

- The coffee machine will automatically keep your coffee warm after it finishes brewing. Shut it down by pressing the ON/OFF button. For a better taste, enjoy the coffee within 1 hour.

- Remove the coffee carafe.
- Open the one-piece cover to take out the filter and filter insert with the drip stop.
- Take out the filter and discard the used coffee grounds.
- Clean the filter with water and dry it.

- Clean the filter insert with the drip stop with water and dry it.
- Put the filter insert with the drip stop and permanent filter back onto the machine correctly

- Wait for 10 minutes to let the machine cool down, and wipe the warming plate.
Auto Pause Feature
- It stops brewing so you can pour a rich-tasting cup and then finishes the brewing cycle after you place the carafe back in position.
- Replace the carafe within 30 seconds to avoid any overflow without making a mess.
- In this case, immediately place the carafe back into the machine and let all the coffee flow into the carafe.
- Be aware that using this feature will weaken the flavor strength of the finished pot, because the flavor profile of coffee brewed at the beginning of the cycle differs from coffee made at the end.
Cleaning & Maintenance
- Do not let foreign objects enter the water tank.
- We recommend using pure water.
- The numbers(cup quantity) marked on the carafe correspond to those on the water tank.
- You can add water to the carafe and then fill it in the water tank.
- Do not add more than a maximum of 4 cups of water into the water tank; otherwise, the water will leak from the overflow hole of the water tank.
- Do not make coffee with used coffee grinds, as this will greatly reduce the flavor.
After Each Brew
Make sure to clean the coffee grinds from the filter after each use, as some older coffee grinds may be sitting inside your machine and will affect the quality of your next batch. For an operation guide, refer to page 16, steps 14- 25 in section“ 6. Operation Guide ”.
After 100 Uses

- Fill the water tank with water to the 4-cup marking that is 600mL.
- Add 12g of the descaler into the water tank, then mix evenly.
- Put the coffee carafe onto the warming plate.
- Plug the machine.

- Press the ON/OFF button, and the machine starts to brew.
- When the water level of the water tank reaches 2 cups, flip the ON/ OFF button to the “O” position, and the machine will stop working.
- Let the machine stand for 5 hours to make sure the limescale is in better contact with the descaling solution and totally dissolved.
- After 5 hours, flip the ON/OFF button to the “I” position to pour the remaining 2 cups of descaling solution.

- Take out the coffee carafe and pour away the descaling solution.
- Add 4 cups of water to the coffee carafe.
- Pour the water in the coffee carafe into the water tank.

- Put the coffee carafe onto the warming plate.
- Flip the ON/OFF button to the “I” position, and the machine starts to brew.

- Remove the coffee carafe.
- Open the one-piece cover to take out the filter and filter insert with the drip stop.
- Clean the filter insert with the drip stop with water and dry it.

- Put the permanent filter back into the filter insert with the rip stop.
- Put the filter insert with the drip stop and permanent filter back onto the machine correctly.

- Wait for 10 minutes to let the machine cool GEVI GECMD008-U 4-Cup Drip Coffee Machine down, and wipe the warming plate.
- Put the coffee carafe back on the machine.
Troubleshooting
| The machine cannot be switched on. | The machine is not connected to the power supply. | Connect the machine to a power outlet properly. |
| The ON/OFF button is broken. | Contact the Gevi support team. | |
| The one-piece cover does not close. | The removable filter insert with the drip stop may not be correctly placed. | Reposition the filter insert with the drip stop correctly into the filter basket. |
| No water is flowing out of the coffee machine. | The water tank is empty. | Add water to the water tank. |
| The removable filter insert with a drip stop may not be correctly placed. | Reposition the filter insert with the drip stop correctly into the filter basket. | |
| The water quality is not good, or the machine is not cleaned in time, so there is a buildup of lime scale inside the heating tubes. | A deep descaling is needed for your machine. Refer to “After 100 Uses”, page 19. | |
| The coffee carafe is not placed correctly on the warming plate. | Place the carafe correctly on the warming plate. | |
| Use filter paper and the permanent filter at the same time. | Do not use them at the same time. |
Warranty
In order to claim our warranty, you must have the original GEVI GECMD008-U 4-Cup Drip Coffee Machine proof of purchasing documentation for the product, including but not limited to Order Number and QR Code, and present it when requested. This guarantee is valid for the original retail purchaser from GEVI GECMD008-U 4-Cup Drip Coffee Machine the date of initial retail purchase and is not transferable. Upon receipt of your claim, Gevi will seek to resolve your difficulties.
Our replacement or repair warranty only applies where GEVI GECMD008-U 4-Cup Drip Coffee Machine a defect arises as a result of faulty material or workmanship during the warranty period. Your warranty does not cover misuse or negligent handling (including damage caused by failing to use the product in accordance with this instruction booklet), accidental damage, normal wear and tear, or lack of maintenance. Do not attempt to repair or adjust any electrical or mechanical functions on this product. Doing so will void this guarantee.
Your warranty does not: cover freight or any other costs incurred in making a claim, consumable items, accessories that by their nature and limited lifespan require periodic renewal (such as filters and seals), or any consequential loss or damage; or servicing or modification of the product other than by Gevi or an authorized Gevi service center.
Use of the product with other accessories, attachments, product supplies, parts, or devices that do not conform to Gevi specifications,s; or
Customer Service
For any questions relating to Gevi-branded products(coffee machines, grinders, milk frothers, toasters, air fryers, and related accessories), please contact GEVI GECMD008-U 4-Cup Drip Coffee Machine us through the information below:
- Web: https://www.gevilife.com
- E-mail: @gevi-home.com
- FB: https://bit.ly/3pqt61v
- YT: https://bit.ly/3fxrFqq
- Phone: 855-9922-888
Gevi headquarters
- Web: www.gevi-tech.com
- E-mail: service@gevi-tech.com
FAQs
What is the maximum coffee capacity of the GEVI GECMD008-U?
This drip coffee maker is perfect for small homes or individual use because it can brew up to 4 cups (around 20 ounces or 600 ml) every cycle.
Is the carafe dishwasher safe?
The glass carafe is safe to use in the dishwasher. It is advised to wash your hands to preserve durability and clarity.
How long does the warming plate keep coffee hot?
After brewing, the coffee can stay hot for up to half an hour thanks to the warming plate. To avoid overheating, always turn off the machine when not in use.
Can I leave water in the reservoir overnight?
To preserve freshness and avoid mineral buildup, it is best to empty the water reservoir after usage.
What type of coffee grind is best?
Just like with a regular drip coffee machine, use a medium grind of coffee. A grind that is too coarse could provide poor coffee, while one that is too fine could clog the filter.
Does the machine have an automatic shut-off?
No, an automated shut-off is not a feature of the GEVI GECMD008-U. When the brewing process is over, always manually turn the machine off.
Is the machine safe to use with an adapter or voltage converter?
Verify your machine’s voltage rating, which is typically 120V in the US. To prevent harm, only use an adapter or converter that is compatible when visiting nations with differing voltages.