
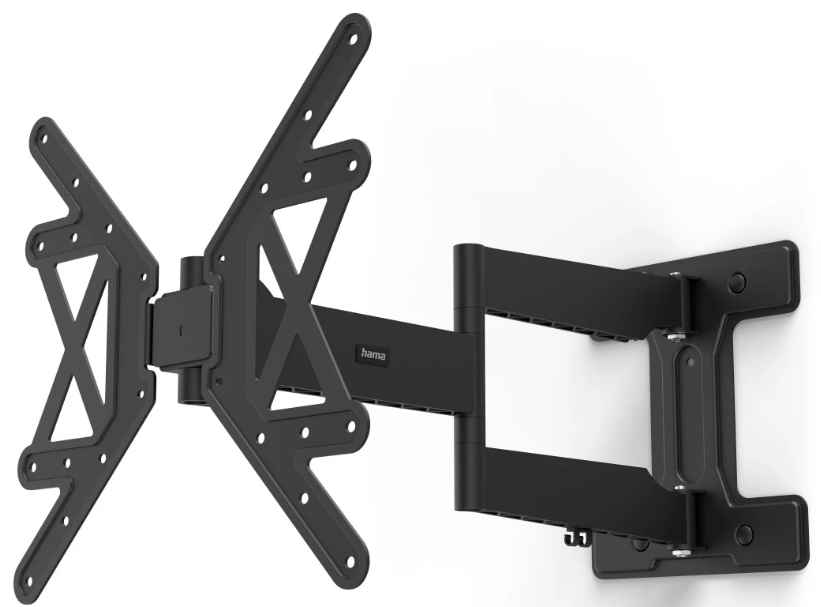
Hama 00220854 TV Wall Bracket Installation
Safety Instructions
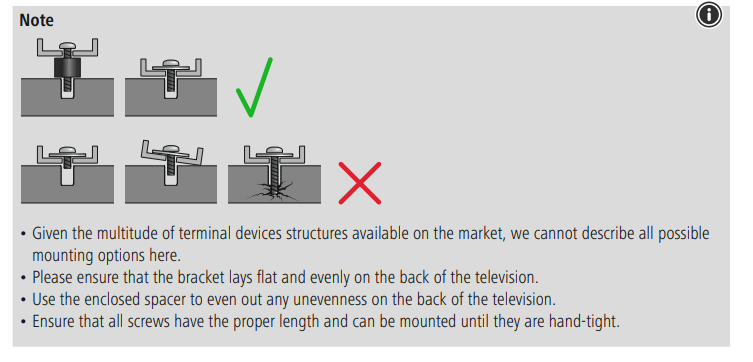
- It occasionally happens that the screws for attaching the device to the bracket are too long.
- The supplied wall plugs are for use with solid, hollow, wood, and board construction materials only.
- Read the operating instructions for your terminal device before attempting to mount it.
- The instructions provide information about the type and measurements of suitable fastening materials.
- Never apply force during assembly. This can damage your device or the holder.
- If in doubt, have this product installed by a qualified technician – do not attempt to install it yourself!
- Do not mount the product above locations where persons might sit or stand.
- You should repeat this check at regular intervals (at least every three months).
- Make sure that the product is loaded symmetrically.
- Maintain the necessary safety clearance around the attached load (depending on the model).
- In the event of damage to the product, remove the attached load and stop using the product.
- Do not attach any additional objects to the product.
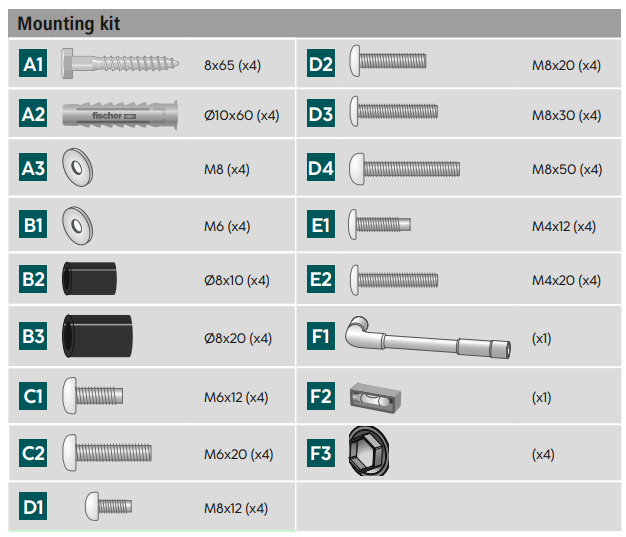
Package Contents
- TV wall bracket
- Drilling template
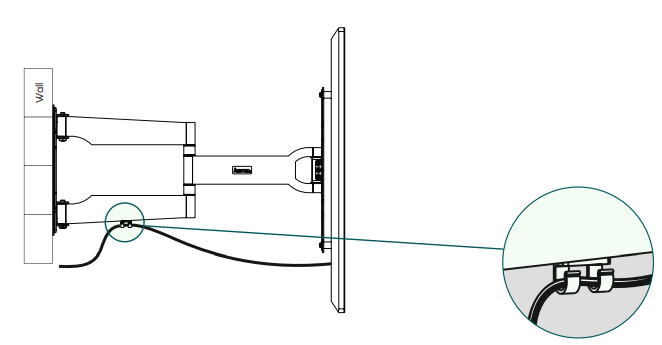
- Cable manager
- Mounting kit
- Safety instructions, illustrated quick start guide
Additionally Required Tools

Preparation
- Never install the bracket alone. Seek assistance and help!
- Different end devices have different connections for cabling and other devices.
- Before commencing the installation, check whether the necessary connections can still be reached after mounting.
- Depending on the product and mounting method, you may not need all parts of the mounting kit.
- It is therefore possible that unneeded screws and other small parts will be left over even after correct mounting.
- Keep these in a safe place together with these operating instructions for use for later reference (sale of the product, moving house, relocation of the bracket, new TV, etc.).
Fischer Plugs
The Fischer plugs supplied are approved for the following building materials.
- Concrete
- Plasterboard and gypsum fibreboard
- Vertical perforated brick
- Lightweight concrete hollow block
- Hollow brick and concrete ceilings
- Perforated sand-lime brick
- Solid sand-lime brick
- Natural stone
- Aerated concrete
- Chipboard
- Solid plaster boards
- Lightweight concrete solid block
- Solid brick
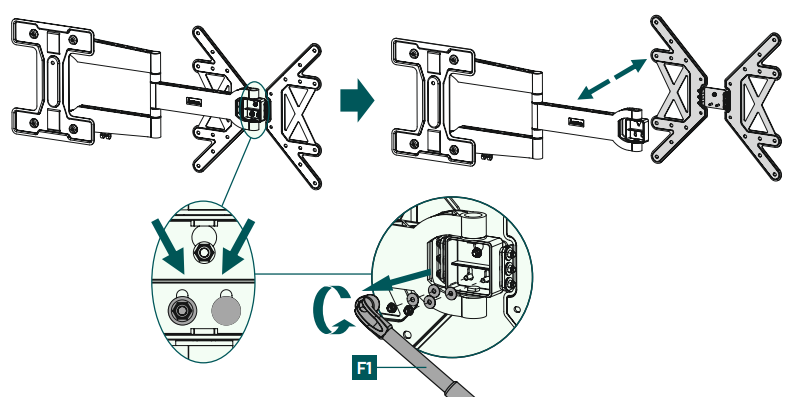
Assembly
- First loosen the upper flange nut using the pipe bowl spanner included.
- In the next step, loosen the two lower flange nuts as shown above.
- Remove the VESA plate from the wall bracket by lifting it.
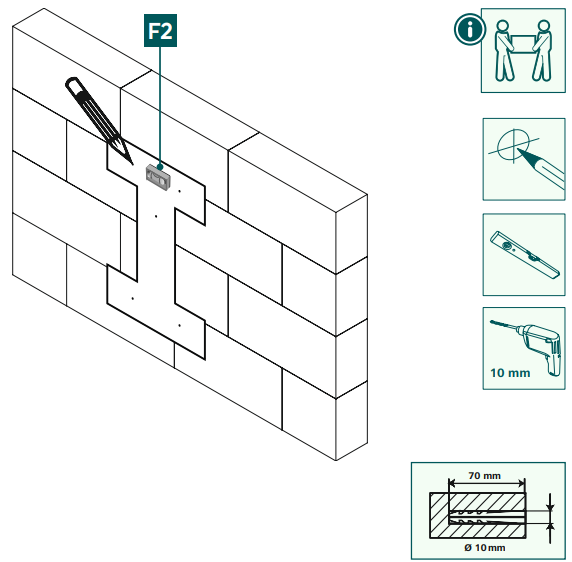
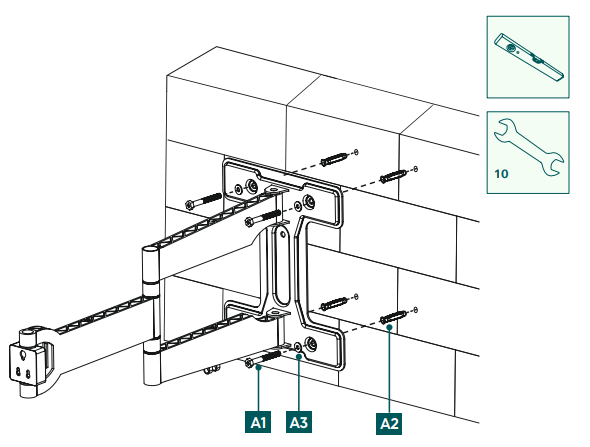
Mounting on the Wall
Get support and help from other people for the following assembly steps.
- Use the enclosed drilling template to determine the desired position of your bracket.
- Use a spirit level [F2] to check the horizontal and vertical alignment of the bracket on the wall.
- Now mark the holes on the wall.
- Make sure that the drilling attachment is suitable for the intended wall.
- The depth of the hole should be 70 mm.
- Now insert the plug [A2] into the drill hole so that it is flush with the hole.
Attaching the Wall Bracket
- Attach the wall bracket to the wall as shown above using the enclosed mounting material ([A2] plug, [A3] M8 washer, [A1] 8×65 mm screw, and the [F2] spirit level).
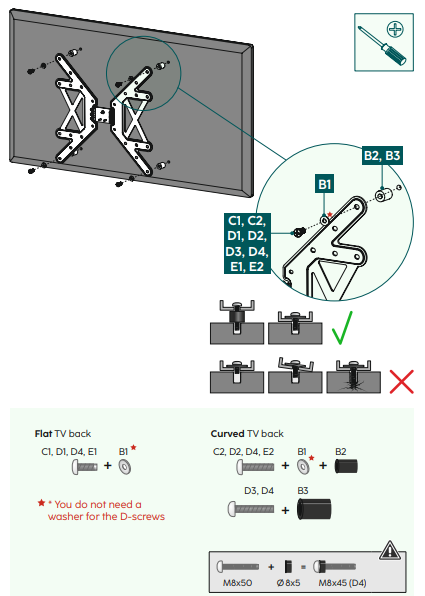
Mounting
TV Set
VESA Plate
- Mount the VESA plate onto the back of your TV set.
- Note the combination of screw, washer, and spacer listed above for your flat or curved TV
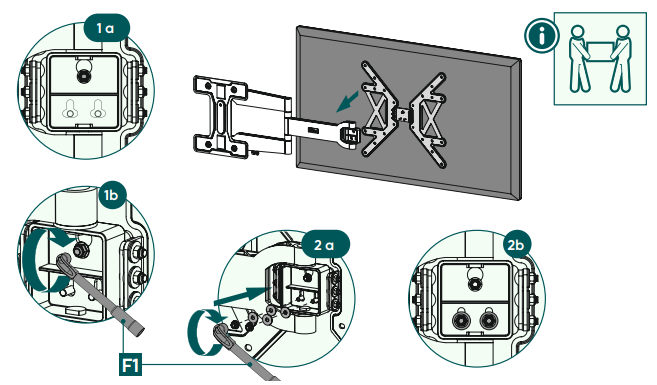
TV on the Wall Bracket
Get support and help from other people for the following assembly step.
- During installation, the joints must be adjusted so that lateral movement of the TV set is possible.
- Hang the TV with the mounted VESA plate on the wall bracket.
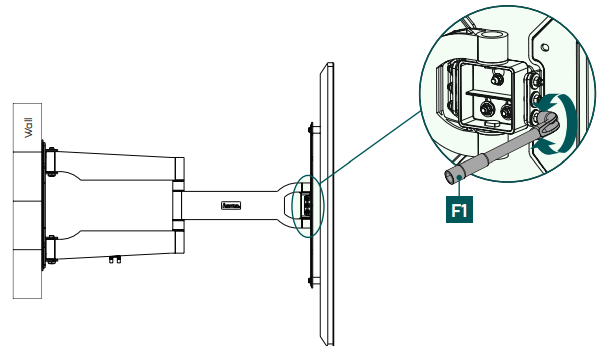
- To secure it, turn the three nuts along with the washers using the pipe bowl spanner.
- Then tighten the fixing screws on the side with the enclosed pipe bowl spanner [F1].
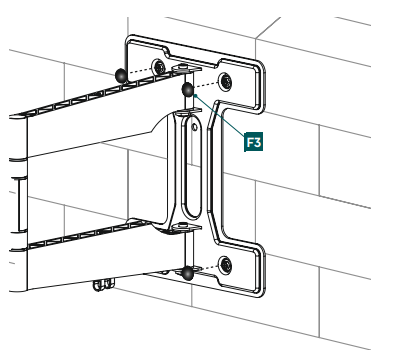
Attaching Cover Caps
- Then attach the enclosed cover caps [F3] to the hexagon head screws [A1] as shown above.
- Then attach the enclosed cover caps [F3] to the hexagon head screws [A1] as shown above. Wall
Adjustment & Maintenance
- Ensure that no electrical cables are crushed or damaged during installation or adjustment.
- During adjustment, ensure that the product is loaded symmetrically and that the maximum permitted carrying capacity is not exceeded.
- Check the strength and operational safety of the bracket and the load attached to it at regular intervals (at least quarterly).
- Clean only with water or conventional household cleaners.
- To adjust the tilt angle, open the fastening screws at the side, set the required tilt, and then secure the screws in place again.
Technical Data
| Maximum load: | 50 kg |
| Screen diagonal: | 81.0 – 165.0 cm (US: 32″ – 65″) |
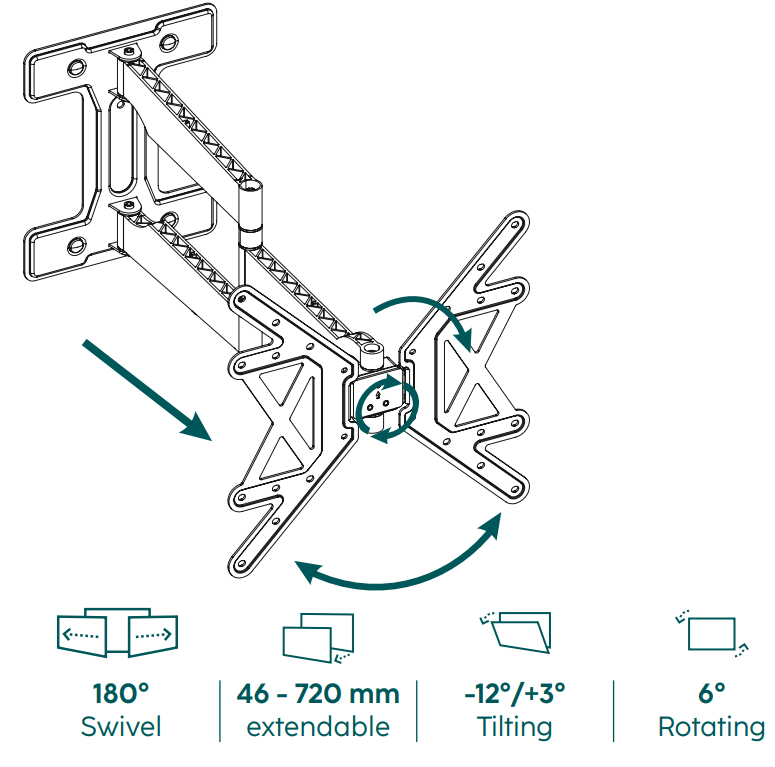
| Depth: | 4.6 cm – 72.0 cm |
| Tilt: | -12°/+3° (depending on device) |
| Swivel range: | Up to 180° (depending on device) at 3 joints |
| Dimensions of the wall mounting plate: | 28.1 x 34.7 cm |
| Mount: | Compliant with the VESA standard: 100×100 ,200×200 ,300×200 ,400×200 ,400 x 400 |
Warranty disclaimer
Hama GmbH & Co. KG assumes no liability and provides no warranty for damage resulting from improper
installation/mounting, improper use of the product, or failure to observe the operating instructions and/or safety notes
Declaration of Conformity
Hama GmbH & Co KG hereby declares that the radio equipment type [00184067, 00184068, 00184074, 00184075, 00184076, 001884077] complies with Directive 2014/53/EU.
- Frequency band(s) 2402 MHz – 2480 MHz
- Maximum radio-frequency power transmitted 2 .5mW E.I .R .P
Customer Service
- Website: https://de.hama.com
- Ph: 49 9091 502-0
FAQs
What TV sizes and weights are compatible with this wall bracket?
The Hama 00220854 supports a maximum weight of 40 kg (88 lbs) and works with TVs that range in size from 32″ to 65″ (81–165 cm). Before installation, always verify the weight and VESA mounting pattern of your TV.
What is the VESA standard supported by this bracket?
The majority of contemporary flat-screen TVs are compatible with this wall bracket, which supports VESA patterns ranging from 100×100 mm to 400×400 mm.
Can this bracket be installed on drywall?
Yes, although for optimal stability, mounting the bracket into wall studs is advised. If studs are not accessible, use toggle bolts or the proper wall anchors.
How far will the TV sit from the wall?
Depending on your installation, the TV will be installed between 60 and 70 mm (2.4 and 2.8 inches) from the wall.
Is this a tilting or fixed bracket?
With the Hama 00220854 tilting wall bracket, you may change the TV’s vertical angle for better viewing and less glare.
How do I tilt the TV after installation?
Holding the TV securely, gently tilt it up or down within the angle range of the bracket (usually ±15°). Don’t push past the boundary of the bracket.
Can I rotate the TV horizontally (swivel)?
No, there is no horizontal swivel on this model. The only feature it offers is tilting.
How do I ensure the bracket is level during installation?
Before drilling, position the mounting plate on the wall using a spirit level. Before fastening screws, make sure the alignment is correct.
1 Comment
Pingback: Hama 00221056 2 in1 Zapper Remote Control Manual & Guide