
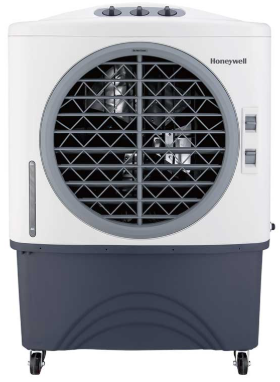
Honeywell CL48PM Portable Evaporative Air Cooler
Safety Instruction
The Air Cooler Guide and User Manual are intended to provide important information needed to set up, operate, maintain, and troubleshoot your Air Cooler. Failure to follow these instructions may damage and/or impair its operation, create hazards, and void the warranty. In case there is any inconsistency or conflict between the English version and any other language version of the content of this material, the English version shall prevail.
- Before operating the product, remove the packaging and check thatthe product is in good condition.
- DO NOT allow children to play with this appliance, packaging, or plastic bags.
- Check the household voltage to ensure it matches the appliance’s rating specifications.
- DO NOT use an extension cord with this unit.
- DO NOT runthe power cord under carpeting, or cover it with rugs or runners. Keep the cord away from areas where it may be tripped over.
- Always ensure the water tank is filled with water above the “min.” level mark when operating the air cooler in evaporative COOLING mode.
- Always unplug the Air Cooler before refilling the water tank, cleaning, servicing, or relocating the unit.
- Never pull the cord. Remove it from the electrical outlet/ socket by grasping and pulling on the plug-end of the cord.
- This appliance has been manufactured for use in domestic environments and must not be used for other purposes.
- DO NOT use in areas where gasoline, paint, or other flammable goods and objects are stored.
Parts Description
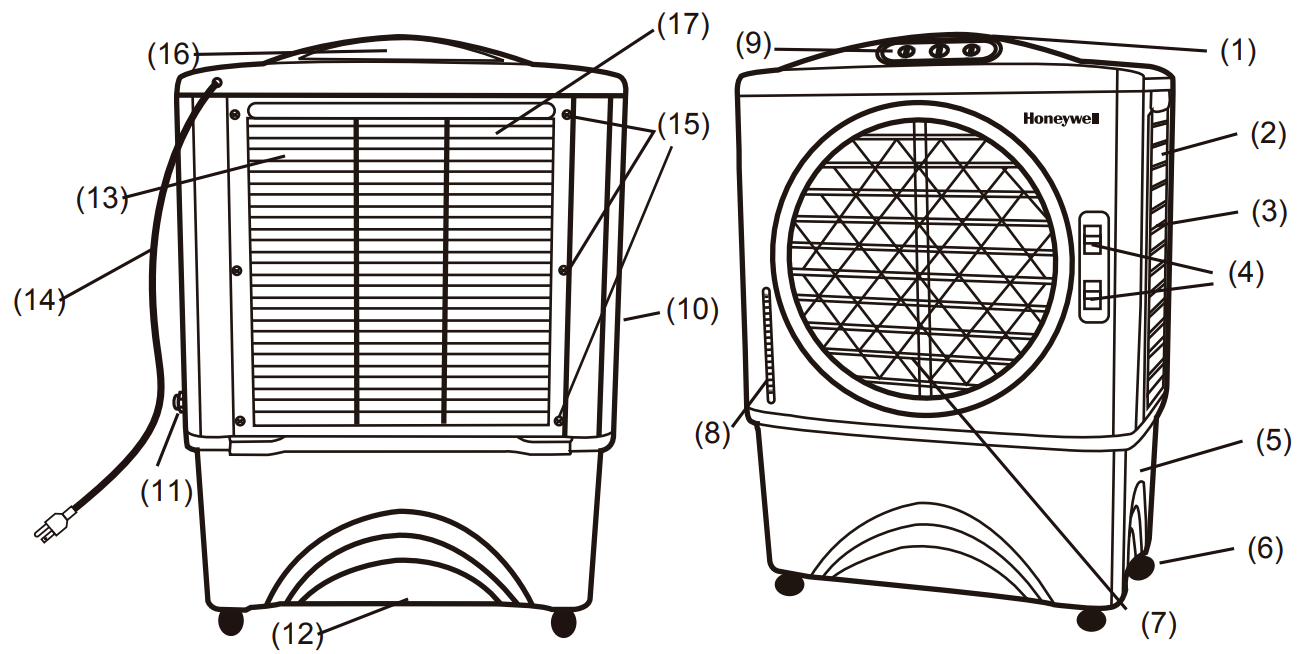
- Water Inlet Hole
- Handle
- Left Side Grill
- Lever for Horizontal Louvers
- Water Tank
- Casters
- Louvers
- Water Level Indicator
- Control Panel
- Right Side Grill
- Water Inlet Valve
- Drain Plug
- Rear Grill
- Power Cord & Plug
- Rear Grill Screws
- Water Fill Door
- Honeycomb Cooling Media
Using the Device
What is Evaporative Cooling?
Water pumped from the water tank pours over the Honeycomb Cooling Media. As the warm air passes through the Honeycomb Cooling Media, the water absorbs the heat, naturally cooling and humidifying the air. A fan propels the cooled air out into the room. This no-compressor system cools naturally, efficiently, and inexpensively.
Evaporative Air Cooling Mechanism
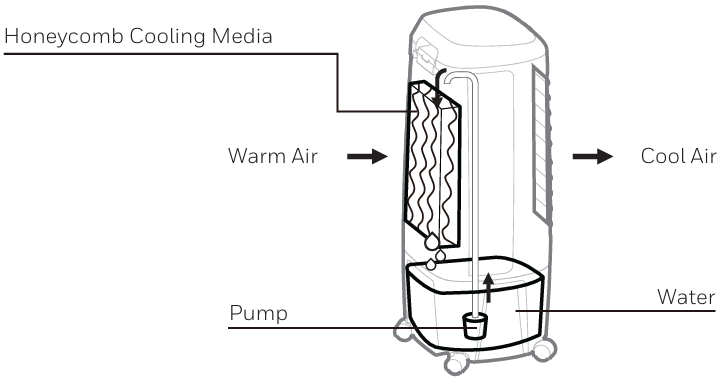
The recommended maximum relative humidity level is 60% or less, which allows a noticeable temperature decrease. The temperature will be lower in drier climates because higher evaporation occurs when the humidity is low.
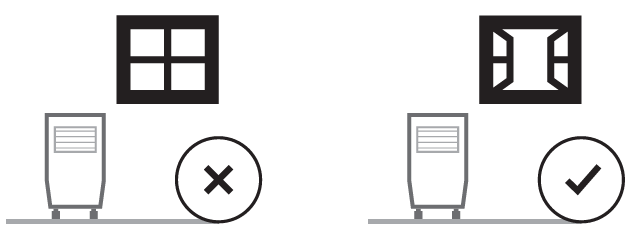
Location
Indoors
Place the cooler in front of an open door or window. Ensure that there is adequate cross-ventilation in the room by leaving a door or window open opposite the cooler.
Outdoors (for outdoor models only)
- Use only GFCI-protected outlets/ sockets (for USA only). Press the TEST button (then RESET button) every month to ensure proper operation.
- Power cords must be secured to avoid tripping.
- The wiring and connections must be protected from water. The electrical plug and Air Cooler connections must be dry at all times. When used outdoors, insert the air cooler electrical plug into an IP44-compliant outdoor electrical outlet.
- Set the unit on a solid flat surface.
Storage And Maintenance
Read the detailed CLEANING & DRAINING THE WATER TANK instructions for your Air Cooler, located in the separate User Manual. Below is a general guideline for the maintenance and storage of your Air Cooler.
Cleaning
At least once a week, drain the water tank of the Honeywell CL30XC Portable Evaporative Air Cooler completely and refill with fresh water. Doing this will greatly reduce mineral deposits and help to extend the life of the Honeycomb Cooling Media.
End of Season Storage
If the air cooler is not used for a long time:
- Make sure all parts are dry by running the Fan Only mode for about 1 to 2 hours before storing (time depends on ambient humidity conditions).
- Switch OFF the Air Cooler and unplug it from the power supply.
- Empty/drain all the water from the tank. This function is only available on some Honeywell Air Cooler models. Check the User Manual to see if your unit has the Continuous Water Supply Function.
- Clean the water tank with a damp cloth to wipe away any dust or mineral deposits.
- Remove the Honeycomb Cooling Media and Carbon Dust Filter* from the Air Cooler and rinse under fresh water to remove dust and dirt.
- Replace the Honeycomb Cooling Media and Carbon Dust Filter* after they are clean and dry.
- To protect the unit from dust, moisture, and scratches, cover it with a clean cloth, tarp, or plastic bag before storing.
- Coil the power cord and store it away from the floor to protect it.
- Store this unit at room temperature in a dry location, away from direct sunlight and/or very cold or damp environments.
Troubleshootig
Customer Service Center Contact: See the last page of the User Manual.
| PROBLEM | POSSIBLE CAUSE | SOLUTION |
| No discharge of air. | The cord is not plugged in. | Make sure the power cord is plugged i,n and the switch is ON. |
| Power is not ON. | Turn the unit ON by pressing the power button on the control panel / remote control or turning the SPEED knob. | |
| Not Cooling / Unit is making noise. | The pump is not turned ON. | Turn on the COOL function from the remote or the control panel. |
| Low or no water in the tank when COOL is selected. | Refill the water tank. | |
| Damaged Pump or Calcium deposits on the blower. | Contact Customer Service Center. | |
| Excessive humidity in the room. | In cooling mode, the Air Cooler produces moisture as a result of evaporative cooling. This is normal. | The Air Cooler cools best in dry climates. If the ambient humidity level is high (approx. |
| Make sure the window/doors are open, and there is adequate cross-ventilation in the room so that the moisturized air can circulate better. Do not use the evaporative cooling function on days with high ambient humidity. | ||
| Odors. | When the Cooler is new. | When the unit is used for the first time, the Honeycomb Cooling Media will have an odor, which will dissipate within a few hours of initial use. |
| Algae or mold due to moist parts. In very damp conditions, algae may form. | Check the Honeycomb Cooling Media. If you see mold spots on the media or suspect an algae issue, remove and replace the Honeycomb Cooling Media. Contact the Customer Service Center for more information. |
Correct Disposal of this product
To prevent possible harm to the environment or Honeywell CL30XC Portable Evaporative Air Cooler human health from uncontrolled waste disposal. Recycle it responsibly to promote the sustainable reuse of material resources. They can take this product for environmentally safe recycling.
Warranty
Some states do not allow limitations on how long an implied warranty lasts, so the above limitation may not apply to you. This warranty gives you specific legal rights, and you may have other rights which vary from state to state.
Customer Support
- Website: resideo.com
- Visit: HoneywellHome.com
- Tell: 1-800-633-3991.
2019 Resideo Technologies, Inc.
FAQs
Q: What is the Honeywell CL48PM designed for?
By pulling heated air through water-saturated pads, moistening dry air, and circulating cooler air, the CL48PM portable evaporative air cooler offers energy-efficient cooling. For medium to big indoor environments, it is perfect.
Q: Can I use ice or chilled water in the tank?
Particularly in extremely hot weather, adding ice or cold water improves cooling efficacy. Don’t use more water than the tank can hold.
Q: How does evaporative cooling work?
The CL48PM uses water-saturated cooling pads to pull heated, dry air. Heat is absorbed by the evaporating water, which cools and humidifies the air that is then circulated throughout the space.
Q: Can I use the cooler as a fan without water?
Indeed. The CL48PM can function as a standard fan, but it will no longer have the same cooling and humidifying effects.
Q: Can I use the cooler outdoors?
No, the CL48PM is exclusively intended for indoor use. Rain or direct sunlight exposure could harm the device and nullify the warranty.
Q: What is the optimal humidity for evaporative cooling?
In arid regions with humidity levels below 60%, evaporative coolers perform best. Even though cooling performance drops in extremely humid conditions, the device will still add moisture and circulate air.
Q: Can I run the cooler overnight?
Yes. Use the timer and a low fan speed for safe overnight operation. Ensure the tank has sufficient water for the duration.
Q: Can I add fragrance or essential oils?
Use only aroma pads made especially for evaporative coolers. Oils should not be poured straight into the water tank as this could harm internal parts or pads.