
Honeywell H31MRS 2 Door Compact Refrigerator
Safety Instructions
- Do not store explosive substances such as aerosol cans in this appliance.
- Do not use extension cords or ungrounded (two-prong) adapters.
- Keep ventilation openings in the appliance enclosure or the built-in structure clear of obstruction.
- Do not damage the refrigerant circuit.
- This freezer uses flammable blowing gas and refrigerant. Please dispose of according to local regulators.
- Do not locate multiple portable socket-outlets or portable power supplies at the rear of the appliance.
- Risk of child entrapment. Before disposing of your old freezer:
- Take off the doors.
- Leave the shelves in place so that children may not easily climb inside.
- Opening the door for long periods can cause a significant increase in the temperature in the compartments of the appliance.
- Regularly clean surfaces that can come in contact with food and accessible drainage systems.
Electricity Safety
- Do not pull the power cord when unplugging the upright freezer.
- Replace worn or damaged power cords in manufacturer-authorized maintenance stations.
- In case of a gas leak, please turn off the valve of the leaking gas and then open the doors and windows.
- Do not unplug the upright freezer and other electrical appliances since that spark may cause a fire.
Installation
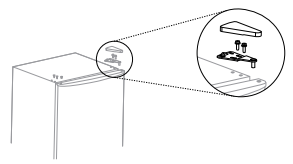
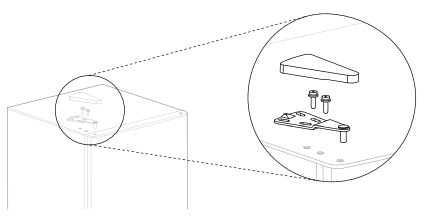
Leveling Feet
Schematic diagram of the leveling feet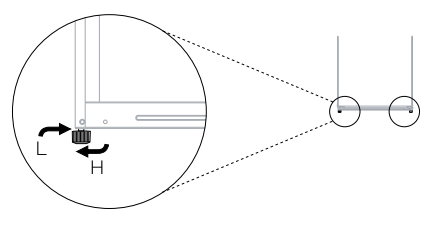
Adjusting procedures
- Turn the feet clockwise to raise the refrigerator.
- Turn the feet counterclockwise to lower the refrigerator.
- Adjust the right and left feet based on the procedures above to a horizontal level.
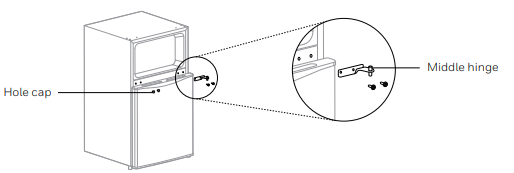
Reversing the Door Swing
- Remove all food from door shelves. Fix the door with tape.
- Dismantle the top hinge cover, the top hinge, and the hole cap of the other side.
- Remove the freezer door as well as the middle hinge and the hole cap of the other side.;
- Exchange the installation position of the bottom Honeywell H31MRS 2 Door Compact Refrigerator hinge and the adjustable foot, then fix them respectively. Remove the hinge sleeve pipe of the refrigerating door, and install it on the other side. Remove the hinge sleeve pipe of the freezer door and install it on the other side.
- Place the refrigerator door on the bottom hinge, then fix the middle hinge on the left side and insert the hole caps on the right side.
- Place the freezer door on the middle hinge, then Honeywell H31MRS 2 Door Compact Refrigerator fix the top hinge, the top hinge cover on the left side, and insert the hole caps on the right side.
Changing the Light
Disconnect the power supply before replacing the bulb; hold and remove the light bulb cover. Remove the old bulb by unscrewing it counterclockwise. Reassemble the light cover and reconnect your freezer to the power supply.ply
Starting to use
- The refrigerator must stand upright for two hours before connecting power when it is first started.
- Run the refrigerator for 2 to 3 hours, or 4+ hours in the summer, before loading fresh or frozen food.
Structure & Functions
Key Components
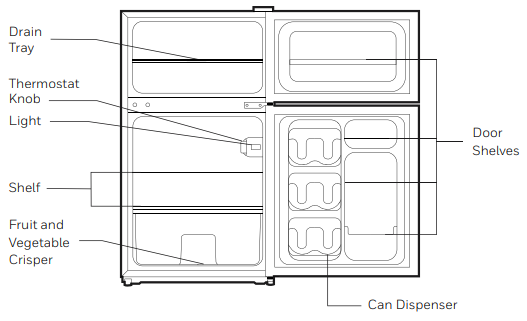
Refrigerator
- The refrigerator is suitable for storing a variety of fresh foods to be consumed within the short term.
- Cooked food should be cooled to room temperature before being placed into the refrigerator.
- Glass shelves may be adjusted up or down for easy use or additional storage space.
Freezer
- The low temperature of the freezer may keep food fresh for a long time, and it is mainly used to store frozen foods and to make ice.
- The freezer is suitable for the storage of meat, fish, shrimp, pastries, and other foods not to be consumed in the short term.
- Chunks of meat are preferably divided into small pieces for easy access. Please note that food should be consumed within its shelf life.
Temperature Control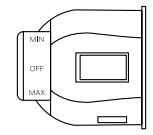
The markings on the control knob indicate the “MIN, MAX, and OFF” for the different temperature levels. “MAX.” lowers the internal temperature of the refrigerator; “MIN.” increases the internal temperature of the refrigerator; Recommended gear: “Mid-range.”
Maintainance
Cleaning
- Check the door gasket regularly to make sure there is no debris.
- Clean the door gasket with a soft cloth dampened with soapy water or diluted detergent.
- Clean the interior of the refrigerator regularly to avoid odor.
- Please turn off the power before cleaning the interior, and remove all food, shelves, drawers, etc.
- Use a soft cloth or sponge to clean the inside of the refrigerator, with two tablespoons of baking soda and a quart of warm water. Then rinse with water and wipe clean.
- After cleaning, open the door and let it dry naturally before turning on the power.
- Do not use soap, detergent, scrub powder, spray cleaner, etc., as these may cause odors in the interior of the refrigerator or contaminate food.
- Clean the bottle frame, shelves, and drawers with a soft cloth dampened with soapy water or diluted detergent. Dry with a soft cloth or dry naturally.
Defrost
Power off the refrigerator and disconnect the plug from the wall socket. Open the door and remove all the food to a cool place. Clean the drain pipe, paying special attention to cleaning the compressor compartment water draining tray to avoid water overflowing onto the ground. It is recommended to remove the frost with a plastic scraper or let the temperature rise naturally until the frost melts. Then wipe away the remaining ice and water, and plug in the freezer. After defrosting, put all food back into the refrigerator, and power on.
Stop Using
- Long-time nonuse: Please unplug the unused refrigerator for cleaning.
- Keep the door open to avoid odor.
- Moving: Do not turn upside down or shake the refrigerator; the carrying angle can not be greater than 45°. Do not hold the door or hinge when moving this unit.
Troubleshooting
| Inoperation | Ensure the refrigerator is plugged in and connected to power. Check that the voltage is not low. The temperature control knob is not set to “OFF“ |
| Odor | Thoroughly clean the interior of the refrigerator. |
| Long-term operation of the compressor | Do not overload the refrigerator. Do not put hot contents in the refrigerator |
| The light is out | Check whether the refrigerator is connected to the power supply. |
| Doors cannot be properly closed. | Check for any items blocking the refrigerator door or unbalanced items. |
| Loud noise | Ensure that the refrigerator is sitting on a flat and stable surface. |
| The door seal fails to be tight | Remove foreign matter from the door seal. Heat the door seal and then cool it for restoration (or use an electrical drier or a hot towel for heating). |
| The water pan overflows | Heavy defrosting may occur when there is too much food in the refrigerator or if the food contains too much water. |
| Hot housing | Heat dissipation of the built-in condenser via the housing is normal. When housing becomes hot due to high ambient temperature or storage of too much food, provide ventilation to facilitate heat dissipation. |
Warranty
Some states do not allow limitations on how long an implied warranty lasts, so the above limitation may not apply to you. This warranty gives you specific legal rights, and you may have other rights which vary from state to state.
Customer Support
- Website: resideo.com
- Visit: HoneywellHome.com
- Tell: 1-800-633-3991.
2019 Resideo Technologies, Inc.
FAQs
Q: What is the total capacity of the Honeywell H31MRS?
The H31MRS is a small, two-door refrigerator made for workplaces, bedrooms, dorms, and tiny kitchens. Although the capacity may differ slightly depending on the model batch, it usually consists of a primary fresh-food portion designed for daily storage and a separate freezer compartment.
Q: How long should I wait before storing food after plugging it in?
Before putting food inside, let the device run for two to four hours. Wait at least four hours for freezer-safe items to attain the right freezing temperatures.
Q: Can the refrigerator be placed directly against a wall?
No. To guarantee adequate ventilation and avoid overheating, leave at least 4 to 6 inches of space behind and on the sides of the refrigerator.
Q: Is the refrigerator safe to use in a bedroom?
The H31MRS is appropriate for offices, dorm rooms, and bedrooms, and runs silently. While noise levels will vary, short-lived humming during compressor operation is typical.
Q: Does the freezer require manual defrosting?
Turn off the unit, let the ice melt, and clean the compartment once the frost has accumulated to about ¼ inch.
Q: Can I store heavy items on the door shelves?
Steer clear of hefty jars or bottles that could put stress on the hinges.
Q: How do I clean the inside of the refrigerator?
Take out all of the food and unplug the device. Use a mixture of baking soda and warm water or a light soap solution. Steer clear of harsh chemicals, bleach, and abrasive cleaners that could harm surfaces.