
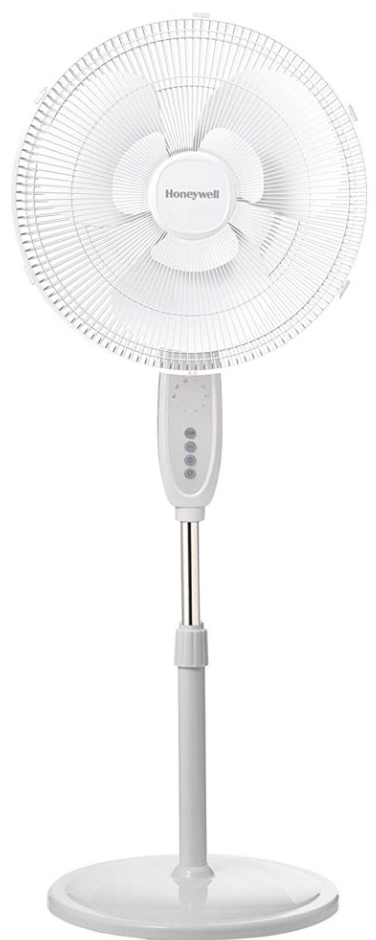
Honeywell HSF1640 Series Double Blade Stand Fan
Safety Instructions
- Before proceeding with the installation, please note the following safety warnings.
- Use this fan only as described in this manual. Never pull the plug by the cord.
- Other uses are not recommended as they may cause fire, electric shock, or injury to persons.
- This product is intended for household use ONLY and not for commercial, industrial, or outdoor use.
- This appliance has a polarized plug (one blade is wider than the other).
- To reduce the risk of shock, this plug is intended to fit only one way in a polarized outlet.
- If the plug does not fit fully in the outlet, reverse the plug.
- If it still does not fit, contact a qualified electrician.
- Close supervision is necessary when any appliance is used by or near children.
- To disconnect the fan, first turn the unit OFF, grip the plug, and pull it from the wall outlet.
- DO NOT operate the fan in the presence of explosive and/or flammable fumes.
- DO NOT place the fan or any parts near an open flame, cooking, or other heating appliance.
Fused Plug
This fan features a fused safety plug, which is designed to cut off the electric current to the fan if an electrical fault occurs.
Servicing Instructions
- If your fan loses power and you suspect that the fuse on your fan has blown, grasp the plug and remove it from the receptacle or other outlet device. Do not unplug by pulling on the cord.
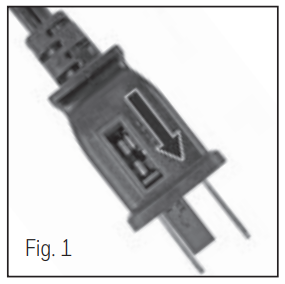
- Slide the fuse cover, located on the top of the plug, towards the prongs of the plug.

- Carefully remove the blown fuse and snap a new fuse into place. To reduce the Risk of Fire, replace the fuse only with a 2.5-amp, 125-volt fuse. Fully close the fuse door by sliding it back into place. (Fig. 2) Discard the blown fuse. The plug should now be ready for normal use.
- To reduce the Risk of Fire, do not replace the attachment plug. Contains a safety device (fuse) that should not be removed. Discard the product if the attachment plug is damaged.
- If you need further information on how or when to replace the fuse in the safety plug.
Assembly
- Align the pole in the base using tabs as a guide.
- Gently place the base on its side.
- Insert and tighten the L-shaped bolt and washer on the bottom of the fan base.
- Tighten by turning clockwise.
Parts
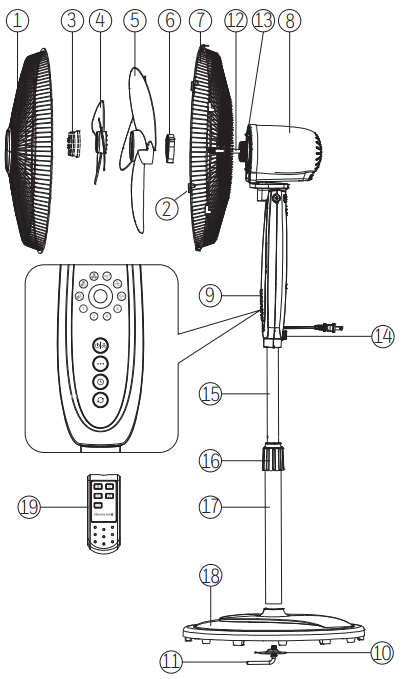
- Front Grille
- Locking Clips
- Blade Nut
- Small Blade
- Large Blade
- Plastic Nut
- Rear Grille
- Fan Head Assembly
- Control Panel
- Washer
- “L” Screw
- Motor Shaft
- Alignment Prongs
- Locking Screw
- Extension Pole
- Pole Locking Nut
- Lower Pole
- Base
- Remote Control
Assembly
- The small blade is packaged separately in cardboard, apart from the large blade.
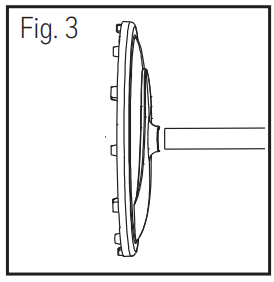
- Position the rear grille onto the fan head assembly, making sure the two alignment holes are aligned with the two prongs.
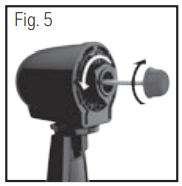
- Screw the plastic nut tightly clockwise to attach the rear grille.
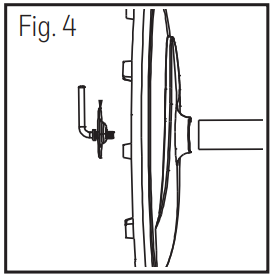
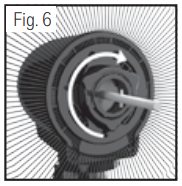
- Install the blade onto the shaft until the retaining pin fits into the notch on the blade. Now place the small blade onto the shaft, making sure the alignment pin is inserted into one of the three holes on the large blade.
- Screw the blade nut to the motor shaft counterclockwise (tighten by turning to the left).
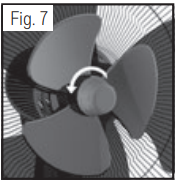
- Mount the front grille and secure it using the locking clips.
Operation
Tilt Control
The airflow can be adjusted upward or downward by tilting the fan head as desired. To change the tilting angle of the fan head assembly, simply move the fan head to the desired angle. 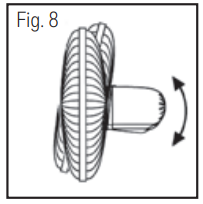
Height Adjustment
Turn the pole locking nut counterclockwise to loosen the pole. Adjust the pole to the desired height and firmly tighten the locking nut in a clockwise direction. 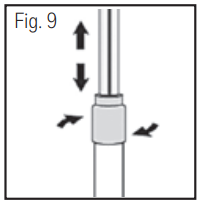
Fan Operation
On/Off
To turn the fan on, press the Power button located at the top of the control panel.
Speed Control
To adjust the speed up or down, press the Fan Speed button ( ) repeatedly to increase the level of air speed. 1 (Low) 2 (Me..) 3 (High) and Off
Timer
Choose from 1, 2, 4, or 8-hour settings by performing the following function.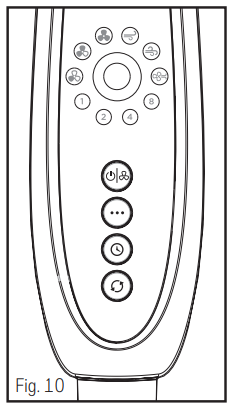
- 1 hour: Press the Timer button ( ) once.
- 2 hours: Press the Timer button twice.
- 4 hours: Press the Timer button a third time.
- 8 hours: Press the Timer button a fourth time.
- Press the Timer button a fifth time to turn the Timer feature off.
Oscillation
- Press the Oscillation ( ) button to select or stop the oscillation.
Mode
- Press this key to select from three featured air flow modes as desired.
- Variable: quiet, ideal for nighttime Series Double Blade Stand Fan with a soothing intermittent hi/low.
- Breezy: natural air flow, intermittent hi/lo
- Constant: normal steady air flow
Battery Installation / Replacement Instructions
- Remove the battery door by sliding downward in the direction of the arrow.
- Insert 2 AAA batteries into the remote following the directional guides in the recessed slots.
- Replace the battery door by sliding upward opposite the arrow direction until the door snaps in place.
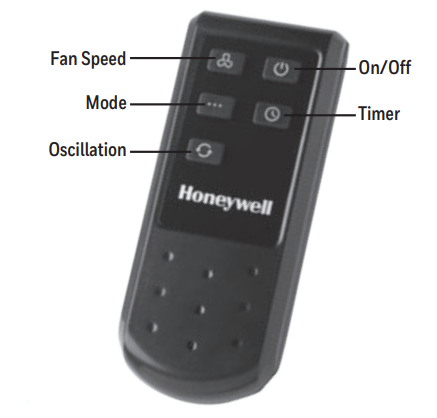
Remote Button Function
Fan Speed Selection, Timer, Oscillation, and Mode Select operate as described in the Control Panel Operation section.
Cleaning and Storage
- Be sure your fan is in the OFF position.
- Unplug the fan before cleaning.
- Use only a soft, damp cloth to gently wipe the fan clean.
- DO NOT immerse the fan in water and never allow water to enter the Motor Housing.
- DO NOT use gasoline, paint thinner, or other chemicals to clean the fan.
Front Grille for Cleaning
- Remove the Front Grille by releasing the Grille clips.
- Unscrew the Blade Knob by turning it CLOCKWISE (REVERSE THREAD).
- Pull the Fan Blade away from the Motor Housing.
- Gently wipe the Fan Blade and Grilles with a soft, damp cloth.
- Assemble the fan by following the last three steps in the ASSEMBLY INSTRUCTIONS.
Storage
- For storage, disassemble and clean the fan carefully as instructed.
- Store the fan in its original box.
- You may also leave the fan fully assembled and covered with plastic to protect it from dust.
- Store your fan in a clean, dry place.
Customer Service
- Website: Honeywell.com
- Ph: 1-800-477-0457
FAQs
Q: What is the number of speed options available on the HSF1640?
Three speed options are available for this fan: Low, Medium, and High. The control knob on the fan’s base allows you to choose the optimum airflow intensity.
Q: Is it possible to change the fan’s height?
Yes, the stand is telescopic, meaning you can easily change the direction of airflow in your room by adjusting the height between 38 and 50 inches.
Q: Is there oscillation in the fan? What is the oscillation’s width?
The HSF1640 does really vibrate to disperse air throughout the space. In order to provide greater airflow coverage, it offers an oscillation angle of roughly 80 degrees.
Q: Is it okay to use the fan outside?
Ans: The HSF1640 is only meant to be used indoors. The motor and electrical components may sustain damage from exposure to dampness or weather-related factors.
Q: Is the fan silent enough to be used in offices or bedrooms?
Yes, the fan runs silently on the low and medium settings, making it appropriate for study spaces, workplaces, and bedrooms without creating any noise. 10. Can I use this fan with an extension cord? Use an extension cord made for home appliances and rated for at least 13 amps if required. Do not overload the circuit or use defective cords.
Q: Is there a safety function on the fan to stop it from overheating?
Indeed, the fan has an overheat prevention mechanism that helps to reduce damage and fire risks by instantly turning off the motor if it becomes too hot.
Q: Is it possible to use the fan in pet-friendly rooms?
Yes, however, to avoid pet hair accumulation that could impair performance, clean the grill and fan blades regularly.