
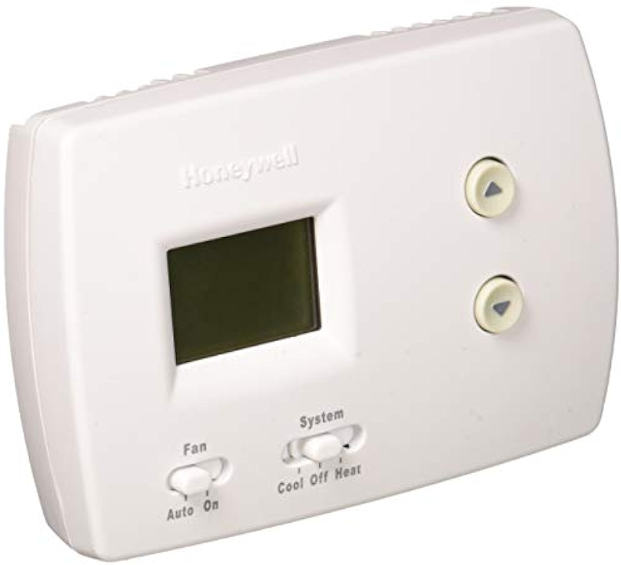
Honeywell TH3110D1008 Digital Thermostat
Safety Instructions
- Power supply. Provide disconnect means and overload protection as required.
- Remove jumper for 2-transformer systems.
- Optional 24 Vac common connection.
- The common connection must come from the cooling transformer.
- Use either O or B terminals for the changeover valve.
- Use a small piece of wire (not supplied) to connect W and Y terminals.
- Set the fan operation switch to Heat Pump (see page 5) and configure the system type for heat pump (see page 6).
- The L terminal sends a continuous output when the thermostat is set to Em. Heat.
- Connect to Honeywell Home zoning panels to switch the panel to Emergency Heat.
- Install a field jumper between Aux and E if there is no emergency heat relay.
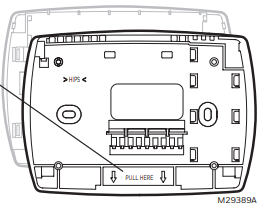
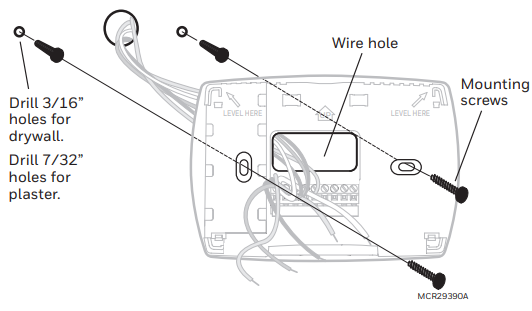
Wallplate installation
Remove the wallplate from the thermostat by pulling from the bottom, then follow the directions below for mounting.
- Pull wires through the wire hole.
- Position the wallplate on the wall, level and mark the hole positions with a pencil.
- Drill holes at marked positions as shown below, then tap in the supplied wall anchors.
- Place the wallplate over the anchors, insert and tighten the mounting screws.
Power options
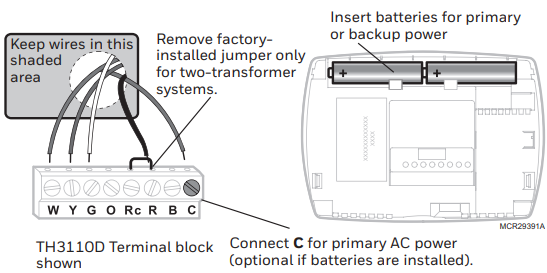
Wiring terminal designations
TH3110D
- C 24 Vac common. For 2 transformer systems, use a common wire from the cooling transformer.
- B Changeover valve energized in heating
- R 24 Vac power from heating transformer
- Rc 24 Vac power from cooling transformer
- O Changeover valve energized in cooling
- G Fan relay
- Y Compressor contactor
- W Heat relay
TH3210D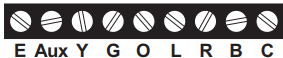
- C 24 Vac common
- B Changeover valve energized in heating
- R 24 Vac power
- L sends output when set to Em. Heat
- O Changeover valve energized in cooling
- G Fan relay
- Y Compressor contactor
- Aux: Auxiliary heat relay
- E: Emergency heat relay
Wiring conventional and heat pump systems
2H/1C Heat Pump System TH3210D
- C 24 Vac common [3]
- B Changeover valve energized in heating [5]
- R Power [1]
- L sends output when set to Em. Heat [8]
- O Changeover valve energized in cooling [5]
- G Fan relay
- Y Compressor contactor
- Aux: Auxiliary heat relay [9]
- E: Emergency heat relay [9]
1 transformer
- C 24 Vac common [3]
- R [R+Rc joined by jumper]
- Rc Power [1]
- G Fan relay
- Y Compressor contactor
- W Heat relay
2 transformers

- C 24 Vac common [3, 4]
- R Power (heating transformer) [1, 2]
- Rc Power (cooling transformer) [1, 2]
- G Fan relay
- Y Compressor contactor
- W Heat relay
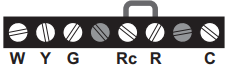
1H/1C Heat Pump System TH3110D [7]
- C 24 Vac common [3]
- B Changeover valve energized in heating [5]
- R [R+Rc joined by jumper]
- Rc Power [1]
- O Changeover valve energized in cooling [5]
- G Fan relay
- Y Compressor contactor [6]
- W [W+Y joined by jumper]
Heat Only System TH3110D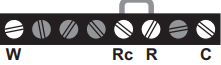
- C 24 Vac common [3]
- R [R+Rc joined by jumper]
- Rc Power [1]
- W Heat relay
Heat Only System with Fan TH3110D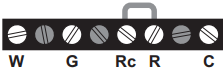
- C 24 Vac common [3]
- R [R+Rc joined by jumper]
- Rc Power [1]
- G Fan relay
- W Heat relay
Cool Only System TH3110D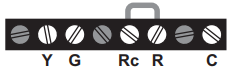
- C 24 Vac common [3]
- R [R+Rc joined by jumper]
- Rc Power [1]
- G Fan relay
- Y Compressor contactor
Fan operation settings (TH3110D only)
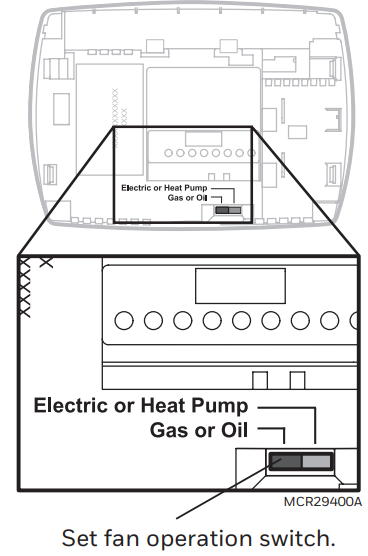
Gas or Oil: For gas or oil heating systems, leave the fan operation switch in this factory-set position. (This setting is for systems that control the fan in a call for heat.)
Electric or Heat Pump: Change the switch to this setting for heat pump or electric heat systems. (This setting is for systems that allow the thermostat to control Honeywell TH3110D1008 Digital Thermostat the fan in a call for heat, if a fan wire is connected to the G terminal.)
Thermostat mounting
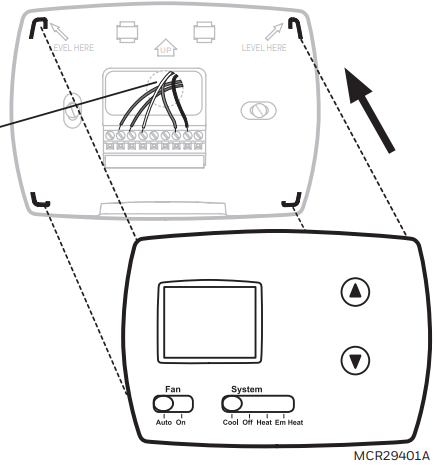
- Align the 4 tabs on the wallplate with the corresponding slots on the back of the thermostat.
- Push gently until the thermostat snaps in place.
- Push excess wire back into the wall opening.
- Plug wall opening with nonflammable insulation.
Installer Setup
Follow the procedure below to configure the thermostat to match the installed heating/cooling system, and customize feature operation as desired.
To begin, press and hold the s and t buttons until the display changes.
- Press t to change settings.
- Press s to advance to the next function.
- Press and hold ts to exit and save settings.
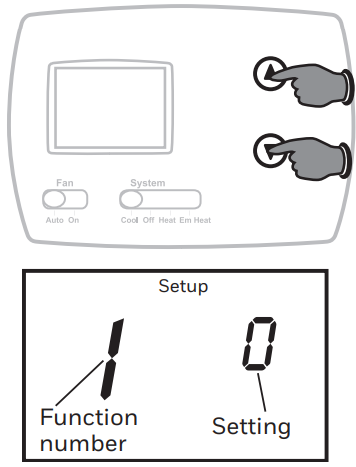
Set up function/Settings & options (factory settings in bold)
- 1 System type TH3110D only 0
Gas, oil, or electric heat with air conditioning 1 Heat pump 5-minute compressor off time in heating and cooling) - 5 Heating cycle rate (CPH: cycles/hour) TH3110D only
5 For gas or oil furnaces of less than 90% efficiency 1 For steam or gravity systems 3 For hot water systems & furnaces of over 90% efficiency 9 For electric furnaces [Other cycle rate options: 2, 4, 6, 7, 8, 10, 11 or 12 CPH] - 6 Auxiliary heat cycle rate (CPH) TH3210D only
5 For gas or oil furnaces of less than 90% efficiency 1 For steam or gravity systems 3 For hot water systems & furnaces of over 90% efficiency 9 For electric furnaces [Other cycle rate options: 2, 4, 6, 7, 8, 10, 11 or 12 CPH] - 8 Emergency heat cycle rate (CPH) TH3210D only
9 For electric emergency heat 1 For steam or gravity systems 3 For hot water systems & furnaces of over 90% efficiency 5 For gas or oil furnaces of less than 90% efficiency [Other cycle rate options: 2, 4, 6, 7, 8, 10, 11, or 12 CPH] - 9 Compressor cycle rate (CPH)
3 Recommended for most compressors [Other cycle rate options: 1, 2, 4, 5, or 6 CPH] - 14 Temperature display
0 Fahrenheit 1 Celsius - 15 Compressor protection
5 Five-minute compressor off time [Other options: 0, 1, 2, 3, or 4-minute off time]
Compressor Protection (Setup Function 15): Forces Honeywell TH3110D1008 Digital Thermostat the compressor to wait a few minutes before restarting, to prevent damage. During the wait time, the message Cool On or Heat On (heat pumps only) will flash on the display.
Installer system test
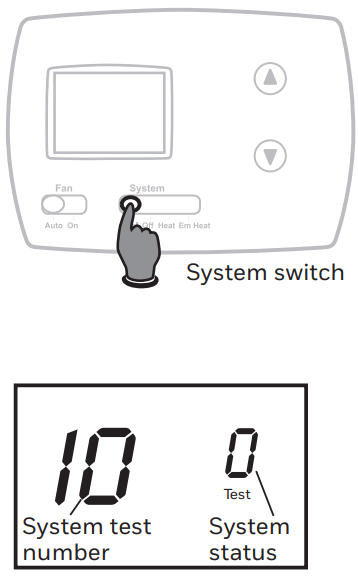
- Set the SYSTEM switch to Heat.
- Press t to turn on and check systems.
- Press t until systems turn off.
- Set the SYSTEM switch to Em Heat Honeywell TH3110D1008 Digital Thermostat and repeat steps 2-3 above (TH3210D only).
- Set the SYSTEM switch to Cool and repeat steps 2-3 above.
- Press and hold ts to terminate the test at any time.
System test/System status
- 10 Heating system
0 Heat and fan turn off. 1 Heat turns on. 2 Auxiliary heat turns on (TH3210D only). - 20 Emergency heat
0 Heat and fan turn off. 1 Heat and fan turn on. 2 Auxiliary heat turns on. - 30 Cooling system
0 Compressor and fan turn off. 1 Compressor and fan turn on. - 70 Thermostat information (for reference only)
71 Software revision number (major revisions) 72 Software revision number (minor revisions) 73 Configuration identification code (major) 74 Configuration identification code (minor) 75 Production configuration date code (week) 76 Production configuration date code (year)
Specifications
- Temperature Ranges
Heat: 40° to 90°F (4.5° to 32°C)
Cool: 50° to 99°F (10° to 37°C) - Operating Ambient Temperature
32° to 120°F (0° to 48.9°C) - Shipping Temperature
-20° to 120°F (-28.9° to 48.9°C) - Operating Relative Humidity
5% to 90% (non-condensing) - Physical Dimensions
3-13/16” H x 5-3/8” W x 1-1/4” D
97 mm H x 137 mm W x 32 mm D - Input: 24 V~ @ 60 Hz, 1.0 A
Electrical Ratings
- System Voltage (50/60Hz) Running Current
- Heat (1st stage) 20-30 Vac 0.02-1.0 A
- (Powerpile) 750 mV DC 100 mA DC
- Emergency heat 20-30 Vac 0.02-1.0 A
- Auxiliary heat 20-30 Vac 0.02-1.0 A
- Cooling 20-30 Vac 0.02-1.0 A
Troubleshooting
If you have difficulty with your thermostat, please Honeywell TH3110D1008 Digital Thermostat try the following suggestions. Most problems can be corrected quickly and easily.
- Check the circuit breaker and reset if necessary.
- Make sure the power switch on the heating & cooling system is on.
- Make sure the furnace door is closed securely.
- Make sure fresh AA alkaline batteries are correctly installed (see page 2).
- Set the system switch to Heat. Make sure the temperature is set higher than the Inside temperature.
- Set the system switch to Cool. Make sure the temperature is set lower than the Inside temperature.
- Wait 5 minutes for the system to respond.
- Make sure heating and cooling temperatures are set to acceptable ranges:
- Heat: 40° to 90°F (4.5° to 32°C).
- Cool: 50° to 99°F (10° to 37°C).
- Compressor protection feature is engaged. Wait 5 minutes for the system to restart safely, without damage to the compressor.
- Set the System switch to Heat, and set the temperature level above the current room temperature.
- Set the System switch to Cool, and set the temperature level below the current room temperature.
Need Help?
For assistance with this product, please visit customer.resideo.com. Or call Customer Care toll-free at
1-800-468-1502.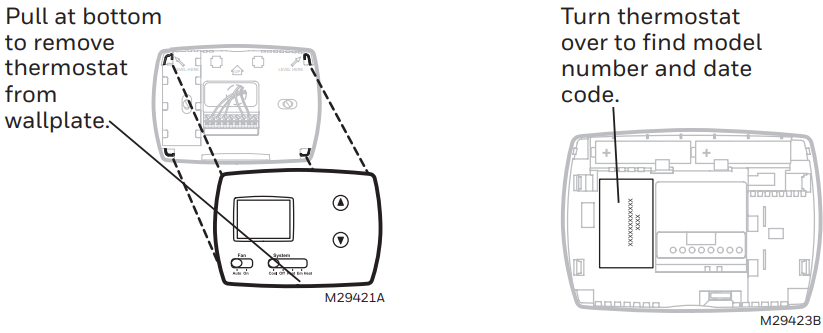
Disposal
- The upright freezer’s refrigerant and Honeywell TH3110D1008 Digital Thermostat cyclopentane foam materials are combustible materials.
- Please transfer the upright freezer to a qualified professional recycling company for processing to avoid damage to the environment or other hazards.
- Please remove the door of the upright freezer and the shelves to prevent children from entering and playing in the upright freezer.
Correct Disposal of this product
- To prevent possible harm to the environment or human health from uncontrolled waste disposal, recycle it responsibly to promote the sustainable reuse of material resources.
- Contact the retailer, as many will take them back for recycling.
Customer Service
- BHRS Group, LLC 585 Prospect St., Lakewood, NJ 08701
- Tel: 1-800-604-0295
- Email: support@honeywellcoolingappliances.com
- Website: honeywellcoolingappliances.com
FAQs
What types of heating and cooling systems are compatible with the TH3110D1008?
Gas, oil, and electric furnaces, as well as other single-stage heating and cooling systems, are compatible with the TH3110D1008 and other standard 24-volt heating and cooling systems.
How do I set the desired temperature on the thermostat?
To change the temperature, use the up and down arrow buttons on the front panel. As you make changes, the digital display will show the desired temperature.
Does this thermostat have programmable scheduling features?
No, the TH3110D1008 is a manual temperature control thermostat that is not programmable and offers easy-to-understand operation.
How do I replace the batteries?
Replace the two AA batteries within the thermostat by opening the cover. Battery replacement is advised once a year or whenever the low battery signal shows up.
What does the “Fan” mode do?
You can move air about without heating or cooling by using the Fan mode. The fan can be set to AUTO to only run when the system is heating or cooling, or ON for constant airflow.
How do I switch between heating and cooling modes?
Toggle between Heat, Cool, and Off with the thermostat’s mode switch. Make sure the heating and cooling functions of your HVAC system are supported.
What should I do if the thermostat display is blank?
Examine the batteries and swap them out if needed. Additionally, make sure the power is on for your HVAC system and that the thermostat wiring is firmly attached.
Can I use this thermostat with a heat pump?
No, heat pump systems are incompatible with the TH3110D1008, which is made for traditional heating and cooling systems.