
INSIGNIA NS-DWH2BS8 Top Control Dishwasher
Introduction
Congratulations on your purchase of a high-quality Insignia product. Your NS-DWH2BS8 / NS-DWH2SS8 /
NS-DWR2BS8 / NS-DWR2WH8 / NS-DWR2SS8 represents the state of the art in dishwasher design and is designed for reliable and trouble-free performance. This installation guide will show you how to install your new dishwasher.
Safety Instructions
- Note to Installer – Be sure to leave these instructions for the consumer’s and local inspector’s use.
- Note to Consumer – Keep these instructions with your User Guide for future reference.
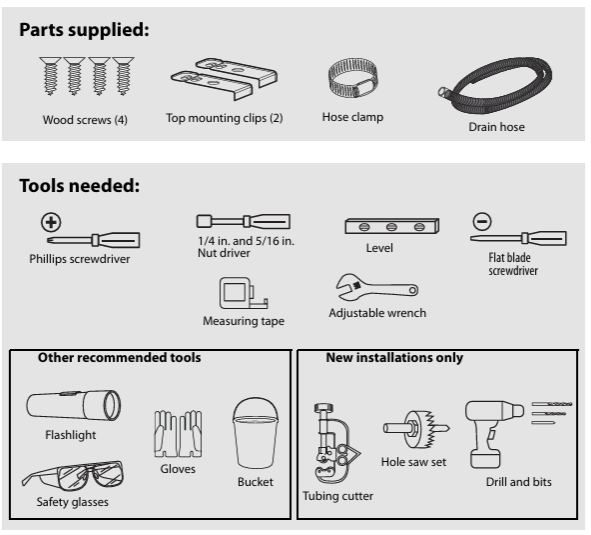
- Skill Level – Installation of this dishwasher requires basic mechanical and electrical skills.
- Proper installation is the responsibility of the installer.
- Product failure due to improper installation is not covered under the Appliance Warranty.
- Completion Time – One to three hours. New installations require more time than replacement installations.
- While performing installations described in this booklet, gloves and safety glasses or goggles should be worn.
Preparing to install your dishwasher
Enclosure requirements
- The dishwasher includes a drain hose. If you are installing this dishwasher with a different drain hose, make sure that the drain hose is no more than 10 feet (3.01 m) in length for proper drainage.
- The dishwasher is designed to be enclosed on the top, both sides, and back by a standard residential kitchen cabinet unit.
- The installation enclosure must be clean and free of any obstructions.
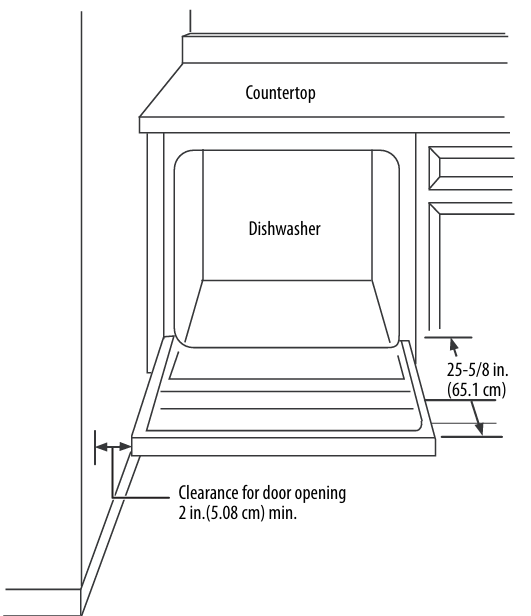
- The rough cabinet opening must be at least 24 in. (61 cm) deep and 34 in. (86.4 cm) high.
- For the front door of the dishwasher to be flush with the front edge of the countertop, the countertop must be 25 in. (63.5 cm) deep.
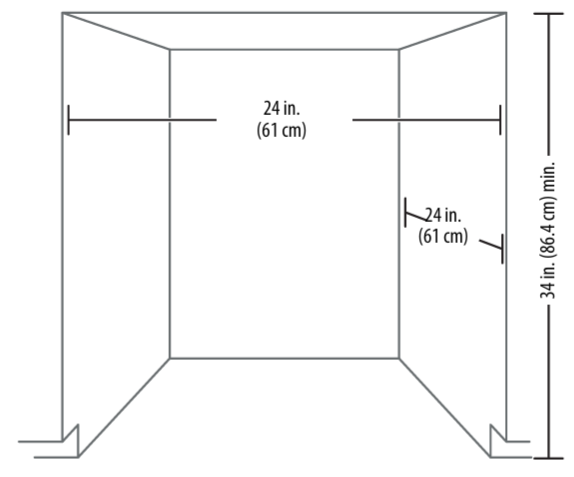
- If installing into a corner, allow 2 in. (5.08 cm) min. Clearance between the dishwasher and the adjacent cabinet, wall, or other appliances.
- Allow 25-5/8 in. (65.1 cm) min. Clearance from the front of the dishwasher for opening the door.

Drain requirements
- Follow all local codes and ordinances.
- Do not exceed 10 ft. (3.01 m) of drain hose.
- Do not connect the drain lines from other devices to the dishwasher drain hose.
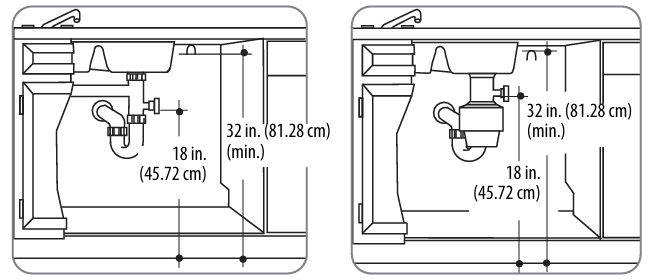
- The dishwasher must be connected to a waste line with an air gap (not provided) or a 32 in. (81.28 cm) high (min.) drain loop, depending on local codes and ordinances, to prevent backflow into the dishwasher.
- An air gap must be used if the waste tee or garbage disposal connection is less than 18 in. (45.72 cm) above the floor, to prevent siphoning.
Drain preparation
The type of drain installation required depends on the answers to the following questions:
- Do local codes or ordinances require an air gap?
- Will the waste tee or garbage disposal connection be less than 18 in. (45.72 cm) above the floor?
- Will installation have a drain loop less than 32 in. (81.28 cm) above the floor?
If the answer to ANY of these questions is YES, Method 1 MUST be used. Otherwise, either Method 1 or Method 2 may be used.
- An air gap MUST BE USED if the drain hose is connected to a waste tee or garbage disposal lower than 18 in. (45.72 cm) above the floor.
- Failure to provide the proper drain connection height with an air gap or a 3a 2 in. (81.28 cm) (min.) high drain loop will result in improper draining of the dishwasher.
Install the waste tee or garbage disposal connection and air gap according to the manufacturer’s instructions.
Method 1 – Air gap with a waste tee or garbage disposal connection
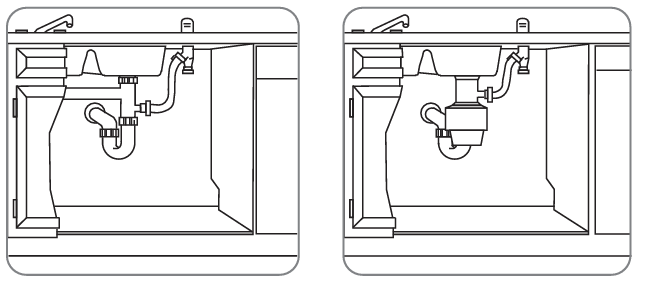
Method 2 – High drain with a waste tee or garbage disposal connection
You must provide a method to attach the drain hose to the underside of the countertop (See Step drain hose, Method 2 – High drain with a waste tee or garbage disposal, Connecting the on page 22 )
Electrical requirements
- This appliance must be supplied with 120V, 60 Hz electricity, and connected to its own, properly grounded branch circuit, protected by a 15 or 20 ampere circuit breaker or time delay fuse.
- Wiring must be two-wire with ground.
- If the electrical supply does not meet the above requirements, call a licensed electrician before proceeding.
In the event of a malfunction or breakdown, grounding will reduce the risk of electrical shock by providing a path of least resistance for electric current. The plug must be plugged into an appropriate outlet that is installed and grounded in accordance with local codes and ordinances.
Direct Wire Method
- The cable must be routed as shown in Cabinet preparation and wire routing minimum of 24 in. (60.96 cm) from the rear wall. On page 8, and extend a
- Use flexible, armored, or ornon-metallicc sheathed copper wire with a grounding wire that meets the wiring requirements for your home and local codes and ordinances.
- Use a UL Listed/CSA Approved strain relief.
Power Cord Method
- Install a 3-prong grounding-type receptacle. The wall outlet can be installed in a cabinet or on a wall adjacent to the undercounter space in which the dishwasher is to be installed.
- Use the power cord kit (part number 5304504505) under the Smart Choice brand marked with Dishwasher Install Kit With Power Cord, available for purchase from an authorized store. The power cord and connections must comply with local codes and ordinances.
- The recommended power cord length is between 54 in. (1.4 m) min. and 64 in. (1.6 m) max.
Cabinet preparation and wire routing
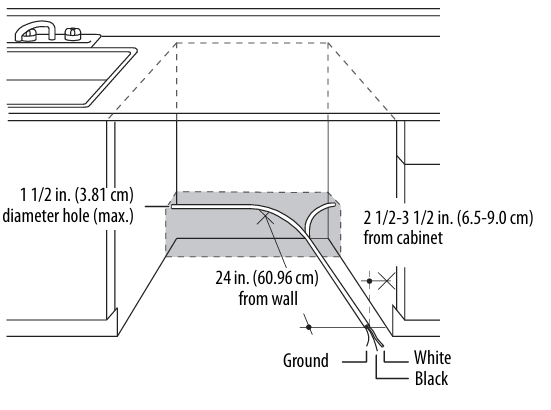
- The wiring may enter the opening from either side, the rear, or the floor within the shaded area.
- The electrical connection is on the right front of the dishwasher.
- Drill a 1 1/2 in. (3.81 cm) maximum diameter hole to run the electrical cable through the wall of the cabinet.
- The hole must be free of sharp edges. If the cabinet wall is metal, the hole edge must be covered with a bushing or rubber grommet.
- Cable direct connections may pass through the same hole as the drain hose and hot water line, but power cords with plugs must pass through a separate hole.
Preparing the hot water line
- The water connection is on the left front of the dishwasher.
- The hot water line may enter the opening from either side, the rear, or the floor within the shaded area.
- The hot water line may pass through the same hole as the electrical and drain hose. Or, you can drill an additional 1 1/2 in. (3.81 cm) maximum diameter hole for the hot water line.
- If a power cord with a plug is used, the hot water line may not pass through the same hole as the power cord.
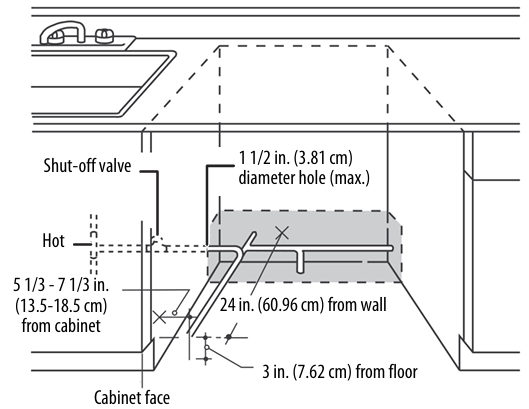
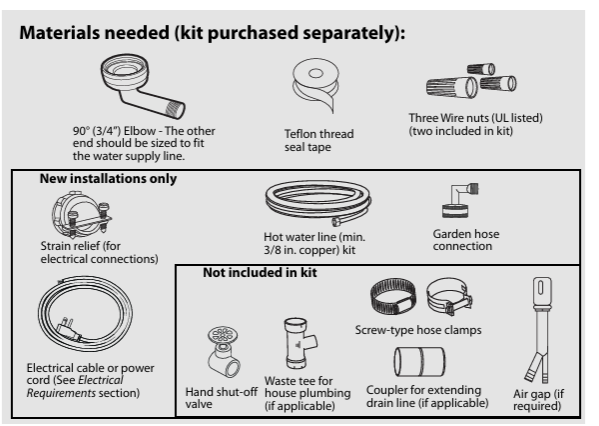
Connecting the water line to the water supply
- Turn off the water supply.
- Install a hand shut-off valve in an accessible location, such as under the sink. This is optional, but strongly recommended, and may be required by local codes.
- Install the hot water inlet line using at least 3/8 in. O.D. copper tubing.
- Route the line and place it into the brackets in the groove shown in the figure above (there are two white brackets in the groove on the bottom of the dishwasher that help keep the line in place), and extend it forward at least 24 in. (60.96 cm) from the rear wall of the enclosure.
- Adjust the water heater to a temperature of from 120° F to 150° F (49° C to 65° C). 5 Flush the water line to clean out any debris.
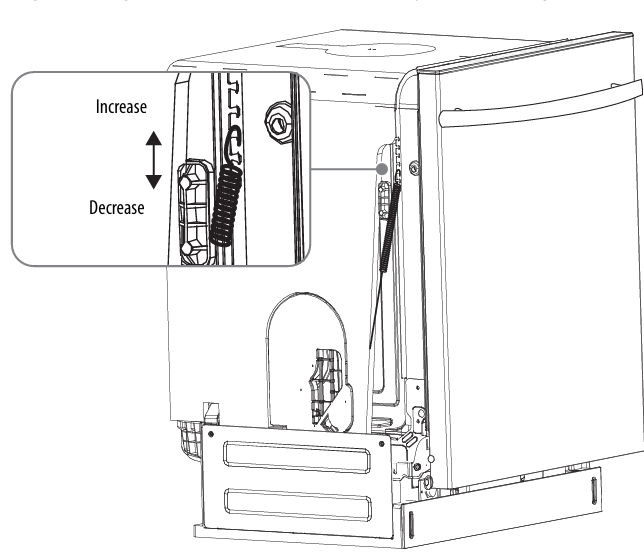
Installation instructions
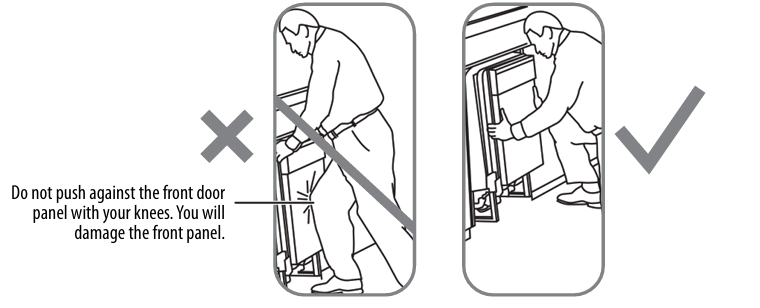
- Do not open the door until you are ready to install your dishwasher.
- Hold the top of the dishwasher firmly.
- Open the door slowly, then release it. If the door drops, increase the spring tension.
- If the door closes, decrease the spring tension.
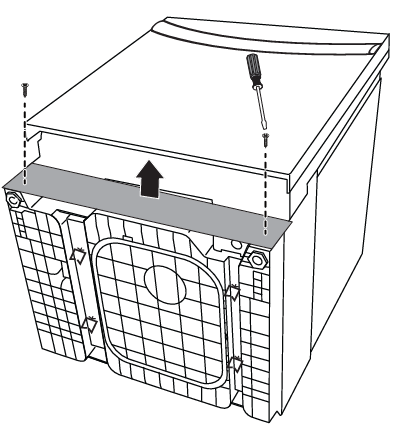
- Lay the dishwasher on its back, then remove the two toekick screws with a Phillips screwdriver.
- Remove the toekick.
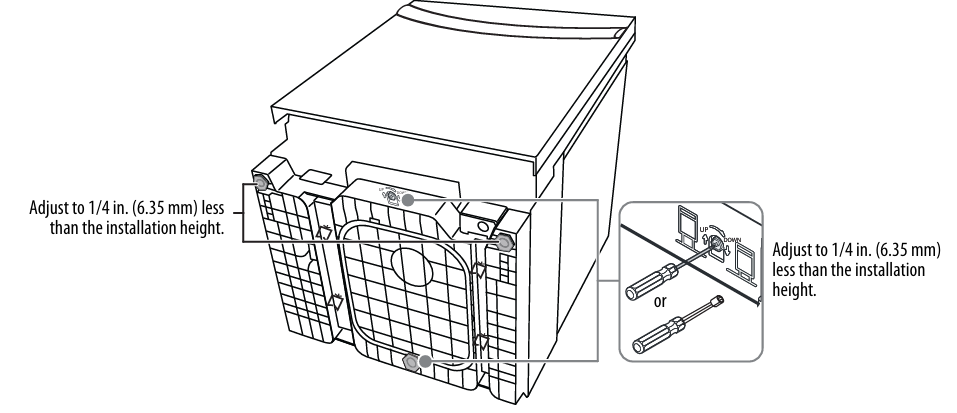
Adjust the leveling legs

- Move the dishwasher close to the installation location and lay it on its back.
- Measure the installation height and the dishwasher height.
- Extend the leveling legs out from the dishwasher base 1/4 in. (6.35 mm) less than the installation height.
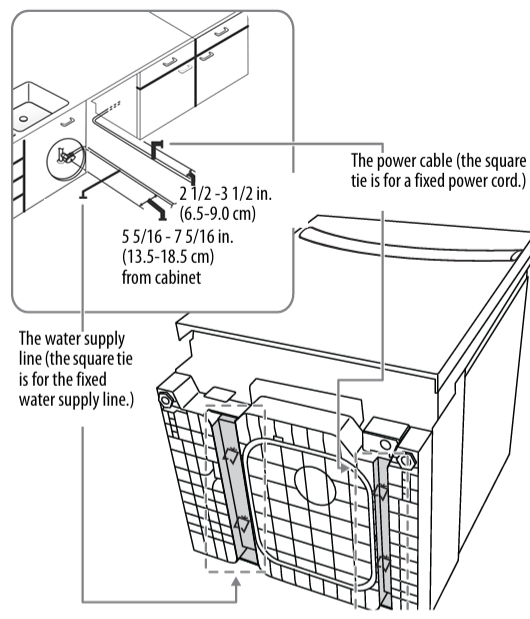
Power cord
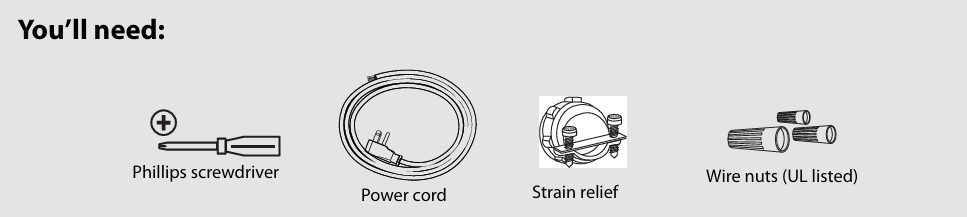
- Remove the junction box cover on the right front of the dishwasher.
- Remove the lock nut from the strain relief, then push the strain relief into the round opening of the junction box.
- Install the lock nut on the strain relief from inside the junction box.
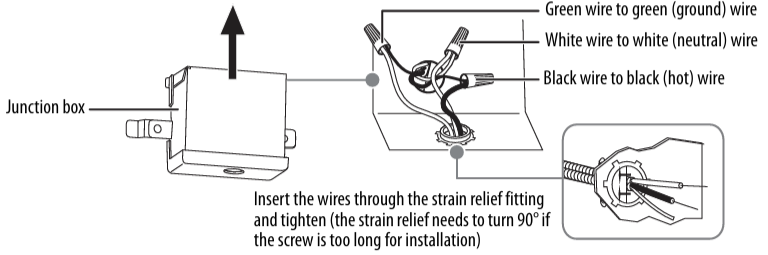
- Insert the ends of the power cord’s electrical wires into the junction box through the strain relief.
- Route the cord and place it in the brackets in the groove on the bottom of the washer.
- Replace the junction box cover on the right front of the dishwasher.
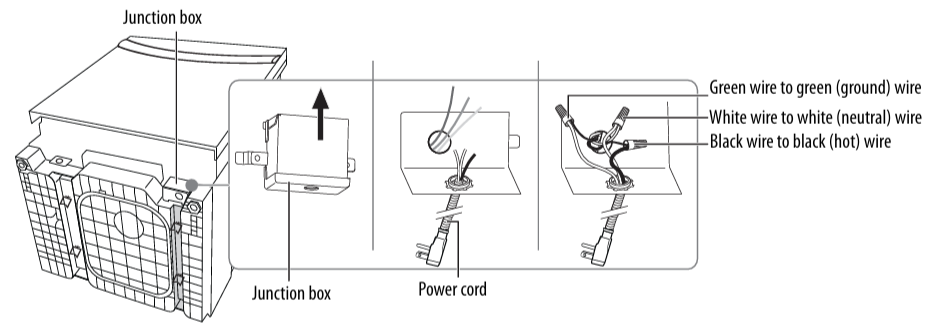
Direct wiring

- Remove the junction box cover from the power supply junction box on the right front of the dishwasher.
- Locate the three dishwasher wires (white, black, and green) with stripped ends, then insert the dishwasher wires through the small hole in the junction box.
- Secure the house wiring to the bottom of the junction box with a strain relief fitting.
- Use wire nuts to connect the incoming ground to green, white to white, and black to black.
- Replace the junction box cover. Make sure that no wires are pinched under the cover.
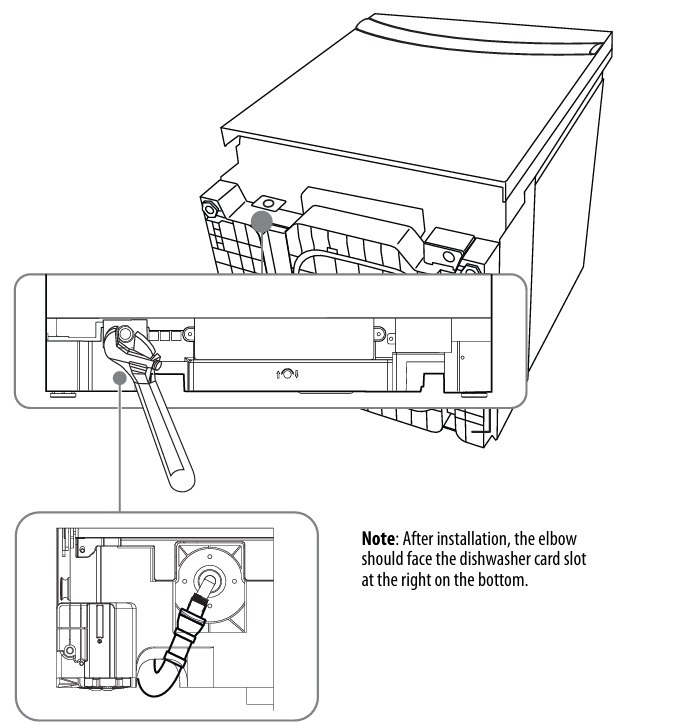
Install the 90° water supply elbow

- Install the 90° elbow onto the water valve. Do not over-tighten the 90° elbow. The water valve bracket could bend, or the water valve fitting could break.
- Position the end of the elbow to face the bottom right side of the dishwasher.
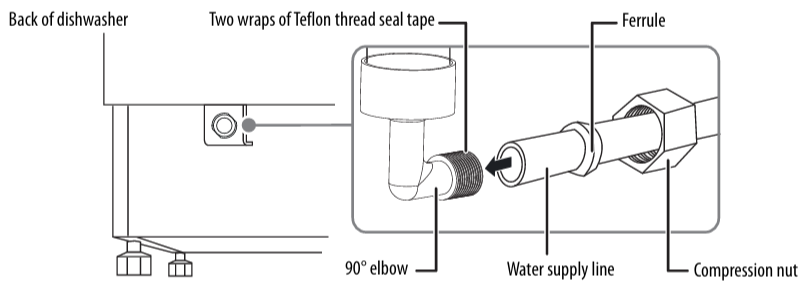
Connecting the water supply line
- Wrap the 90° elbow with Teflon tape twice.
- Slide the compression nut, then the ferrule over the end of the water supply line.
- Insert the water supply line into the 90° elbow.
- Slide the ferrule against the 90° elbow and secure it with the compression nut.
Install the drain hose
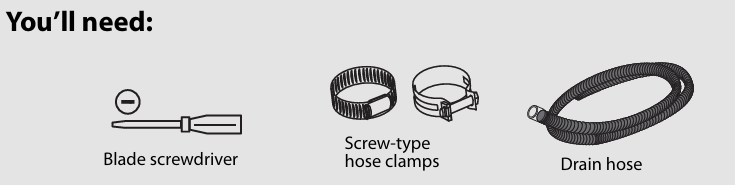
- Turn the dishwasher upright.
- Slide a screw-type hose clamp onto the drain hose.
- Install the drain hose to the dishwasher drain outlet on the back of the dishwasher, then tighten the screw-type hose clamp.
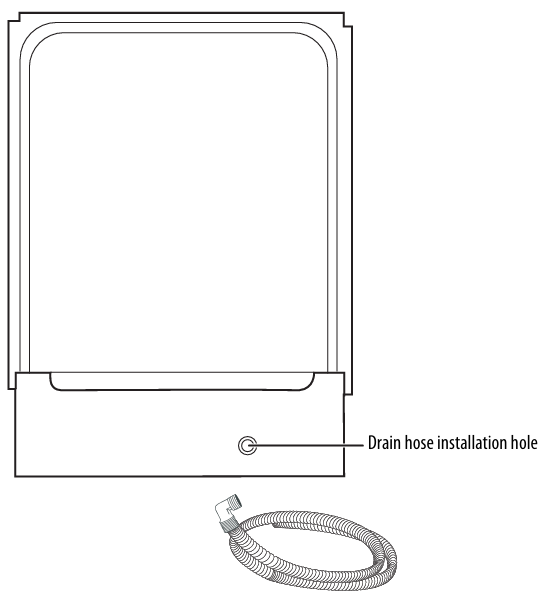
Inserting the drain hose through the cabinet
- Insert the drain hose into the hole in the cabinet wall. If a power cord is used, guide the end through a separate hole.
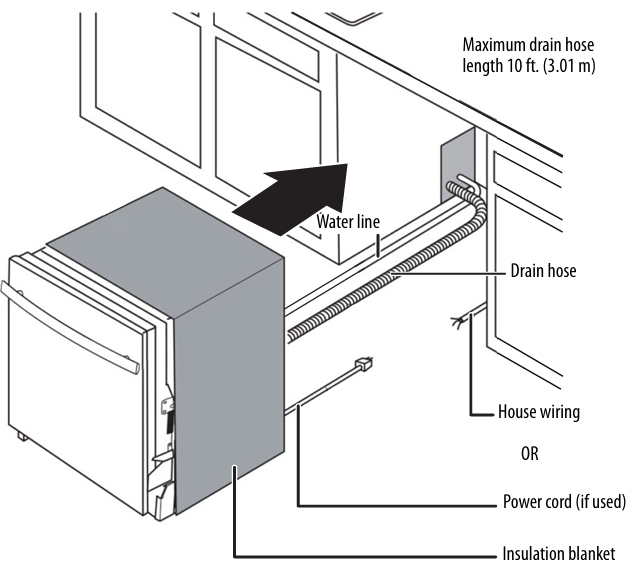
Slide the dishwasher partially into the cabinet
- Position the dishwasher in front of the opening, then slide the dishwasher into the opening a few inches at a time.
- Pull the drain hose through the opening under INSIGNIA NS-DWH2BS8 Top Control Dishwasher the sink as you proceed. Stop when the dishwasher is a few inches in front of the adjacent cabinetry.
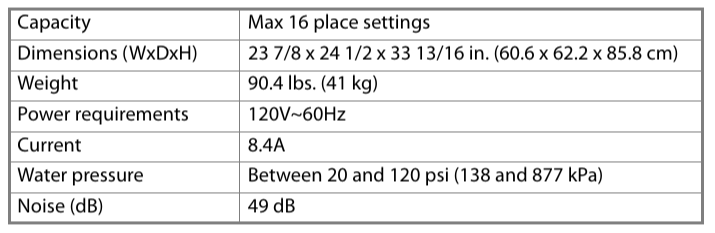
Specifications
Legal notices
FCC Statement
This device complies with Part 15 of the FCC Rules. Operation is subject to the following two conditions: (1) this device may not cause harmful interference, and (2) this device must accept any interference received, including interference that may cause undesired operation.
FCC Caution
Changes or modifications not expressly approved by the INSIGNIA NS-DWH2BS8 Top Control Dishwasher party responsible for compliance could void the user’s authority to operate this equipment.
EMC guidance
- Don’t use near active HF Insignia NS-GLSBFSCW1 Glass Scale surgical equipment or the RF shielded room of an ME system for magnetic resonance imaging, where the intensity of EM disturbances is high.
- Use of accessories, transducers, and cables other than those specified or provided by the manufacturer of this equipment could result in increased electromagnetic emissions or decreased electromagnetic immunity of this equipment and result in improper operation.
- Otherwise, degradation of the performance of this equipment could result.
One-Year Warranty
Definitions
The Distributor* of Insignia-branded products warrants to you, the original purchaser of this new Insignia-branded product (“Product”), that the Product shall be INSIGNIA NS-DWH2BS8 Top Control Dishwasher free of defects in the original manufacturer of the material or workmanship for one (1) year from the date of your purchase of the Product (“Warranty Period”).
How to obtain warranty service?
If you purchased the Product at a Best Buy retail store INSIGNIA NS-DWH2BS8 Top Control Dishwasher location or from a Best Buy online website, please take your original receipt and the Product to any Best Buy store. Make sure that you place the Product in its original packaging or packaging that provides the same amount of protection as the original packaging. To obtain warranty service, in the United States and Canada, call 1-877-467-4289. Call agents may diagnose and correct the issue over the phone.
Where is the warranty valid?
This warranty is valid only in the United States and INSIGNIA NS-DWH2BS8 Top Control Dishwasher Canada at Best Buy branded retail stores or websites to the original purchaser of the product in the country where the original purchase was made.
Customer Support
- Ph: 1-877-467-4289
- Website: www.insigniaproducts.com
INSIGNIA is a trademark of Best Buy and its affiliated companies. Distributed by Best Buy Purchasing, LLC 7601 Penn Ave South, Richfield, MN 55423 U.S.A.
©2021 Best Buy. All rights reserved.
FAQs
How many place settings can the NS-DWH2BS8 accommodate?
This style is perfect for medium-sized to big families or entertaining visitors because it can accommodate up to 14 place settings.
What wash cycles are available on this dishwasher?
It offers a variety of wash cycles, including Normal, Heavy, Quick, Eco, Rinse Only, and Delicate, to accommodate various dishwashing requirements.
Does the dishwasher have a delay start function?
Yes, you can set the dishwasher to run at a convenient time by delaying the start of a wash cycle by up to 24 hours.
Is there a child lock feature?
Indeed, the dishwasher has a control lock to stop kids from making unintentional adjustments or using it.
How do I properly load dishes for optimal cleaning?
Pots and pans and other large, highly filthy things should go on the bottom rack, while cups, glasses, and smaller items should go on the top rack. Avert crowding and make sure the spray arms have unrestricted rotation.
What kind of detergent should I use?
Only use detergents made especially for dishwashers, such as tablets, gels, or powders, to prevent damage and guarantee thorough cleaning.
Does this dishwasher require rinse aid?
Only use detergents made especially for dishwashers, such as tablets, gels, or powders, to prevent damage and guarantee thorough cleaning.