
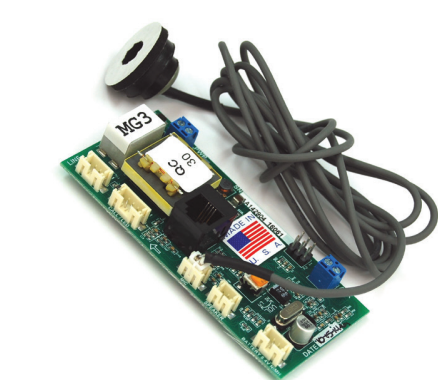
JANUS ADA Telephone MG3 Powered Phone
Installation
- Install the JANUS ADA Telephone MG3 Powered Phone by mounting it on the car station using the existing phone bracket. For installation instructions of similar models, see the JANUS ADA Telephone G3 Line-Powered Instruction Manual.
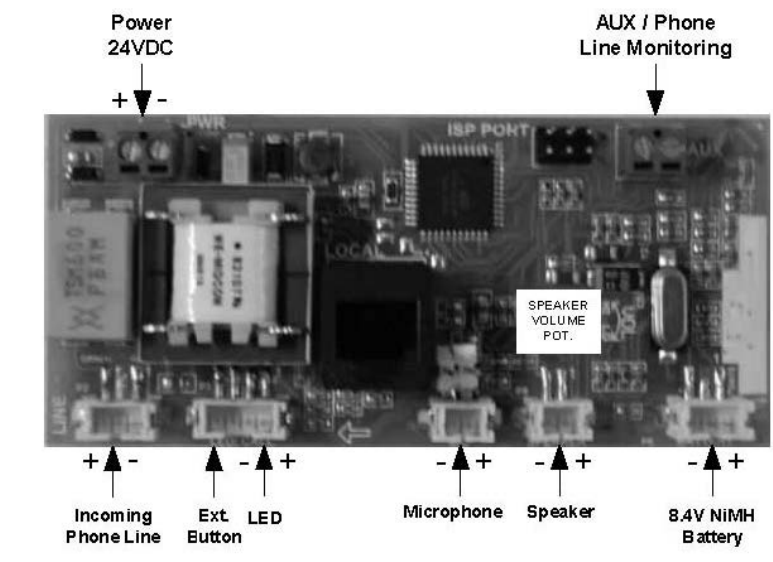
- Plug in the ext. button and LED to the white connector at “CALL/LED” – P3.
- Plug in the speaker to the white “SPEAKER” connector – P8.
- Plug in the microphone to the white “MIC” connector – P7.
- Plug in the 24VDC external power supply to the white “PWR” connector – P4.
- The “PWR” connector is polarity sensitive.
- Plug in the optional 8.4 NiMH battery to the white “BATTERY” connector.
- Plug in the phone line to the white “LINE” connector – P2. The Phone line is not polarity sensitive.
- Plug in the phone line monitoring device to the “AUX” connector –P1.
P.C. Board Diagram (Top View)
Programming Set-Up Methods
There are two methods for programming your JANUS ADA Telephone MG3 Powered Phone. Select the one applicable to your situation as described below.
Call the Elevator Phone to Program it.
- Go to the “Programming Instructions” section to continue.
- After programming the phone, you should test it by pressing the “HELP” button.
- The test will ensure the phone is functioning correctly and as
Setting Up for Programming without a Phone Line.
- For setting up your JANUS ADA Telephone MG3 Powered Phone, first disconnect the phone line from the MG3.
- Make sure you have external power or a 9-volt battery connected to the MG3.
- Plug a touch-tone phone into the black modular “LOCAL” jack.
- Pick up the touch-tone phone handset.
- Press the “HELP” or “CALL” button on the elevator car panel to turn the JANUS ADA Telephone MG3 Powered Phone ʻONʼ.
- Make sure that the red light of the phone turns on.
- Unplug the touch-tone phone and test the JANUS ADA Telephone MG3 Powered Phone completely when it is connected to a phone line.
List of Commands for Converse Mode
- Enters Two-Way Communication
- Plays Location Message and Alert Message
- Renew Call Timer
- Plays back 1st Phone Number in DTMF tones
- Plays back 2nd Phone Number in DTMF tones
- Plays back 3rd Phone Number in DTMF tones
- Plays back 4th Phone Number in DTMF tones
- Plays back Unit ID in DTMF tones
- Plays Firmware Version in DTMF tones
- Plays back 1st Phone Number in Voice
- Plays back the 2nd Phone Number for in Voice
- Plays back the 3rd Phone Number for in Voice
- Plays back 4th Phone Number for in Voice
- Plays back the Unit ID in Voice
- Plays Firmware Version in Voice
- Hangs up with a 2-3 second delay
- Hangs up the phone with no delay
Operating Instructions
- The passenger hears the dial tone and the dialling of the first phone number.
- The passenger hears intermittent ringing. If the first phone number is not answered within approximately 50 seconds, the elevator phone will hang up and dial the second phone number.
- The same sequence of events will occur for additional numbers the phone is programmed to call.
- Once the receiving operator responds to the call with a touch-tone digit, the passenger and the operator will be able to communicate.
- When the red LED flashes or the green light turns ʻONʼ, the operator can request the passenger to press the “HELP” button again.
- This action will send an audible signal to let the operator know that someone is actually stuck in the elevator and not just a prank call.
- This action is normally only important for someone who cannot speak.
Responding Operator
- The operator hears the ringing of an incoming call from the elevator and answers the call.
- The operator hears a repeating message from the elevator phone stating, “Elevator call, at the tone press one to talk, press two for location.”
- The message will keep repeating until the operator presses a “1” or “2” after the tone on their phone.
- The passenger does not hear any voice messages.
- Normally, the operator should press “1” after the touch tone at the end of the message to quickly establish two-way voice communication with the trapped passenger.
- At any time, the operator can press “2” to hear the location of the elevator.
- In elevators with background noise, the operator can press # to mute the microphone.
- Entry of any other digit will re-enable the microphone.
- At the end of the location message, another message will be heard by the operator that says: “Press zero to alert the passenger of rescue.”
- The operator can request that the passenger press the “HELP” button again.
- If the passenger presses the button, the operator will hear a diddle-diddle-diddle sound.
- For the operator, this means that there is a passenger in the elevator.
- Before the phone turns off (normally 3 minutes), the operator will hear this message twice: “To avoid disconnect, press three now.”
- The operator presses *0 to hang up the elevator phone
Operator Calling Into Elevator Phone
- The operator dials the phone number of the elevator phone and hears it ringing.
- After four rings, the elevator phone turns on automatically, and the operator will hear a diddle-diddle-diddle sound.
- At this time, the operator and passenger can talk. All other operations stay the same.
Passenger Receiving Call from Operator
- The passenger hears the elevator phone ringing. The phone turns on automatically after 4. The passenger can push the “HELP” button to turn the elevator phone on.
- When the elevator phone turns on, the passenger and operator can communicate.
Battery and Power Supply Information
The MG3 phone requires an external 24VDC power supply to operate. The power supply connects to the P4 connector of the board.
Troubleshooting Guide
- Check the power connection at P4; it should measure 24VDC
- Check polarity at P4 (the “PWR” connector is polarity sensitive)
- Check the button connection at P3
- Remove the button connector and try shorting the button connection pins
- Check to see if the JANUS ADA Telephone MG3 Powered Phone is on a ring-down line.
- Check to see if another auto-dialer is on the line and remove it
- Reprogram unit
- Check speaker connection (see P.C. Board Diagram)
- Try calling into the unit and speaking to the person in the car
- Measure the resistance of the speaker, which should read approximately 40-45ohms
- Check the button connection
- Try a spare pair of wires through the traveling cable
- Check if the wire is running through the hoist way by itself
- Check if the voice prompt message is being stopped
- Check if there is loud background noise in the cab
- Check the location of the microphone
- Check the mounting of the microphone and speaker
- Check to see if the person answering the call is using a handset (headsets could cause problems
Specifications
- Input Connections: Standard (analog) loop start voice grade touch tone telephone line, PBX or key system station analog telephone line.
- Electrical Optional AC Adapter: 24VDC @ min. 100mA
- Operating Current Range: 18mA to 55mA
- Phone Line Voltage: On-hook 24VDC to 70VDC (nominally 48VDC)
- Phone Line Voltage: Off-hook 8 to 20VDC (nominally 14VDC)
- Dialing: DTMF (Dual Tone Multi-Frequency)
- Frequency Response: 550Hz – 3400Hz +/- 3db
- Operational Loop Impedance: 600 ohms
- Ring Sensitivity: 30 – 120VAC RMS
- FCC Registration: US: NLFTE07BMG3X7771
- Ringer Equivalent Number: 0.7B
- Environmental Operating Temperature Range: 0 to 50 °C / 32 to 122°F
- Storage Temperature Range: -20 to 70 °C / -4 to158°FF
- Relative Humidity: Up to 95% (non-condensing)
FAQs
Q: What type of power supply does the MG3 telephone require?
An external 24 V DC power source that is attached to the board’s “PWR” (P4) connector is necessary for the MG3. The connector, which is marked + and –, is sensitive to polarity.
Q: Can the MG3 telephone be used on a digital phone system?
No, the MG3 is designed to run on an analogue station port of a PBX or key system, or an analogue loop-start voice-grade phone line.
Q: How is the MG3 installed and mounted?
The handbook states that the installation entails placing the device (for instance, in a lift car), attaching the external button/LED to its “CALL/LED” connector (P3), attaching the speaker (P8), microphone (P7), power (P4), and phone line (P2 – “LINE”).
Q: Can the MG3 be used without an external power supply?
In theory, yes—as long as the phone line itself provides sufficient current and voltage (on-hook 24–70 VDC).
Q: How many numbers can be programmed for auto-dial?
For an emergency call-out sequence, the MG3’s built-in auto-dialer function can support up to four phone numbers (first through fourth numbers).
Q: Is the MG3 compatible with modern VoIP/ SIP telephone systems?
Not directly. An analogue loop-start voice-grade line is what the MG3 anticipates. For the MG3 to function dependably in a VoIP system, you would need to supply an analogue station port or analogue line interface that simulates the proper voltages and line behaviour.
1 Comment
Pingback: JANUS ADA Telephone G3 Line Powered | Installation & Guide