
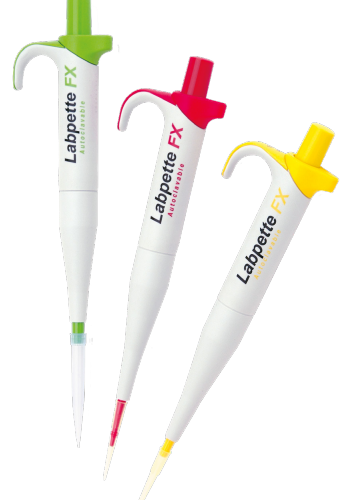
Labnet Labpette FX Single-channel Pipettors
Introduction
Labnet Labpette FX single-channel, fixed volume pipettor is a volumetric instrument designed to measure and transfer liquids precisely and safely. It can accommodate volumes from 2 μL to 1,000 μL, depending on the model.
Safety Information
Long-term use of the pipettor relies on the correct method of use. Please read and follow the instructions for use carefully. Symbols used:
- The pipettor is designed for the transfer of liquids only using the tip. Do not aspirate liquids without the tip attached. The aspirated liquid should not enter the pipettor, as it may cause damage.
- Single-use tips reduce the risk of contamination of samples.
- Keep the pipettor clean, avoiding the use of abrasive or corrosive cleaning agents (e.g., acetone).
- Keep the pipettor upright when there is liquid in the tip.
- Only using the pipettor in accordance with the manufacturer’s instructions ensures the correct pipettor parameters are maintained.
- After replacing the plunger or the shaft, the pipettor should be calibrated.
- In the case of incorrect operation, the device should be cleaned in accordance with the Instructions for Use or transferred to a service point.
- Ambient operating temperature is +5°C to 45°C.
- Ambient storage conditions (in the original packaging during transport and short storage) are -25°C to 55°C. When working with the pipettor:
- Follow general work safety regulations regarding hazards related to work in the laboratory.
- Take special care when pipetting aggressive substances.
- Use appropriate protective attire (e.g., clothing, goggles, and gloves).
- Avoid pointing the pipettor at yourself or others during use.
- Only use parts and accessories recommended by the manufacturer.
Description
| Nominal Volume (µL) | Cat. No. | Color Code |
| 2 | P3900-2 | Red |
| 5 | P3900-5 | Red |
| 10 | P3900-10 | Red |
| 20 | P3900-20 | Yellow |
| 40 | P3900-40 | Yellow |
| 50 | P3900-50 | Yellow |
| 70 | P3900-70 | Yellow |
| 75 | P3900-75 | Yellow |
| 100 | P3900-100 | Yellow |
| 120 | P3900-120 | Yellow |
| 150 | P3900-150 | Yellow |
| 200 | P3900-200 | Yellow |
| 250 | P3900-250 | Green |
| 300 | P3900-300 | Green |
| 400 | P3900-400 | Green |
| 500 | P3900-500 | Green |
| 1,000 | P3900-1000 | Green |
Labnet pipettors operate using an air-cushion (i.e., the aspirated liquid does not come into contact with the shaft or plunger of the pipettor). The liquid is drawn into the disposable tip attached to the pipettor.
Unpacking
The pipettors are delivered with the following:
| Description | Qty/Pk |
| Instruction manual | 1 |
| Quality control certificate | 1 |
| Calibration key | 1 |
| Shelf clip | 1 |
| Lubricant | 1 |
Pipettor Design
Model Identification
The volume of the pipettor is shown on its pushbutton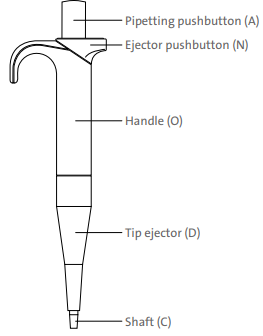
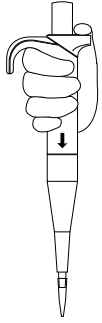
Attaching the Tips
- Attach the correct tip corresponding to the model number displayed on the pipettor finger rest (Section 5).
- Position the pipettor vertically when attaching tips.
- Press the pipettor against the tip positioned in the rack box. The suspension system will ensure even and airtight sealing of the pipette tips.
- Hold down the tip ejector button to ensure a tighter fit of the tip.

- Do not attach the tips with a rocking movement, as this may damage the shaft or plunger.
- Never draw liquids directly into the pipettor without the tip attached.
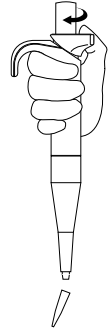
Ejecting the Tip
- Place your thumb against the ejector pushbutton side and press it to the side.
Operating Instructions
Observing the following recommendations will ensure maximum possible accuracy and precision of liquid sampling.
- During operation, the volume setting should be locked, with the black adjustment knob in the lower position.
- Ensure smooth and slow operation of the pipettor.
- Immersion of the tip into the sample liquid should be kept to a minimum depth, which should remain constant during aspiration.
The recommended immersion depths are given in the table below:
| Model Volume Range (µL) | Immersion Depth (mm) |
| 0.1-1 | ≤1 |
| 1-100 | 2-3 |
| 101-1,000 | 2-4 |
- The pipettor should be held in a vertical position.
- The pipette tip should be changed whenever the volume setting is altered, and when a different liquid is to be aspirated.
- The pipette tip should be changed if a droplet remains on the end of the tip from the previous pipetting operation.
- Each new pipette tip should be pre-rinsed with the liquid to be pipetted.
- Liquid should never enter the pipettor shaft. To prevent this:
- Press and release the pushbutton slowly and smoothly.
- Never turn the pipettor upside down.
- Never lay the pipettor on its side when there is liquid in the tip
- Never force the volume setting beyond the recommended limits.
- When pipetting liquids with a different temperature from the ambient temperature, it is recommended to pre-rinse the tip several times before use.
- Do not pipette liquids with temperatures above 70°C.
Aspiration and Dispensing Instructions

Aspirating Liquid
- Press the pushbutton to the first stop point. Holding the pipettor vertically, immerse the pipette tip into the sample liquid to the recommended depth (for recommended values see Section 7). If the pipettetip is not immersed to the recommended depth or if the pipetting pushbutton is rapidly released, air may enter the pipette tip.
- Release the pipetting pushbutton slowly and smoothly to aspirate the sample. Wait one second and then withdraw the pipette tip from the liquid.
Dispensing Liquid
- Place the end of the pipet tip against the inside wall of the vessel at an angle of 10° to 40°. Press the pushbutton smoothly to the first stop. Wait one second.
- Press the pushbutton to the second stop to expel any remaining liquid. While keeping the pushbutton depressed, remove the pipettor from the vessel by drawing the pipet tip against the inside surface of the vessel.
- Release the pushbutton to its starting position.
- Eject the pipet tip by pressing the tip ejector pushbutton to the side (left or right).
Aspirating High-density Liquids
Allowing a film to form before sampling ensures optimal accuracy and repeatability. If the above method does not result in accurate values, recalibrate the pipettor in accordance with Section 9.
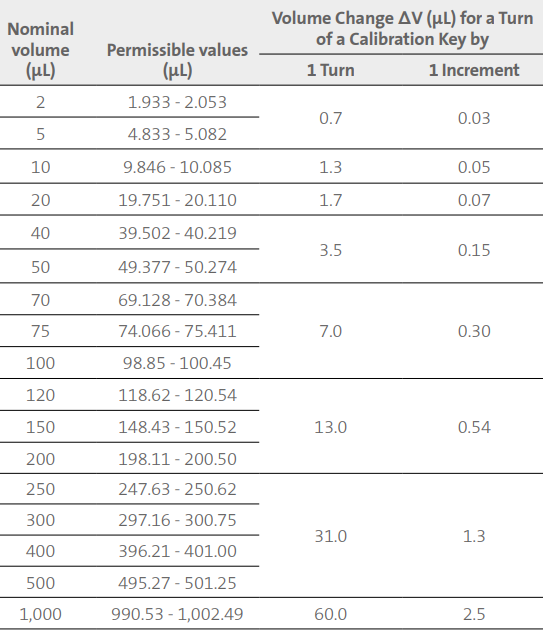
If during pipettor operation the accuracy error exceeds the permissible value given in the table in Section 5, pipettor recalibration should be carried out. Recalibration of the pipettor involves adjusting the settings according to the table on page 10.
Parameters for Checking the Pipetting Accuracy
- Ambient temperature and temperature of the pipettor, pipettetips, and liquid should be within the range of 20°C to 25°C and stabilized during weighing within ±0.5°C.
- Measurements should be conducted using distilled water.
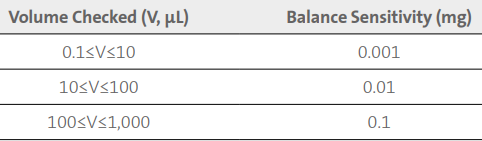
- Balance sensitivity should be suitable for the volume “V” to be measured.
- When calculating the liquid volume aspirated by the pipettor, the conversion factor (Z) [μL/mg] for distilled water or a liquid with comparable density should be taken into account. Sample values of conversion factors are given in the following table.
Temperature (°C)
Pressure (kPa) 95.0 101.3 105.0 20 1.0028 1.0029 1.0029 21 1.0030 1.0031 1.0031 22 1.0032 1.0033 1.0033 23 1.0034 1.0035 1.0036 24 1.0037 1.0038 1.0038 - Set the preset volume depending on the pipettor volume according to the following table.
- Perform 10 aspirations, and calculate the average value in [mg].
- Calculate the volume in [μL] by multiplying the value in [mg] by the conversion factor Z [μL/mg].
Recalibration
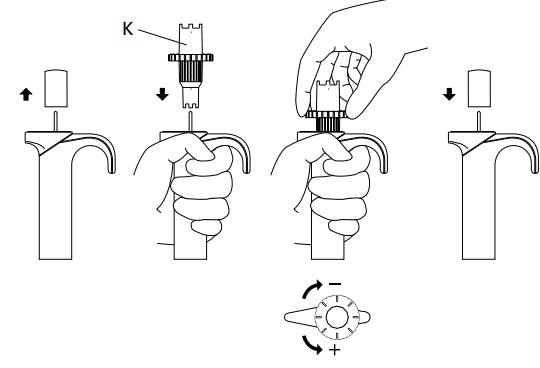
- Remove the pipetting pushbutton.
- Insert the calibration key into the calibration screw.
- Turn the key clockwise to reduce the aspirated volume, or counter-clockwise to increase the aspirated volume. Use the values given in the above table to precisely adjust the volume.
- Remove the key and replace the pipetting pushbutton.
Maintenance
Depending on the applications and intensity of use, the pipettor requires periodic maintenance. Do not use sharp tools for pipettor maintenance. It may cause damage to the device and affect the user’s safety.
Sterilization
- Sterilize the pipettors using an autoclave with an initial vacuum and drying cycle.
- Check the calibration of the pipettor after the first, third, and fifth autoclaving cycles, and then after every 10 autoclaving cycles.
Ultra Violet (UV) Sterilization
The pipettors are UV-resistant. The distance from the radiation source to the exposed element of the pipettor should be at least 50 cm. Prolonged or intense UV exposure can cause discoloration of pipettor parts, but does not affect its performance.
Specifications
The pipettor is a high-quality instrument that offers excellent accuracy and precision. The accuracy and precision (repeatability) of the liquid volume depend on the quality of the pipette tips used. 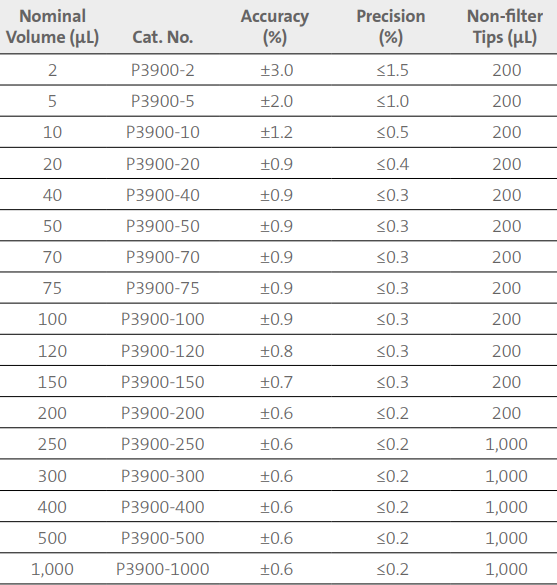
The use of tips from other manufacturers or filter tips may result in incorrect liquid aspiration and require pipettor recalibration. The design of the pipettor enables the user to recalibrate it according to the information presented in Section 9.
Troubleshooting
| Problem | Cause | Solution |
| Droplets of liquid remain in the pipette tip. | The pipette tip is emptied too fast. | Decrease the speed of pressing the pipettor pushbutton. |
| The pipette tip wettability has increased due to extensive use. | Replace the tip with a new one. | |
| Droplets of air appear in the liquid aspirated into the pipette tip. | The pipette tip immersion depth is too shallow. | Immerse the tip to the recommended depth according to the instructions. |
| The pipettor incorrectly aspirates the liquid, or the liquid drops out of the tip. | The pipettor tip is incorrectly pressed onto the pipettor shaft. | Press the pipette tip firmly onto the pipettor. |
| The pipettor incorrectly aspirates the liquid, or the liquid drops out of the tip. | The plunger or the O-ring is damaged due to prolonged aspiration of corrosive liquids. The inside of the pipettor is contaminated. The sealing elements are | Disassemble the shaft set; wash the shaft, the plunger, and the seal (Section 10: Cleaning). Replace the elements with new ones if necessary. Apply a small amount of lubricant onto the plunger and |
Spare Parts
Contact our Customer Service to inquire about the availability of spare parts. The pipettor model and the name of the part required should be specified. The most common parts are depicted below.
| Item | Description | Model | Cat. No. | Qty/Pk |
| A | Pipetting pushbutton | 2 – 20 (red) | SP9175 | 1 |
| 40 – 200 (yellow) | SP9176 | 1 | ||
| 250 – 1,000 (green) | SP9177 | 1 | ||
| C, F, F1 | Shaft Kit | 2 – 20 | SP9095 | 1 |
| 40, 50 | SP9140 | 1 | ||
| 70 – 200 | SP9031 | 1 | ||
| 250 – 500 | SP9141 | 1 | ||
| 1,000 | SP9032 | 1 | ||
| D | Tip ejector | 2 – 200 | SP9178 | 1 |
| 250 – 1,000 | SP9161 | 1 | ||
| I, J | Seal, O-ring, and Bush set | 2 – 10 | SP9054 | 1 |
| 20 | SP9055 | 1 | ||
| 40, 50 | SP9132 | 1 | ||
| 70 – 100 | SP9070 | 1 | ||
| 120 – 200 | SP9073 | 1 | ||
| 250 – 500 | SP9133 | 1 | ||
| 1,000 | SP9076 | 1 | ||
| K | Calibration key | All | SP9174 | 1 |
Limited Warranty
Corning Incorporated (Corning) warrants that this product will be free from defects in material and workmanship for a period of one (1) year from the date of purchase. Corning’s sole obligation shall be to repair or replace, at its option, any product or part thereof that proves defective in material or workmanship within the warranty period, provided the purchaser Labnet Labpette FX Single-channel Pipettors notifies Corning of any such defect. Corning is not liable for any incidental or consequential damages, commercial loss, or any other damages from the use of this product.
Corning’s Customer Service team will help arrange local service where available or coordinate a return authorization number and shipping instructions. Corning may elect for on-site service for larger equipment. Some states do not alllimitationsion on the length of implied warranties or the exclusion or limitation of incidental or consequential damages. This warranty Labnet Labpette FX Single-channel Pipettors gives you specific legal rights. You may have other rights that vary from state to state. No individual may accept for, or on behalf of Corning, any other obligation of liability, or extend the period of this warranty
Warranty/Disclaimer
Unless otherwise specified, all products are for Labnet Labpette FX Single-channel Pipettors research use or general laboratory use only.* Not intended for use in diagnostic or therapeutic procedures. Labnet Labpette FX Single-channel Pipettors Not for use in humans. Corning Life Sciences makes no claims regarding the performance of these products for clinical or diagnostic applications. *For a listing of US medical devices, regulatory classifications, or specific information on claims, visit www.corning.com/resources.
Equipment Disposal
Consequently, the buyer shall follow the instructions for reuse and recycling of waste electronic and electrical equipment (WEEE) provided with the products and available at www.corning.com/weee.
Customer Service
- Website: www.labnetlink.com.
- Visit: www.corning.com/lifesciencs
- Visit: www.corning.com/resources
- USA/Canada: 1.800.492.1110
- Others: +1.978.442.2200
- North America: 978.442.2200
- Australia/New Zealand: 61 427286832
FAQs
What is the Labpette FX Single-Channel Pipettor used for?
For precise and reproducible microlitre volume dispensing in applications including molecular biology, cell culture, ELISA, and standard laboratory work, the Labpette FX is a precision liquid handling tool.
What volume ranges are available for the Labpette FX pipettors?
There are eight versions in the Labpette FX series, with capacities ranging from 0.2 µL to 1000 µL.
Can I adjust the volume on a Labpette FX pipettor?
No, the FX series has set volumes, which makes them perfect for repetitive, constant pipetting operations that don’t require volume change.
Are these pipettors autoclavable?
Indeed. This lessens cross-contamination and preserves sterility.
What types of pipette tips are compatible?
Most universal-fit tips work with Labpette FX pipettors; however, for the best fit and precision, choose Labnet high-quality tips.
How do I maintain or clean the pipettor?
Wiping the outside with 70% ethanol or a mild detergent is part of routine cleaning. Disassemble the lower portion for service or sterilisation for a more thorough cleaning.