
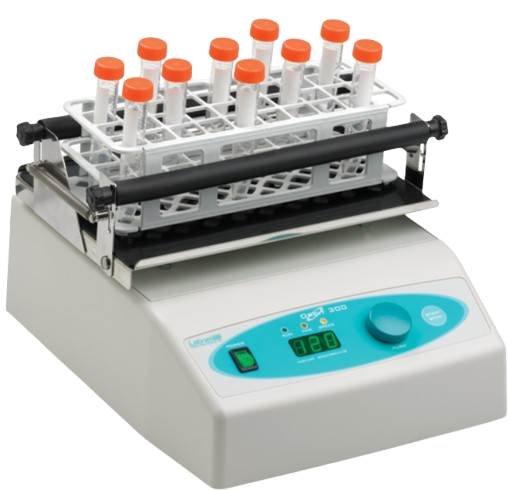
Labnet S2030-300-B Orbit Digital Shaker
Introduction
Labnet’s Orbit™ Digital Shakers are intended for shaking microliter plates, tubes, bottles, flasks, dishes, and other laboratory vessels. The shakers are driven by asynchronous motors, which enable silent operation and constant shaking speed independent of the load or power supply fluctuations.
Each shaker device consists of two main components:
- Motor with eccentric mechanism
- Control electronics
The motor drives the shaker’s eccentric mechanics and generates the shaking effect. The electronics control the motor RPM, TIME, and keyboard functions.
Safety Information
In case of a malfunction or liquid being spilled into the unit, unplug the device from its power outlet and contact Corning’s service department.
If the equipment is used in a manner not specified by this manual, the equipment may become unsafe to operate, could harm the user or the device, and may void the warranty.
- Always plug the unit into a properly grounded and fused outlet.
- Do not use the device near water sources. Take care that water does not fall on the device, especially during cleaning procedures.
- Do not use the device in a caustic or explosive atmosphere.
- There are no user-serviceable parts in the unit. Opening the unit may void the warranty.
Installation
Unpacking
Before starting installation, carefully examine the shaker for damage or missing parts.
- Open the box and lift the device, together with the inner packing, out of the box.
- Remove the inner packing and check that the shaker has not been visibly damaged during transportation. Keep the packing material until you are sure that the shaker works properly.
- Check information on the rear data label and verify the correct electrical rating:
- Model
- Serial Number
- Electrical rating
Should any kind of damage have occurred during transportation, immediately notify the carrier. The carrier is responsible for correcting damage caused during shipment.
Device Placement
When selecting the right place for the device, please consider the following:
- Put the device on a smooth, horizontal, and stable surface.
- Leave enough space beyond the device for normal air circulation, min. 10 cm.
- Leave enough space around the device so it can be easily controlled and maintained.
- Don’t use the device in surroundings where there are major temperature and humidity fluctuations. Also, avoid locations in direct sunlight or places near devices that produce heat.
- Avoid locations with excessive vibrations.
Attaching the Power Cord
Fit the main power cord, which is included in the package, into the power receptacle on the shaker. Connect the other end of the cord to a properly grounded wall outlet. To avoid interference from noise, surges, and spikes, a dedicated line is preferred. If no such line is available, avoid lines to which powerful electric motors, refrigerators, and similar devices are connected.
Environmental Requirements
The Orbit™ Digital Shakers have been built for operating in both cold and heated laboratory environments and in high-humidity environments as follows:
- At temperatures between 0°C and +60°C
- In humidity up to 85% (without condensation)
Installation of Shaker Platforms
Orbit™ P4
- The Unit comes with the platform already installed.
Orbit 300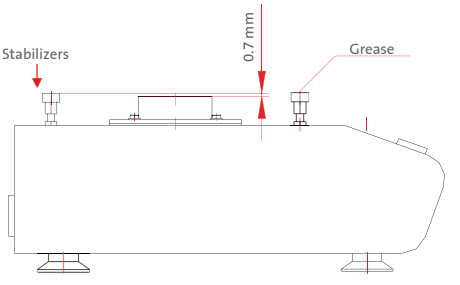
Before you attach the platform, make sure that the slide stabilizers are properly fastened, adjusted, and lubricated with the included grease.
The flat mat platform has a circle cut-out in the rubber and screw holes in the center. Remove the cutout rubber circle and screw down the four screws onto the shaker. After attaching the platform, remove the non-adhesive backing paper on the rubber circle and paste it back into place.
The grease that you use to lubricate the slide stabilizers is sufficient for 1000 working hours (1 year). After that time, you should remove the shaking platform and clean, adjust, and re-grease the slide stabilizers.
Orbit 1000 and Orbit 1900
The Orbit 1000 and Orbit 1900 model shakers have available a variety of platforms to meet most shaking needs. These platforms mount to the shakers via four mounting platforms, which easily plug into four rubber mount points on the top of the shaker.
Operating Instructions
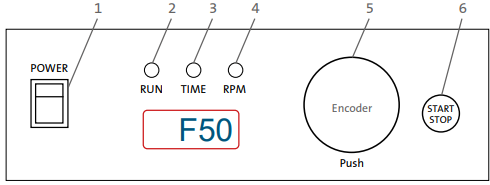
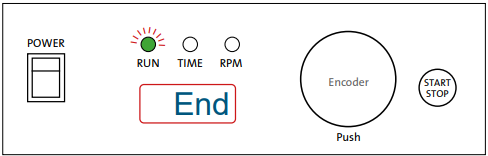
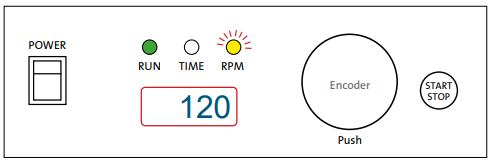
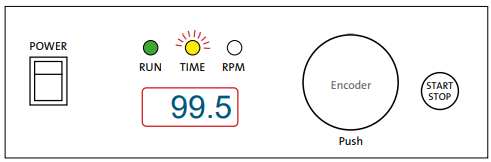
Control Panel
- POWER switch – to turn the shaker ON (power switch illuminates) or OFF.
- RUN – green signal light illuminated when the shaker is running.
- ENCODER – By rotating the encoder right (+) or left (-), you can change the set TIME or RPM. Push the encoder to switch between TIME and RPM set values. If you rotate the ENCODER knob fast, then the numbers go up or down on the display very quickly.
- START/STOP button – START or STOP operating.
Basic Operation
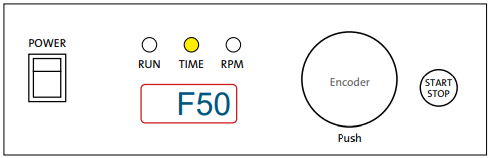
- Press the POWER switch on the control panel. The Orbit™ Digital Shaker automatically detects the supply frequency of 50 or 60Hz, and displays F50 or F60.

- Then the display switches to show the set time and illuminates the Time light.
- The time signal light is on. By rotating the encoder right (+) or left (-), the set time can be selected from 30 sec. to 99 min. 50 sec.:
- 99.5 = 99 min. 50 sec.
- 9.59 = 9 min. 59 sec.
- 0.30 = 30 sec.
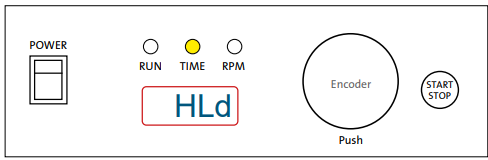
- If you want to set the timer to hold, turn the knob left or right until “HLd” is displayed.
You can reach the “HLd” function by setting it to under 0.30 or above 99.5. - Push down on the encoder knob to switch modes between time set mode and RPM set mode. The
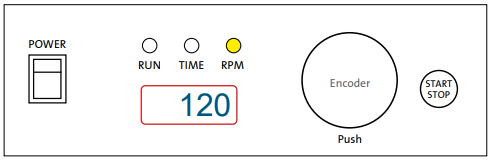
RPM signal light is on. By rotating the encoder right (+) or left (-) the desired RPM can be selected:- 34 = 340 rpm
- 120 = 1,200 rpm
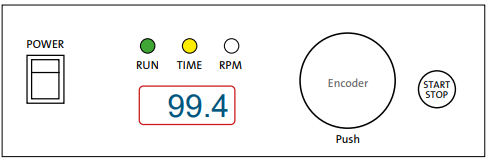
- Press the START/STOP button to start the operation. RUN and TIME signal lights. Shaker runs and counts down time from the set value.
- NOTE: You can not modify the set time during shaking; however, you can stop the unit with the START/STOP button and then reset the time.

Changing the RPM during shaking
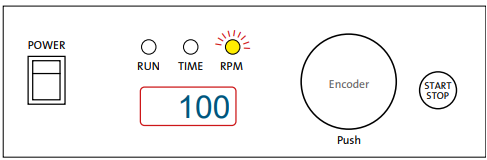
- Push the encoder knob to put the shaker into RPM set mode (RPM signal light will be on).
- Rotate the encoder right (+) or left (-) to set the desired value. In the meantime RPM signal light will flash.
- When you stop rotating the encoder knob, the signal light for RPM will stop flashing after 2 seconds.
- When the run time has elapsed or when you press the START/STOP button, the display will show “End” and the Run light will flash.
- When the haker completely stops, the set speed and time will return to the last programmed values.
Additional Operations
- If you want to view the set value for RPM during Labnet S2030-300-B Orbit Digital Shaker shaking, rotate the encoder knob for ONE CLICK right
(+) or left (-). The RPM signal light will then flash for 2 sec., and the display will show the set RPM, and the light will stop flashing. - If you want to view the set value for TIME during shaking, rotate the encoder knob for ONE CLICK right
(+) or left (-). The time signal light will then flash for 2 sec., and the display will show the set TIME, and the light will stop flashing.
Maintenance and Cleaning
Except for the occasional maintenance described in Section 5 of this manual, no scheduled
maintenance is normally required. However, an experienced technician should regularly check the device operation at least once a year to make sure it is operating correctly.
Cleaning
The housing of the shaker unit can be cleaned with special cleaners for polyurethane plastic surfaces. A damp (not wet) cloth is recommended.
Specifications
| Electric Power Supply | 230V ± 10%, 50/60Hz or 120V ± 10%, 50/60Hz |
| Motor Power | 15W |
| Fuse | 2 x 0.25AT (230V) 2 x 1AT (120V) |
| RPM Regulation | Digital, load independent, from 100 to 1,200 rpm (1,400 rpm – 120V version) in 10 rpm steps |
| Shaker Orbit | 3 mm |
| Timer | 30 sec. to 99 min. 50 sec. In 10 sec. Steps, under 10 min. in 1 sec. steps, timer, HOLD function |
| Maximum Load | 0.66 lbs. (0.3 kg) |
| Dimensions (W x D x H) | 7.4 x 11.8 x 5.9 in. (18.8 x 30 x 15 cm) |
| Weight | 9.5 lbs. (4.3 kg) |
| Orbit 300 Model | |
| Electric Power Supply | 230V ± 10%, 50/60Hz or 120V ± 10%, 50/60Hz |
| Motor Power | 15W |
| Fuse | 2 x 0.25AT (230V) 2 x 1AT (120V) |
| RPM Regulation | Digital, load independent, from 100 to 1,200 rpm in 10 rpm steps |
| Shaker Orbit | 3 mm |
| Timer | 30 sec. to 99 min. 50 sec. In 10 sec. Steps, under 10 min. in 1 sec. steps, timer, HOLD function |
| Maximum Load | 4.4 lbs. (2 kg) |
| Dimensions (W x D x H) | 10.3 x 13.3 x 5.1 in. (26.2 x 33.7 x 13 cm) |
| Weight | 12.35 lbs. (5.6 kg) |
Accessories
| Description | Cat. No. | Qty/Pk |
| Orbit™ 300 | ||
| Platform for four microplates | S2030-10 | 1 |
| Platform with a non-slip rubber mat | S2030-12 | 1 |
| Spring-loaded platform for flasks, bottles, or tube racks | S2030-13 | 1 |
| Orbit 1000 | ||
| Flat platform with non-slip rubber mat (30 x 30 cm) | S2031-12 | 1 |
| Two stacked platforms with a non-slip rubber mat (30 x 30 cm) | S2032-12D | 1 |
| Spring-loaded platform for flasks, bottles, or tube racks | S2031-13 | 1 |
| Flask clamp platform (clamps sold separately – see below) | S2031-18 | 1 |
| Orbit 1900 | ||
| Flat platform with non-slip mat (40 x 50 cm) | S2040-12 | 1 |
| Universal bar clamp platform for holding a variety of containers | S2040-15 | 1 |
| Platform for flask clamps are sold separately – see below) | S2040-18 | 1 |
| Clamps | ||
| Clamp for a 25 mL Erlenmeyer flask Orbit 1000 (max. 16) Orbit 1900 (max. 28) | S2040-25 | 1 |
| Clamp for a 50 mL Erlenmeyer flask Orbit 1000 (max. 16) Orbit 1900 (max. 28) | S2040-50 | 1 |
| Clamp for a 125 mL Erlenmeyer flask Orbit 1000 (max. 16) Orbit 1900 (max. 28) | S2040-85 | 1 |
| Clamp for a 250 mL Erlenmeyer flask Orbit 1000 (max. 9) Orbit 1900 (max. 20) | S2040-99 | 1 |
| Clamp for a 500 mL Erlenmeyer flask Orbit 1000 (max. 5) Orbit 1900 (max. 10) | S2040-09 | 1 |
| Clamp for a 1L Erlenmeyer flask Orbit 1000 (max. 4) Orbit 1900 (max. 6) | S2040-01 | 1 |
| Clamp for a 2L Erlenmeyer flask Orbit 1900 (max. 5) | S2040-02 | 1 |
Troubleshooting
Problem/Explanation/Solution
| The power switch does not light up | Check the power source Check fuses |
| Shaker stalls – Message Er1 | Power unit down, then restart |
| The display does not light up Message Er2, Er3, or Er4 on display | Contact Labnet’s Service Department |
Should you have a question about the operation of the Labnet Orbit™ Digital Shakers or if service is
required, contact your Corning representative. Do not send in a unit for service without first calling to
obtain a repair authorization number. Should the unit require return to Corning for service, it should
be properly packed to avoid damage. Any damage resulting from improper packaging shall be the responsibility of the user.
Limited Warranty
Corning Incorporated (Corning) warrants that this product will be free from defects in material and workmanship for a period of one (1) year from the date of purchase. Corning’s sole obligation shall be to repair or replace, at its option, any product or part thereof that proves defective in material or workmanship within the warranty period, provided the purchaser notifies Corning of any such defect. Corning is not liable for any incidental or consequential damages, commercial loss, or any other damages from the use of this product.
Corning’s Customer Service team will help arrange local service where available or coordinate a return authorization number and shipping instructions. Corning may elect for on-site service for larger equipment. Some states do not alllimitationsion on the length of implied warranties or the exclusion or limitation of incidental or consequential damages. This warranty gives you specific legal rights. You may have other rights that vary from state to state. No individual may accept for, or on behalf of Corning, any other obligation of liability, or extend the period of this warranty
Warranty/Disclaimer
Unless otherwise specified, all products are for research use or general laboratory use only.* Not intended for use in diagnostic or therapeutic procedures. Not for use in humans. Corning Life Sciences makes no claims regarding the performance of these products Labnet S2030-300-B Orbit Digital Shaker for clinical or diagnostic applications. *For a listing of US medical devices, regulatory classifications, or specific information on claims, visit www.corning.com/resources.
Equipment Disposal
Consequently, the buyer shall follow the instructions for reuse and recycling of waste electronic and electrical equipment (WEEE) provided with the products and available at www.corning.com/weee.
Customer Service
- Website: www.labnetlink.com.
- Visit: www.corning.com/lifesciencs
- Visit: www.corning.com/resources
- USA/Canada: 1.800.492.1110
- Others: +1.978.442.2200
- North America: 978.442.2200
- Australia/New Zealand: 61 427286832
FAQs
What is the Labnet S2030-300-B Orbit Digital Shaker used for?
It is perfect for staining/destaining, cell culture, solubility research, and general mixing applications.
What is the shaking motion and orbit size?
With a 19 mm orbit diameter and orbital shaking, this model offers smooth circular motion that is ideal for uniform mixing and aeration.
What is the speed range of the shaker?
Users can fine-tune the agitation intensity to fit their application thanks to the shaking speed’s 40–300 RPM adjustment.
Is the shaking speed digitally controlled?
Indeed. A digital control panel with an LED display allows for easy monitoring and exact speed adjustment on the shaker.
Is the shaking platform included with the unit?
Indeed. Separate universal platforms and clamps for microplates, tubes, or flasks are optional.