
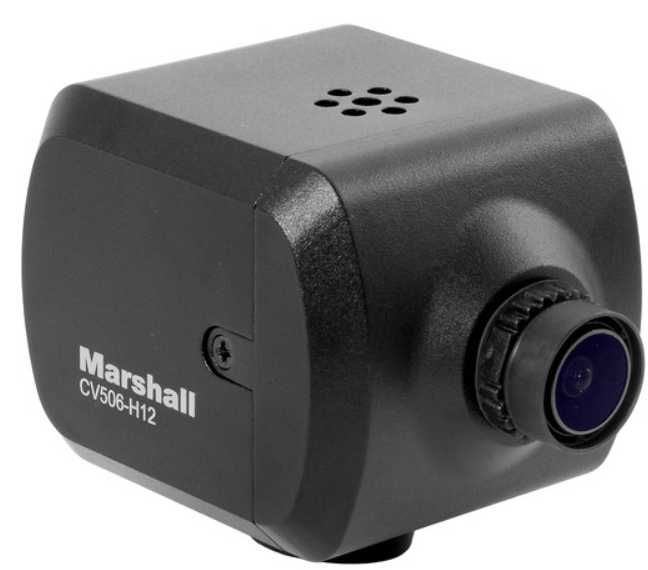
Marshall CV506-H12 Miniature High-Speed Camera
Menu Structure
| SETUP | SUB MENU | SUB MENU |
| WB CONTROL | ATW | |
| ONE PUSH | ||
| OUTDOOR | ||
| SUB MENU | ||
| MANUAL | BLUE | |
| RED | ||
| AE CONTROL | AUTO | AGC MAX |
| SENS UP | ||
| AE BRIGHT | ||
| FLK CONTROL | ||
| SHUT FIX | SHUTTER | |
| FLK CONTROL | ||
| AGC MAX | ||
| SENS UP | ||
| AE BRIGHT | ||
| AGC FIX | AGC | |
| AE BRIGHT | ||
| FLK CONTROL | ||
| MANUAL | SHUTTER | |
| AGC | ||
| SENS UP | ||
| FLK CONTROL | ||
| WB CONTROL | DAY | |
| NIGHT | NIGHT COLOR | |
| COLOR BURST | ||
| AUDIO | AUDIO LEVEL | |
| MIC/LINE | ||
| MIC ATTENUATOR | ||
| SAMPLE BITS |
| SETUP | SUB MENU | SUB MENU |
| IMAGE CONTROL | LENS SHADING | |
| CONTRAST | ||
| BRIGHTNESS | ||
| SATURATION | ||
| HUE | ||
| EDGE ENHANCE | ||
| AUTO SATURATE | ||
| AUTO EDGE | ||
| BLACK LEVEL | ||
| GAMMA CORRECT | ||
| DNR | DNR MODE | |
| DNR LEVEL | ||
| PRIVACY | DZOOM | |
| DEFOG | ||
| BACKLIGHT | ||
| BINNING | ||
| DEFECT PIXEL | ||
| DISP FUNCTION | ||
| FLICKER DETECT | ||
| PRIVACY | ||
| SETUP | CAM TITLE | |
| COMMUNICATION | RS-485/ID | |
| SYSTEM INFO | ||
| OUTPUT FORMAT | ||
| USER/FACTORY | ||
| RESET | ||
| EXIT |
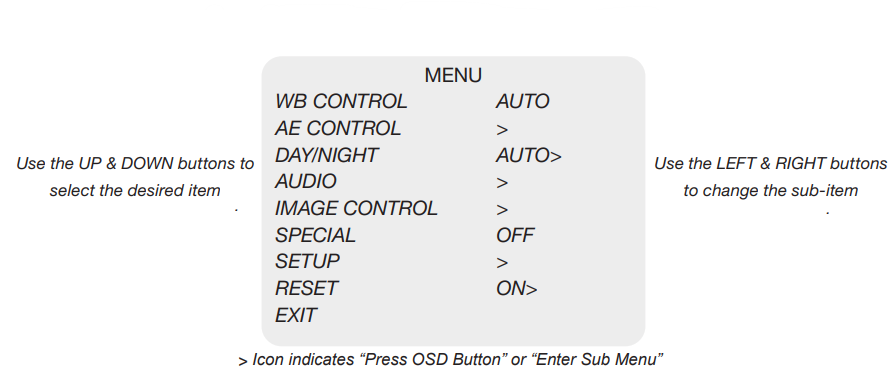
OSD Joystick
- SET is used to access the menu and confirm selection. Used to move the cursor up.
- DOWN Used to move the cursor down. LEFT Used to move the cursor to the left and change the value.
- RIGHT Used to move the cursor to the right and change the value.
- Press the SET button to access the MAIN MENU.
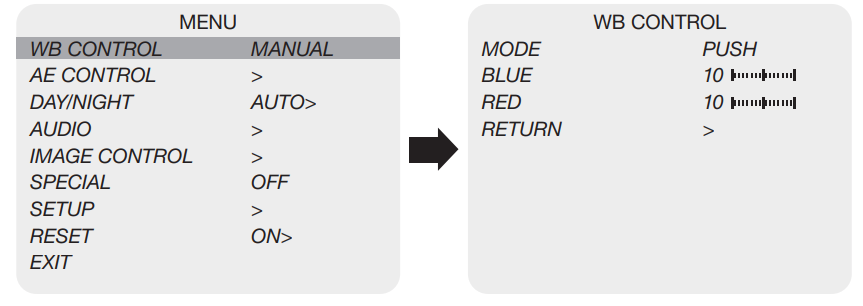
WB Control
Select WB CONTROL using the UP or DOWN button. You can change between AUTO, ATW, PUSH, and MANUAL using the LEFT or RIGHT button.
- AUTO: Controls the automatic adjustment of the light source’s color temperature to 3,000°K~8,000°K.
- ATW: Continuously adjusts camera color balance in accordance with any change in color temperature.
- PUSH: Color temperature will be manually adjusted by pushing the OSD button.
- MANUAL: Select this to fine-tune White Balance manually.
- BLUE: Adjust the Blue tone of the image. (0~20)
- RED: Adjust the Red tone of the image. (0~20)
- INDOOR: Select this to adjust white balance to indoor lighting conditions.
- OUTDOOR: Select this to adjust white balance to outdoor lightinconditionson.
- Adjuthe white balance first by using the AUTO or ATW mode before switching to the MANUAL mode.
- White Balance may not work properly under the following conditions.
- In this case, select the ATW mode.
- When the ambient illumination of the subject is dim. If the camera is directed towards a fluorescent light or installed in a place where illumination changes dramatically, the White Balance operation may become unstable.
AE Control
Select AE CONTROL using the UP or DOWN button. You can select one sub-mode using the UP or DOWN button.
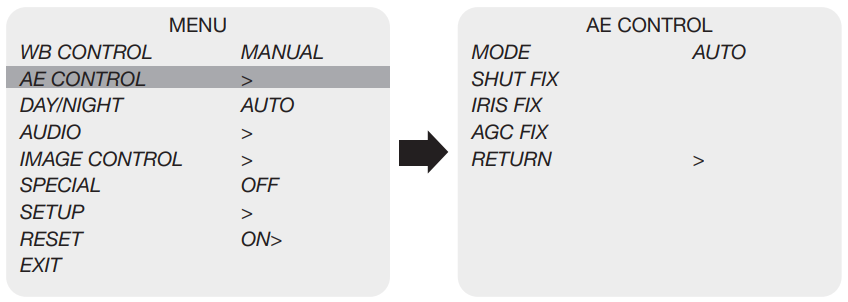
- AUTO: Adjusts the exposure level automatically. Detailed fine-tuning options are available under this menu.
- SHUT FIX: Provides more detailed shutter speed options.
- IRIS FIX: Provides more detailed iris control options.
- AGC FIX: Provides a more detailed gain option. All other controls are tuned for the selected gain value.
- SHUTTER: Speed can be set at auto or manual. (1/30~1/10,000)
- AGC MAX: Used to set the maximum gain value to control the video noise caused by Auto Gain Control. (Off, Low, Middle, High, DMIN, DMID, DMAX)
- SENS UP: Controls the digital slow shutter to allow extra light into the camera and adjust the picture quality. (Off, x2~x10)
- AE BRIGHT: Select this to adjust auto exposure brightness levels. (0~10)
- IRIS SPEED: Electronic Iris speed can be controlled for the C Iris lens only. (0~5)
- LENS MODE: Lens setting will be optimized for the selected environment, for the DC Iris lens only.
- FLK CONTROL: Provides a proper image sensor frequency to match the power frequency in order to minimize video flicker.
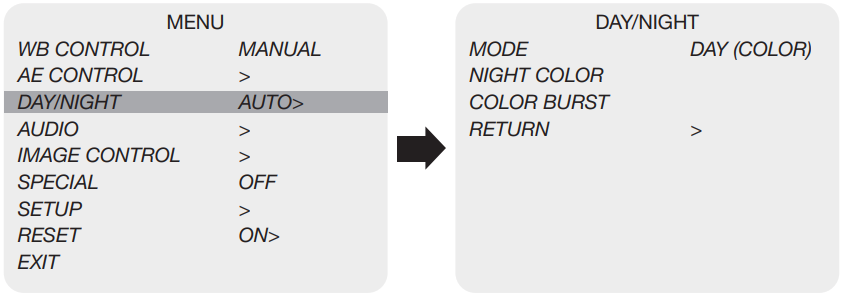
Day / Night
Select DAY / NIGHT using the UP or DOWN button. You can select one sub-mode from AUTO, COLOR, and NIGHT using the UP or DOWN button.
- MODE: Set the camera to either color mode or B&W mode. (Day, Night)
- DAY: When set to DAY mode, the camera stays in color, andthe IR cut filter is engaged.
- NIGHT: When set to NIGHT mode, the camera stays in B/W, andthe IR cut filter is removed.
- NIGHT COLOR: When on, the camera stays in color mode. Night (B&W) can be selected from this mode. (On, Off)
- COLOR BURST: Signal ON or OFF can be set for the CVBS signal. (On, Off)
Audio
Select AUDIO using the UP or DOWN button and enter ON using the SEL button. You can select one
sub-mode using the UP or DOWN button
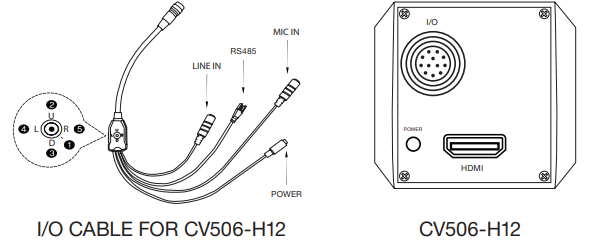
- MIC / LINE: When using an audio microphone, use MIC mod; when using audio sources, use LINE mode
- AUDIO LEVEL: Select this to adjust the audio level manually.
- MIC ATTENUATOR: Audio attenuation can be controlled from this menu to minimize the audio noise level.
- SAMPLE BITS: Select the bit depth of audio.
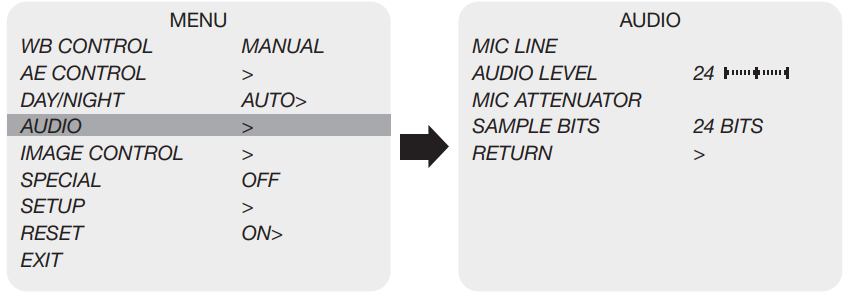
Image Control
Select IMAGE CONTROL using the UP or DOWN button. You can select LENS SHADING, CONTRAST, HUE, and EDGE ENHANCE using the UP or DOWN button.
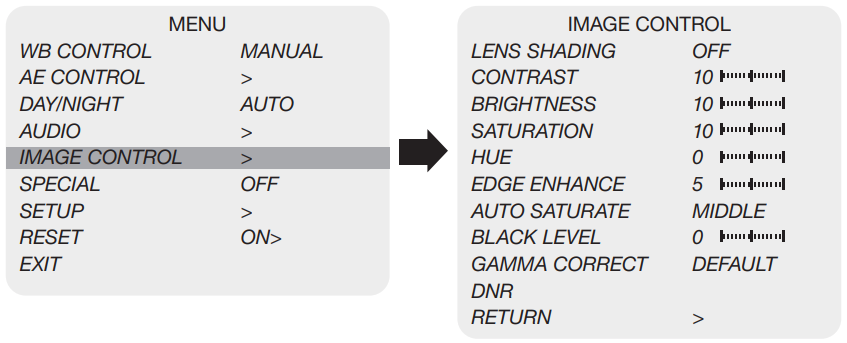
- LENS SHADING: Corrects inconsistent brightness level in the image.
- CONTRAST: Adjust the image contrast level value.
- BRIGHTNESS: Adjust the image brightness level value.
- SATURATION: Adjust the image saturation level value.
- HUE: Adjust the image hue level value.
- EDGE ENHANCE: Adjust the image sharpness level.
- AUTO SATURATE: Decrease saturation automatically when noise scene is detected.
- BLACK LEVEL: Adjust the image black level value.
- GAMMA CORRECT: Adjust the image output gamma level.
- DNR: Reduces video noise at low ambient light. Select the DNR level from OFF, LOW, MIDDLE, and HIGH using the LEFT or RIGHT button.
Special
Select SPECIAL using the UP or DOWN button. You can select DEFOG, MOTION DETECT, BACKLIGHT, DEFECT PIXEL, and FLICKER DETECT using the UP or DOWN button.
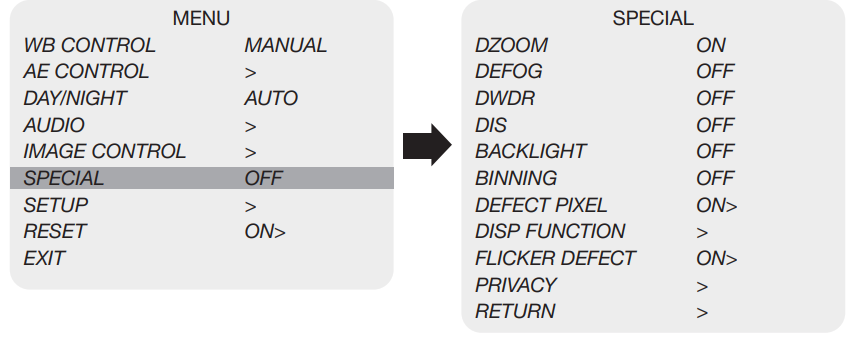
- DZOOM: Digitally zoom the video by the desired ratio.
- DEFOG: This feature will help increase visibility in extreme weather conditions such as fog, rain, or any other luminous setting.
- DWDR: This feature enables the user to view both the object and the background more clearly when the background is too bright.
- BLACKLIGHT: Adjust blacklight compensation by choosing either BLC or HLM from this menu.
- BINNING: Enable or disable pixel binning.
- DEFECT PIXEL: Advanced defective pixel correction menu. From this menu.
- FLICKER DETECT: Adjust the image sensor frequency to match the power frequency.
- PRIVACY: Mask an area you want to hide on the screen by applying the privacy zones.
Setup
You can select CAMERA ID, Communication, System Info, and Output Format using the UP or DOWN button.
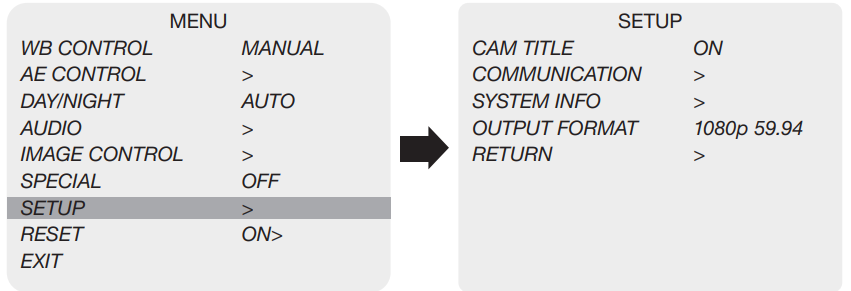
- CAM TITLE: Camera title can be turned ON or OFF.
- COMMUNICATION: VISCA communication can be adjusted.
- CAM ID: Camera ID can be set up. (0~7)
- OUTPUT FORMAT: Camera resolution and frame rate can be set (1080 by default). Select the FRAME RATE using the LEFT or RIGHT button.
- Available Frame Rates are: 1920 x 1080p 120, 100, 60, 59.94, 50, 30, 29.97, 25, 24, 23.98 1920 x 1080i 60, 59.94, 50 1280 x 720p 120, 100, 60, 59.94, 50
Reset
Select RESET using the UP or DOWN button.
- RESET: Reset the camera settingto s the factory defaults or the user setting value
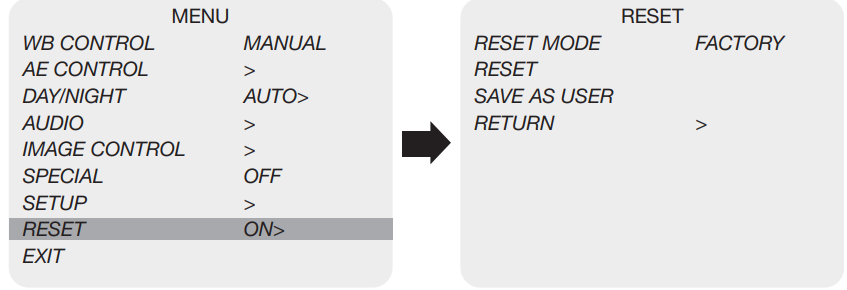
- ON: Set the camera setting to either “FACTORY”, “USER”, or “CHANGE” menu.
- Make sure to select the right mode from “CHANGE” before defaulting the camera.
- RESET MODE: Select the desired setting mode. Select from USER or FACTORY using the LEFT or RIGHT button.
Exit
Select EXIT using the UP or DOWN button.
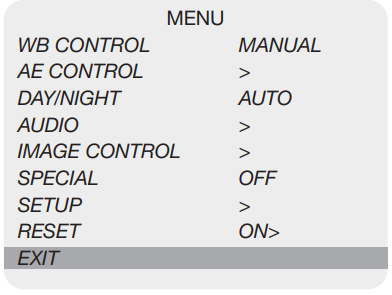
- SAVE: Exit the setup after saving the value changes.
Troubleshooting
| Problem | Solutions |
| Nothing appears on the screen. | Confirm that the voltage is correct. Confirm that the power supply provides enough current to power the camera. |
| The picture is not clear. | Confirm that the glass in front of the lens is clean. To clean the glass, use a soft, dry, and non-abrasive cloth or a commercially available lens cleaning set. c. Correctly adjust the focus. |
| The picture has interference. | The camera may be close to a high voltage source, such as a power generator. |
| The picture is flickering continually. | Check the termination and set the impedance at 75 properly. Ensure that the camera is not pointing towards the Sun or any light source. Check if there is any intermediate device. Check if the distance of the video cable exceeds the maximum transferable limitation. |
| The camera is not synchronizing with the reference signal. | Locking takes up to 1 minute, depending on the signal strength. Check if the cable and connectors used in reference sync are in good condition. Make sure the cable length used in reference sync does not exceed 100 ft. Make sure OUTPUT EN is on when using the genlock output. |
Warranty
Marshall Electronics warrants to the first consumer that this device will, under normal use, be free from defects in workmanship and materials, when received in its original container, for a period of two years from the purchase date. If there is no proof of purchase provided with a warranty claim, Marshall Electronics reserves the right not to honor the warranty set forth above.
This warranty does not apply to the product exterior or cosmetics. Misuse, abnormal handling, alterations, or modifications in design or construction void this warranty. Due to constant efforts to improve products and product features, specifications may change without notice.
FCC Warning
IC Warning
This digital apparatus does not exceed the Class A limits for radio noise emissions from digital apparatus as set out in the interference-causing equipment standard entitled “Digital Apparatus,” ICES-003 of Industry Canada.
CE Warning
Operation of this equipment in a residential environment could cause radio interference.
Supplier’s Declaration of Conformity
- Manufacturer: Marshall Electronics, Inc.
Responsible Party – U.S. Contact Information Supplier: Marshall Electronics, Inc. 20608 Madrona Ave, Torrance, CA. 90503
FCC Compliance Statement
This device complies with Part 15 of the FCC Rules. Operation is subject to the following two conditions :
- This device may not cause harmful interference, and (2) this device must accept any interference received, including interference that may cause undesired operation.
Warranty
For Warranty information, please refer to Mathe rshall website page:
- https: marshall usa.com/company/warranty.php
Copyright Information
In order to keep improving the product, Marshall Electronics, Inc. hereby reserves the right to make changes to product specifications without prior notice. The information in this file is subject to change without prior notice.
Disclaimer of Warranties: Marshall Electronics, Inc. is neither responsible for any possible technological, editorial errors or omissions, nor responsible for any incidental or related damages arising from providing this file, using or operating this product.
Customer Support
- Tel: (800) 800-6608
- Website: www.marshall-usa.com
FAQs
Q: What kind of video output does the camera provide?
For smooth integration into current AV systems, the camera’s high-quality SDI output supports HD video transmission via professional-grade wiring.
Q: Can the CV506-H12 capture slow-motion footage?
Indeed. Smooth slow-motion recording is made possible by its high-speed capabilities, making it ideal for in-depth analysis of fast-action events.
Q: Is the camera suitable for live production workflows?
Of course. Because of its low-latency design, the CV506-H12 is dependable for live switching and real-time monitoring.
Q: Can it be integrated into multi-camera setups?
Indeed. It is simple to integrate with other cameras in multi-camera production situations because of its SDI output and small form factor.
Q: How does the camera perform in varying lighting conditions?
The CV506-H12’s architecture ensures constant image quality in both controlled and dynamic contexts by preserving clarity and detail in a variety of lighting conditions.