
Meec Tools 024232 Saw Blades Grinding Machine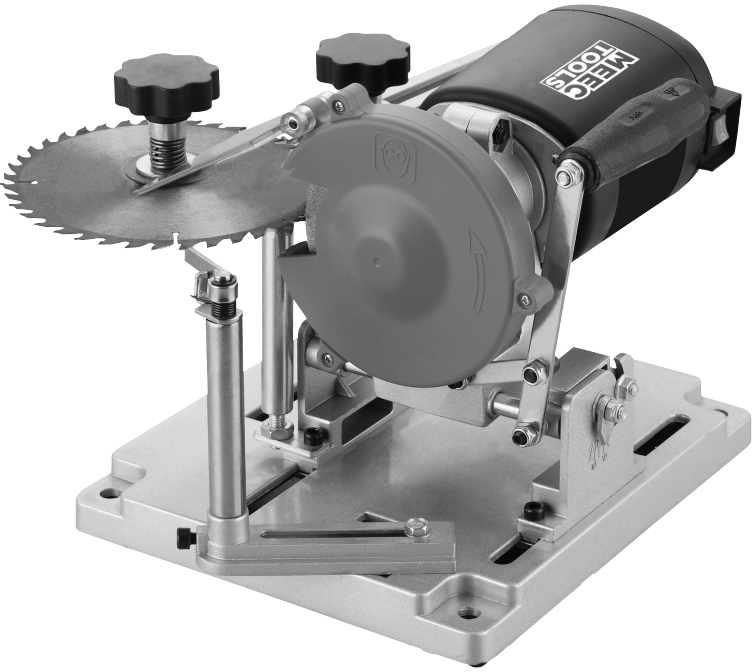
SAFETY INSTRUCTIONS
Read all the safety instructions and other instructions. Failure to follow all the instructions and safety instructions can result in the risk of electric shock, fire and/or serious personal injury. Save all warnings and instructions for future reference. The term “power tool” in all the warnings below refers to mains-powered (corded) or battery-powered (cordless) power tools.
WORK AREA
- Keep the work area clean and well-lit. Dark and cluttered work areas increase the risk of accidents and injuries.
- Do not use power tools in explosive environments, such as in the vicinity of flammable liquids, gas or dust. Power tools produce sparks that can ignite dust and fumes.
- Keep onlookers, especially children, at a safe distance when using power tools. You can easily lose control of the power tool if you are distracted.
ELECTRICAL SAFETY
- The plug on the power tool must match the power outlet. Never modify the plug in any way. Never use an adapter with earthed power tools. Unmodified plugs and matching power points reduce the risk of electric shock.
- Avoid body contact with earthed surfaces such as pipes, radiators, cookers and refrigerators. There is an increased risk of electric shock if your body is earthed.
- Do not expose power tools to rain or moisture. There is a greater risk of electric shock if water gets into a power tool.
- Be careful with the power cord. Never use the power cord to carry or pull the tool, or to pull out the plug from the mains socket. Keep the power cord away from heat, oil, sharp edges and moving parts. Damaged or tangled power cords increase the risk of electric shock.
- If the power tool is used outdoors, only use an extension cord approved for outdoor use. Cords intended for outdoor use reduce the risk of electric shock.
- If it is necessary to use power tools in damp conditions, use a mains connection protected by a residual current device (RCD). Using an RCD reduces the risk of electric shock.
USING AND LOOKING AFTER POWER TOOLS
- Pull out the plug and/or remove the battery before making any adjustments, changing accessories or putting the power tool away. These safety precautions reduce the risk of accidentally starting the power tool.
- Store power tools out of the reach of children when not in use. Never allow children, or anyone who is unfamiliar with the power tool and these instructions, to use the tool. Power tools are dangerous if used by inexperienced persons.
- Keep cutting tools sharp and clean. Properly maintained cutting tools with sharp cutting edges are less likely to jam and are easier to control.
- Keep handles and grips clean, dry and free from oil and grease. Greasy handles and grips make it difficult to hold and control the tool in unexpected situations.
SERVICE
- Power tools must only be serviced by qualified personnel using identical spare parts. This will ensure that the power tool remains safe to use.
MINIMISATION OF NOISE AND VIBRATION
- Plan the work so that exposure to heavy vibrations is spread over a longer period.
- To reduce noise and vibrations when in use, limit the time the tool is in use, and use low-power/vibration mode and suitable safety equipment.
- Take the following precautions to minimise the risks of exposure to vibrations and/or noise:
- Only use the tool according to these instructions.
- Check that the tool is in good condition.
- Use accessories in good condition which are suitable for the purpose.
- Keep a firm grip on the handles/ grips.
- Maintain and lubricate the tool in accordance with these instructions.
DESCRIPTION
The product is intended to be used for sharpening circular saw blades with a diameter of up to 400 mm.
Parts
- Motor
- Blade holder
- Support for the saw blade
- Handle
- Power switch
- Base plate
ASSEMBLY
Remove the lock nut, washers, spring and centring piece from the blade holder. Put the blade to be sharpened on the screw and replace the parts as shown in the drawing.
- Lock nut
- Washer
- Spring
- Washer
- Centring piece
- Saw blade

The saw blade must be centred, but not locked. Do not tighten the lock nut so hard that the saw blade cannot rotate. Check that the centring piece is not at an angle.
USE
Switch off the product, pull out the plug and wait until all moving parts have completely stopped before cleaning, adjusting, maintenance and/or replacing accessories.
ADJUSTING THE SAW BLADE
Adjust the position of the saw blade about the grindstone, as shown in the figures below, to sharpen the front and back of the tooth.
- Back of the tooth
- Front of the tooth
- Bottom of tooth

Positioning of the grindstone when sharpening the front of the tooth. Positioning of the grindstone when sharpening the back of the tooth.
- Adjust the arm of the blade holder and, if necessary, the position of the motor, depending on the diameter of the saw blade.
- Undo the lock nut and pull out (2) and turn (1) the arm.
- Adjust the saw blade to the correct position on the grindstone. Lift the handle to adjust and align the grindstone to the bottom of the tooth.
Examples of adjustments for different diameters of saw blades
- Saw blade 90 mm: Motor moved back.
- Saw blade 230 mm: Motor moved forward to avoid collision with the arm.
- Saw blade 400 mm: Motor moved forward, arm turned away so that the lock nut does not collide with the saw blade.

Depth stop
Tighten the lock screw to lock the depth stop in place.
Support for the saw blade
For better stability and alignment, the support for the blade should be placed as close to the grindstone as possible so that the blade is resting against it.
Sharpening of the set saw blade.
The motor can be angled to sharpen the teeth on the blade to the required angle. Undo the lock nuts on each side of the motor and adjust to the required angle. The motor can be angled up to about 25° both ways.
The motor can go against the base plate when adjusting larger angles. In which case ,undo the clamping screw on the motor bracket, turn the motor 180° and tighten the screw.
Sharpening a circular saw blade

Start the product and use the handle to move the grindstone against the tooth until it reaches the set depth. Pull back the grindstone with the handle, turn the saw blade and sharpen the next tooth. To sharpen the back of the teeth, adjust the grindstone according to the instructions.
TECHNICAL DATA
- Rated voltage 230 VAC, 50 Hz
- Rated output 110 W
- Speed, no load 5700 rpm
- Diameter, grindstone 100 mm
- Saw blade diameter 90–400 mm
- Weight 5.4 kg
- Sound pressure level, LpA: 69.0 dB(A), K= 3 dB
- Sound power level, LwA: 82 dB(A), K= 3 dB
MAINTENANCE
IMPORTANT: Switch off the product, pull out the plug and wait until all moving parts have completely stopped before cleaning, adjusting, maintenance and/or replacing accessories. Keep the product clean and dry. Clean the product with a dry or damp cloth. Lubricate moving parts at regular intervals. Do not use strong or flammable detergents. The motor is maintenance-free. Keep the ventilation openings on the product clean to avoid overheating.
Customer Services
Website Visit:
Email:
Tell: