


Milwaukee 3841-20 M 18 Hot Shot Jump Starter
Safety Instructions
- Keep the work area clean and well-lit. Cluttered or dark areas invite accidents.
- Do not operate power tools in explosive atmospheres, such as in the presence of flammable liquids, gases, or dust. Power tools create sparks, which may ignite the dust or fumes.
- Keep children and bystanders away while operating a power tool. Distractions can cause you to lose control.
- Do not expose equipment to rain or wet conditions. Water entering a power tool will increase the risk of electric shock.
- Stay alert, watch what you are doing, and use common sense when operating a power tool. A moment of inattention while operating power tools may result in serious personal injury.
- Use personal protective equipment. Always wear eye protection. Protective equipment, such as a dust mask, non-skid safety shoes, hard hats, or hearing protection, on used for appropriate conditions, and will reduce personal injuries.
- Do not overreach. Keep proper footing and balance at all times. This enables better control of the power tool in unexpected situations.
- Do not let familiarity gained from frequent use of tools allow you to become complacent and ignore tool safety principles. A careless action can cause severe injury within a fraction of a second.
- Do not force the power tool. Use the correct power tool for your application.
- Disconnect the plug from the power source and/ or remove the battery pack, if detachable, from the power tool before making any adjustments, changing accessories, or storing power tools. Such preventive safety measures reduce the risk of accidentally starting the power tool.
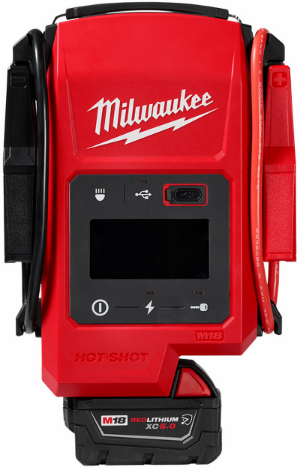
Description
- Negative (-) terminal clamp
- Negative terminal clamp storage posts
- Negative (-) lead wire
- Carrying handle
- LED Task light
- Positive (+) lead wire
- Positive terminal clamp storage posts
- Positive (+) terminal clamp
- USB LED indicator
- USB button
- USB charging port
- Display screen
- Charge LED indicator
- Start engine LED indicator
- Start engine button
- Charge the capacitor button
- Power button
- LED task light button
ASSEMBLY
Removing/Inserting the Battery
To remove the battery, push in the release buttons and pull the battery pack away from the tool.
OPERATION
Icon Symbology
This tool has buttons and a screen that displays the icons below. The icons change as needed during normal tool operation. If a setting is changed, the icon on the screen will be updated.
- To reduce the risk of injury, always remove the battery pack anytime the tool is not in use.
- To reduce the risk of injury from fire, DO NOT use a power tool next to gasoline, flammable, or explosive liquids or materials.
- To reduce the risk of sparks, DO NOT allow positive and negative battery clamps to touch or connect.
- To reduce the risk of sparks, heat, and electric shock, ensure all tools are away from the power tool and battery terminals.
Jump Starting in Standard Mode
- Ensure the vehicle is off and turn off all vehicle accessories (headlights, radio, air conditioning, etc) before continuing.
- To turn on the jump starter, press the power button.
- Press the Charge Capacitor Button to begin charging. Once charging is complete, the charge LED will turn solid and the display screen will show 100%. The start engine LED will begin flashing.
- To attach clamps, connect the (red) clamp to the (+) positive battery terminal. Next, connect the (black) clamp to the (-) negative battery terminal.
- Press the Start Engine Button on the jump starter. The Start Engine Timer will start to count down. Start the vehicle within the time limit. Turn the vehicle key to the on position or press the ignition button in the vehicle.
- To turn off the jump starter, press the power button.
- To remove, disconnect the black clamp from the black (-) negative battery terminal first, then remove the red clamp from the red (+) positive battery terminal.
- Secure clamps onto storage posts (positive clamp to positive post, negative clamp to negative post).

Jump Starting in Override Mode
This tool has an override function only for use in low vehicle battery voltage situations. Override mode is required when the vehicle battery voltage is lower than 1.2 V.
If the clamps are attached to a low-voltage battery before entering override mode, the display will indicate it can not read the voltage “–“. Ensure clamps are connected properly to the positive and negative terminals before following the steps below.
- Follow steps 1–4 in the “Jump Starting in Standard Mode” section, then continue with the steps below.
- Press and hold the start engine button on the jump starter; the override icon will illuminate. The timer will start to count down. Start the vehicle within the time limit. Turn the vehicle key to the on position or press the engine ignition button in your vehicle.
- To turn off the jump starter, press the power button.
- To remove, disconnect the black clamp from the black (-) negative battery terminal first, then remove the red clamp from the red (+) positive battery terminal.
- Secure clamps onto storage posts (positive clamp to positive post, negative clamp to negative post).
Cold Weather Operation
MILWAUKEE Lithium-Ion battery packs are designed to operate in temperatures below freezing. When the battery pack is too cold, it may need to warm up before normal use. For best cold-weather results, keep M18™ batteries fully charged and use an M18™ XC 5.0 Ah battery or higher. Depending on battery charge and temperature, an error may be displayed (see “Troubleshooting”).
Maintainance & Cleaning
Maintaining
Keep this tool, battery pack, and charger in good repair by adopting a regular maintenance program. Inspect the tool for issues such as undue noise, misalignment, or binding of moving parts, breakage of parts, or any other condition that may affect the tool’s operation. Return the tool, battery pack, and charger to a MILWAUKEE service facility for repair.
Depending on use, periodically have an authorized service facility inspect and maintain the tool, battery, and charger to ensure proper performance. If the tool does not start or operate at full power with a fully charged battery pack, clean the contacts on the battery pack. If Milwaukee 3841-20 M 18 Hot Shot Jump Starter the tool still does not work properly, return the tool, charge, and battery pack to a MILWAUKEE service facility for repairs.
Cleaning
Clean dust and debris from any vents. Keep the tool clean, dry, and free of oil or grease. Use only mild soap and a damp cloth to clean, since certain clean- ing agents and solvents are harmful to plastics and other insulated parts. Some of these include gasoline, turpentine, lacquer thinner, paint thinner, chlorinated cleaning solvents, ammonia, and household detergents containing ammonia. Never use flammable or combustible solvents around tools.
Repairs
For repairs, return the tool, battery pack, and charger to the nearest authorized service center.
Specifications
- Cat. No……………………………………………… 3841-20
- Volts…………………………………………………….. 18 DC
- Battery Type …………………………………………M18™t
- Charger Type………………………………………..M18™t
- Peak Current ……………………………………….. 2000 A
- Input Current Rating …………………………………..36 A
- Output Voltage…………………………………………. 15 V
- Maximum USB Output…………………………….5V DC
- Maximum USB Output Amps……………………….. 3 A
- Operating Temperature (Tool Only)……………………………….-4°F to 122°F*
- Vehicle Battery Type………………….. 12 V Lead Acid
Refer to the M18™ battery manual for acceptable battery operating temperatures.
Troubleshooting
LIMITED WARRANTY USA & CANADA
Normal Wear: Many power tools need periodic parts replacement and service to achieve the best performance. This warranty does not cover repair when normal use has exhausted the life of a part, including, but not limited to, chucks, brushes, cords, saw shoes, blade clamps, o-rings, seals, bumpers, driver blades, pistons, strikers, lifters, and bumper cover Milwaukee 3841-20 M 18 Hot Shot Jump Starter washers. *This warranty does not cover battery packs or all power tools. Refer to the separate and distinct warranties available for those products.
The warranty period for the LED in the LED Work Light (49-24-0171) and the LED Upgrade Bulb (49-81-0090) is the lifetime of the product, subject to the limitations above.
This warranty applies to products sold in the U.S.A. and Canada only. Please consult the ‘Service Center Search’ in the Parts & Service section of MILWAUKEE’s website www.milwaukeetool.com or call 1.800. SAWDUST (1.800.729.3878) to locate your nearest service facility for warranty and non-warranty service on a MILWAUKEE power tool
Customer Support
- Website: https://www.jula.se/varumarken/meec-tools/
- Tel: +39-0645652462
2 Comments
Pingback: How to Make and Use LED Headlights Easily & Safely
Pingback: 9006 LED Headlight Bulb User Guide & Installation