
Pioneer VREC-Z820DC Dash Camera

Safety precautions
Certain countries, states, and provincial laws may prohibit or restrict the placement and use of this product in your vehicle. Please comply with all applicable laws and regulations regarding the use, installation, and operation of this product. It is the user’s responsibility to comply with all applicable laws, rules, regulations, and ordinances.
Before using this product, be sure to read and fully understand the following safety information.
- Don’t use this product if it will distract you from safely operating your vehicle. Always observe safe driving rules and follow all existing traffic regulations. If you experience difficulty in operating this product or reading the display, park your vehicle in a safe location and apply the parking brake before making the necessary adjustments.
- Certain functions (such as viewing of screen and certain button operations) offered by this product could be dangerous (possibly resulting in serious injury or death) and/or unlawful if used while driving.
Packaging Contents
- 1N Dash Camera [VREC-Z820DC], 1N Power Adapter, 1N Power Cable, 1N Electrostatic Film, 1N Mount with adhesive, 1N Rear Camera, 1N Rear Camera Connecting Cable, 1N Quick Start Guide, 1N Warranty Card, 1N Pry Tool
Appearance

- Function Buttons
- Mic
- LCD Display
- Mounting
- Rear camera connection terminal (to connect rear camera cable)
- Cooling holes
- ON/OFF Power Button
- Reset
- microSDTM Card Slot
- Power port (to connect the power cable)
- Speaker
- Camera Lens
Specifications
- Resolution: 4K (Front); 1080p/Full HD (Rear)
- Display Screen: LCD; 3 inches; 7.2 cm
- Wi-Fi: In-built (2.4 GHz)
- G-sensor: Supported
- GPS: Supported
- Storage: microSD Card (Class 10 or above; up to 1 TB)
- Power Supply: 5 V, 2.0 A (via cigarette charger slot of vehicle or via Hardwire Kit)
- Power Connector: USB Type-C®
- Power Back-up: Super Capacitor
Status Display
The status display shows the operating status of this product.
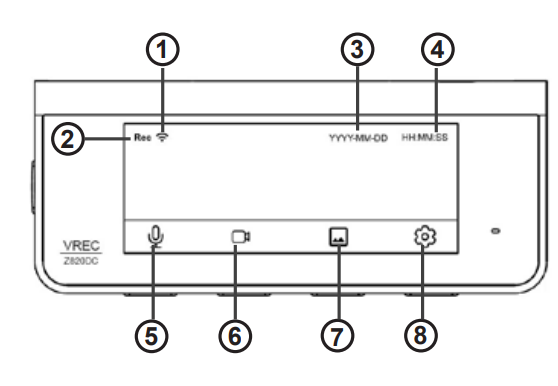
- Recording
- Wi-Fi
- Date
- Time
- Mic
- Event Recording
- Gallery
- Settings
System Indicator Display
| System Indicator | System Indicator Color | System Indicator pattern |
| Normal Recording | Green | Continuous Illumination |
| Event Recording | Green | Blinking |
| Error Condition | Red | Continuous Illumination |
| Video Recording turned off | Red | Continuous Illumination |
| Gallery access via App | Red | Continuous Illumination |
| Event Recording in parking mode | Green | Continuous Illumination |
Function Buttons
There are 4 function buttons on the bottom of the dash camera and 2 buttons on the side, as indicated below. The functions of the buttons will depend on the displayed screen.
Recording
- Turn ON/OFF Audio recording*
- Capture emergency video
- Access Gallery
Settings * This function changes to toggle front / rear camera when the rear camera is connected.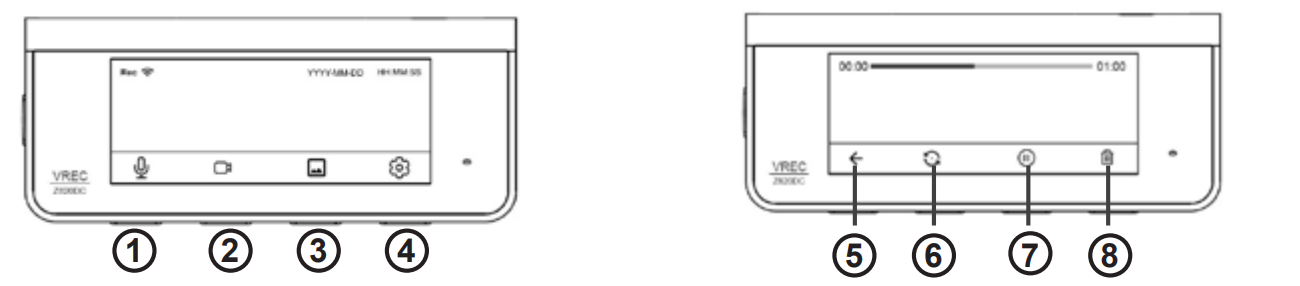 During playback
- Back
- Rear Camera*
- Play/Pause
- Delete * This function changes to toggle front / rear camera when the rear camera is connected.
During the MENU screen display

- Back
- Go Previous / Up
- Go Next / Down
- Confirm
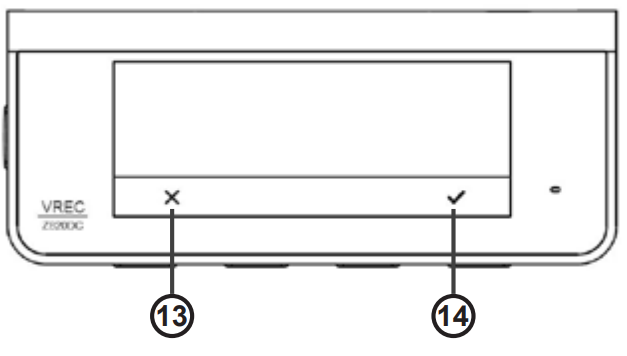
- Cancel
- Confirm
Inserting and Ejecting the microSD Card
- Turn OFF the power to this product when inserting and removing the microSD card.
Inserting the microSD Card
- Hold the top edge of the microSD card, position the microSD card so that the microSD card label is facing the opposite side of the lens, and slowly insert it into the microSD card slot until it clicks.

Ejecting the microSD Card
- Slowly push in the top edge of the microSD card until it clicks (1). Pull out the microSD card (2).
Specified Installation Position on Front Windshield
- Install the product at a place where it doesn’t obstruct any of the airbag deployment zones. The ideal location is behind the rear-view mirror out of the driver’s view, as shown in the illustration below.
- A position where this entire product is within 20% of the top edge of the height of the front windshield or is in the shadow of the rear-view mirror as viewed from the driver’s seat.
- A position where the lens part of this product is within the wiping range of the wiper.
- A position where the lens part of this product does not hang over the sunshade, and black ceramic lines/black ceramic pattern.
- A position where this product faces in the horizontal direction, front to back and side to side.
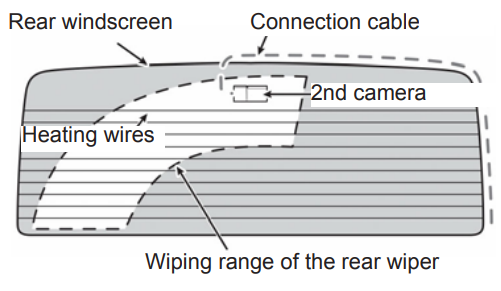
Recommended Installation Position on Rear Windshield
- A position where the lens part of the rear camera is within the wiping range of the wiper.
- A position where the rear camera faces in the horizontal direction from the rear to side to side.
- A position where the lens part of the rear Pioneer VREC-Z820DC Dash Camera camera and the double-sided tape do not overlap the heating wires.
Installing the rear camera
- Clean the installation area of dirt and oils using a clean cloth.


Install the rear camera.
- Peel off the double-sided tape and release the paper from the rear camera.
- Adjust the lens so that it faces outside the vehicle, and install it at the specified position on the rear windshield.

Adjust the angles
- Adjust the angles of this product so that the video outside the vehicle is properly displayed.

Switch on the ignition.
- Switch on the ignition to check if the installed product is working as expected.
Direct connection with Vehicle Battery (Parking mode)
Be sure to disconnect the y terminal of the vehicle’s battery before connecting the power cable. In case you switch back to a USB power adaptor (from Hardwire kit) to power the dash camera, please note to perform a factory-reset operation using the App or Dash Camera GUI.

Ground (Black)
- Securely connect to the metal part of the vehicle body. To prevent noise, connect as close to the navigation unit as possible.
Battery power supply (Yellow)
- Always connect to the power circuit supplied with power from the battery, regardless of whether the vehicle engine switch is ON or OFF.
Accessory power supply (Red)
- Connect to the power circuit supplied with power when the vehicle engine switch is turned to the ACC position. Never install the accessory power supply to a vehicle that does not have an ACC position on the engine switch. Doing so may lead to a dead battery.

Connecting to Dash Camera App
- Scan the code for the Companion App on Google Play or App Store
- Download the App
- Sign up and follow the pairing instructions.
- Default Wi-Fi Name (SSID): Pioneer_Z820DC_XXXX
- Default password: 12345678
Trademarks and Copyrights
- App Store is a service mark of Apple Inc., registered in the U.S. and other countries and regions.
- Android and Google Play are trademarks of Google LLC.
- STARVIS and are trademarks of Sony Group Corporation or its affiliates.
- microSD, microSDHC, and microSDXC Logos are trademarks of SD-3C LLC.
Customer Support
- Address: Parker Davis HVAC International 7290 NW 77th Court, Doral, FL 33166 – USA
- Tel: (305) 513-4488
- Fax: (305) 513-4499
- E-mail: info@pdhvac.com
- Website: www.pdhvac.com
- Pioneer Customer Support Center: http://www.pioneer.eu
FAQs
Q: What are the key features of the Pioneer VREC-Z820DC dash camera?
Ans: Dual-channel (front and rear) recording, Full HD video capture, GPS tracking, impact detection (G-sensor), and loop recording for continuous footage are all features of the VREC-Z820DC.
Q: How do I install the dash camera in my vehicle?
Ans: Install the back camera inside the rear window and the front camera on the windscreen behind the rearview mirror. For a neater installation, hardwire the power cable or connect it to the 12V power socket in your car.
Q: How does the loop recording function work?
Ans: To guarantee that you always have the most recent footage, the camera constantly records video, overwriting the oldest files when the memory card is full.
Q: What type of memory card does the VREC-Z820DC use?
Ans: According to the handbook, it can accommodate microSD cards up to a certain size, often 64GB or 128GB. For dependable recording, use high-speed cards (Class 10 or higher).
Q: What is the purpose of the G-sensor?
Ans: When the G-sensor senses abrupt shocks or hits, it automatically stores the current video to avoid overwriting it.
Q: Can I customize recording settings?
Ans: Yes, the camera’s menu system allows you to change a number of settings, including exposure, audio recording, resolution, and loop time.