
POWERTEC 71845 Pocket Hole Jig Kit
Safety Instructions
For your own safety, read all of the rules and precautions before operating the tool.
You must be familiar with the use of any tool or accessory used with this pocket hole jig. The supplier cannot be held responsible for any accident, injury, or damage incurred while using this pocket hole jig with any tool. It is the responsibility of the purchaser of this product to ensure that any person using this product reads and complies with all instructions and safety precautions outlined in this manual and the operating manual of the tool being used prior to use.
- Keep children and visitors at a safe distance from the work area.
- Keep the work area clean. Cluttered work areas invite accidents.
- The work area should be properly lit.
- Do not use power tools in dangerous environments.
- Do not use power tools in damp locations. Do not expose power tools to rain.
- Wear proper apparel. Do not wear loose clothing, gloves, neckties, rings, bracelets, or other jewelry that may get caught in the moving parts of the tool.
- Wear a protective hair covering to contain long hair.
- Wear safety shoes with non‑slip soles.
- Wear safety glasses complying with the United States ANSI Z87.1.
- Everyday glasses have only impact-resistant lenses. They are NOT safety glasses.
- Wear a face mask or a dust mask if the operation is dusty.
- A guard or any other part that is damaged should be properly repaired or replaced.
- Do not perform makeshift repairs.
- Use safety equipment such as featherboards, push sticks, push blocks, etc, when appropriate.
- Maintain proper footing at all times and do not overreach.
- Do not force woodworking tools.
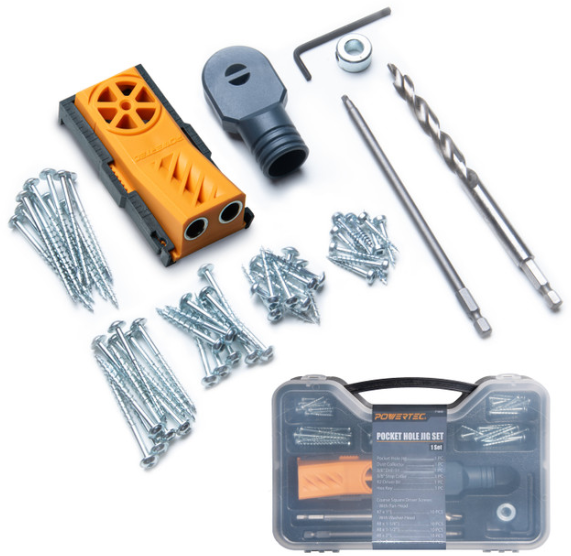
Unpacking
Check for shipping damage. Check immediately whether all parts and accessories are included.
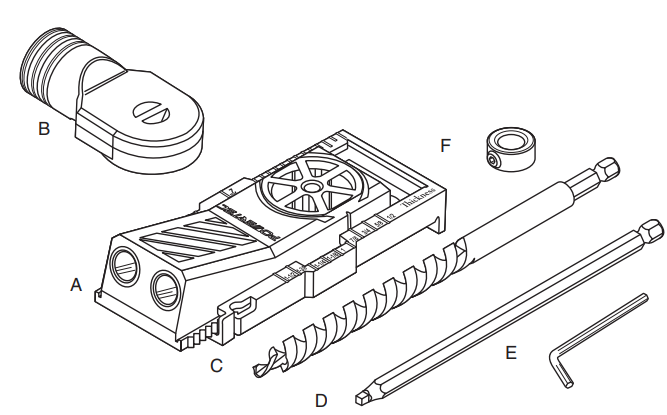
- Pocket hole jig 1
- Dust collector adapter 1
- 3/8″ drill bit 1
- R2 driver bit 1
- Hex key 1
- 3/8″ stop collar 1
The pocket hole jig is completely assembled. Before using, make sure you have read and understood this entire operating manual and the operating manual of the drill being used.
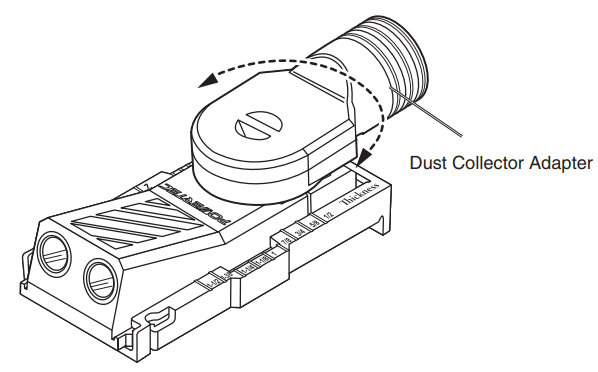
Dust Collector Adapter
The pocket hole jig is equipped with a dust collector adapter; it can be used with or without the adapter.
- Snap the dust collector adapter onto the top of the pocket hole jig.
- Connect it to a dust extractor or dust collector.
- Adjust the dust collector adapter to the needed position; it can be rotated over 180°.

Set Up
Drill Hose Poles
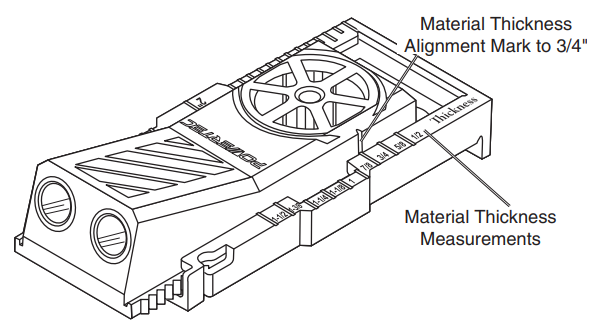
- Measure your material thickness.
- On the side of the pocket jig is a material thickness alignment mark and measurements.
- Slide the body of the jig in or out to align the alignment mark with the measurement of the material thickness. The mark is aligned to 3/4″ material thickness in Figure 3.
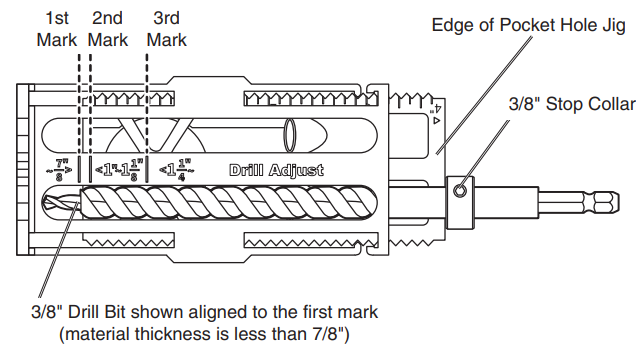
- Turn the pocket hole jig over to set the drill depth position.
- Slide the 3/8″ stop collar onto the 3/8″ drill bit. Do not tighten.
- Slide the drill bit into the pocket hole jig and align the second step of the drill bit with the scale mark.
- The thickness of the material is less than 7/8″, aligned with the first mark.
- Material thickness is 1″ – 1-1/8″, align with the second mark
- Material thickness is greater than 1-1/4″, align with the third mark
- Slide the 3/8″ stop collar to the edge of the pocket hole jig and tighten the screws on the stop collar with the hex key (provided).
Drilling Pocket Holes
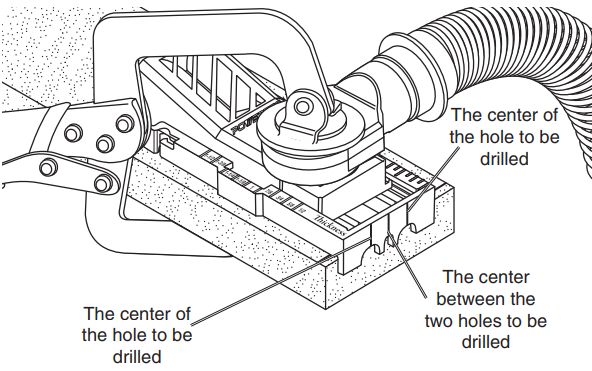
- Position the pocket hole jig in place and clamp it to the workpiece.
- Place pocket holes 5/8″ to 1-1/2″ from the edge and every 6″ to 8″ apart.
- If not using the dust collector adapter, DO NOT block the chip ejection holes.
- There are three alignment marks on the front of the jig.
- Start to drill the hole, drill at a slow speed until the stop collar touches the edge of the jig.

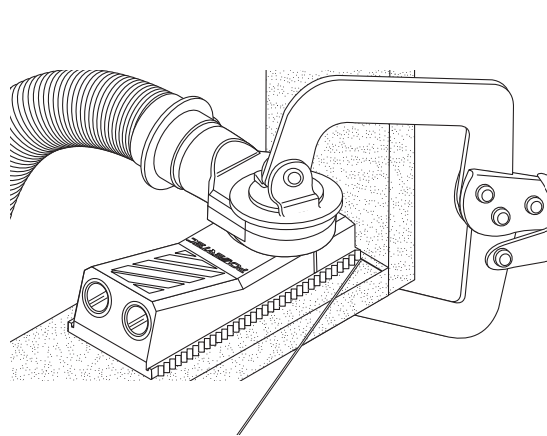
Drilling Holes into Assembled Material
The POWERTEC Pocket Hole Jig can also be used to repair or strengthen previously assembled case goods or drawers.
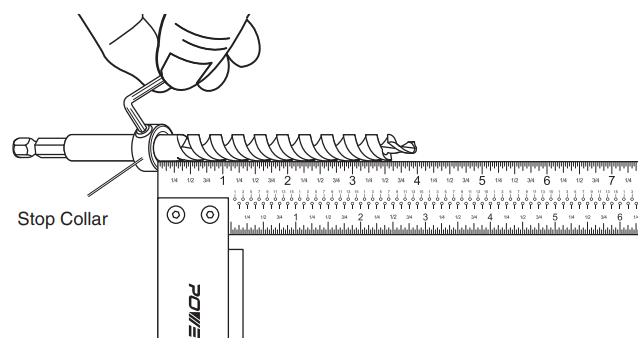
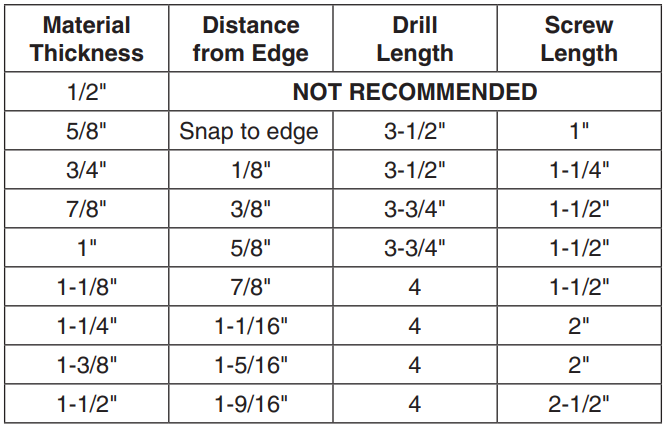
- Reference the Drilling After Assembly chart for the appropriate drill length for the material thickness.
- Measure from the bottom of the stop collar to the first step of the drill bit and tighten the stop collar.
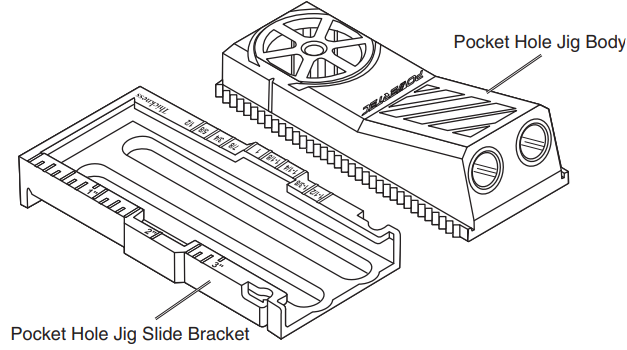
- Remove the pocket hole jig body from the pocket hole jig slide bracket.
- Scribe a line on the assembled material. Reference the Drilling After Assembly chart for the distance from the edge measurement
- Align the edge of the pocket hole jig to the scribed line and clamp firmly in place with the appropriate clamp for the application.
- Start to drill the hole, drill at a slow speed until the stop collar touches the edge of the jig.
Drilling After Assembly
Drive Pocket Holes Screws
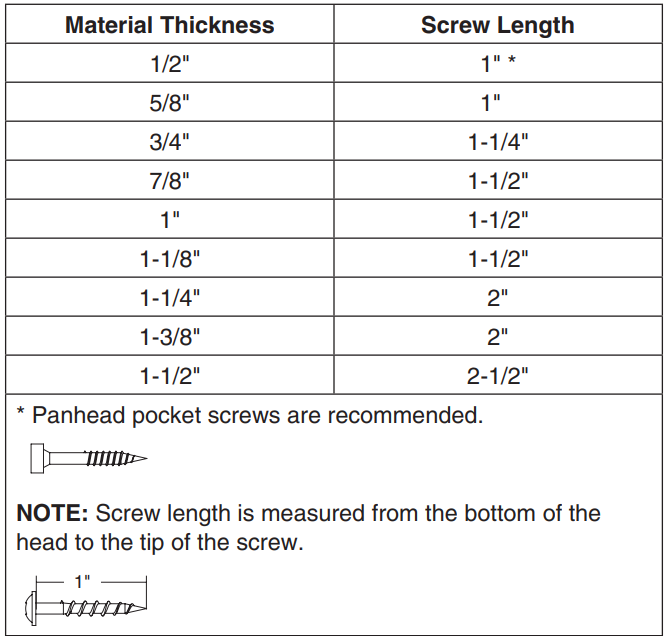
- Reference the Recommended Screw Length chart for the correct screw length for the material thickness used.
- Use the R2 driver bit (supplied) to drive the wood screws into the material.

Recommended Screw Length
Maintainance
When servicing, use only identical replacement parts. Use of any other parts may create a hazard or cause product damage.
Keep the pocket hole jig dry, clean, and free from oil and grease. Always use a clean cloth when cleaning. Never use brake fluids, gasoline, petroleum-based products, or any strong solvent to clean the pocket hole jig. Chemicals can damage, weaken, or destroy plastic, which may result in serious personal injury.
Customer Service
- Distributed by: Electus Distribution Pty Ltd 46 Eastern Creek Dr, Eastern Creek NSW 2766 Australia
- Ph: 1300 738 555
- Website: www.electusdistribution.com.au
FAQs
Q: What is the purpose of the POWERTEC 71845 Pocket Hole Jig Kit?
With the help of this jig kit, you can swiftly and safely attach items without leaving visible screws on the surface by making exact pocket holes in wood. It’s perfect for do-it-yourself woodworking projects, furniture, and cabinets.
Q: What materials can I use with this pocket hole jig?
Most softwoods, hardwoods, plywood, and MDF can be used with the jig. Steer clear of fragile composites and exceptionally thin materials since they might split when drilled.
Q: What drill bit size should I use?
0For reliable results, the kit includes a depth collar and a stepped drill bit. To choose the proper depth collar location, always refer to the thickness chart included in the handbook.
Q: Can I use the jig for angled or mitered joints?
It is possible to make angled pocket holes using the jig, but careful alignment is required. Prior to drilling, always measure and clamp firmly.
Q: Can I use a cordless drill with this jig?
Indeed. As long as the drill has enough power to neatly pierce the wood, the jig works with both corded and cordless drills.
Q: Where can I find detailed specifications and a parts list?
A complete parts list, drilling guidelines, and specifications for wood thickness, drill bit sizes, and suggested screws are all included in the instruction booklet.