
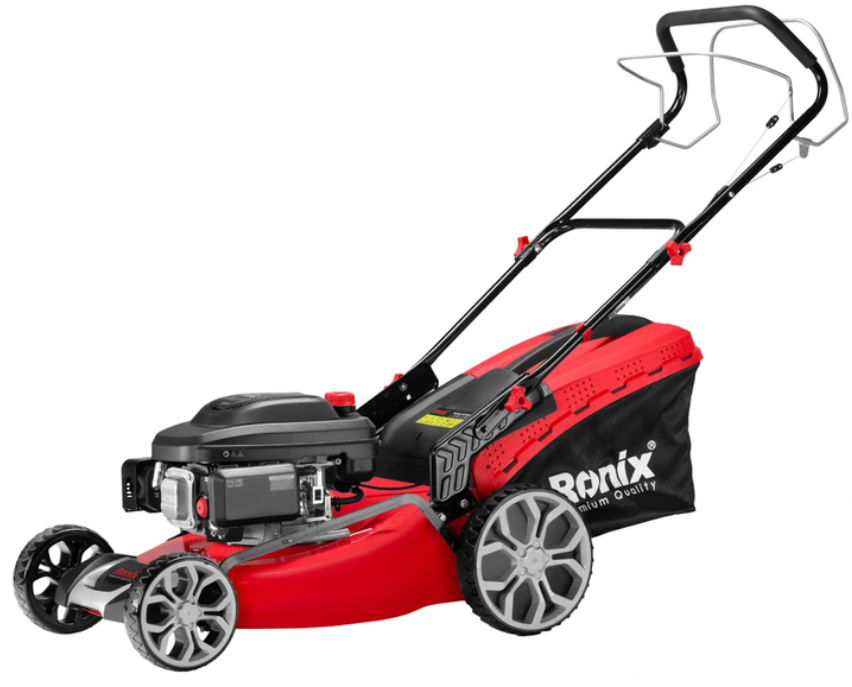
Ronix 4451 6.5HP Gasoline Lawn Mower
Safety Instructions
This cutting machine is capable of amputating hands and feet and throwing objects. Failure to observe the following safety instructions could result in serious injury or death.
- Read the instructions carefully. Be familiar with the controls and the proper use of the equipment.
- Never allow children or people unfamiliar with the instructions to use the lawnmower.
- Never mow while people, especially children, or pets are nearby.
- While mowing, always wear substantial footwear and long trousers.
- Do not operate the equipment when barefoot or wearing open sandals.
- Petrol is highly flammable. Store fuel in containers specifically designed for this purpose.
- Refuel outdoors only and do not smoke while refueling.
- Never remove the cap of the fuel tank or add petrol while the engine is running. Add fuel only when the engine is cold.
- If petrol is spilled, do not attempt to start the engine but move the machine away from the area of spillage and avoid creating any source of ignition until petrol vapors have dissipated.
- Replace all fuel tanks and container caps securely. Before using, always visually inspect to see that the blades, blade bolts, and cutter assembly are not worn or damaged. Replace worn or damaged blades and bolts in sets to preserve balance.
Operation
- Do not operate the engine in a confined space where dangerous carbon monoxide fumes can collect.
- Mow only in daylight or in good artificial light.
- Avoid operating the equipment in wet grass, where feasible.
- Always be sure of your footing on slopes. Walk, never run.
- For wheeled rotary machines, mow the face of slopes, never up and down.
- Exercise extreme caution when changing direction on slopes.
- Do not mow excessively steep slopes.
- Use extreme caution when reversing or pulling the lawnmower towards you.
- Do not change the engine governor settings or overspeed the engine.
- Operating the engine at excessive speed may increase the hazard of personal injury.
- Start the engine carefully according to instructions and with feet well away from the blade.
- Do not start the engine when standing in front of the discharge chute.
- Do not put hands or feet near or under rotating parts.
- Keep clear of the discharge opening at all times.
- Never pick up or carry the lawnmower while the engine is running.
- Stop the engine and disconnect the spark plug wire before cleaning blockages or unclogging the chute.
- before checking, cleaning, or working on the lawnmower; after striking a foreign object.
- Inspect the lawnmower for damage and make repairs before restarting and operating the lawnmower.
- If the lawnmower starts to vibrate abnormally (check immediately).
- Stop the engine: – whenever you leave the lawnmower; Before refueling. Reduce the throttle setting during engine shutdown and, if the engine is provided with a shut-off valve, turn the fuel off at the conclusion of mowing.
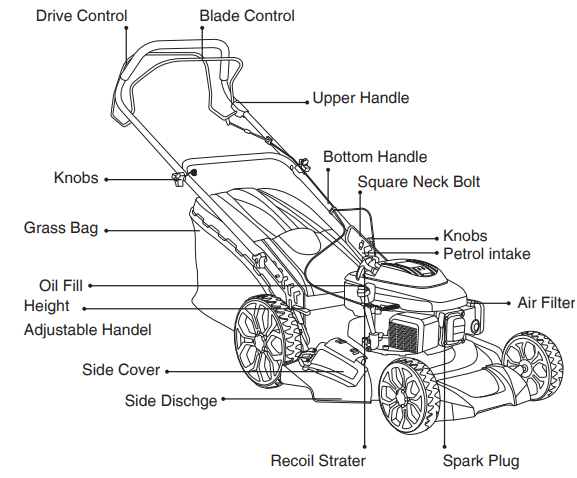
Part List
Assembly
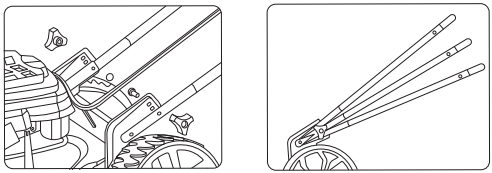
- Lower handle assembly.
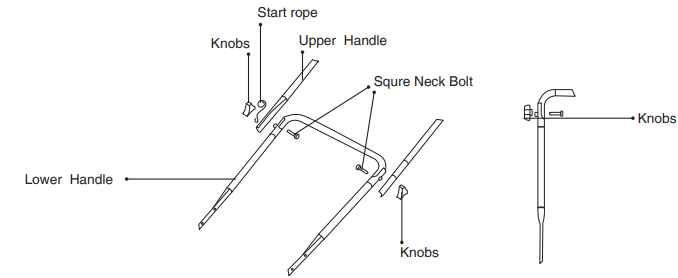
Insert the pin into the round hole of the lower handle from both the left and right sides. Insert square neck bolt (M8×20) into the bracket and lower handle, then tighten with knob nut. - Upper handle assembly
Insert bolt (M8X45) into the left handle holder, lower handle, and upper handle assembly in turn, then tighten with the knob nut. Insert bolt (M8X45) into right handle holder, lower handle, upper handle assembly, and start rope hook in turn, then tighten with knob nut. Fasten cables with the clips on the handle rod. - Grass catcher assembling
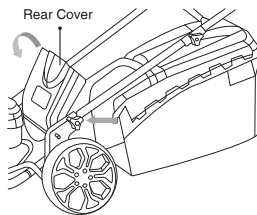
Hold up the rear cover and fit the grass catcher - Grass collection setting:
- For rear bagging
- Grass catcher box installed.
- For rear discharging
- stall grass catcher. Close the rear cover.
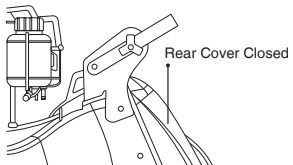
- For side discharging(If equipped)
- Rear cover closed. Keep pushing down the “PUSH”, then open the side cover side discharge guard installed.
- For mulching
- Lift the rear cover and hold up, insert mulching. Rear cover closed
- Lift the rear cover and hold up, insert mulching. Rear cover closed
- For rear bagging
- Working depth setting
Only when the mower is stationary and the rotating blade has come to a complete standstill.

Mow the lawn twice weekly during the most active periods of growth. Never cut more than 1/3 of the length of the grass, especially during dry periods. Mow with a high cutting height setting the first time. Examine the result and lower the mower to the desired setting. Mow slowly or mow the grass twice if it is very long. 1=30mm 2=40mm 3=50mm 4=60mm 5=70mm 6=80mm 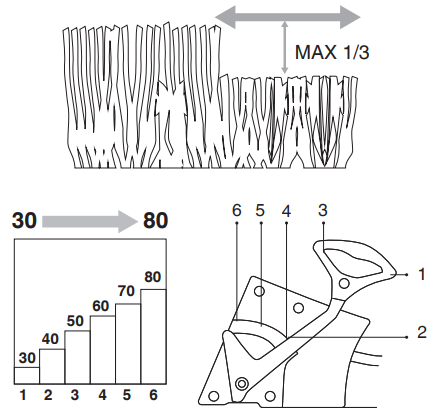
Start & Stop
Add fuel
- Place the lawnmower level.
- Clean around the filter cap.
- Remove the filter ca.p
- Using a clean funnel, fill the tank to approximately 5mm below the inner edge of the filter neck, being careful not to spill fuel.
- `Tighten the filter cap back and clean any spilled fuel.
Add oil
- Place engine level.
- Clean around the oil fill.
- Remove the filter cap, clean the tip of the dipstick, insert it, and tighten down.
- Remove the ipstick again and check the oil level, which must be between the “MIN” and “MAX” marks.
- If oil is required, add oil of the same kind up to the “MAX” mark, being careful not to spill any outside the oil fill.
- Close the filter cap and wipe off any spilled oil.
Spark plug cap
- Connect the cap of the cable to the spark plug, making sure that there is no grass or dirt either inside the cap or on the spark plug terminal.
Starting engine
- Push down the button three times.
- Close the blade control handle, as shown in the lawnmower instructions.
- Then pull the cord rapidly.
- When the engine starts, release the recoil starter.

Starting the Engine
Hot Starting
Keep your hands away from the silencer and the surrounding areas that can become extremely hot. With the engine running, do not get loose-fitting clothing (ties, scarves, etc.) or hair closer to the top part of the engine.
- Drive
- Forward drive is engaged and disengaged with the drive control at the top of the handle.
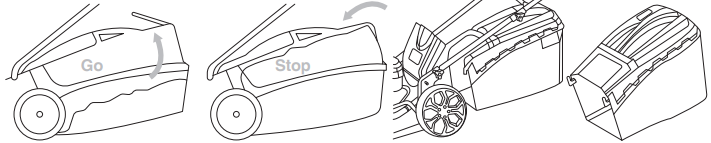
- Stopping during operation
- Release the blade control handle to stop the engine.
- Stopping at the end of the operation
- Release the blade control handle to stop the engine.
- Once the engine has cooled, disconnect the spark plug cap.
- Remove any grass buildup from the engine, in particular from the silencer, to reduce fire hazard.

Cold Starting
- The mower should not be used on ground that slopes more than 15°. This could cause engine lubrication problems.
- To empty the grass catcher: when the indicator cap is closed, the grass catcher is full. Please empty it.
- To remove the rass box, release the engine brake control to stop the engine.
- Lift the rear cover and remove the grass catcher by the handle.
- Empty the grass catcher.
- Do not drag the bag when emptying, as it will cause unnecessary wear.
Maintainance & Storage
Always remove the spark plug lead before repair, cleaning, or maintenance work. After 5 hours of running time, tighten the screws and nuts. Check the oil. Clean the mower thoroughly after each mowing with a cloth or a brush. Do not spray with water. Keep the mower in a dry room. Annually (After the end of the season), grind and balance the cutter blade. Remove the sparkplug lead.
Fitting and removing the blade require the use of protective gloves. Tighten the screw properly when reassembling. Drain fuel from the tank to prevent buildups inside the tank. Change oil after each season or after 25 hours of running time. Run the engine warm, remove the spark plug lead. Remove the drain plug from the bottom of the engine and drain oil. Fill with new oil.
- Keep all nuts, bolts, and screws tight to be sure the equipment is in safe working condition.
- Never store the equipment with petrol in the tank inside a building where fumes may reach an open flame or spark.
- Allow the engine to cool before storing it in any enclosure.
- To reduce the fire hazard, keep the engine, silencer, battery compartment, and petrol storage area free of grass, leaves, or excessive grease.
- Check the grass catcher frequently for wear or deterioration.
- Replace worn or damaged parts for safety.
- If the fuel tank has to be drained, this should be done outdoors.
Cleaning the Air Filter
Keep the filter clean and oil saturated. Replace it if broken, cut, or with damaged parts.
- Clean around the filter cover
- Release the clip; remove the cover and the foam element.
- Wash the foam element in liquid detergent and water.
- Squeeze dry in a clean cloth.
- Saturate the foam element with 2 tablespoons of clean engine oil and squeeze it a few times to distribute the oil evenly.
- Remove excess oil with a clean cloth.
- Clean the interior of the air cleaner housing from any dust and grass, making sure that they do not enter the intake manifold.
- Install the foam element in its housing and close the cover.
If the foam element has been replaced, proceed to oil the new filter as described above in sections.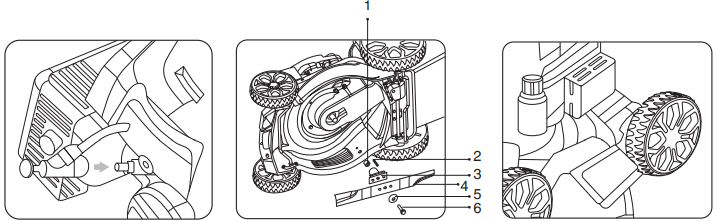
Specifications
| Model | 4451 |
| Engine Power | 6.5HP |
| Engine Type | Single Cylinder, Four-Stroke, Air Cooled |
| Fuel Tank Capacity | 1.3L |
| Oil Tank Capacity | 600ml |
| Carburetor Type | Float Carburetor |
| Fuel Consumption Rate | 0.95 l/h |
| Displacement | 196cc |
| Maximum No-Load Speed | 2900RPM |
| Ignition System | Inductance Type |
| Starting System | Recoil Start |
| Engine Noise Level (Lpa) | 98Db |
| Body Dimension | 1660 × 1040 × 560mm |
| Body Material | Steel |
| Handle Dimension | 1120 × 480mm |
| Handle Material | Q235(steel) |
| Handel Height Adjustment | 910-1180mm |
| Handel Tilt Adjustment | 23-40°Degree |
| Cutting width | 510mm |
| Grass Catcher Capacity | 70L |
| Grass Catcher Material | Fabric With Plastic Cover |
| Wheels Dimension | 203/280mm |
| Cutting Height Adjustment | 6 Positions (30,40,50,60,70,80mm ) |
| Blade Type | Straight Blade |
| Blade Material | 40Mn |
| Total Weight | 35Kg |
| Net Weight | 32.5Kg |
| Includes | 4pcs Knob, 1pc Clip 4pc Bolt, 1pc Hook, 1pc Spark Plug Wrench, 1pc Spark Plug Sleeve |
Troubleshooting
| PROBLEM | LIKELY CAUSE | SOLUTION |
| Hard starting | No fuel | Check and top up |
| Stale fuel or build-ups in the tank | Empty the fuel tank and refill it with fresh fuel | |
| Spark plug disconnected | Check that the spark plug cap fits well over the plug terminals | |
| Dirty electrodes or an incorrect gap | Check | |
| Air filter clogged | Check and clean the air cleaner | |
| Incorrect oil for the season | Replace with proper oil | |
| Fuel evaporation in the carburetor (vapor lock) due to high temperatures | Wait for a few minutes, then start again | |
| Fault in carburation | Contact a Licensed Service Center | |
| Stale fuel or build-ups in the tank | Empty the fuel tank and refill it with fresh fuel | |
| Inconsistent working | Dirty electrodes or an incorrect gap | Check |
| Air filter clogged | Check and clean the air cleaner | |
| Fault in carburation | Contact a Licensed Service Center | |
| Loss of power while mowing | Air filter clogged | Check and clean the air cleaner |
| Fault in carburation | Contact a Licensed Service Center | |
| The governor is out of phase with respect to the accelerator | Adjust the cable |
Environmental Instructions
- Dispose of cardboard packaging and polyethylene (PE) bags in the appropriate containers for separate collection of municipal waste according to their description.
- If there are batteries in the device, remove them and separately return them to the collection and storage facility. Return the used device to a suitable collection and storage facility, as the hazardous substances in it may pose a threat to health and the environment.
- Waste electrical equipment is waste that contains substances harmful to humans, animals, and the environment.
- These substances can lead to contamination of the soil, water, or air, and through this they can get into the human body and lead to numerous health ailments, such a vision, hearing, and speech disorders; they can also lead to kidney, liver, and heart damage, and cause skin diseases.
- Harmful substances can also have adverse effects on the respiratory and reproductive systems and lead to cancerous changes. Consumption of plants growing on the contaminated soils, and products made from them, may risk the above-mentioned health effects.
- Do not dispose of the device in the municipal waste container!!! Service: If you wish to purchase spare parts or report any complaints, please contact directly with the seller who issued the receipt directly.
Customer Support
- Address: Lyoner Str. 36 60528 Frankfurt am Main
- Tel:+49 69 310 900 66
- Website: www.ronixtools.com
FAQs
Q: How often should I change the engine oil?
After the first five hours of operation, change the oil every 25 to 50 hours, or at the beginning of each mowing season. Use the oil type specified in the handbook at all times.
Q: How do I adjust the cutting height?
To choose the appropriate cutting height, use the wheel mechanism or height adjustment lever. To keep the cut level, make sure all four wheels are set equally.
Q: What type of gasoline should I use?
Make use of brand-new, unleaded petrol with an octane value of at least 87. Unless the engine specifies otherwise, do not combine oil with fuel (see the handbook).
Q: Where can I purchase replacement parts or accessories?
Authorised Ronix dealers and the official Ronix website sell replacement blades, air filters, spark plugs, and other components. For maximum performance and safety, always use authentic parts.
Q: How do I safely transport the lawn mower?
Make sure that the fuel cap is securely fastened, the mower is off, and the blade has stopped. To avoid tipping or sliding, secure the mower on trucks or trailers.
Q: How do I prime the engine before starting?
Before pulling the starter cord, press the priming bulb three to five times, if it has one. Particularly in cold weather, this facilitates the delivery of fuel to the carburettor for simpler ignition.
Q: How often should I clean the mower deck?
To avoid corrosion and preserve performance, clear the deck of debris and grass clippings after every two to three mowing sessions. When the engine is running, never wipe the deck.