
VacMaster VP330 Chamber Vacuum Sealer User Manual
Safety Instructions
- Connect the device only to a 5V⎓3A USB outlet.
- Take special care when using the device when children are around.
- Always remove the plug from the power outlet after use by holding the outlet with your hand.
- When removing the plug from the outlet, never pull on the power cord; only on the plug.
- Do not immerse the cable, lug, or the entire device in water or other liquid.
- Do not use the device near flammable materials.
- Do not leave the device or the power supply to the outlet unattended.
- Never use the device without water! This risks damaging it.
- Never direct a jet of hot steam or water toward your body.
- Never use the device with carbonated water!!!
- Never leave the device at temperatures below 0 degrees Celsius, as it risks damaging it.
- Always disconnect the device from the power supply before filling the tank with water.
- Use a liquid descaler designed for espresso machines to descale the machine.
- Never touch the brewing chamber during use.
- Use only original accessories.
- Do not rearrange or move the machine during operation.
Assembly
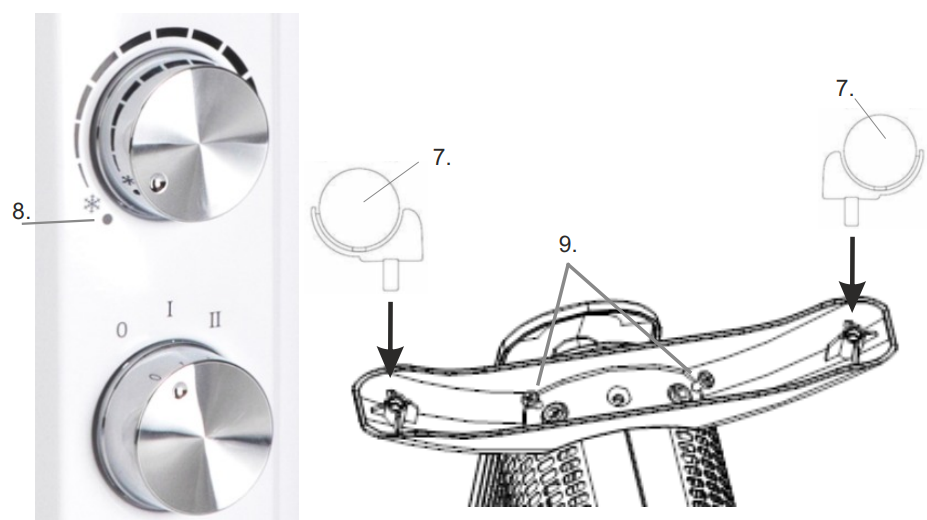
- Before using the heater, the wheels (7) supplied separately in the carton must be fitted to the device. Position the device carefully upside down.
- Press wheel (7) into the hole – look at figure C. Next, place the screw (9) in the round hole of the wheels’ base and screw it tightly with a screwdriver.
- Repeat for the second wheel’s base.
- Turn the device the right way up.
Before First Use
- Do not use the heater unless both bases with wheels are correctly assembled.
- Do not place the device on carpets having a very high pile.
- Ensure that the device is not located close to curtains or furniture, as this could create a fire hazard.
- Place the device on a flat, even surface.
- Always unplug the device before moving it from one location to another.
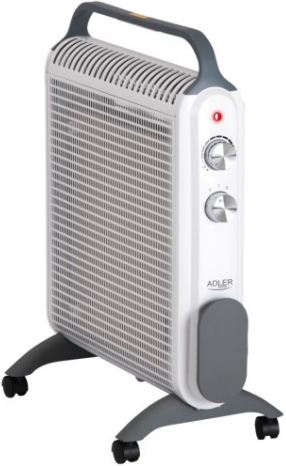
Description
- Handle
- Air outlet grid
- Indication lamp
- Thermostat knob
- Heating knob
- Power cord storage
- Wheels
- Thermostat OFF position
- Screws for the wheel’s base assembly
Operation
- Place the device upright position on a flat and stable surface with 1 meter distance to any other objects.
- Ensure the heating knob (5) is in the off position and the thermostat is turned to the off position (8). Plug the device into a suitable socket.
- The device operates when both the heating knob (5) and the thermostat knob (4) are active.
- The indication lamp (3) does not light up red when plugged into the power socket, but it lights on when the heater is heating
- Switch on the device in two steps: Turn the heating knob (5) to position I – means heating power 1000W or II – means heating power 2000W. Turn the thermostat knob (4) fully in a clockwise direction to the maximum setting.
- When the desired room temperature has been reached, the thermostat knob (4) should be turned slowly anti-clockwise until the thermostat is heard to click off and the indication lamp (3) will turn off.
- After this, the device will keep the air temperature in the room at the set temperature by switching on and off automatically. The red indication lamp (3) will switch on and off at intervals when the heater is heating.
- To switch off the device fully, turn the heating knob (5) to the zero position and the thermostat knob (4) to the off position (8), then the indication lamp (3) will also turn off.
Overheat Protection
This heater is protected with an overheat protection cut-out facility that switches it off automatically if it overheats. Overheating can be caused by an obstruction to the air intake on the back of the heater or the grill on the front. If this occurs, please disconnect the heater from the power socket and allow it to cool for 30 minutes. Remove any obstruction and turn the heater back on. The heater should operate normally. Should the problem persist, contact your retail seller.
Cleaning & Maintainance
Make sure the device is not hot. Remove the plug from the socket before cleaning. Keep the inlet and outlet grids clean. Clean the outside of the heater by wiping with a damp cloth or buffing with a dry cloth. Do not use any detergents or abrasives, and do not allow any water to enter the heater. Do not immerse the device in water. Pack the device in a case to protect it from dust. Store it in a cool, dry place until next use.
Technical Data
- Voltage: 220-240V ~50/60Hz
- Power: 1800-2000W
Environmental Instructions
- Dispose of cardboard packaging and polyethylene (PE) bags in the appropriate containers for separate collection of municipal waste according to their VacMaster VP330 Chamber Vacuum Sealer description.
- If there are batteries in the device, remove them and separately return them to the collection and storage facility. Return the used device to a suitable VacMaster VP330 Chamber Vacuum Sealer collection and storage facility, as the hazardous substances in it may pose a threat to health and the environment.
- Waste electrical equipment is waste that contains substances harmful to humans, animals, and the environment.
- These substances can lead to contamination of the soil, water, or air, and through this they can get into the human body and lead to numerous health ailments, such a vision, hearing, and speech disorders; they can also lead to kidney, liver, and heart damage, and cause skin diseases.
- Harmful substances can also have adverse effects on the respiratory and reproductive systems and lead to cancerous changes. Consumption of plants VacMaster VP330 Chamber Vacuum Sealer growing on the contaminated soils, and products made from them, may risk the above-mentioned health effects.
- Do not dispose of the device in the municipal waste container!!! Service: If you wish to purchase spare parts or report any complaints, please contact directly with the seller who issued the receipt directly.
Customer Service
- Website: service@adlerglobal.com.
- Ph: 0800 9753 003
- Timings: Mo – Fr, 8:30 am – 5:00 pm
FAQs
How do I clean the machine?
Unplug the machine and turn it off. Wipe the gasket, seal bars, and interior chamber surfaces with a gentle, moist cloth. Clear the area surrounding the seal of any debris or food residue. Make sure that the lid gasket is still clean and intact.
The seal looks white or spotty — what should I do?
That suggests either an excessively long seal time or an increase in bag thickness. Cut the seal time down by around 0.2 seconds, or choose a bag that is the right thickness.
What if the lid doesn’t open at the end of the cycle?
Switch off, unplug, wait for internal pressure to equalise, and then manually open in accordance with safety guidelines if there is still no opening.
Can I vacuum any food in this machine?
Although the VP330 can handle a wide variety of foods, remember that vacuum packaging cannot replace freezing or refrigeration. Observe food safety regulations at all times.
What should I do if the machine has been idle for a long time?
Before use: Verify the condition and amount of the oil, check the seal bars and lid gasket, make sure there are no bags or debris left in the chamber, and test the vacuum and seal effectiveness with an empty pouch.
What is the warranty period?
Under regular commercial use, the VP330 normally has a one-year limited warranty that covers parts and labour.