
Whirlpool W11651308C Dishwasher
Safety Instructions
- Read all instructions before using the dishwasher.
- Use the dishwasher only for its intended function.
- When loading items to be washed:
- Locate sharp items so that they are not likely to damage the door seal; and
- Load sharp knives with the handles up to reduce the risk of cut-type injuries.
- Do not wash plastic items unless they are marked “dishwasher safe” or the equivalent.
- For plastic items not so marked, check the manufacturer’s recommendations.
- Do not touch the heating element during or immediately after use.
- Do not operate your dishwasher unless all enclosure panels are properly in place.
- Do not leave the dishwasher open when not loading or unloading dishes.
- This product is intended for residential use only.
- Do not tamper with controls.
- Do not abuse, sit on, or stand on the door or dish rack of the dishwasher.
- To reduce the risk of injury, do not allow children to play in or on a dishwasher.
- Do not use replacement parts that have not been recommended by the manufacturer (e.g., parts made at home using a 3D printer).
Installation
- For a grounded, cord-connected dishwasher: The dishwasher must be grounded.
- In the event of a malfunction or breakdown, grounding will reduce the risk of electric shock by providing a path of least resistance for electric current.
- The dishwasher is equipped with a cord having an equipment-grounding conductor and a grounding plug.
- The plug must be plugged into an appropriate outlet that is installed and grounded in accordance with all local codes and ordinances.
- Improper connection of the equipment grounding conductor can result in a risk of electric shock.
- Check with a qualified electrician or service representative if you are in doubt whether the dishwasher is properly grounded.
- Do not modify the plug provided with the dishwasher; if it will not fit the outlet, have a proper outlet installed by a qualified electrician.
Location Requirements
Drill hole locations – new construction
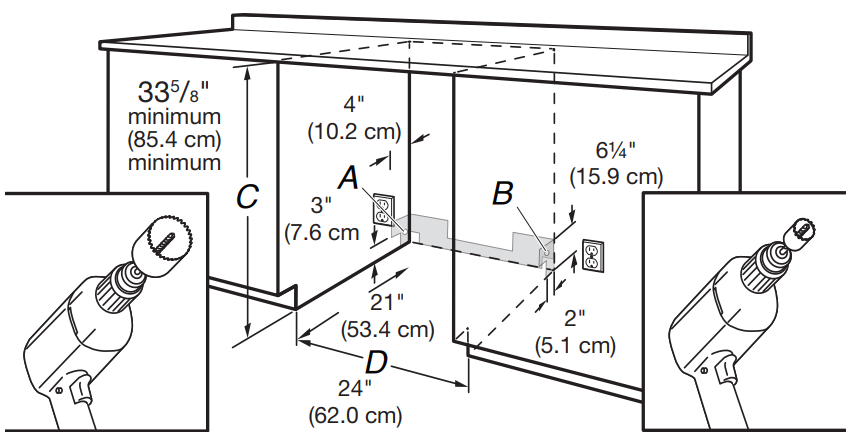
- Optional location
- Preferred location
- Measured from the lowest point on the underside of the countertop.
- It may be reduced to 335 /8″ minimum (85.4 cm) by removing the feet and the perforated area of insulation (blanket) on the dishwasher.
- Minimum, measured from the narrowest point of opening.
The power-supply receptacle for the appliance shall be installed in a cabinet or on a wall adjacent to the under-counter space in which the appliance is to be installed.
Sand Holes Smooth
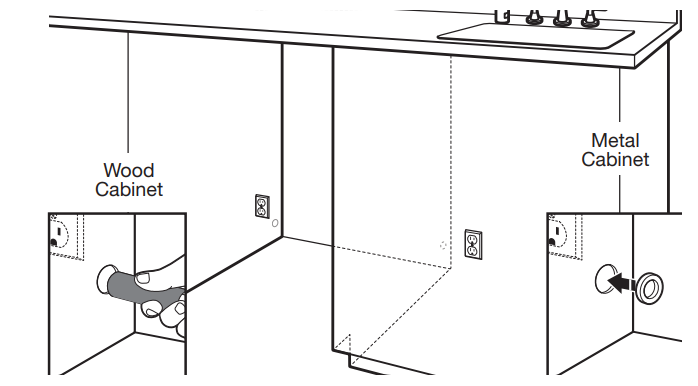
Wood cabinet: Sand the hole until smooth.
Metal cabinet: Cover the edges of the hole with the grommet included with the power cord kit.
Drain Requirements
- A new drain hose is supplied with your dishwasher. If the drain hose is not long enough, be sure to purchase only Whirlpool factory-certified parts.
- To order, refer to the contact information referenced in your Quick Start Guide.
- Make sure to connect the drain hose to the waste tee or disposer inlet above the drain trap in the house plumbing, and 20″ (50.8 cm) minimum above the floor.
- It is recommended that the drain hose either be looped up and securely fastened to the underside of the counter or be connected to an air gap.
- Make sure to use an air gap if the drain hose is connected to house plumbing lower than 20″ (50.8 cm) above the subfloor or floor.
Use of Air Gap
- If required, the air gap should be installed in accordance with the air gap installation instructions.
- When you are connecting the air gap, a rubber hose (not provided) will be needed to connect to the waste tee or disposer inlet.
- Use 1/2″ (1.3 cm) minimum I.D. drain line fittings.
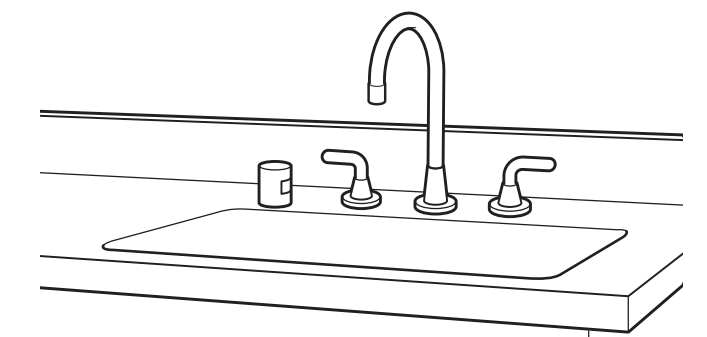
Water Supply
- This dishwasher has a water heating feature and also requires a connection to a hot water supply line.
- A hot water line with 20 psi to 120 psi (138 kPa to 862 kPa)water pressure can be verified by a licensed plumber.
- 120°F (49°C) water in the dishwasher.
- 3/8″ (0.95 cm) O.D. copper tubing with compression fitting or flexible braided water supply line.
- A 90° elbow with 3/4″ (0.95 cm) hose connection with a rubber washer.
- Do not solder within 6″ (15.2 cm) of the water inlet valve.
- If installed in new construction, make sure the house water supply lines have been flushed before connecting the dishwasher to remove any debris that may exist in the supply line.
Valve Connection
Be sure the rubber washer is properly seated in the fitting. Slide the 3/4″ (19 mm) fitting of the 90 elbow up to the valve and hand-tighten it to avoid cross-threading. Hand-tighten until the coupling is tight. Using pliers, check the tightness of the coupling. An additional 1/4 to 1/2 turn may be required to seal the rubber gasket. Route fill hose out the rear left side of the unit.
Electrical Connections
Disconnect electrical power at the fuse box or circuit breaker box before installing the dishwasher. Failure to do so can result in death or electrical shock.
- 120 V, 60 Hz, AC only, 15 A or 20 A, fused electrical supply
Direct wire – route cable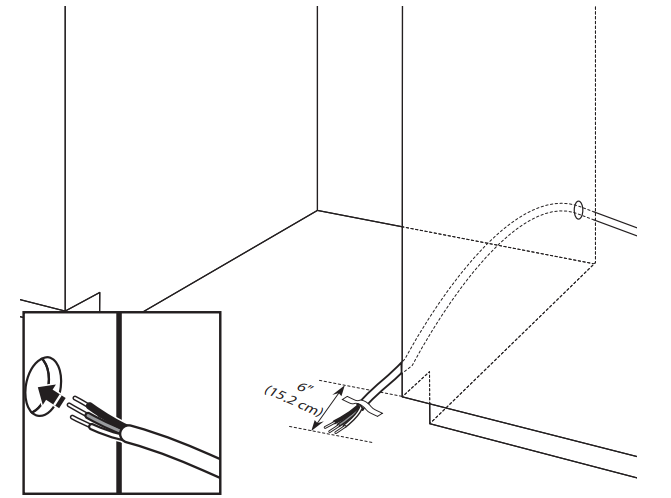
If installing with a direct wire, route the cable as shown. Do not connect the wire to the product at this time. This connection will be made later, after the unit is installed in the cabinet opening. Route the cable from the power supply through the cabinet hole. (Cable must extend to the right front side of the cabinet opening.) Tape the cable to the floor in the area shown. This will prohibit the cable from moving when the dishwasher is moved into the cabinet opening.
Put the Dishwasher on its back
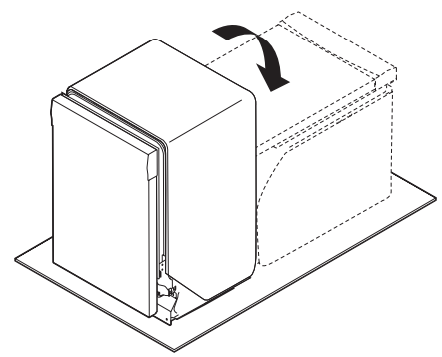
Place cardboard under the dishwasher until installed in the cabinet opening to avoid damaging the floor covering. Using two or more people, grasp the sides of the dishwasher door frame, and place the dishwasher on its back. Do not use the door panel as a worktable without first covering it with a towel to avoid scratching the door panel.
Remove Access Panel & Insulation
Remove access panels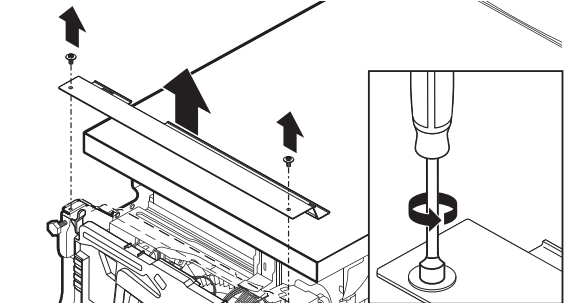
Using a 5/16″ (7.9 mm) nut driver, remove the two screws attaching the access panels to the dishwasher. Once the screws are removed, push the access panel toward the top of the product to unhook it and then remove it.
Remove access panels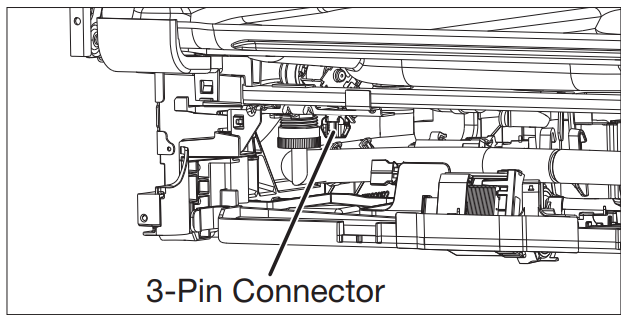
On some models, a service connection wire with a 3-pin connector is intentionally left unplugged and tucked behind the access panel. This is provided for use by the service technician.
Disconnect & Remove Drip Tray Assembly
Remove the drip tray assembly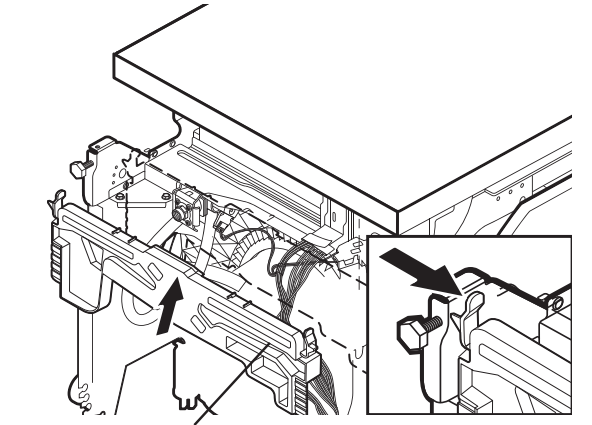
To remove the drip tray assembly, press the snap at each side of the plastic tray in toward the center of the product and pull toward yourself. Be sure not to pull too far or too hard, as the float switch wire is still connected at this time.
Remove the float switch wire
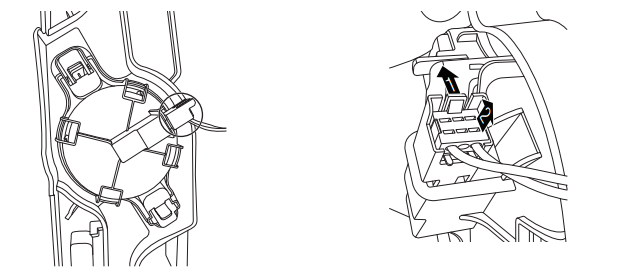
To remove the float switch wire, gently push the connector latch tab (1) and then pull the connector (2) out of the housing. The float itself should not be removed from the tray. NOTE: Do not reinstall the drip tray until instructed.
Power Cord Connections
Select a UL Listed/CSA Approved power cord for the Dishwasher. Power cord Kit typically includes power cord, metallic strain relief, grommet, and twist-on wire connectors (Straight: Whirlpool Part Number 4317824, 90°: Whirlpool Part Number W10278923RP). For proper installation, refer to the installation instructions provided with the kit.
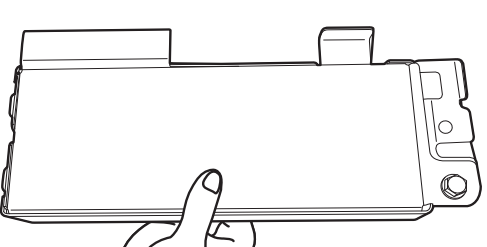
Remove the terminal box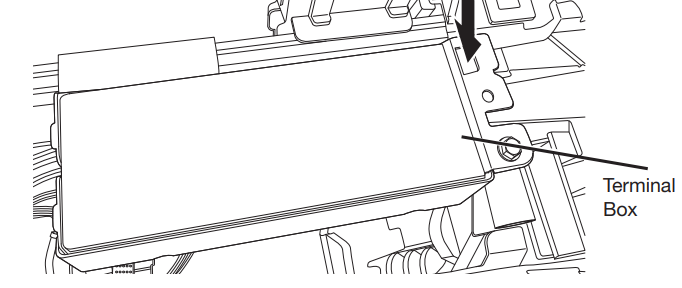
To remove the terminal box, depress the plastic latch, slide the box toward the left of the unit along the metal tube, and rotate the left side of the box forward. Make sure that the product wiring is still attached to the terminal box.
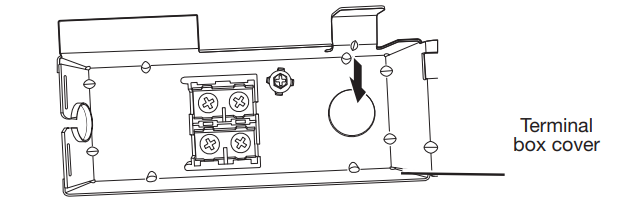
Remove the terminal box cover
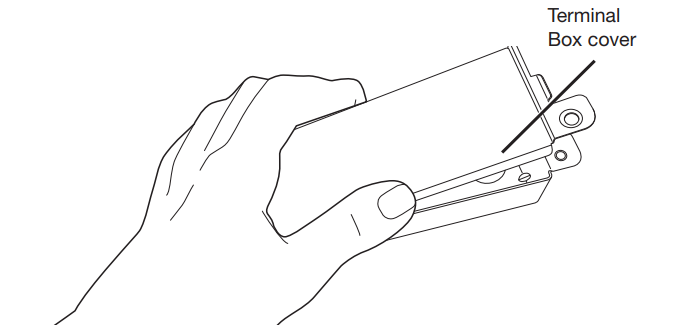
Using a 1/4″ (6.4 mm) nut driver, remove the screw holding the terminal box cover. Remove the cover by lifting it out of the box. Keep the cover for later use.
Install strain relief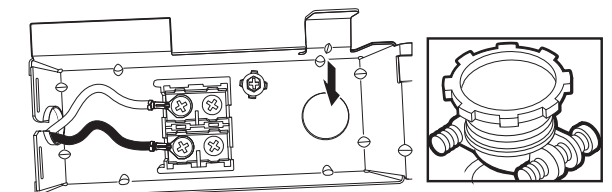 Install a UL Listed/CSA Approved metallic strain relief. Make sure screw heads are facing up when tightening the conduit nut. Strain relief is provided with the power cord kit. Suggested wire length relative to the strain relief electrically grounded dishwasher.
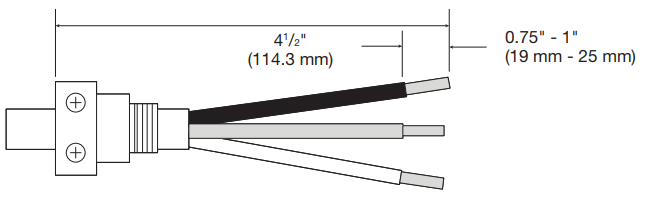
Connect the ground wire to the green ground connector in the terminal box. Do not use an extension cord. Failure to follow these instructions can result in death, fire, or electrical shock.
Connect the ground wire
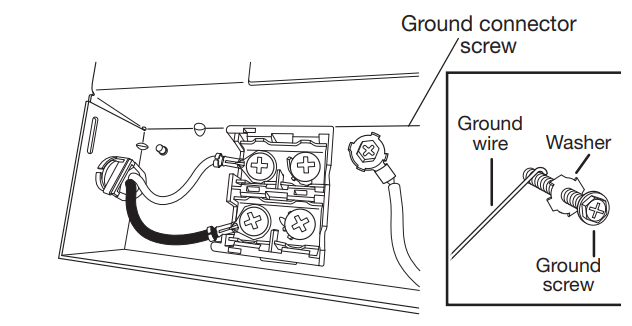
Route the power cord through the strain relief in the back of the terminal box. Remove the ground connector screw on the raised floor inside the box and place it through the ring terminal of the green ground wire of the power cord. If the wire has no ring terminal, bend a loop at the end of the wire. Reattach and tighten the ground connector screw to the raised floor of the box.
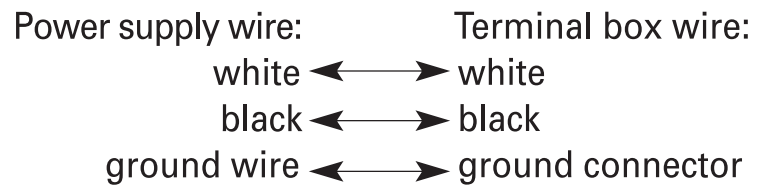
Connect the remaining wires

To connect wires with ring terminals, remove the screws from the terminal block, place the screw through the ring terminals, and reattach the screws back into the terminal block. To connect wires without ring terminals, remove the screws from the terminal block. Bend a loop at the end of the wires. Push the screws through the loop. Return the screws to the terminal block. Tighten the screws.
Wiring Configuration
- Secure the cord or wire in a strain relief
- Tighten strain relief screws to secure the cord.
- Reinstall the terminal box cover and wiresPlace wires inside the terminal box. Replace the cover by inserting the hooks of the terminal cover into the slots in the floor of the terminal box and sliding the cover tight against the back wall where wires come in. Make sure wires are tucked inside the box and not pinched by the cover. Put the terminal box back on the crossbar and push to the right so the terminal box snaps into the plastic side member. NOTES:
- Do not plug the cord into an outlet until instructed to do so.
- Once the terminal box has been remounted on the dishwasher, tuck any excess length or slack over nearby components to help keep them off the floor.
- Route the cord out the rear of the dishwasher so that it does not touch the dishwasher motor or the lower part of the dishwasher tub.
- A maximum of 2 power cord supply conductors (12 AWGlargest size) plus 1 grounding conductor are permitted in the terminal box.
 Place wires inside the terminal box. Replace the cover by inserting the hooks of the terminal cover into the slots in the floor of the terminal box and sliding the cover tight against the back wall where wires come in. Make sure wires are tucked inside the box and not pinched by the cover. Put the terminal box back on the crossbar and push to the right so the terminal box snaps into the plastic side member. NOTES:
Complete Installation
Reconnect the float switch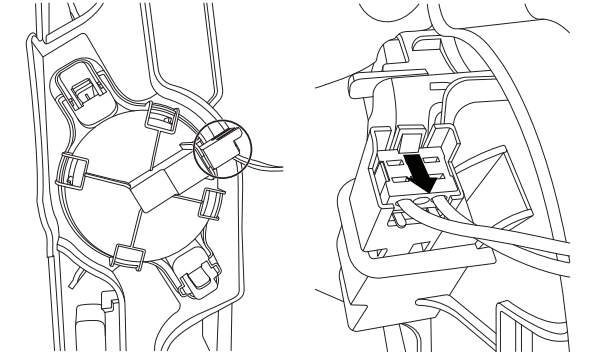
Check that the power supply wire or cord does not touch the dishwasher motor or the lower part of the dishwasher tub. Reconnect the float switch by aligning the connector removed in Step Remove float switch wires with the connector housing and pushing in until the locking tab is visible over the back of the connector.
Replace the drip tray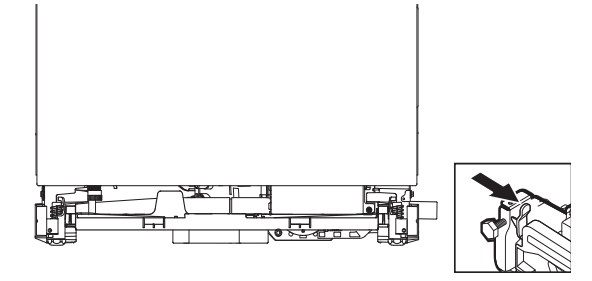
Before replacing the dip tray, ensure that Whirlpool W11651308C Dishwasher there is no water present in the tray. To replace the drip tray, align it with the snaps in the side members and push it in toward the unit.
Plug into a grounded 3-prong outlet. Failure to follow these instructions can result in death, fire, or electrical shock.
Power supply cord—Plug into a grounded 3-prong outlet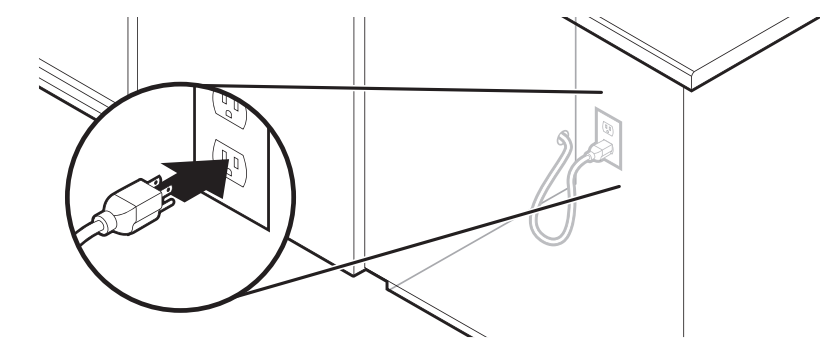
Reconnect power
Reconnect electrical power at the fuse box or circuit breaker box. NOTE: With the access panel off, start the dishwasher and allow it to complete the shortest Installation Cycle while checking the unit for leaks. See instructions online under Check Whirlpool W11651308C Dishwasher Operation in the Owner’s Manual or Product Guide.
Install access panels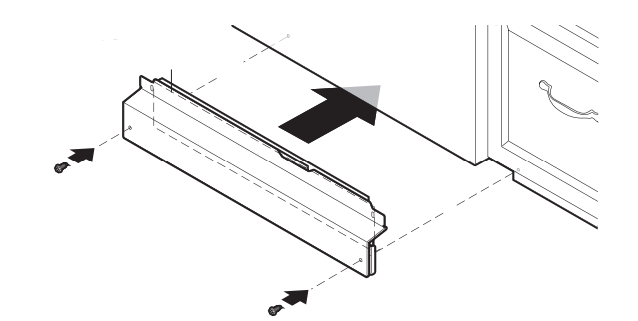
Place the toe panel behind the access panel against the dishwasher leg. Push the access panel up toward the top of the product so that it hangs on the hooks on the plastic side members.
Align the rectangular slot in the foam and assemble the toe/access panel assembly to the unit using the screw.
Check the access panel edge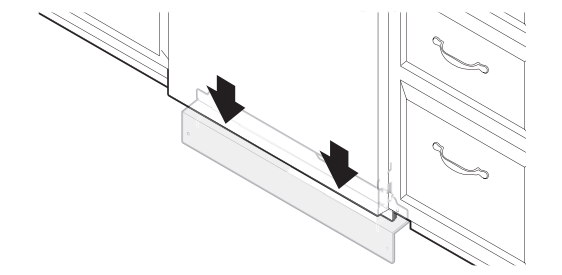
Check that the lower edge of the access panel touches the floor. Adjust if necessary.
Reinstall access panels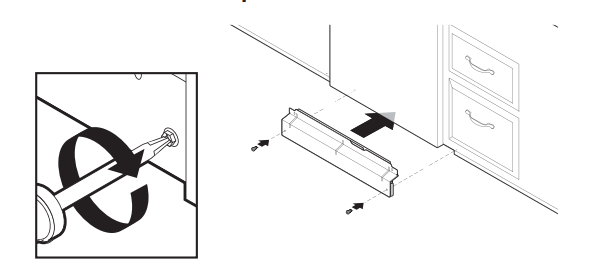
Use a 5/16″ (7.9 mm) nut driver to reinstall the screws through the Whirlpool W11651308C Dishwasher in the holes in the access panels.
Santation Cycles
Sanitized Cycles sanitizes dishes and glassware in accordance with NSF International NSF/ANSI Standard 184 for Residential Dishwashers.
There is no intention, either directly or indirectly, that all cycles on an NSF/ANSI 184 certified Whirlpool W11651308C Dishwasher dishwashers meet the NSF/ANSI 184 performance standard for soil removal and for sanitization efficacy.
If your dishwasher did not properly sanitize your Whirlpool W11651308C Dishwasher dishes, the Sanitized indicator flashes at the end of the cycle.
Maintainance & Cleaning
- When you will not be using the dishwasher during the summer months, turn off the water and power supply to the dishwasher.
- Ice formations in the supply lines can increase water pressure and cause damage to your dishwasher or home.
Customer Service
- Website: https://www.whirlpool.com/
- Ph: 1-800-253-1301
FAQs
Q: What detergent should I use?
Make use of premium dishwasher detergent designed especially for automatic dishwashers. Regular dish soap might generate excessive suds and harm the device, so avoid using it.
Q: Can I wash plastic items in the dishwasher?
Yes, but to prevent warping from the heating element, make sure plastics are dishwasher-safe and put on the upper rack.
Q: Can I add detergent mid-cycle?
No. Hold off until the subsequent complete cycle. Water spills and decreased cleaning effectiveness could result from opening in the middle of the cycle.
Q: Can I open the door mid-cycle?
Yes, but the dishwasher will pause on its own. To restart the cycle, close the door.
Q: How do I adjust the upper rack?
To optimise space, raise or lower based on the size of the goods on the lower rack.
Q: Is this dishwasher energy-efficient?
Indeed. The Whirlpool W11651308C has an eco cycle to use less water and electricity, and it satisfies current energy efficiency regulations.