
Whirlpool WHGF 6534 X4UK Refrigerator Description
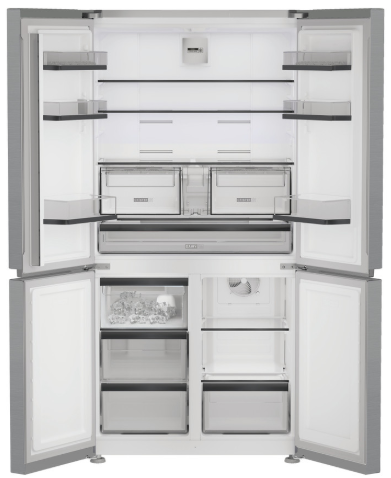

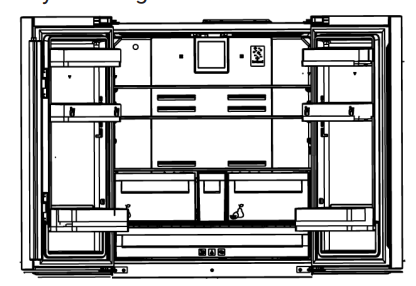
- Control and indicator panel
- Butter/cheese compartment
- Movable door shelf
- Cooler compartment door shelves
- Freezer compartment glass shelf/cooler
- Freezer compartment drawers
- Ice box drawer 8 Dairy (cold storage) bin
- Crispers 10 *Cooler compartment glass shelves
- Water tank
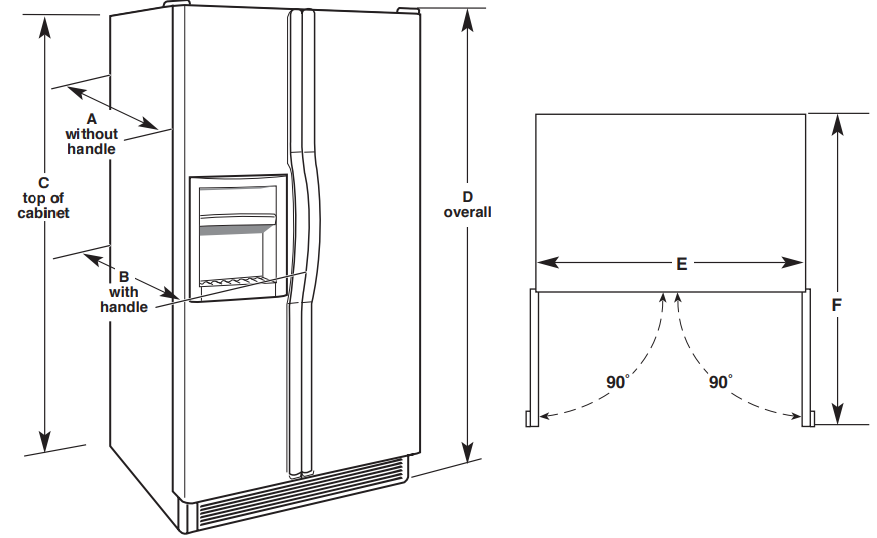
Product Dimensions
| Model Number | WRSC5536R*, WRSC6536R* |
| Model Size | 20.85 cu ft (589.8 L) |
| Depth – Without Handles “A” | 271/2” (69.8 cm) |
| Depth – With Handles “B” | 291/4” (74.3 cm) |
| Height – Top of Cabinet “C” | 687/8” (174.9 cm) |
| Height – Overall “D” | 69″ (175.3 cm) |
| Width – Cabinet “E” | 36″ (91.4 cm) |
| Depth – Doors Open 90° “F” | 457/8” (116.4 cm) |
| Handle and door style will vary with model. Dimensions “C” and “D” included rollers extended 3/4″ (1.9 cm). | |
Electrical Requirements
Recommended Grounding Method
A 115 V, 60 Hz AC only, 15 A or 20 A fused, grounded WHIRLPOOL WRFC5036R French Door Refrigerator electrical supply is required. It is recommended that a separate circuit serving only your refrigerator be provided. Use an outlet that cannot be turned off by a switch. Do not use an extension cord.
Water Pressure
A cold water supply with water pressure between 30 psi and 120 psi (207 kPa and 827 kPa) is required to operate the water dispenser and ice maker. If you have questions about your water pressure, call a licensed, qualified plumber.
Reverse Osmosis Water Supply
If the water pressure to the reverse osmosis system is less than 40 psi to 60 psi (276 kPa to 414 kPa):
- Replace the filter if necessary.
- Allow the storage tank on the reverse osmosis system to refill after heavy usage.
- If your refrigerator has a water filter, it may further reduce the water pressure when used in conjunction with a reverse osmosis system. Remove the water filter. See “Water Filtration System.”
Installation
Right place for installation.. Read the “Safety Instructions” first! Contact the Authorized Service for the product’s installation. To prepare the product for installation, see the information in the user manual and make sure the electric and water utilities are as required. If not, call an electrician and plumber to arrange the utilities as The damaged power cable must be replaced by an Authorized Service.
- When placing two coolers in adjacent positions, leave at least 4 cm distance between the two units.
- Keep the product out of direct sunlight and in a dry place.
- If the door span is too narrow for the product to pass, remove the door and turn the product sideways; if this does not work, contact the authorized service.
- Place the product on a flat surface to avoid vibration
- Place the product at least 30 cm away from the heater, stove, and similar sources of heat and at least 5 cm away from electric ovens.
- Do not expose the product to direct sunlight or keep it in damp environments.
- Before transport or use, never open the
control board cover on the product. Risk of electric shock and fire! - Our firm will not assume responsibility for any damages due to usage without earthing and without a power connection in compliance with national regulations.
- The power cable plug must be easily accessible after installation.
Hot surface warning!
- The side walls of your product are equipped with cooler pipes to enhance the cooling system.
- High-pressure fluid may flow through these surfaces and cause hot surfaces on the side walls.
- This is normal, and it does not require servicing. Be careful when you contact these areas.
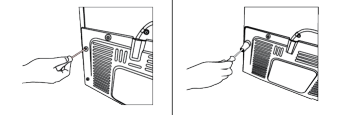
Attaching the plastic wedges
- Use the plastic wedges provided with the product to maintain sufficient space for air circulation between the product and the wall.
- Remove the screws from the product and mount the screws provided with the wedges.
- Attach 2 plastic wedges to the ventilation cover as shown in the figure.
Adjusting the Legs
- If the product is not in a balanced position, adjust the front adjustable stands by rotating right or left.
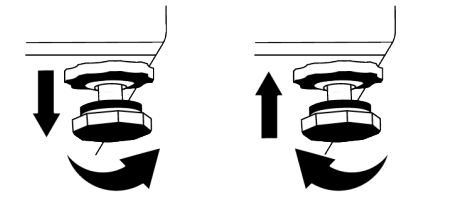
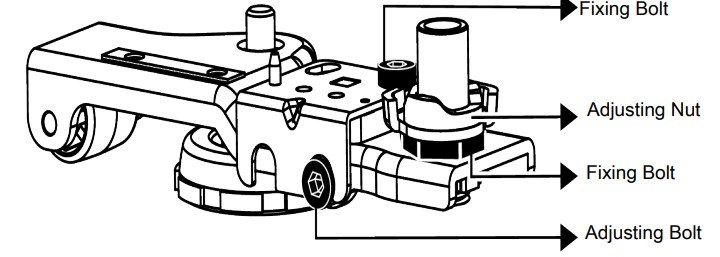
For adjusting the doors vertically
- Loosen the fixing nut at the bottom. Screw adjusting nut (CW/CCW) according to the position of the door. Tighten the fixing nut bolt for the final position..
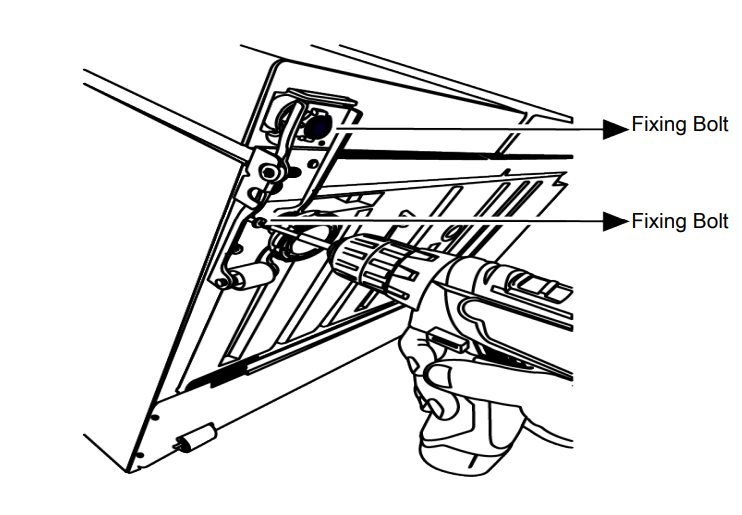
For adjusting the doors horizontally,
- Loosen the fixing screw at the bottom. Loosen the fixing nut at the top. Screw the adjusting bolt (CW/CCW) on the side according to the position of the door. Tighten the fixing nut on the top for the final position. Tighten the fixing screw at the bottom
- Fix the upper hinge assembly with 3 screws. Install the hinge cover after the sockets are
installed. Secure the hinge cover with two screw

Preparation
- This refrigerating appliance is not intended to be used as a built-in appliance.
- Under these circumstances, functions and components such as compressor, fan, heater, defrost, lighting, display, and so on will operate according to the needs by consuming minimum energy.
- In case that multiple options are present, glass shelves must be placed so that the air outlets at the rear wall are not blocked and preferably, in a way that air outlets remain below the glass shelf. This combination may help improve air distribution and energy efficiency.
- Using the drawer below when storing is strongly recommended.
- In most cases, 24 hours is enough for the Quick Freezing function after fresh foods are placed in the freezer. After some time, the Quick Freezing function will deactivate automatically.
- Store food in the cooler or chill compartment according to proper storage conditions to save energy.
Before First Use
Before using your product, make sure the necessary preparations are made in line with the instructions in the “Safety Instructions” and “Installation” sections.
- Wait for at least 2 hours before operating the product to ensure the complete efficiency of refrigeration.
- Keep the product running without placing any food inside for 6 hours, and the product door should be kept as closed as possible..
- The temperature change caused by opening and closing the door while using the product may normally lead to condensation on the door/body shelves and glassware placed in the product.
- A sound will be heard when the compressor is engaged. It is normal for the product to make noise even if the compressor is not running, as fluid and gas may be compressed in the cooling system.
- It is normal for the front edges of the product to be warm. These areas are designed to warm up to prevent condensation..
- For some models, the indicator panel turns off automatically 1 minute after the door closes. It will be reactivated when the door is opened or any button is pressed.
Climate Class and Definitions
Please refer to the Climate Class on the rating plate of your device. One of the following information applies to your device.
According to the Climate Class.
- SN: Long Term Temperate Climate: This cooling device is designed for use at ambient temperatures between 10 °C and 32 °C.
- N: Temperate Climate: This cooling device is designed for use at ambient temperatures between 16°C and 32 °C.
- ST: Subtropical Climate: This cooling device is designed for use at ambient temperatures between 16°C and 38°C.
- T: Tropical Climate: This cooling device is designed for use at ambient temperatures between 16°C and 43°C.
Operating the Product
Read the “Safety Instructions” first
- The product shall be used for storing food only.
- Turn off the water valve if you will be away from home (e.g., on vacation) and you will not be using the icemaker or the water dispenser for a long period of time. Otherwise, water leaks may occur. Unplugging the Product
- Remove the food to prevent odours,
- Wait for the ice to melt, clean the interior, and let it dry. Leave the doors open to avoid damaging the inner body plastics.
Control Panel of the Product
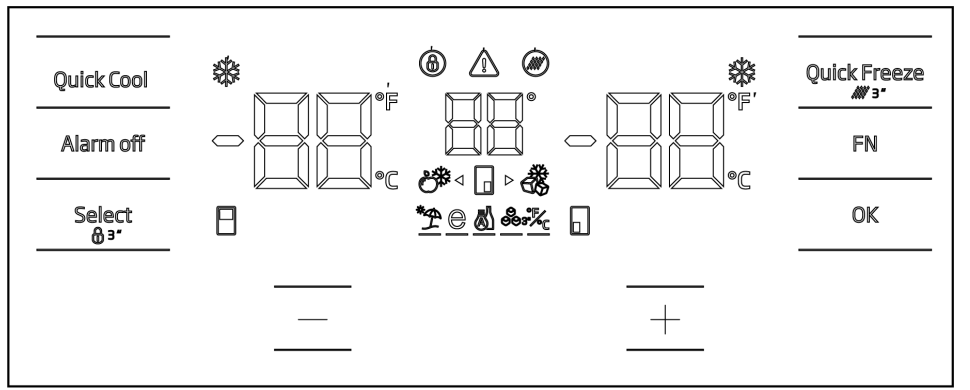
Quick freeze function indicator
Illuminates when the quick freeze function is activated. Cooler compartment temperature indicator: Displays the temperature of the cooler compartment, which may be set as 8,7,6,5,4,3,2,1.
Key lock
Press the key lock button simultaneously for 3 seconds. The key lock symbol Lights on, and the key lock mode is activated. The keys cannot be operated when the eye lock mode is active. Press the Keypad lock button again simultaneously for 3 seconds. The key lock symbol goes out, and the key lock mode is deactivated. Press the key lock when you want to prevent changes to the temperature setting of
the refrigerator.
Power failure / High temperature / Error
This icon will light up in case of power failure, high temperature fault,s, or fault alerts. When there is a long power failure, the highest temperature value that the freezer compartment reaches flashes on the digital indicator. After the food in the freezer compartment is checked, the warning will be deleted by pressing the alarm off button. If you see this indicator is lit up, please see the “Troubleshooting” section in this guide.
Temperature change compartment icon
Indicates the compartment for which the temperature will be changed. When the temperature change compartment icon starts blinking, it means that the relevant compartment is selected.
Joker freezer icon
Select the Joker freezer icon using the FN button. The icon starts to flash. When you press the OK button, the Joker compartment freezer icon illuminates and operates as a freezer.
Freezer compartment temperature indicator
Displays the temperature of the cooler compartment, it may be set as -16-18,-19-,20,-21,-22,-24. Quick freeze function indicator: Illuminates when the quick freeze function is activated.
Fahrenheit indicator
This is the Fahrenheit indicator. When Fahrenheit display mode is activated, the temperature setpoints are displayed in Fahrenheit, and the respective icon is illuminated.
Quick freeze function button
Press this button to activate or deactivate the quick freezing function. When you activate the function, the freezer compartment will be cooled to a lower value than the set temperature. The quick freeze function is used to quickly freeze the food put in the freezer compartment.</p>
FN button
You can navigate through the functions you want to select using this button. When this button is pressed, the icon and indicator of the function to be activated or deactivated start to flash. If this button is not pressed for 20 seconds, the FN button is deactivated. You need to press this button to navigate through the functions again.
Celcius indicator
This is the Celsius indicator. When Celsius display mode is activated, the temperature setpoints are displayed in Celsius, and the respective icon is illuminated.
OK button
After navigating between the functions with the FN button, when the function is canceled with the OK button, the relevant icon and indicator flash. The function remains illuminated when the function is activated, and the indicator continues to flash to indicate which icon is selected.
Temperature change compartment icon
Indicates the compartment for which the temperature will be changed. When the temperature change compartment icon starts blinking, it means that the relevant compartment is selected.
Temperature change compartment icon
Indicates the compartment for which the temperature will be changed. When the temperature change compartment icon starts blinking, it means that the relevant compartment is selected.
Set the increase button.
You can select the relevant compartment by pressing the select button; the compartment icon for the relevant compartment starts to flash, and the set value is increased if the set increase button is pressed at this time. Set value returns to the initial value if the button is cycled.\
Temperature change compartment icon
Indicates the compartment for which the temperature will be changed. When the temperature change compartment icon starts blinking, it means that the relevant compartment is selected.
Setting of Celsius and Fahrenheit indicator
Use the FN key to select this function, and use the arrow keys to select Fahrenheit and Celsius. Fahrenheit and Celsius indicators are illuminated when the relevant temperature type is selected.
Ice maker on icon
To turn the ice maker on, press the FN button (until the ice icon and its underscore). The ice maker icon and ice maker function indicator start to flash when they are selected, thus you can understand that the ice maker can be turned on and off. The ice maker icon lights up continuously when the OK button is pressed, and the Indicator continues to flash at this time. After 20 seconds, the icon and indicator remain lit if no button is pressed.
The compartment with the flashing icon is selected as the compartment for which the temperature setpoint is to be changed. Then, you can change the setpoint by pressing the compartment setpoint decrease button (27) and the compartment setpoint increase button (19). Compartment icons turn off if the select button is not pressed in 20 seconds. You should press this button to select a compartment again.
Alarm off
In case of a power outage/high temperature alarm, the warning is deleted by pressing the alarm off button after the foods in the freezer compartment are checked.
Quick cooling function button
The button has 2 functions. Press and release to activate or deactivate the fast cooling function. The quick cooling indicator shall turn off, and normal settings shall be restored. The quick cooling function is used to quickly cool the food put in the c compartment.
Using The Product
Storing Food in the Freezer and Cooler Compartment
- You can activate the Quick Freezing function 4-6 hours before the freezing function and perform faster cooling.
- Bring hot meals to room temperature before placing them in the freezer compartment.
- Foods to be frozen must be divided into portions according to the size to be consumed and frozen in separate packages.
- It is recommended to pack the food before placing it in the freezer.
- To prevent expiration of storage time, write the freezing date, time, and
- name of the product on the package according to the storage times of different foods.
- Consume the foods you have defrosted quickly.
- Defrosted foods cannot be frozen again unless they are cooked.
- It is not safe to consume the refrozen fresh foods without cooking after they are defrosted.
- As you freeze fresh foods, do not bring them into contact with already frozen foods.
- Otherwise, frozen foods will be defrosted.
Storing the foods, which are sold frozen
- When storing food, follow the time periods specified in these instructions.
- In order to protect the quality of the food, keep the time interval between purchasing transactions and storing as short as possible.
- Buy frozen food which are stored at –1°C or lower temperatures.
- Avoid buying foods whose packages are covered with ice, etc. This means that the product could be partially defrosted and refrozen. Temperature impacts the quality of the food.
- Do not exceed the storage time recommended by the food producer. Remove only the food as much as you need from the freezer.
- Except for the cases where extreme circumstances are available in the environment, if your product (on the recommended set values table) is set to the specified set values, the food keeps its freshness for a longer time both in the fresh product compartment and freezer compartment.
- If the fresh food compartment is set to a lower temperature, fresh fruits and vegetables may be partially frozen.
Quick Freezing
- Activate the quick freezing function 24 hours before placing your fresh foods.
- After 24 hours of pressing the button, place the food that you want to freeze in the third or fourth shelves with higher freezing capacity.
- Once the quick freezing function is activated, it is automatically cancelled after a period of time
| Freezer Compartment Setting | Fridge Compartment Setting | Remarks |
| -18°C | 3°C | This is the default, recommended setting. This setting is recommended if the ambient temperature is below 30°C. |
| -18°C or colder | 3°C | These settings are recommended for ambient temperatures exceeding 30°C. |
| Quick Freeze | 3°C | Use when you want to freeze your food in a short time. When the process ends, the product’s settings will return to their previous position. |
| -18°C or colder | 2°C | Use these settings if you believe the cooler compartment is not cold enough due to ambient temperature or frequently opening the door. |
Freezer Details
As per the IEC 62552 standards, the freezer must have the capacity to freeze 4,5 kg of food items at -18°C or lower temperatures at 25°C room temperature in 24 hours for each 100 litres of freezer compartment volume. Food products can only be preserved for extended periods at or below the temperature of -18 °C. You can keep the foods fresh for months (in freezer at or below temperatures of -18 °C). The food products to be frozen must not contact the already-frozen food inside to avoid partial defrosting. Boil the vegetables and filter the water to extend the frozen storage time.
Place the food in air-tight packages after filtering and place them in the freezer. Bananas, tomatoes, lettuce, celery, boiled eggs, potatoes, and similar food items should not be frozen. In case these foods are frozen, only nutritional values and eating qualities will be negatively affected. A rotting that would threaten human health is not in question. Placing the food Freezer compartment shelves: Different frozen foods like meat, fish, ice cream, vegetables, etc. Cooler compartment shelves: Food items inside pots, capped plates, and capped cases, eggs (in closed case).. Cooler compartment door shelves: Small and packaged food or beverages.Crisper: V Vegetables and fruits, resh food compartment::eDelicatessen(breakfast food, meat products to be consumed in a short time
Storing Food in the Cooler Compartment
- Compartment temperatures rise prominently if the compartment door is opened and closed frequently and kept open for a long time. An isan reduces the life span of the food and causes the food to spoil.
- In order not to cause odour and taste changes, the food should be stored in closed containers.
- Do not store too much food in your refrigerator. To achieve better and homogeneous cooling, place the food separately in a way that cold air can circulate through them.
- Provide air flow by leaving a space between the food and the internal wall. If you lean the food against the rear wall, the food may freeze.
- Bring cooked hot meals to room temperature before placing them in the refrigerator. Then, you can place the tepid meal in the lower shelves of your refrigerator. Do not place the tepid meals close to the foods that may easily spoil.
- You can both create a damp environment and provide an air flow by keeping fruits and vegetables, which are prone to drying, in the perforated or unsealed plastic bags.
- Except for the cases where extreme circumstances are available in the environment, if your product (on the recommended set values table) is set to the specified set values, the food keeps its freshness for a longer time both in the fresh product compartment and freezer compartment.
Store different foods in different places according to their properties.
| Food | Location |
| Egg | Door Shelf |
| Dairy products (butter, cheese) | If available, a zero-degree (for breakfast food) compartment |
| Fruits, vegetables, and greenery | Fruit-vegetable compartment, crisper or EverFresh+ compartment (if available) |
| Fresh meat, poultry, fish, sausage, etc. Cooked foods | If available, a zero-degree (for breakfast food) compartment |
| Ready to serve foods, packaged products, canned foods, and pickles | Top shelves or door shelf |
| Beverages, bottles, spices, and snacks | Door Shelf |
Replacing the Illumination Lamp
Call the Authorized Service when the Bulb/ LED used for lighting in your refrigerator needs to be replaced. Lamp(s) used in this appliance cannot be used for house lighting. Intended use of this lamp is to help the user place food into the refrigerator/freezer safely and comfortably..
Product Features
The ice storage area, Automatic Ice Maker
To obtain ice from the automatic ice maker, fill the water tank in the cooler compartment with water up to the maximum level. As a result of the hot and humid weather, your ice accumulated in the ice drawer may stick to each other and become a solid mass in a period of 15 days; this is normal. If you cannot break up the mass, you can empty the ice box and make ice again.
- If the water in your water tank has been left in the tank for more than 2-3 weeks, it is recommended to replace the water.
- Distinct sounds from your refrigerator, 120-minute intervals are the sounds that occur during the making and dumping of ice; this is a normal condition.
- If you do not need ice, pressing the cancel ice icon to stop the ice maker will save energy and extend the service life of your refrigerator. 8.2 Egg holder You can place the egg holder on the door or body shelf you wish. If the egg holder is to be placed on the body shelf, we recommend you choose colder, lower shelves.
- Never place the egg holder in the freezer compartment. 8.3 Crisper The refrigerator’s crisper is designed to keep vegetables fresh by preserving their humidity. For this purpose, the overall cold air circulation is intensified in the crisper. Keep fruits and vegetables in this compartment. Keep the green-leaved vegetables and fruits separately to prolong their life.
Movable Intermediate Compartment
- When the cooler compartment doors are closed, tightness is enabled as the gaskets on the door come into contact with the surface of the movable intermediate compartment.
- Another reason for using a movable intermediate compartment in your refrigerator is to ensure that the net volume of the cooler compartment is increased. Standard intermediate compartments occupy some unserviceable volume in the refrigerator.
- As the left door of the cooler compartment is open, the movable intermediateThe
compartment is in a closed state. - It should not be opened manually. As the door is closed, it moves according to the guidance of the plastic part on the body.
Egg holder
You can place the egg holder on the door or body shelf you wish. If the egg holder is to be placed on the body shelf, we recommend that you choose colder, lower shelves. In situations where contact with other vegetables is not preferred, use packaging materials such as paper that has a certain level of porosity in terms of hygiene. Do not put fruits that have a high ethylene gas production, such as pear, apricot, peach, and particularly apples, in the same crisper with other vegetables and fruits. The ethylene gas coming out of these fruits might cause other vegetables and fruits to mature faster and rot in a shorter period of time.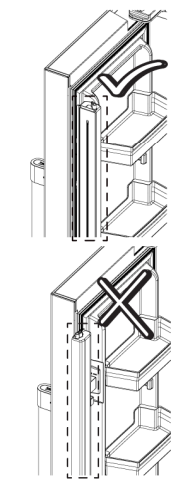
Dairy Products Cold Storage Area
Cold Air Storage Compartment
This compartment provides a lower temperature inside the refrigerator. Use this bin to store delicatessen (salami, sausages, dairy products and etc. ) that require lower storage temperature or meat, chicken, or fish products for immediate consumption. Do not store fruits and vegetables inside this bin.
Humidity Controlled Crisper
With the humidity-controlled crisper feature, the humidity of vegetables and fruits is kept under control, and the food is kept fresh for a longer period of time. We recommend that you place leafy vegetables such as lettuce, spinach, and similar vegetables that are sensitive to moisture loss in the crisper, not upright on their roots, but as horizontally as possible.
When placing the vegetables, place heavy and hard vegetables at the bottom and light and soft ones on the top, taking into account the specific weights of vegetables. Never leave vegetables in plastic bags in the crisper. Leaving them in plastic bags causes vegetables to rot in a short time.
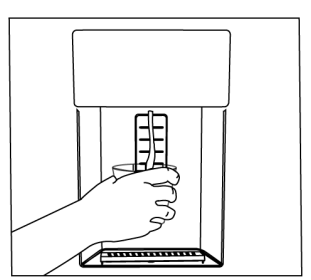
Using the Internal Water Dispenser and the Door Water Dispenser
Flush the water system after connecting <p><p>the refrigerator to the water supply or replacing the water filter. Use a durable container and hold the water dispenser lever for 5 seconds, and then remove your hand for 5 seconds. Continue this operation until the water starts to come out. When the water starts to flow, continue to press and then release the water dispenser pedal (press for 5 seconds, release for 5 seconds) until you reach 4 gallons of water. This will take 15 L of water to the system.
This operation purges the air from the filter and water dispenser system and prepares the water filter for use. Additional bleeding may be required in some households. Water may gush out from the dispenser when you bleed air from the system. Allow the refrigerator to cool and refrigerate the water for 24 hours. Take enough water to ensure fresh water is available in the system every week. After taking water continuously for 5 minutes, the water dispenser will stop dispensing water to prevent overflow. Press the pedal of the dispenser again to continue taking water.
Door water dispenser

Taking water
Hold a container under the tap of the water dispenser while pressing the water dispenser pedal. Release the dispenser pedal to stop taking water. The first few glasses of water taken from the fountain will normally be warm. If the water dispenser is not used for a long time, dispose of the first few glasses of water to get clean water. During the initial operation, you need to wait about 24 hours for the water to cool down. Take the glass out a moment after pulling the trigger.
Internal water dispenser
For the operation of the water dispenser
Water may drip from the water dispenser before you use your refrigerator for the first time and after you change your water filter. To prevent water from dripping or leaking from the dispenser, bleed air from the system by draining 5-6 gallons (about 20 liters) of water from the water dispenser before using your refrigerator for the first time and after each time you change the water filter. In this way, trapped air is removed from the system and the leaks from the water dispenser are prevented. In case of an obstruction to the flow of water, check the smoothness of the water line behind the unit and the position of the coupling. It is normal for your water dispenser to leak only a few drops of water after you take some water.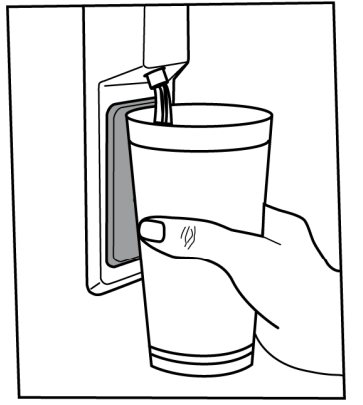
Maintenance and Cleaning
- Do not use sharp or abrasive tools to clean the product. Do not use Whirlpool WHGF 6534 X4UK
- Refrigerator materials such as household cleaning agents, soap, detergents, gas, gasoline, thinner, alcohol, wax, etc.
- The dust shall be removed from the ventilation grill on the rear Whirlpool WHGF 6534 X4UK
- Refrigerator of the product at least once a year (without opening the cover). Clean the product with a dry cloth.
- Take care to keep water away from the lamp’s cover and other electrical parts.
- Clean the door with a damp cloth. Remove all contents to remove the door and body racks. Remove the door racks by lifting them upwards.
- Clean and dry the shelves, then attach them back in place by sliding from above.
- Do not use chlorinated water or cleaning products on the exterior surface and chrome-coated parts of the product. Chlorine will cause rust on such metallic surfaces.
- Use only a mildly dampened micro-fibre cloth to clean the external surface of the product.
- Sponges and other types of cleaning clothes may cause scratches.
- To clean all removable components during the cleaning of the Whirlpool WHGF 6534 X4UK
- Refrigerator interior surface of the product, wash these components with a mild solution consisting of soap, water, and carbonate.
- Wash and dry thoroughly. Prevent contact of water with illumination components and the control panel.
- Do not use vinegar, rubbing alcohol, or other alcohol based cleaning agents on any interior surface.
Stainless Steel External Surfaces
- Use a non-abrasive stainless steel cleaning agent and apply it with a soft, lint-free cloth. To polish, gently wipe the surface with a micro-fibre cloth dampened with water and use dry polishing chamois. Always follow the veins of the stainless steel.
Preventing Odours
- The product is manufactured free of any odorous materials. Whirlpool WHGF 6534 X4UK Refrigerator. However, inappropriately storing food and improper cleaning of internal surfaces may lead to odours.
- To avoid this, clean the inside with carbonated water every 15 days.
- Keep the foods in sealed holders, as micro-organisms Whirlpool WHGF 6534 X4UK Refrigerator arising from foods kept in unsealed containers will cause bad odour.
- Do not keep expired and spoiled foods in the refrigerator.
Troubleshooting
- The door is open too frequently. Take care not to open the product’s door too frequently.
- The product will restart after approximately 6 minutes.
- If the product does not restart after this period, contact the service.
- Defrosting is active. This is normal for a fully-automatic defrosting product.
- The refrigerator’s operating noise is increasing while in use.
- The product’s operating performance may vary depending on the ambient temperature variations.
- This is normal and not a malfunction. The refrigerator runs too often or for too long.
- The new product may be larger than the previous one. Larger products will run for longer periods.
- The room temperature may be high. The product will normally run for long periods in higher room temperatures.
- The cooler or freezer door washer may be dirty, worn out, broken, or not properly settled. Clean or replace the gasket.
- A damaged/torn door washer will cause the product to run for longer periods to preserve the current temperature.
- Hot or humid weather will increase icing and condensation. This is normal and not a malfunction.
- Food packages may be blocking the door. Relocate any items blocking the doors.
- The product is not standing in a full upright position on the ground. Adjust the stands to balance the product.
- The surface is not flat or durable. Make Whirlpool WHGF 6534 X4UK Refrigerator sure the surface is flat and sufficiently durable to bear the product.
- The food items may be in contact with the upper section of the drawer. Reorganize the food items in the drawer. Temperature on the product surface.
- The fan may continue to operate when the freezer door is open. If the problem persists after following the instructions in this section, contact your vendor or an Authorized Service. Do not try to repair the product. This is normal.
Location Requirements
- Observe all governing codes and ordinances.
- Comply with installation specifications and dimensions.
- Remove any moldings or decorative panels from kitchen cabinets that would not allow access to the refrigerator for service.
- Contact a qualified electrical installer.
Customer Service
- Website: https://www.whirlpool.com/
- Ph: 1-800-253-1301
FAQs
Q: How do I properly set the temperature in my Whirlpool WHGF 6534 X4UK?
There are separate thermostats for the freezer and refrigerator sections. Set the freezer to -18°C and the refrigerator to 3–5°C for the best food preservation. The appliance takes a few hours to stabilise after adjustment, so avoid making frequent modifications.
Q: Why is my refrigerator making unusual noises?
The compressor and defrost system may occasionally hum, gurgle, or click. On the other hand, make sure the refrigerator is level, not in contact with walls, and free of obstructions around the fan if you hear loud pounding or constant buzzing.
Q: How long does the appliance maintain cooling during a power cut?
Depending on the refrigerator’s capacity and outside temperature, the Whirlpool WHGF 6534 X4UK can sustain safe temperatures for six to eight hours. To prolong cooling, do not open the doors.
Q: Can I store beverages in the refrigerator door?
Yes, but keep heavy or fragile glass bottles out of the door compartments to prevent spillage or breaking from frequent opening.
Q: What warranty and service support are available?
The standard warranty for parts and labour on the Whirlpool WHGF 6534 X4UK is one year. There might be opportunities for an extended warranty. Contact Whirlpool customer service with your model number and purchase date if you have technical problems.
Q: How does the auto-defrost feature work?
The refrigerator section of the WHGF 6534 X4UK contains an automated defrost mechanism.
Q: Can I switch off the freezer compartment while using the refrigerator?
No, the refrigerator and freezer sections use the same cooling system. Always keep both at the proper temperatures.