
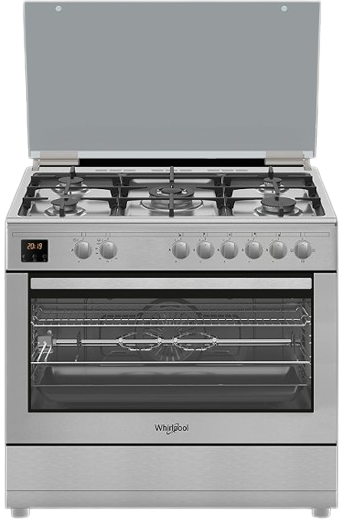
Whirlpool WM9GC6DCX Gas Cooking Range
Safety instructions
This device contains R32. Never use a refrigerant other than R32. Any other gaseous body mixed with R32 could cause abnormally high pressure and lead to a failure or pipes bursting and injuring people. When carrying out repairs or maintenance work, never use copper tubes less than 0.8 mm thick. There is a risk of explosion. Never expose the device to flames, sparks, or other sources of ignition. It could explode and cause serious or even fatal injuries.
- (M/(2.5 x 0.22759 x h0))². M is the quantity of refrigerant in the device in kg, and h0 is the storage height. If stored on the floor, h0 = 0.6 m.
- Do not install the heat pump on a support that risks intensifying the unit’s vibrations.
- Make sure the support provided for the unit is strong enough to bear the weight of the unit.
- Do not install the heat pump anywhere liable to amplify its noise level or anywhere where its noise could disturb neighbours.
- Shut off the main power supply and disconnect the switch before doing any electrical work. Forgetting to do so could cause electrocution.
- The appliance must be handled and installed by two or more persons – risk of injury. Use protective gloves to unpack and install – risk of cuts. The electrical and gas connections must comply with local
- The appliance must be disconnected from the power supply before any installation operation – risk of electrical shock. During installation, ensure the appliance does not damage the power cable – risk fire re or electrical
Specifications

Installation
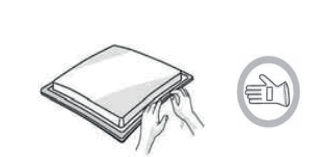
- Use protective gloves for handling, preparing, and installing the product.
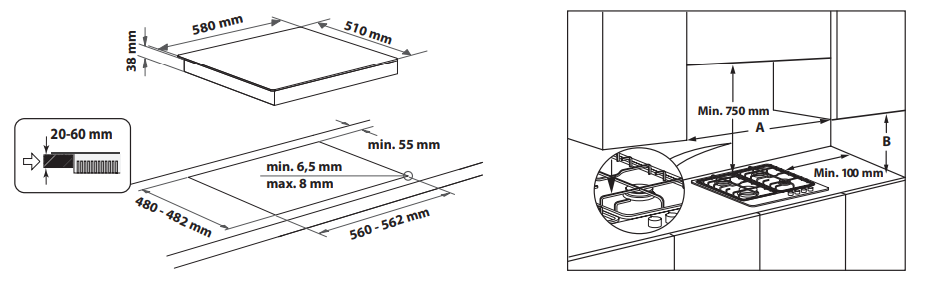
- This product can be embedded in a worktop 20 ÷ 60 mm thick.
- If there is no oven beneath the hob, insert a separator panel with a surface at least equal to the work surface’s opening.
- This panel must be positioned at a maximum distance of 150 mm below the upper surface of the work surface, but in no case less than 20 mm from the bottom of the hob.
- In case you intend to install an oven beneath the hob, make sure that it is equipped with a cooling system..
Dimensions
Assembly
After cleaning the perimeter surface, apply the supplied gasket to the hob as shown in the figure.
Position the hob in the worktop opening made respecting the dimensions indicated in the instructions.
To secure the hob, use the brackets (A) provided with it. Fit the brackets into the relevant bores shown by the arrow and fasten them by means of their screws in accordance with the thickness of the worktop (see the following figures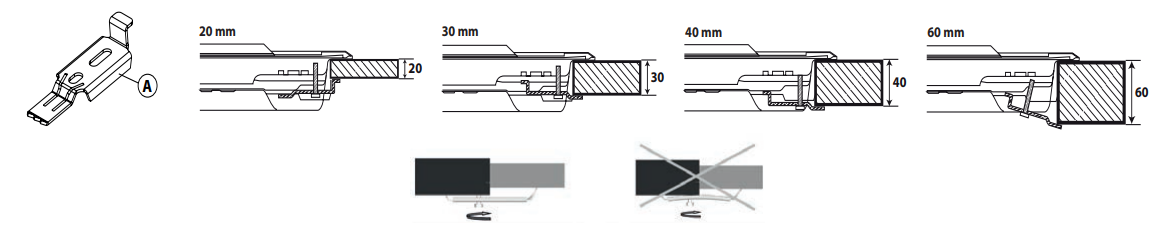
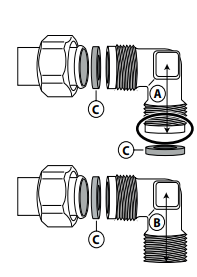
Gas Connection
- Connect elbow (A)* or (B)* supplied to the hob inlet main pipe and interpose the washer (C) supplied, in compliance with EN 549
- After connecting to the gas supply, check for leaks with soapy water. Light up the burners and turn the knobs from the maximum position to the minimum position to check the flame stability.
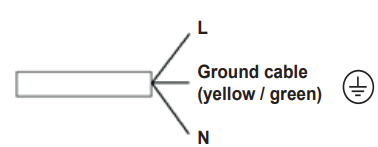
Electrical Connection
Description
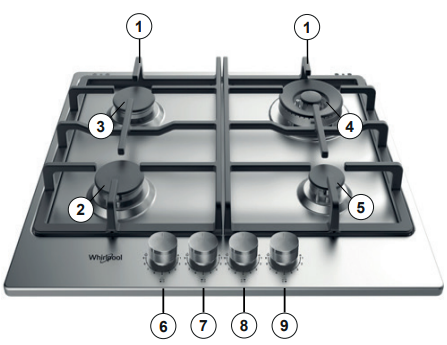
- Removable panstand grids
- Semi-rapid burner
- Semi-rapid burner
- Mini Wok burner
- Auxiliary burner
- Semi-rapid burner control knob
- Semi-rapid burner control knob
- Mini Wok control knob
- Auxiliary burner control knob
How To Use Hob
- To ignite one of the burners, turn the relative knob counterclockwise to the maximum me setting.
- Press the knob against the control panel to ignite the burner.
- After the burner has ignited, keep the knob pressed for about 5-10 seconds to allow proper device operation.
- This burner safety device shuts off the gas supply to the burner if the flame goes out accidentally (because of sudden draught, an interruption in the gas delivery, boiling over liquids, etc.).
- The knob must not be pressed for more than 15 seconds. If, after that time has elapsed, the burner does not remain lit, wait at least one minute before trying to light it again.
- Use pots and pans with bottoms the same width as the burners or slightly larger (see table on the right);
- only use at-bottomed pots and pans;
- Use the correct amount of water for cooking foods and keep the pot covered.
- make sure pots on the grates do not protrude beyond the edge of the hob;
- In the case of pans with convex bottoms (WOK), use the support grille
(not provided), which should be positioned only on the multi-ring burner. - Avoid accidentally knocking the hob with pans, racks, or other kitchen utensils. Do not leave empty steak grills over the lit burner for longer than 5 minutes.

Do not use
- cast iron griddles, ollar stones, terracotta pots, and pans;
- heat di users such as metal mesh, or any other Whirlpool WM9GC6DCX Gas Cooking Range types;
- two burners simultaneously for one receptacle (e.g., a sh kettle).
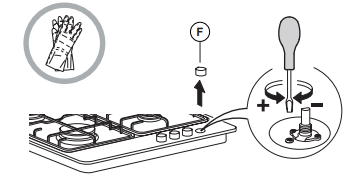
Replacing the Injectors
- Remove grids (A).
- Extract burners (B).
- Using a socket spanner of the appropriate size, unscrew the injector (C) to be replaced.
- Replace it with the injector suitable for the new type of gas.
- Reassemble the injector in (D).
- If you have a multiple-crown burner, use a side spanner to replace the injector (E).

Setting
- Tighten the screw to reduce the ame height (−);
- Loosen the screw to increase the ame height (+). At this stage, light up the burners and turn the knobs to max. Position to the minimum position to check the stability
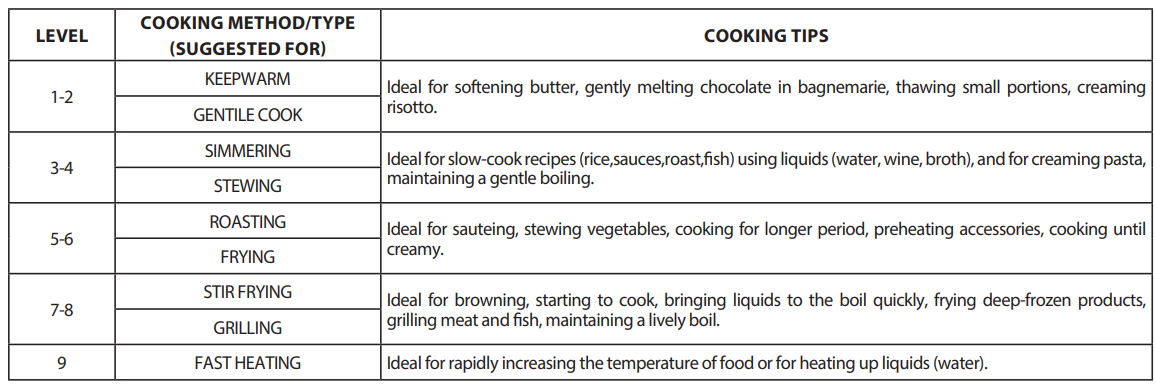
Cooking Table
Cleaning & Maintainance
- All the enamelled and glass parts should be cleaned Whirlpool WM9GC6DCX Gas Cooking Range with warm water and a neutral solution.
- Stainless steel surfaces may be stained by calcareous water or aggressive detergents if left in contact for too long.
- Any food spills (water, sauce, coffee, etc.) should be wiped away before they dry.
- Clean with warm water and neutral detergent, and then dry with a soft cloth or chamois.
- Remove baked-on dirt with specific cleaners for stainless steel surfaces.
- Do not use abrasive or corrosive products, chlorine-based cleaners, or pan scourers.
- Do not use steam cleaning appliances.
- Do not use ammable products.
- Do not leave acid, or alkaline substances, such as vinegar, mustard, salt, sugar, or lemon juice on the hob..
CLEANING THE HOB PARTS
- Clean glass and enamelled parts only with h soft cloth or sponge.
- Grids, burner caps, and burners can be removed to be cleaned.
- The cast-iron grates may be cleaned in the dishwasher.
- Remove any burnt-on food before placing the grates in the lowest rack in the dishwasher.
- Rest burners and burner caps correctly in the Whirlpool WM9GC6DCX Gas Cooking Range respective housings.
- When replacing the grids, make sure that the panstand area is aligned with the burner.
Troubleshooting
- The burner fails to ignite, or the flame is not even. Check that: The gas or electrical supplies are not shut off, and especially that the gas supply tap is open.
- The gas cylinder (liquid gas) is not empty.
- The burner openings are not clogged.
- The plug end is not dirty.
- All the burner parts have been positioned correctly.
- There are no draughts near the hob.
- The burner does not stay lit. Check that:
- When lighting the burner, the knob has been pressed for enough
time to activate the protection device. - The burner openings are not clogged near the thermocouple.
- The end of the safety device is not dirty.
- The minimum gas setting is correct (see relevant paragraph).
- When lighting the burner, the knob has been pressed for enough
AFTER-SALES SERVICE
BEFORE CALLING THE AFTER-SALES SERVICE:
- See if you can solve the problem by yourself with the help of the TROUBLESHOOTING suggestions.
- Switch the appliance off and back on again to see if the fault persists.
IF AFTER THE ABOVE CHECKS THE FAULT STILL OCCURS, GET IN TOUCH WITH THE NEAREST AFTER-SALES SERVICE.
When contacting our Client After-sales service, always specify:
- a brief description of the fault;
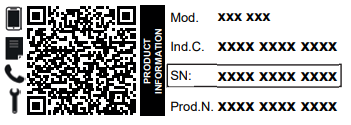
- the type and exact model of the appliance
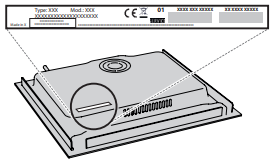
- The serial number (number after the word SN on the rating plate located under the appliance).
- your full address;
- Your telephone number.
Customer Service
- Ph: 1-800-657-2287
- Website: www.haywardcommercialpool.com
FAQs
What type of gas is the WM9GC6DCX range compatible with?
Although this model comes with a conversion kit for liquefied petroleum (LP) gas (propane), it is factory-set for usage with natural gas. A qualified technician should be the only one performing conversion.
Does the gas range need electricity to work?
Indeed. The ignition system, oven light and any electronic controls require electricity, even if the burners run on gas. Burners can be manually lighted with a match or lighter during a power outage (be careful).
Can I adjust the flame size on the burners?
Indeed. To switch between high and low, turn the control knob. The valve orifice may need to be adjusted if the flame is excessively high or low; a certified technician should do this task.
Does this model have convection cooking?
Convection is not a feature of every device. If your model does, “Convection Bake” or “Fan Bake” will be indicated on the control panel and handbook.
How can I get replacement parts or service?
Contact Whirlpool customer care or go to www.whirlpool.com. For quicker assistance, have your model and serial number on hand.
How do I child-lock the controls?
Some versions have oven controls with a child lock feature. To find out which button combinations will activate or deactivate the lock, consult the manual.