


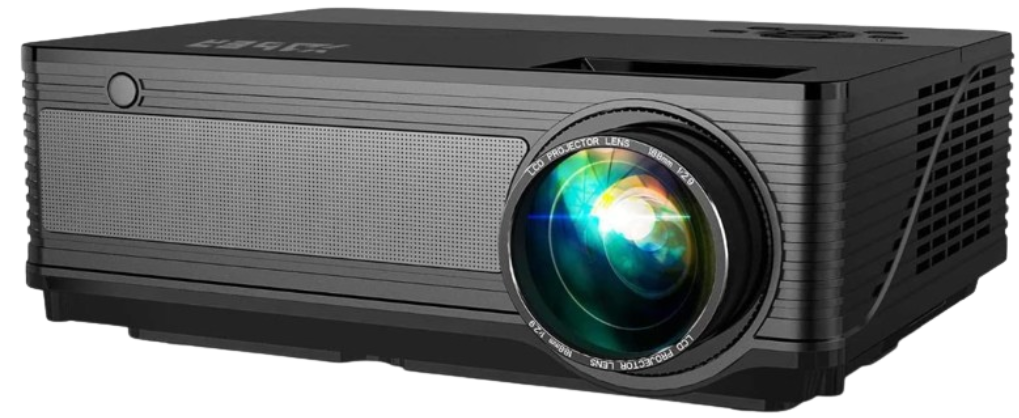
YABER Y21 HD Video LCD Projector
Product Packing List
- YABER Y21 projector X1
- Power cord X1
- Instruction manual X1
- Remote control X1 (batteries not included)
- 3-in-3 AV cable X1
- 2-in-1 AV cable XI
- HDMI cable X1
- VGA cable X1
- Lens cleaning X1
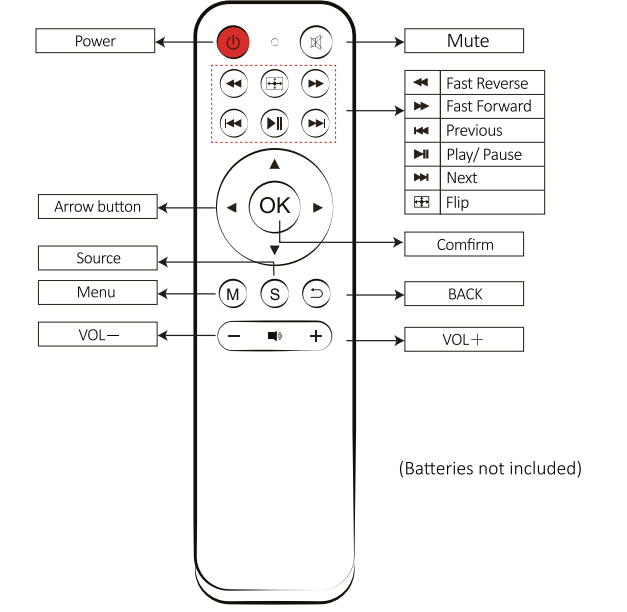
PROJECTOR REMOTE
PROIECTOR OVERVIEW
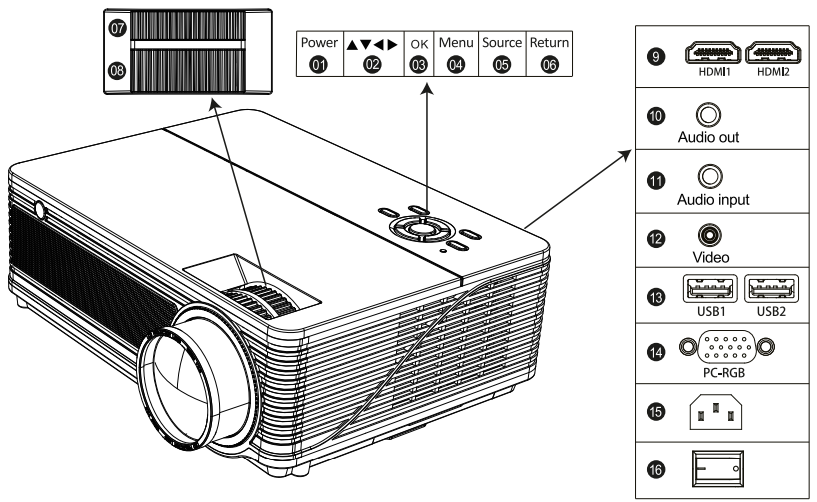
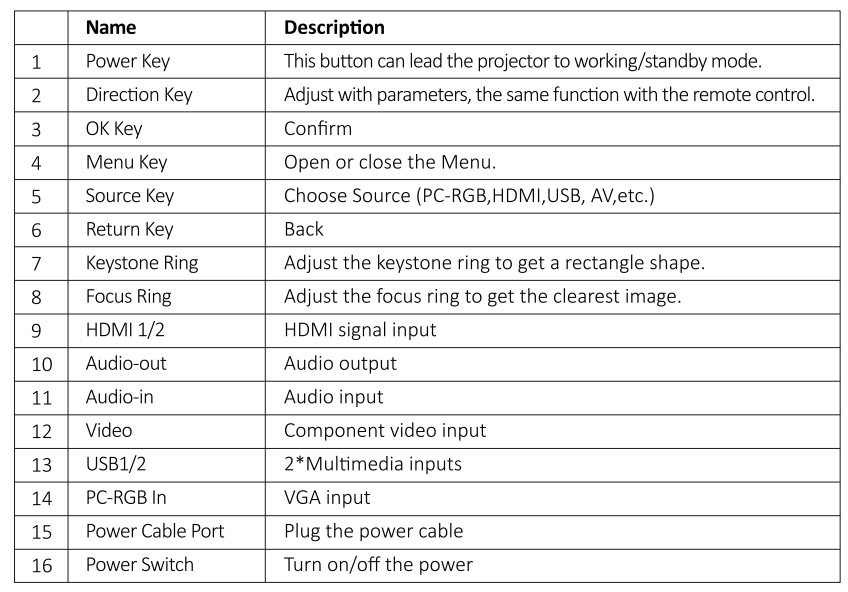
Bottom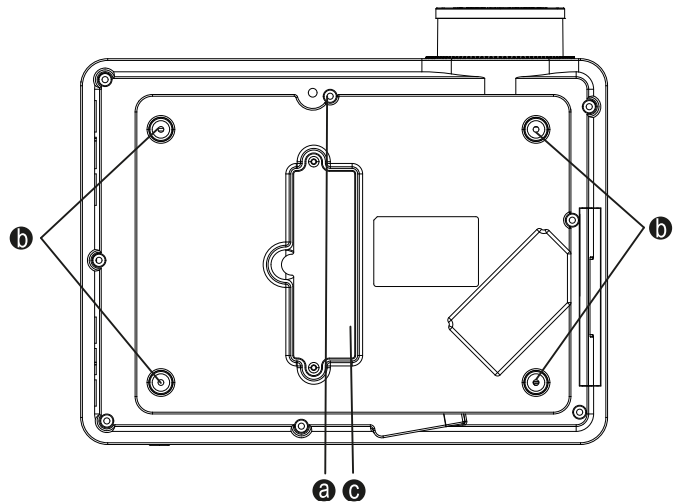

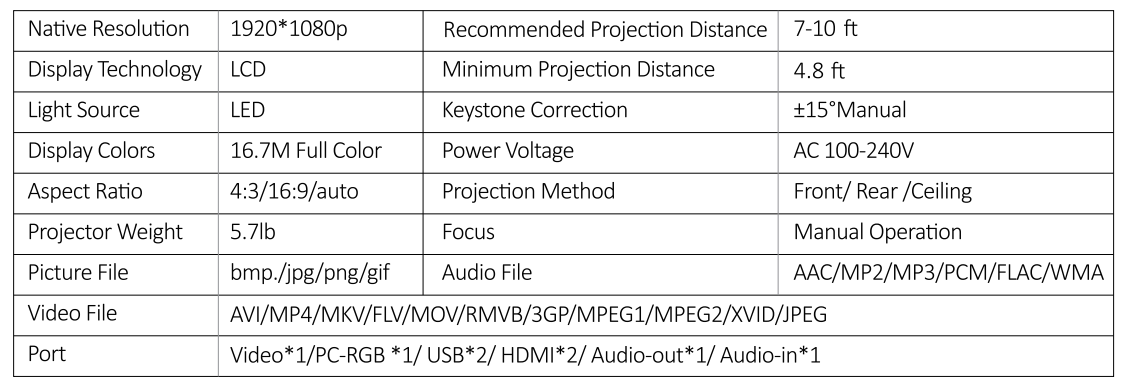
Specification
Starting Projector
Turn on the projector
- Install two AAA batteries in the remote control before using.
- Press the Power switch on the backboard so that the power light turns red.
- Press the Power key on the remote or panel, and the indicator light will turn green.
- Remove the lens cover of the projector, and the lamp will start working 2 seconds later. When an image is projected on the screen, the machine is working smoothly. If the first projection screen is not the start-up screen, press the “S” button on the remote and select USB source.
- Adjust the keystone ring to get a rectangular shape.
- If you connect other devices, be sure to select the corresponding source. If you do not select the correct source, the projector will not be able to detect the signal.
- Press the Menu button on the remote control to enter the OSD Language to set your preferred language.
Turn off the projector.
- Press the Power button when the projector is in use; this will cause it to switch to standby mode.
- When the projector switches into standby mode, the light will turn green from red.
IMAGE ADJUSTMENT
When using the projector for the first time, it normally displays an unclear image. This is due to the lens being out of focus or an incorrect trapezoid setting. Please follow the steps below to correct:
Keystone Correction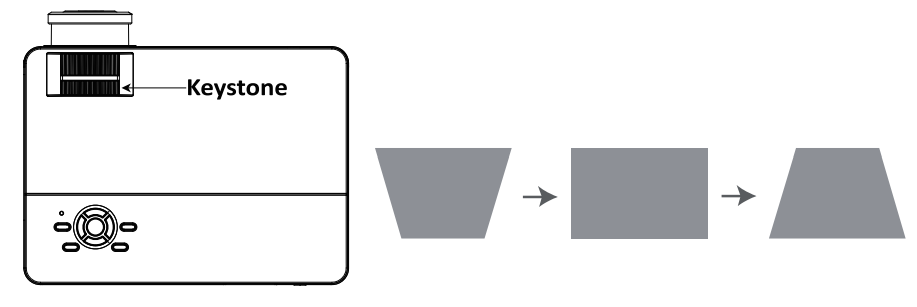
If the projected image is trapezoidal, please adjust the keystone ring to get a rectangular shape.
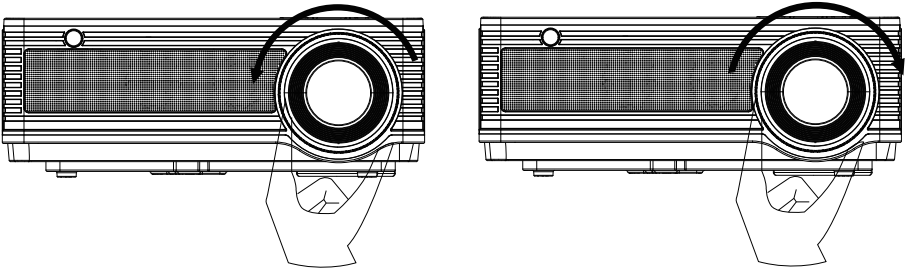
The projected image may be blurry or difficult to see. This is due to a lack of focus adjustment with the lens. Please follow the processes below to adjust the focus.
Focus Adjustment
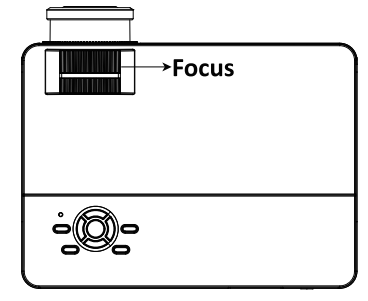
A. Rotate the focus ring slowly. At the same time, check the resolution point carefully. The best focus point for the lens would be where the image is most clear.

Adjust the Tilt Base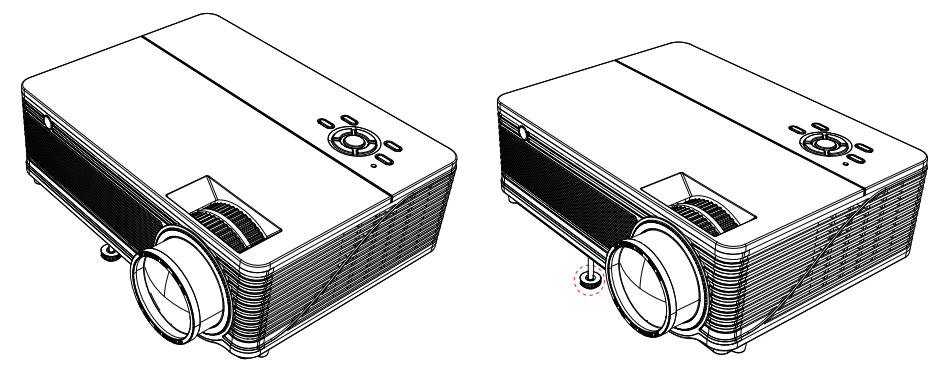
Adjust the height of the image by rotating the height screw on the bottom of the projector.
PROJECTION DISTANCE AND SIZE
Please follow the data in the chart below to adjust the image size and the distance. (Aspect
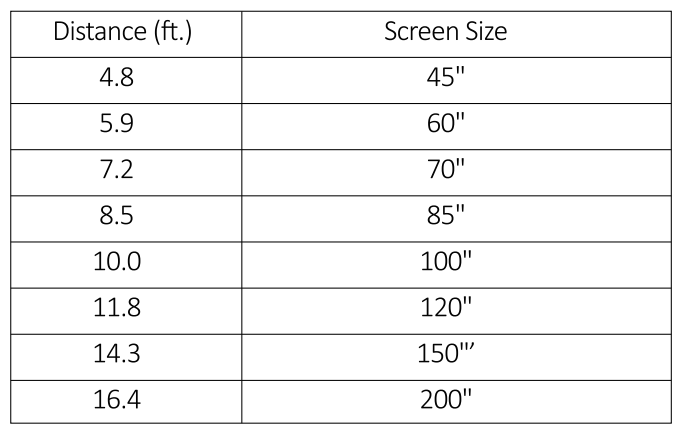
The image size depends on the distance between the projector and the screen; there may be 3% deviation among the above-listed data. Different settings cause various distances.
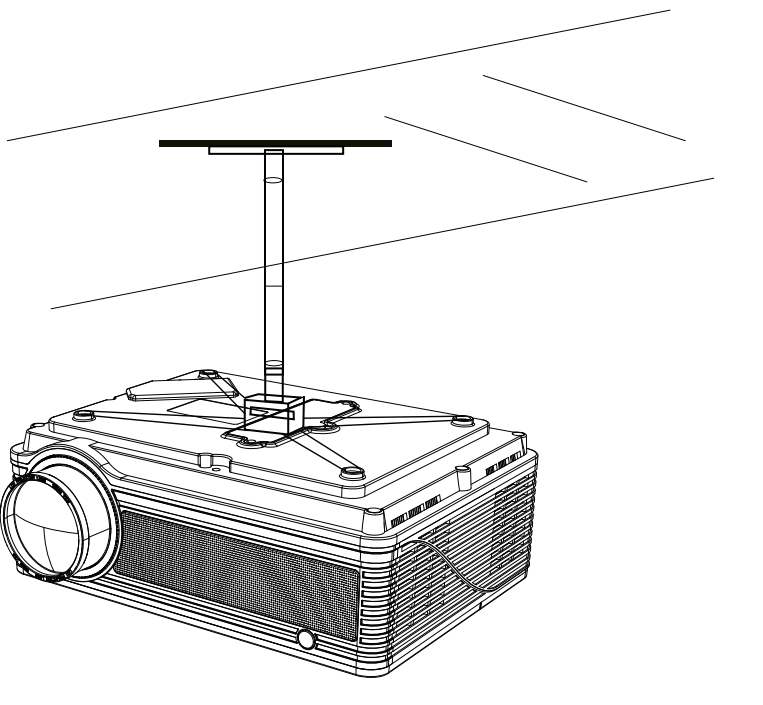
PROJECTOR INSTALLATION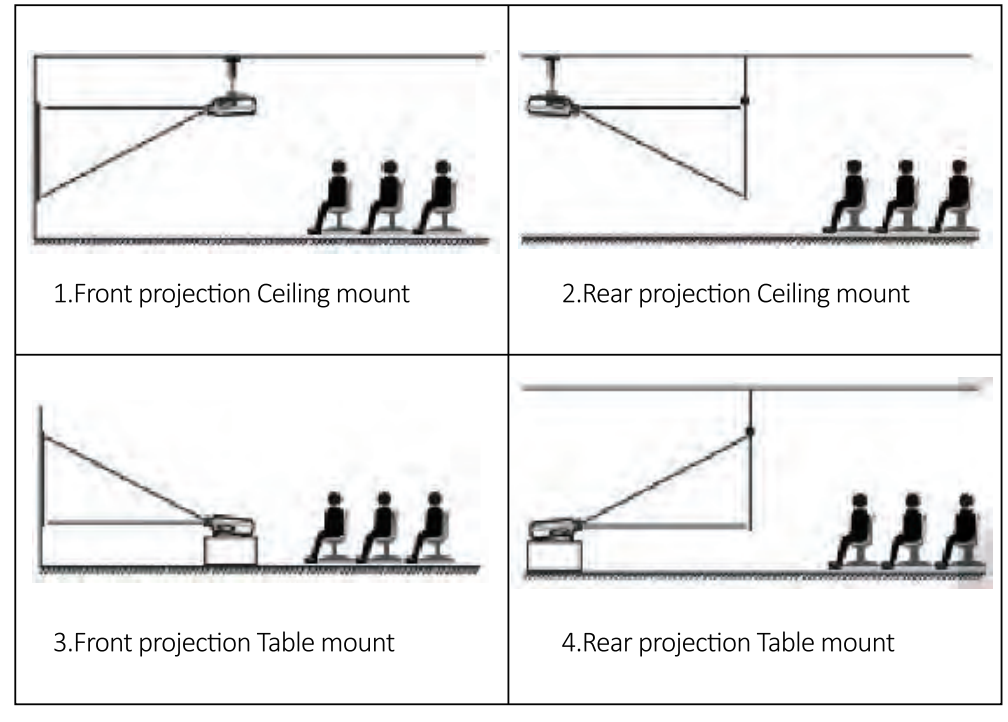 INSTALL ON THE CEILING
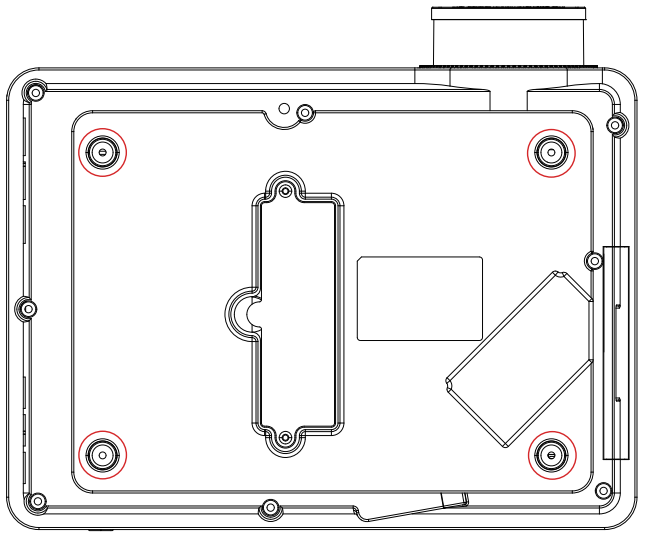
- Please purchase a Universal Projector Ceiling Mount Kit and four M4 x 10 screws.

- Open the 4 buttons on the back of the projector and use the M4 * 10mm screws to hang the projector on the stand.

SETTING UP THE PROJECTOR
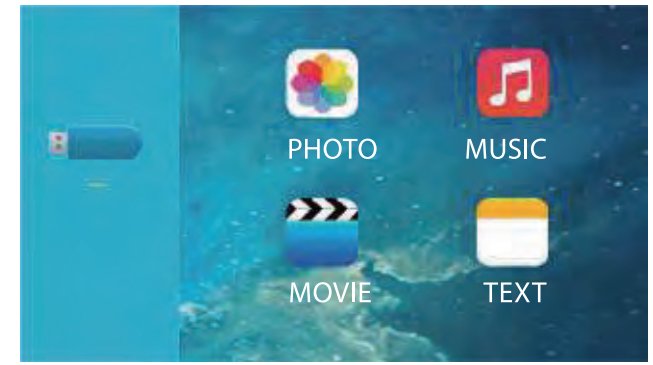
The projector’s normal start-up screen is as follows. If the first projection screen is not this one, press the “S” button on the remote control to select the USB source.
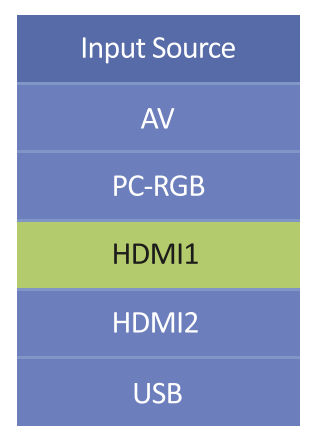
Select the Input Source
When the “No Signal” prompt appears, you need to select the input source:
- Press the “s” button on the remote control to select the desired signal, then press the OK button on the remote control.
- Once the signal is detected, the selected source information will be displayed on the screen after a few seconds.
Menu Setting Method
- Press the “M” on the remote, then the menu picture will display on the screen.
- Press the” /”key, the menu will move to “PICTURE”> “SOUND” > “TIME”> “OPTION”.
- Select the adjust interface, use the” A/” key to choose the wanted item.
- Press”OK” or “</”to adjust the item parameter.
PICTURE MENU
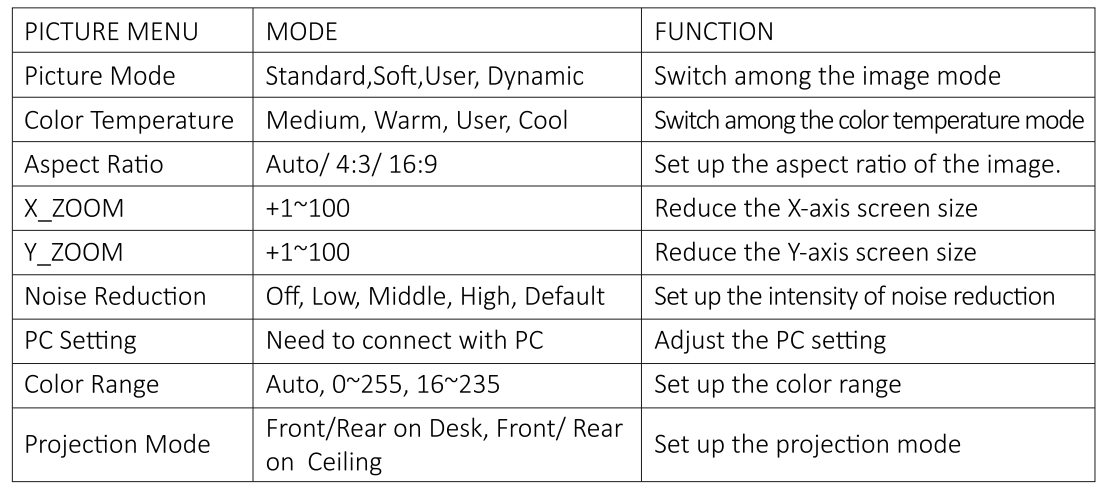
<X_ZOOM & Y_ZOOM>
When playing an image or video, if you want to reduce the size of the projected image or video, you can use the remote control to select the X_ZOOM & Y _ZOOM to adjust the projection size:
- Click “X_ZOOM” to adjust the horizontal size of the projection image.
- Click “Y_ZOOM” to adjust the vertical size of the projection image. You can reduce the height and width of the original size by up to 50%.

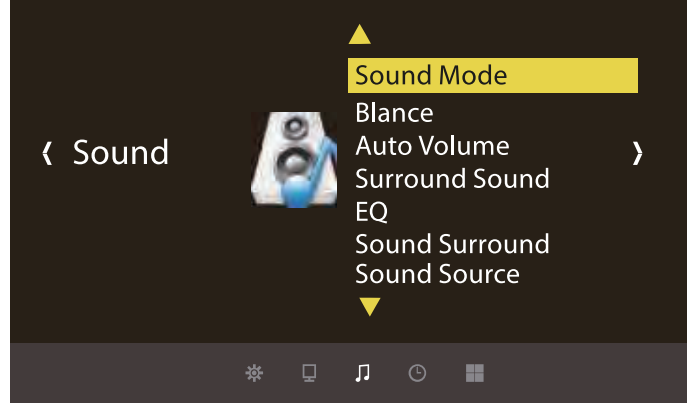
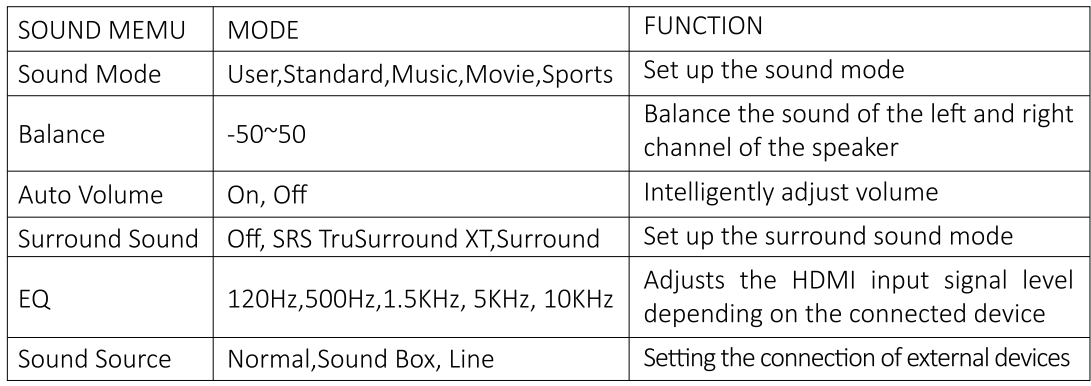
SOUND MEMU

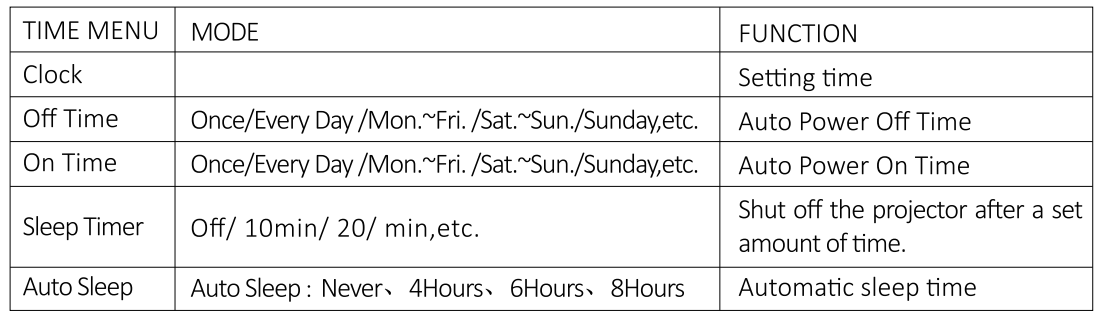
TIME MEMU

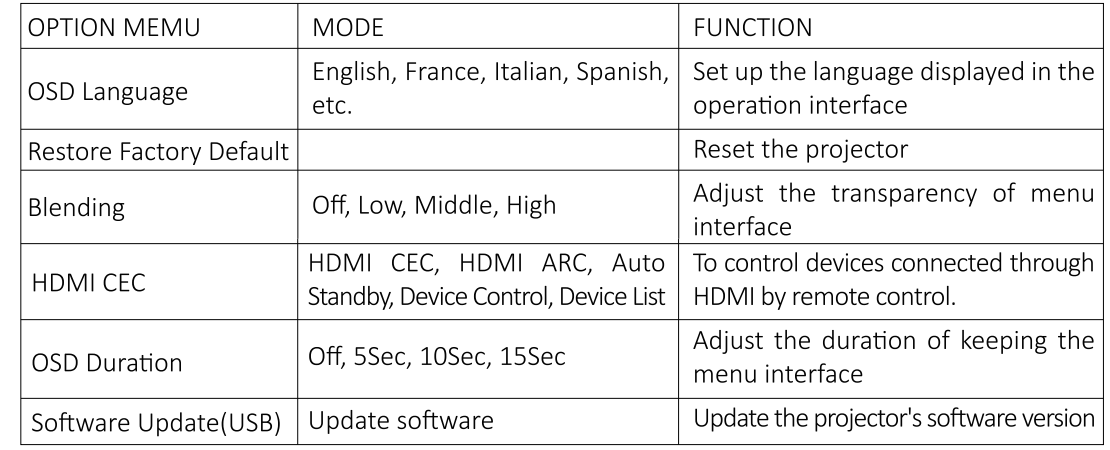
OPTION MEMU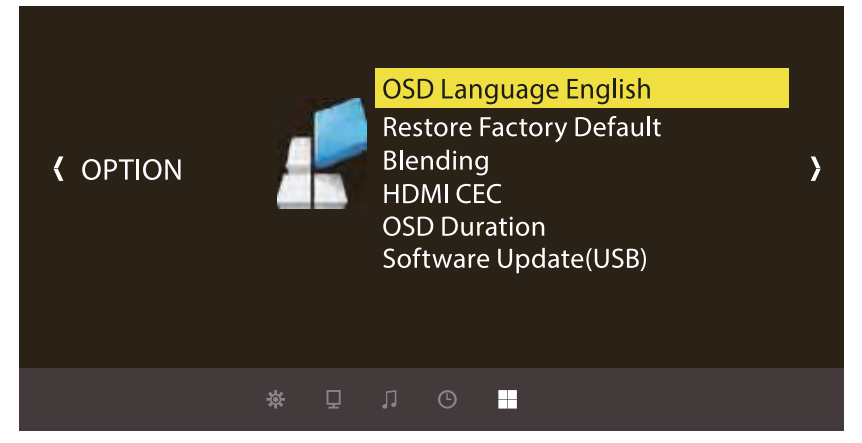
Connecting to the Computer
Using the HDMI or VGA cable in the package to connect to the projector. (An HDMI connection is recommended for projecting movies, videos, and other files that need to be HD.)
- Turn on your computer and the projector.
- Connect the HDMI/VGA cable to your computer’s HDMI/VGA port.
- Connect the other end to any available HDMI/VGA port on your projector.
- Press the “Source” button to enter the interface of the Input Source.
- Select the HDMI/ PC-RGB source to project any files on your computer.
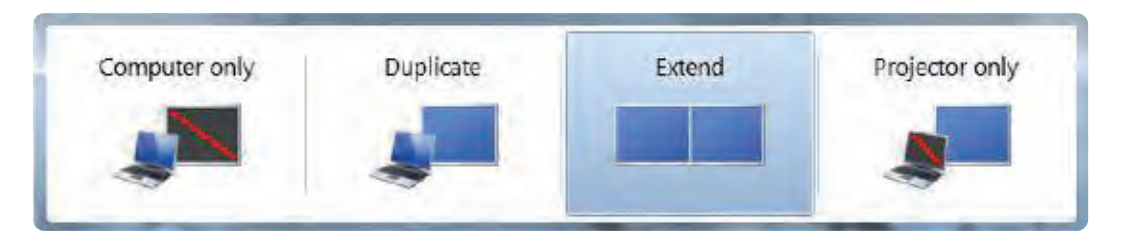
- On your laptop, hold down the key e Win + p board keys to change your display mode:
 Computer only: is the default option – only displays on the main monitor. Duplicate: makes all of the monitors display the same thing, duplicating the desktop on each monitor. Extend: makes all of your monitors act like one big monitor,r extending the desktop across all of th..em Projector only: Displays only on the secondary monitor, like a projector.
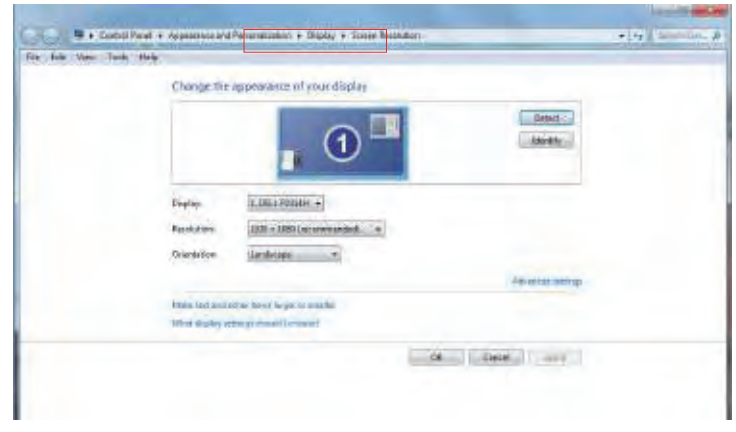
 - You can change your screen resolution: Choose Start→Control Panel→Appearance and Personalization→Adjust Screen Resolution. ution
Connecting to the Mobile Device
- Connect the projector and the Android smartphone with the MHL-HDMI cable.
- Choose the signal source: “HDMI.”
Connect with the iOS system:
- Connect the projector and iPhone with a Lightning-to-HDMI cable (not included)
- Choose the signal source: “HDMI.”
Connect with an Anycast:
- Plug in Anycast with the microUSBb port and another USB port to your power adapter.
- Connect Anycast to your Projector’s HDMI port and switch the Projector source to HDMI.
- You will see the Anycast main menu on the Projector screen.
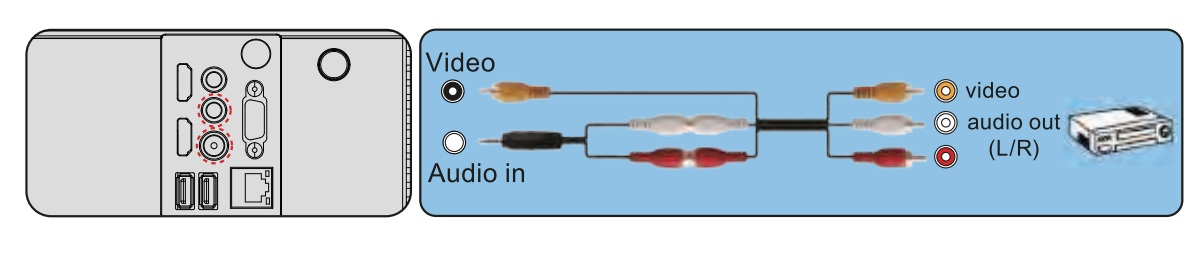
Connecting to the DVD Player
Use the AV cable in the package.
- Turn on your DVD player and the projector.
- Connect the colorful female connectors to your DVD player’s RCA cable.
- Connect the black connector to the Audio-in port of the projector.
- Connect the yellow connector on the other side to the video port of the projector.
- Press the Source button on the projector or the S button on the remote to select the correct AV source.

Or use the HDMI cable in the package:
Connecting to the Sound bar
- Use the supplied AV cable to connect the sound bar to the projector.
- Turn on the projector and the sound bar.
If the display of the projector is available, but without audio:
- Due to copyright issues, the projector does not support Dolby Sound. For the BD player, please turn off the Dolby Sound function.
- Please go to Sound Menu-Sound Source to select the sound source you need:
- Normal: The external speakers and the projector’s built-in speakers emit sound at the same time.
- Sound Box: Only the projector’s built-in speakers will emit a sound.
- Line: Only external speakers emit audio; the projector will not emit any sound.
YABER Lifetime Professional Support
Dear Customer,
Woohoo! Your projector is already in your hands! Let’s get started! Do you have any questions on how it works? Please read this manual thoroughly before using the projector. Are you satisfied with your projector? If you have any issues, email your order number and description of your issue to: service@yabertech.com. Send your email ASAP, as we want to fix your issues the first time you have them.
Customers sometimes can experience some confusion when using the projector. Rather than trying to communicate directly with us, many buyers instead just leave a review on the product page. However, most negative reviews are caused by non-standardized use rather than a defect in the product itself.
Actually, many problems can be easily solved by setting, such as no signal, no sound, etc. We promise that all the projectors have been carefully checked and packaged before shipping. Therefore, if you have any questions, please contact us and give us an opportunity to improve. We guarantee that we will provide you with a more satisfactory solution.
Thanks for your understanding!
Have a beautiful day!
Best regards,
YABER TEAM
WARRANTY
Thank you so much for your purchase and support! Our product provides a 3-year warranty. Any questions, please feel free to contact YABER viaservice@yabertech.com.
TROUBLESHOOTING
Problems listed below might occur during the operation of your projector. Please refer to the possible factors that might cause the issue for troubleshooting.
- Why is the display of the projector available, but without audio
- Why is the audio of the projector available but without a display? The video format is not supported by the projector.
- Encryption is applied to the videos or the media player that holds the video. eo
- If the lamp of the projector is off with only audio playing, the lamp is defective. Please contact YABER for a replacement.
- Try another HDMI cable if you select the HDMI input source
- Why does the projection screen show no signal?
- Make sure all cables are plugged correctly and firmly
- What can I do if the image is blurry or out of shape?
- Adjust the focus and keystone ring by moving it leftward/rightward till it shows the best images.
- The projecting wall or screen is clean and white, if possible.
- How can I do if the image is upside down? *Enter Menu-Picture-Projection Direction to flip the projection image accordingly.
- How can I do if the projection screen is not square or aligned horizontally?
- How can I do it? There is color distortion. *Make sure the video source has a fine resolution. Just set the colors: enter Menu-Picture-Color Temperature, then select different modes and adjust the value accordingly.
- What can I do if the remote is unresponsive?
- Make sure the batteries are installed correctly and that there is enough power.
- What should I do if there are small dots on display? *It may be caused during installation. Please contact YABER to get the video on how to clean it.
- Can this projector support a 3D effect?
Customer Support
- website:support01@yaberauto.com
1 Comment
Pingback: Happrun H1 Portable Native 1080p Projector User Manual