 Levoit LTF-F361-WUS Classic 36 Inch Tower Fan
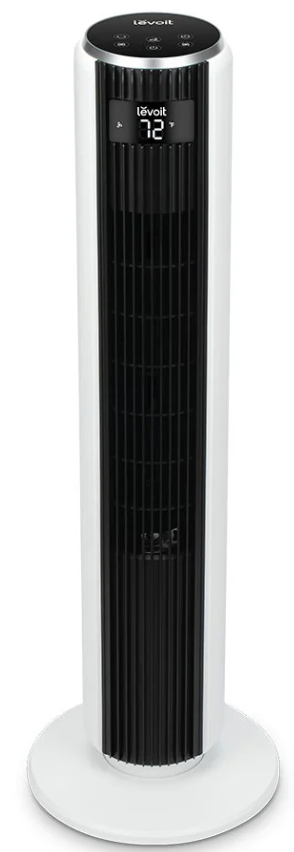
Package Contents
- 1 x Tower Fan
- 2 x Base
- 1 x Remote Control
- 1 x Quick Start Guide
- 1 x User Manual
Safety Instructions
- Only use your tower fan as described in this manual.
- Do not use your tower fan outdoors.
- Do not place the tower fan in a window. Keep your tower fan away from water and wet or damp areas.
- Keep your tower fan away from open flames, heat sources, or other heating and cooking appliances.
- Do not place anything into any opening on the tower fan.
- Avoid contact with moving fan parts.
- Do not hang or mount the tower fan on a wall or ceiling.
- Only use the tower fan on a dry and level surface.
- Close supervision is necessary when the tower fan is used by or near children.
- Children should be supervised to ensure that they do not play with the tower fan.
- Children should be supervised to ensure they do not insert fingers or objects into the vent openings.
- Children should not clean or perform maintenance on the tower fan without supervision.
- To prevent moisture buildup, avoid placing it in rooms with major temperature changes.
- Unplug the tower fan when not in use for an extended period of time.
- Do not use other items or third-party parts as replacement parts for this tower fan.
- Do not use your tower fan if it is damaged or not working correctly, or if the cord or plug is damaged.
- Do not try to repair it yourself. Contact Customer Support (see page 15).
- Not for commercial or industrial use. Household use only.
Know Your Product
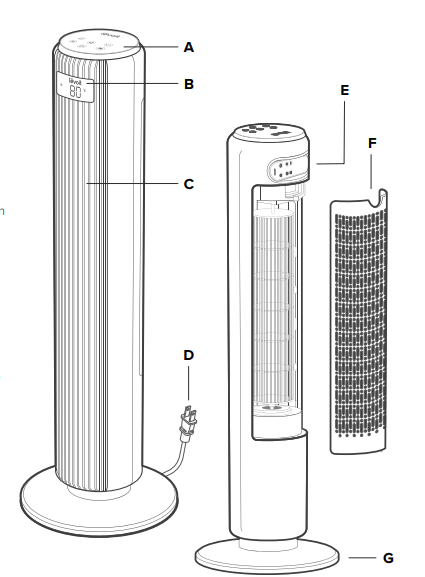
- Control Panel
- LED Display
- Vents
- Power Cord
- Remote Control
- Back Cover
- Base
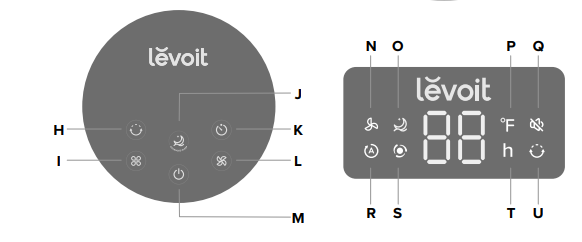
Control Panel
- Oscillate Button
- Fan Mode Button
- Advanced Sleep Button
- Timer Button
- Fan Speed Button
- On/Off Button
LED Display
- Normal Fan Mode Indicator
- Advanced Sleep Mode Indicator
- Fahrenheit Indicator
- Sound Off Indicator
- Auto Mode Indicator
- Turbo Mode Indicator
- Hour Indicator
- Oscillate Indicator
CONTROLS & DISPLAY
On/Off Button
- Tap to turn the tower fan on/off.
Fan Mode Button
- Tap to cycle through fan modes: Normal Fan, Turbo, and Auto (see Fan Modes, page 9).
- Press and hold for 3 seconds to turn selection sounds on/off.
Timer Button
- Tap to cycle through timer options from 1–12 hours.
- Press and hold to quickly cycle through options in increments of 1 hour. Advanced Sleep Button
- Tap to turn Advanced Sleep Mode on/off (see
Oscillate Button
- Tap to turn oscillation on/off.
- The tower fan has a 90° angle of oscillation.
Fan Speed Button
- Tap to cycle through fan speeds from 1 (low) to 5 (high).
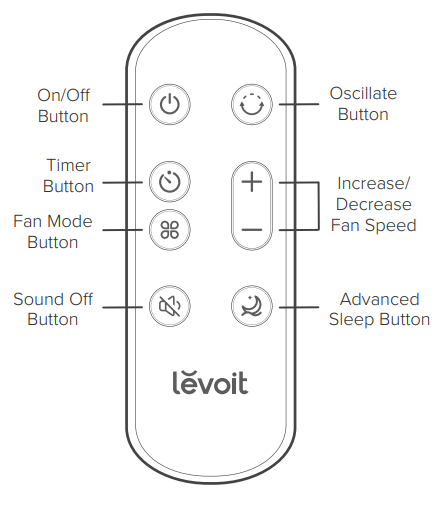
Remote Controls
The remote control can be used to control any of the tower fan’s functions from a distance. The remote must be within 16 ft / 5 m of the tower fan to work.
Sound Off Button (Remote Only)
- Press to turn selection sounds on/off.
Getting Started
- Remove all packaging.
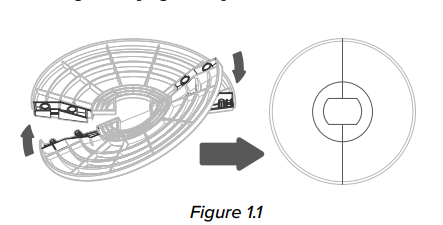
- Snap the two pieces of the base together. [Figure 1.1]

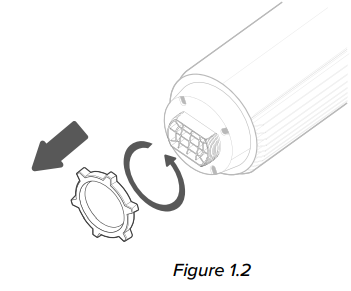
- Unscrew the plastic nut from underneath the tower fan. [Figure 1.2]

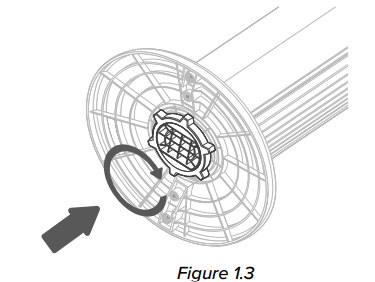
- Secure the base to the tower fan with the plastic nut. [Figure 1.3]

- Place the tower fan on a flat, stable surface such as the floor.
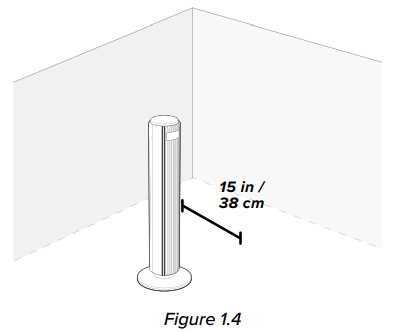
- When using the tower fan, allow at least 15 inches / 38 cm of clearance from the front of the tower fan.
- Keep away from anything that would block air flow, such as curtains. [Figure 1.4]

Using the Fan
- Plug in and tap to turn on the tower fan. The fan will start on low.
- The display will show “01” and will turn on for 5 seconds.
- Then, the display will show the current room temperature for 15 seconds.
- Tap to change fan speed from 1 (low) to 5 (high).
- Optionally, tap to select a different fan mode, or tap to turn Advanced Sleep Mode on/off.
Fan Modes
- Tap to cycle through fan modes: Normal Fan, Turbo, and Auto.
Normal Fan Mode
- Use Normal Fan Mode to manually control the tower fan’s functions, such as fan speed, oscillation, and timer.
- This is the tower fan’s default mode.
- It will show on the display.
Turbo Mode
- Use Turbo Mode with air conditioning to quickly circulate air in your home.
- Tap and select Turbo Mode. It will show on the display.
- The tower fan automatically starts oscillating and operates at fan speed 5.
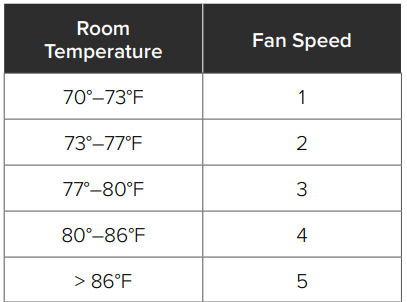
- When the room temperature drops 5°F, the fan speed will decrease to 3, then the tower fan will enter Auto Mode and automatically adjust the fan speed according to the room temperature.
Auto Mode
- Use Auto Mode for automatic fan speed adjustments according to the room temperature.
- Tap and select Auto Mode. It will show on the display.
- The starting fan speed is determined by the current room temperature.

- Optionally, tap to manually adjust the fan speed while in Auto Mode. The tower fan will then operate according to the following logic:
- If the temperature increases 5°F, the fan speed will increase one level.
- If the temperature decreases by 5°F, the fan speed will decrease one level.
Advanced Sleep Mode
Advanced Sleep Mode is an optimized sleep mode that takes into account the stages before you sleep, during sleep, and as you wake up.
- Tap to turn Advanced Sleep Mode on. It will show on the display.
- After 5 seconds, the display will turn off, and selection sounds will be disabled.
- The starting fan speed is determined by your current fan speed when you select Advanced Sleep Mode.
- After 1 hour, the tower fan will decrease fan speed as the room temperature stabilizes.
- The tower fan then begins oscillating and enters Auto Mode. This automatically adjusts the fan speed according to the fluctuating room temperature as you sleep and wake up.
- If the temperature increases 5°F, the fan speed will increase one level.
- If the temperature decreasesby 5°F, the fan speed will decrease one level.
- Tap or to turn Advanced Sleep Mode off.
Auto Display Off
Turn on Auto Display Off if you would like the display to automatically turn off when there is no operation.
- Press and hold for 3 seconds to turn on Auto Display Off.
- After 60 seconds of no operation, the display will automatically turn off (except in Advanced Sleep Mode).
- Tap any button to temporarily turn the display back on. If you don’t tap another button, the display will turn back off after 60 seconds.
- Press and hold for 3 seconds to turn off Auto Display Off.
Standby Mode
- The tower fan is in Standby Mode when it is turned off, but plugged in.
- Tap to turn the tower fan on.
Memory Function
When the tower fan is in standby or turned off and unplugged, it will remember all its previous settings, except for the timer.
Care & Maintainance
Cleaning the Tower Fan
- Unplug before cleaning.
- Wipe the outside of the tower fan with a soft, dry cloth.
- If necessary, wipe the housing with a damp cloth, then immediately dry.
- Use a vacuum, duster, or compressed air to clean the inside of the tower fan.
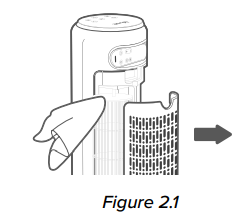
- If necessary, use a screwdriver to remove the back cover and clean the inside of the tower fan.

- Do not clean with abrasive chemicals or flammable cleaning agents.
Replacing the Remote Control Battery
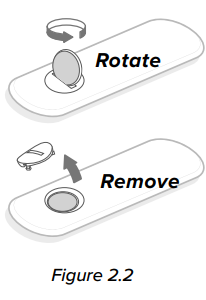
- Insert a coin/button battery into the slot and rotate counterclockwise to remove the battery compartment.
- Remove the old battery.
- Replace with a new 3V CR2025 battery. Make sure the polarities match.
- Replace the battery compartment.

Replacing the Fuse
- Unplug the tower fan. Grab the plug and pull it from the outlet. Never pull from the power cord.

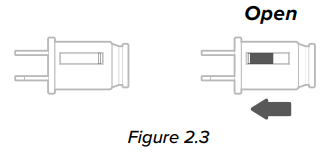
- Open the fuse cover on the plug by sliding the fuse cover toward the metal prongs. [Figure 2.3]
- Carefully remove the blown fuse with tweezers or a small tool. Make sure not to break the glass fuse.
- Risk of fire: Only replace the fuse with a 2.5 Amp, 125V fuse (3.6 x 10 mm). Do not use any other type of fuse.
- Slide the fuse cover closed.
Storage
If not using the tower fan for an extended period of time, cover the tower fan and store it in a cool, dry place to avoid moisture damage.
Specifications
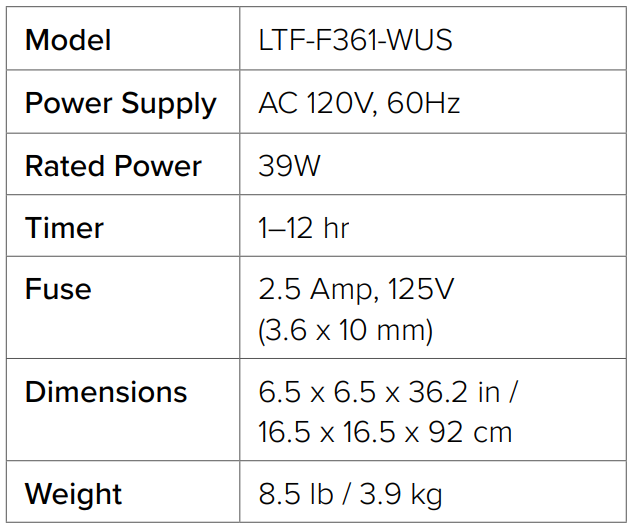
Troubleshooting
| Problem | Possible SolutionThe tower |
| The fan will not turn on or respond to button controls. | Plug in the tower fan. |
| Check to see if the power cord is damaged. If so, stop using the tower fan and contact Customer Support (see page 15). | |
| Plug the tower fan into a different outlet. | |
| The tower fan may be malfunctioning. Contact Customer Support (see page 15). | |
| The tower fan makes an unusual noise while the fan is on. | Make sure the tower fan is operating on a hard, flat, level surface. |
| The tower fan may be damaged, or a foreign object may be inside. Stop using the tower fan and contact Customer. Support (see page 15). Do not try to repair the tower fan. | |
| The tower fan randomly turns off. | The tower fan is malfunctioning. Stop using the tower fan and contact Customer Support (see page 15). |
Limited Warranty
| Product Name | Classic 36-Inch Tower Fan |
| Model | LTF-F361-WUS |
| Date of Purchase | |
| Order ID |
Levoit Limited Product Warranty
Register your products at https://warranty.levoitComom/warranty to stay up to date with important product information such as product updates, limited warranties, usage and maintenance recommendations, and notifications concerning safety warnings or product recalls. Registration is not required to claim your limited warranty.
Two (2) Year Limited Consumer Product Warranty
Arovast Corporation (“Arovast”) warrants that the product shall be free from defects in material and workmanship for a period of 2 years from the date of original purchase (“Limited Warranty Period”), provided the product was used in accordance with its use and care instructions (e.g., in the intended environment and under normal circumstances).
Your Limited Warranty Benefits
During the Limited Warranty Period and subject to this limited Warranty Policy, Arovast will, in its sole and exclusive discretion, either (i) refund the purchase price if the purchase was made directly from the online Levoit store, (ii) repair any defects in material or workmanship, (iii) replace the product with another product of equal or greater value, or (iv) provide store credit in the amount of the purchase price.
Who is Covered?
This limited warranty extends only to the original consumer purchaser of the product and is not transferable to any subsequent owner of the product, regardless of whether the product transferred ownership during the specified term of the limited warranty. The original consumer purchaser must verify the defect or malfunction and provide proof of the date of purchase to claim Limited Warranty Benefits.
What’s Not Covered?
- If the proof-of-purchase has been altered in any way or is made illegible.
- If the product has been modified from its original condition.
- If the product has not been used in accordance with directions and instructions in the user manual.
- Damages caused by connecting peripherals, additional equipment, or accessories other than those recommended in the user manual.
- Damages or defects caused by accident, abuse, Levoit LTF-F361-WUS Convenient Tower Fan misuse, or improper or inadequate maintenance.
- Damages or defects caused by service or repair of the product performed by an unauthorized service provider or by anyone other than Arovast.
- Incidental and consequential damages.
- Damages or defects exceeding the cost of the product.
Claiming Your Warranty Service in 5 Steps
- Make sure your product is within the Levoit LTF-F361-WUS Convenient Tower Fan specified\ limited warranty period.
- Make sure you have a copy of the invoice and order ID or proof-of-purchase.
- Make sure you have your product. DO NOT dispose of your product before contacting us.
- Contact our Customer Support Team.
- Once our Customer Support Team has approved your request, please return the product with a copy of the invoice and order ID.
Customer Support
- Support Hours: Mon–Fri, 9:00 am–5:00 pm PST/PDT
- Email: support@levoit.com
- Toll-Free: (888) 726-8520
FAQs
Q: What features make the Classic 36″ Tower Fan unique?
Wide airflow, many speed settings, oscillation, quiet operation, and a small footprint for home and office use are all features of this model, which stands 36 inches tall.
Q: How do I assemble the tower fan?
The fan is mostly preassembled. All you have to do is use the provided screws to fasten the base parts. Before turning on, make sure the base is fastened.
Q: Does the fan come with a remote control?
The device may come with a remote control, depending on the version. It will be mentioned in your user manual’s package contents section if your model comes with one.
Q: How many speed settings does the fan have?
Usually, the LTF-F361-WUS has three different fan speeds (low, medium, and high), so you may modify the airflow for both energy efficiency and comfort.
Q: Is this tower fan quiet enough for sleeping?
Indeed. The fan is appropriate for bedrooms, nurseries, and other low-noise settings because of its quiet performance design.
Q: How do I clean the tower fan?
Dust the vents with a gentle brush or hoover after unplugging the fan. Use a dry or slightly moist cloth to clean the outside. Avoid using water directly on the fan or disassembling the internal parts.
Q: Can I use the fan continuously for long periods?
To ensure the fan lasts as long as possible, let it rest occasionally and keep it clean to prevent overheating.


 Levoit LTF-F361-WUS Classic 36 Inch Tower Fan