


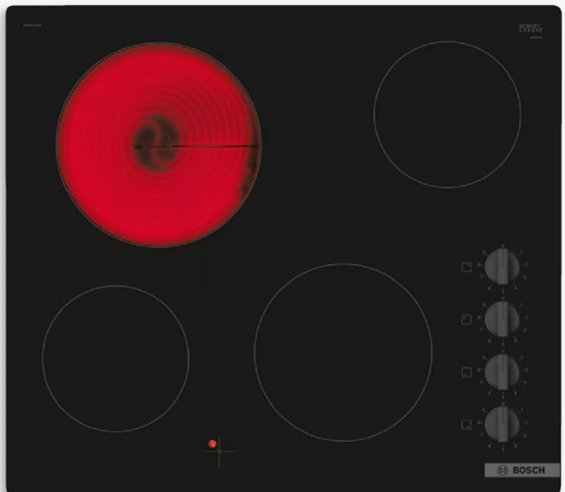
Bosch PKE611FA2A Built-in Electric Hob
Safety Instructions
- Do not perform any measurements on electric circuits with voltages exceeding 1000 V.
- Remove the test leads from the input terminals before you measure current.
- There is a risk of an electric shock. Check the insulation of the test leads regularly.
- Only use test leads that have the same voltage, category, and amperage ratings as the measuring tool.
- Damaged insulation of the test leads can lead to an electric shock.
- Do not use the measuring tool in explosive atmospheres that contain flammable liquids, gases, or dust.
- Verify the function of the measuring tool by measuring a known voltage.
- If in doubt, have the measuring tool serviced.
- Use the measuring tool only as specified in this manual.
- Use the measuring tool or the test leads only if they do not appear damaged.
- Have the measuring tool repaired only by a qualified specialist using only original replacement parts.
- Do not modify or open the battery. There is a risk of short-circuiting.
Intended Use
Overview of the most common damage
Here you can find the most common types of damage and tips on how to avoid them.
| Damage Cause | Measure |
| Stains from Food boiling over | Remove boiled-over food immediately with a glass scraper. |
| Stains: Unsuitable cleaning products | Only use cleaning products that are suitable for glass ceramic. |
| Scratch Salt, sugar or sand | Do not use the hob as a work surface or storage space. |
Control Panel
You can use the control panel to configure all functions of your appliance and to obtain information about the operating status.
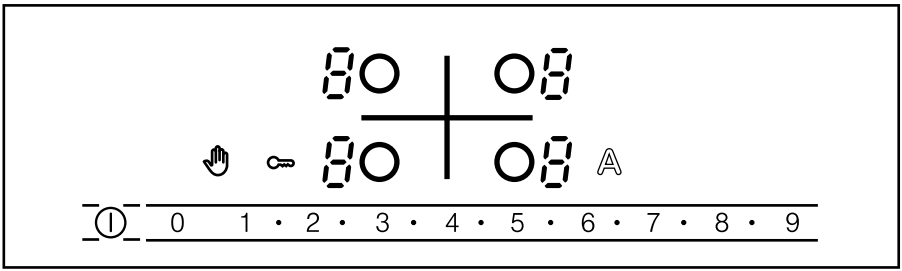
Indicators/symbols
The displays show selected values and functions.s
Touch fields
Touch fields are touch-sensitive surfaces. To select a function, touch the relevant field.
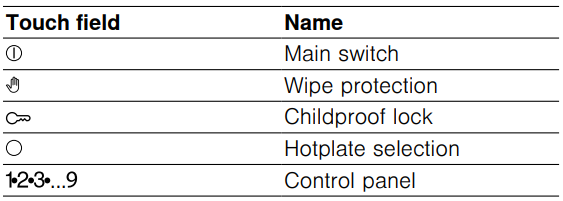
- Always keep the control panel dry. Moisture impairs the function.
- Do not pull pans close to the displays and touch fields. The electronics may overheat.
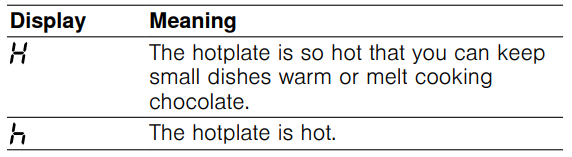
Residual Heat Indicator
The hob has a two-stage residual heat indicator for each hotplate. Do not touch the hotplate while the residual heat indicator is lit up.
Installation instructions
Observe this information when installing the appliance. Follow these safety instructions when installing the appliance.
- Electrical connections must only be carried out by licensed specialist staff.
- An incorrect connection will invalidate the warranty.
- The installer shall be liable for any damage resulting from incorrect installation.
- The safe operation of this appliance can only be guaranteed if it has been installed to a professional standard in accordance with these installation instructions.
Built-under
Do not install refrigerators, dishwashers, non-ventilated ovens or washing machines underneath the appliance.
- If you fit an oven below the appliance, the worktop must be at least 20 mm thick, in certain cases even thicker. Observe the information in the oven installation instructions.
- Make sure that projecting parts such as the mains housing or the mains cable do not collide, e.g. with a drawer.
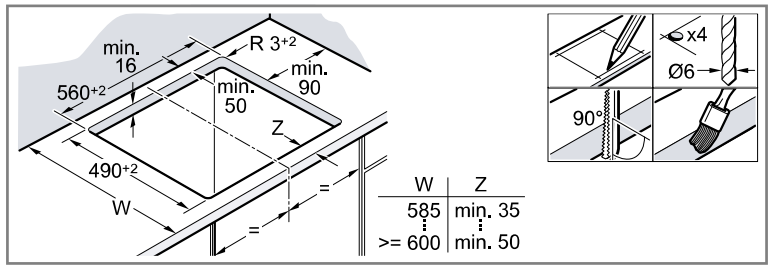
Preparing the units
The worktop must be level, horizontal and stable.
- The fitted units, including wall finishing strips, must be heat-resistant to at least 90 °C.
- Niche cladding within 50 mm of the back wall must not be combustible (e.g. tiles, stone).
- Seal the cut surfaces to make them heat-resistant.
- This prevents the worktop from swelling as a result of moisture.

Electrical Connection
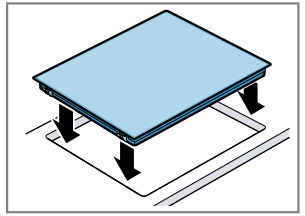
To protect the device, only remove the device from the styrofoam shells when you press the device into the cutout. Never place the device upright on one side of the device.
- Check the household wiring before connecting the appliance.
- If it appears on the appliance’s display, it has not been connected correctly.
- Disconnect the appliance from the mains and check the connection.
- If required, install the enclosed copper bridges.
- The power cable must correspond to type H05 VV-F or a higher rating.
- Use the current load to determine which wire cross-section you require.
- A cross-section of < 1.5 mm² is not permitted.
- The appliance fulfils the requirements of protection class I and must only be operated in conjunction with an earth conductor. In the permanent electrical installation, a partition must be provided in the phases in accordance with the installation regulations.
Connecting with a pre-installed 5-wire power cable
The power cable must only be replaced by trained customer service personnel.
Installing the hob
- Do not trap the power cable, and do not route it over sharp edges.
- If the oven is a built-in type, route the cable along the rear corners of the oven to the mains .socket

- The hob can also be installed in an existing cut-out that has a depth of 500 mm.
- It must protrude by the same distance at the front and the rear.
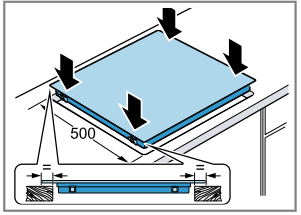 Removing the hob
- Disconnect the appliance from the power supply.
- Push out the hob from below.
Operation
Switching the hob on or off
The main switch is used to switch the hob on and off. If you switch the appliance back on again within 4 seconds after switching off, the hob will start up with the previously stored settings.
Switching on/off
- Touch. The light bar above lights up brightly.
- The displays for the controls and the heat setting display light up. The hob is ready for use.
- Touch. The indicator lamp above goes out. The displays go out. All hotplates are switched off.
- The residual heat indicator remains on until the hotplates have cooled down sufficiently.
Setting the Hotplates
To set a hotplate, it has to be selected. Select the required heat setting on the control panel.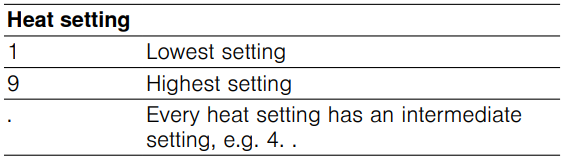
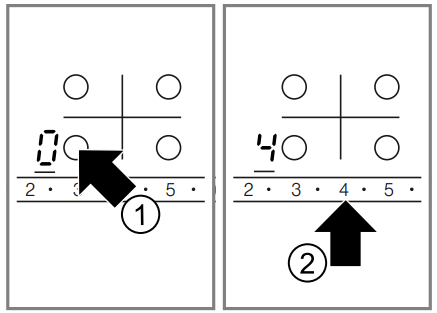
If you have switched off a hotplate, the residual heat indicator appears after approx 10 seconds.
Cooking Settings
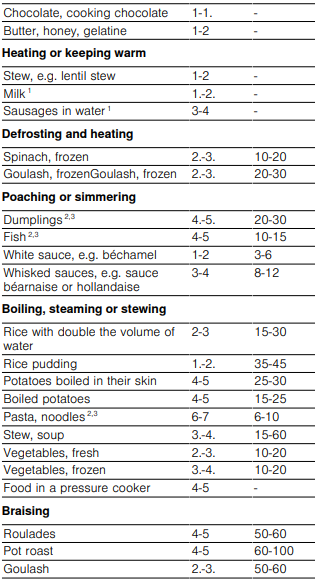
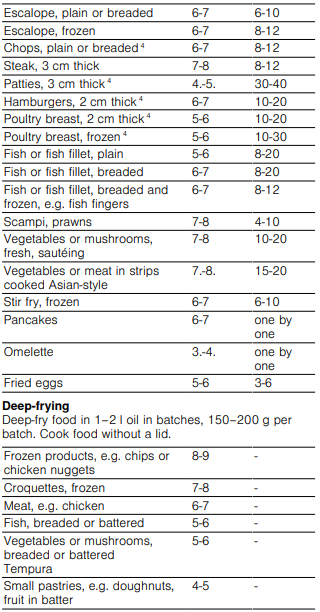
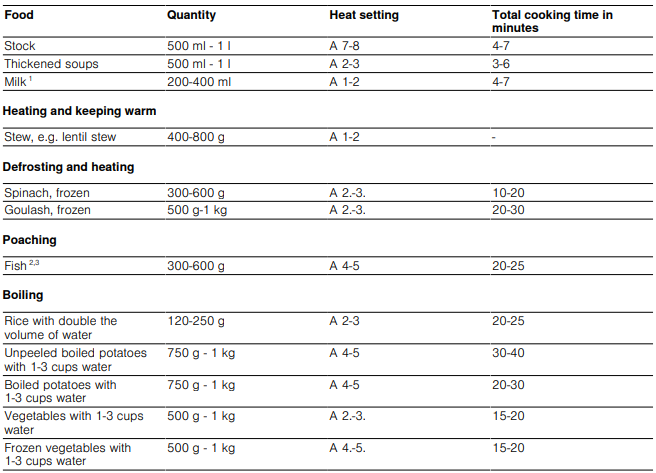
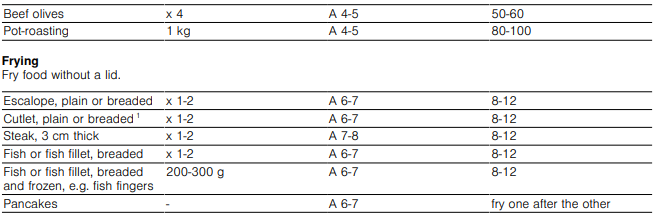
You can find an overview of different foods with appropriate power levels here. The cooking time varies depending on the type, weight, thickness and quality of the food. The ongoing power level depends on the cookware used.
- To bring food to a boil, use the heat setting 9. Stir thick liquids occasionally.
- Food that needs to be seared quickly or that initially loses a lot of liquid during frying should be fried in small portions.
Melting
Frying with little oil
Electronic Boil Start Control
The electronic boil start control heats the hotplate using the highest heat setting and then switches down to the ongoing cooking setting you have selected. The time taken for the hotplate to heat up depends on the ongoing cooking setting selected. The values given here are guidelines. The smaller quantities given are for the smaller hotplates and the larger ones for the larger hotplates.
Cooking Tips
- Electronic boil start control is designed for cooking with little water.
- This function is not suitable for food cooked in a lot of water, e.g. pasta.
- Cover the saucepan with a lid. Stir thick liquids occasionally.
- Add max. 3 cups of water to the food when cooking on large hotplates or max. 2 cups of water on small hotplates.
Stewing
Childproof Lock
You can use the childproof lock to prevent children from switching on the hob.
Activating the childproof lock
- Requirement: The hob is switched off.
- Press and hold for approx. 4 seconds.
- The indicator lamp above lights up for 10 seconds.
- The hob is now locked.
Deactivating the childproof lock
- Deactivating the childproof lock.
- Press and hold for approx. 4 seconds.
- The lock is now released.
Automatic childproof lock
- This function automatically activates the childproof lock when you switch off the hob.
- The automatic childproof lock can be activated in the basic settings
Automatic Switch-Off
When the hotplate switches off depends on the heat setting selected (1 to 10 hours). Touch any touch field. The display goes out. Reset.
Wipe protection
Your hob has a wipe protection function to prevent this. You can switch the hob off at any time. Touch. A signal sounds. The indicator lamp above lights up.
Settings
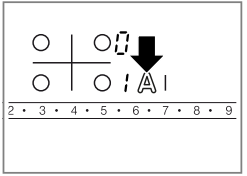
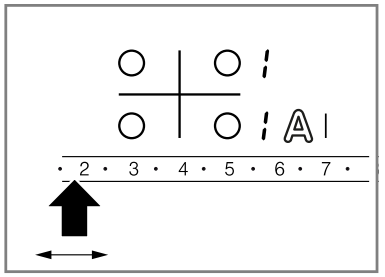
You can configure the basic settings for your appliance to meet your needs. You can find an overview of the basic settings and the default factory settings here.
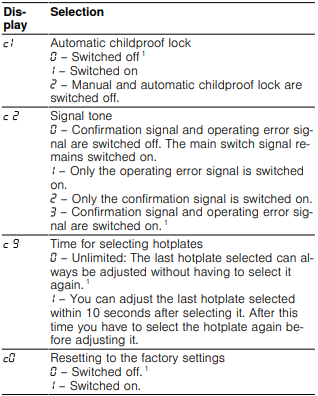
Requirement: The hob is switched off.
- Switch on the hob.
- Within the next 10 seconds, press and hold for approx. 4 seconds.

- Repeatedly touch until the required indicator appears on the lower display.
- Set the required value on the control panel.

- Press and hold for 4 seconds. The setting is activated.
Cleaning and Servicing
To keep your appliance working efficiently for a long time, it is important to clean and maintain it carefully
Cleaning products
You can obtain suitable cleaning products and glass scrapers from customer service, the online shop or a retailer. Inappropriate cleaning products may damage the surfaces of the appliance. Never use unsuitable cleaning products.
Unsuitable Products
- Undiluted detergent
- Detergent intended for dishwashers
- Abrasive cleaners
- Aggressive cleaning products, such as oven spray or stain remover
- Abrasive sponges
- High-pressure or steam jet cleaners
Cleaning the glass ceramic
Clean the hob after every use to stop cooking residues from getting burnt on.
- Remove heavy soiling using a glass scraper.
- Clean the hob with a cleaning product for glass ceramic.
- Follow the cleaning instructions on the product packaging.
Troubleshooting
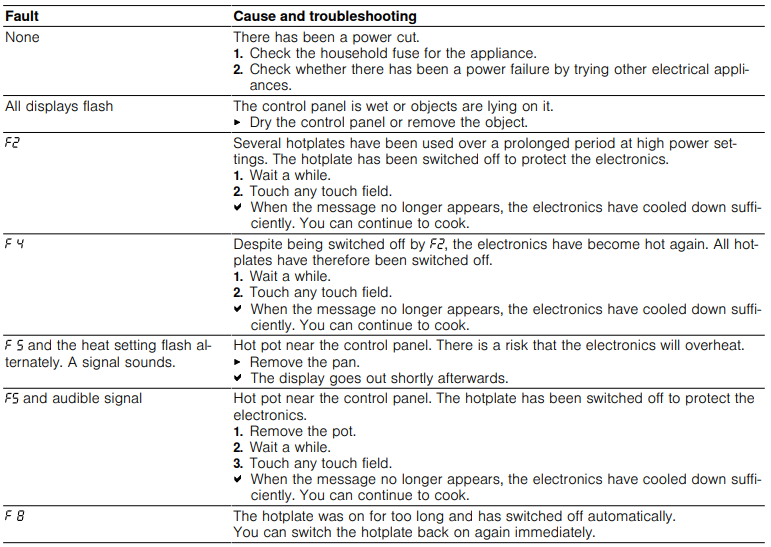
You can rectify minor faults on your appliance yourself. Read the troubleshooting information before contacting after-sales service. This will avoid unnecessary costs.
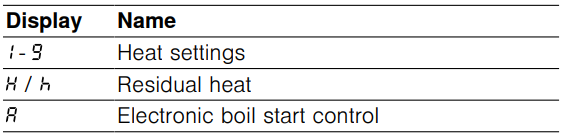
Information on the display panel
Only for EU countries
Use the designated collection systems. If disposed of incorrectly, waste electrical and electronic equipment may have harmful effects on the environment and human health, due to the potential presence of hazardous substances.
Battery packs/batteries
Please observe the notes in the section on transport. Unscrew the screws on the housing and remove the housing shell in order to remove the battery. To prevent a short circuit, disconnect the connectors on the battery one at a time and then isolate the poles.
Disposal
- Unplug the appliance from the mains.
- Cut through the power cord.
- Close the main gas tap.
- Dispose of the appliance in an environmentally friendly manner.
Information about current disposal methods is available from your specialist dealer or local authority. The guideline determines the framework for the return and recycling of used appliances as applicable throughout the EU.
Customer Service
- Website: www.bosch-home.com/welcome
- Timings: Monday to Friday 8 am to 8 pm,
- Ph: +49 (0)89 69 339 339