


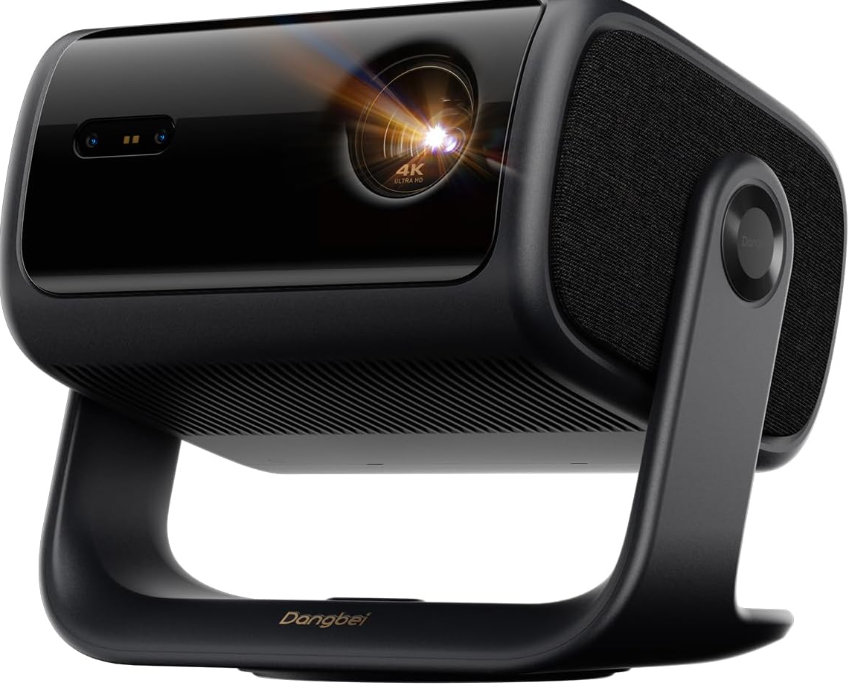
Dangbei MP1 Max Home and Portable Projectors
Safety Instructions
Please read the product instructions carefully. Thank you for purchasing and using these products. For your safety and interests, please read the Product Instructions carefully before using the product. About the Product Instructions:
- As with any bright source, do not stare into the direct beam, RG2 IEC 62471-5:2015.
- Keep away from humidity, exposure, high temperature, low pressure, and magnetic environments.
- Do not place the device in areas susceptible to excessive dust and dirt.
- Do not allow children to handle the device without supervision.
- Please use the correct type of battery for the remote control.
- Place and use the device in a 5-35°C environment.
- The metal casing is coated with insulating paint.
- The plug is considered a disconnected device from the adapter.
- The adapter should be installed near the equipment and should be easily accessible.
- Unplug this device if there are lightning storms or when unused for a long period of time.
Packing List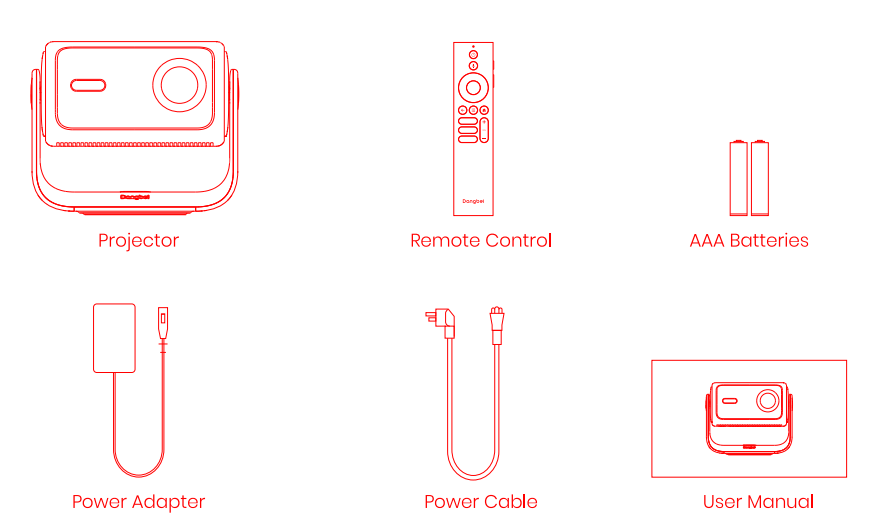
Before using this product, please check that all items are included in the box.
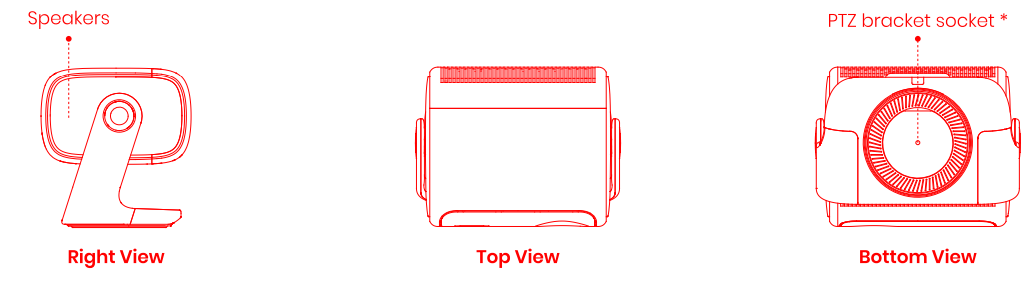
Projector Overview
Overview and interface description.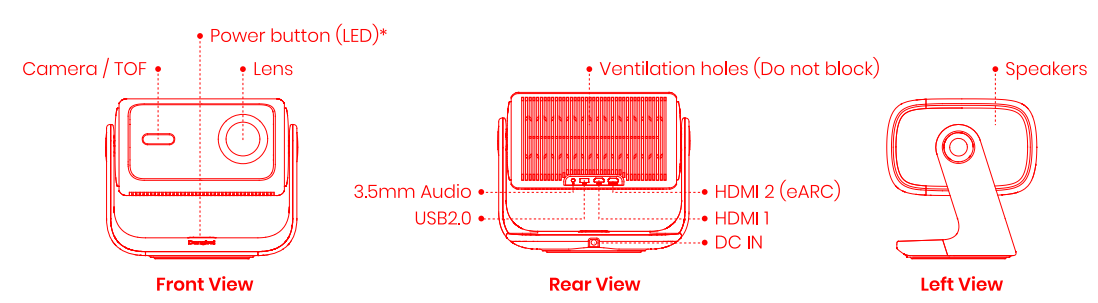

Remote Control Overview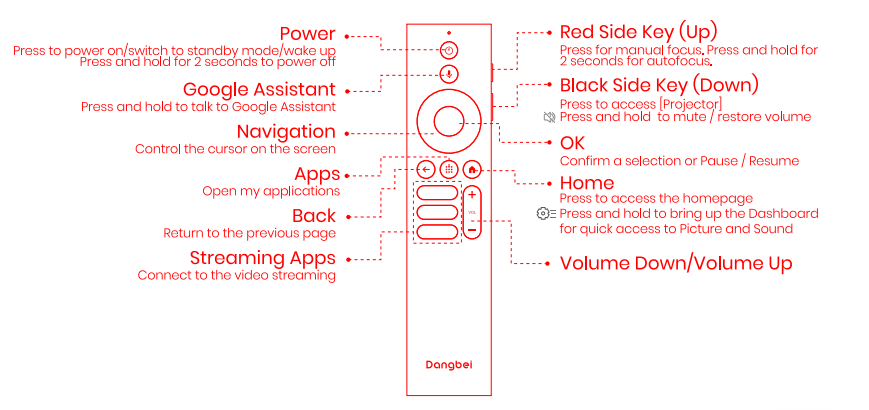
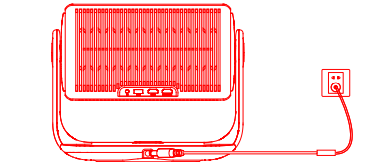
- Open the battery compartment cover of the remote control.
- Put back the battery compartment cover.
Getting Started
Placement
Position the projector on a stable, flat surface in front of the projection surface. A flat and white projection surface is recommended.
Power on
- Connect the projector to the power outlet.

- Press the power button on the projector or remote control to turn on the projector. 20 3. Standby Mode Power off

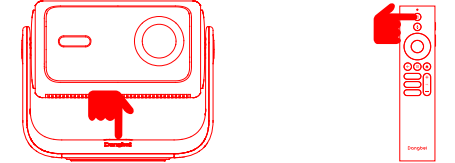
Press the power button on the projector or remote control to enter standby mode.
Press and hold the power button on the projector or remote control for 2 seconds to turn off the projector.
Standby Mode / Power off
Press the power button on the projector or remote control to enter standby mode. Press and hold the power button on the projector or remote control for 2 seconds to turn off the projector.
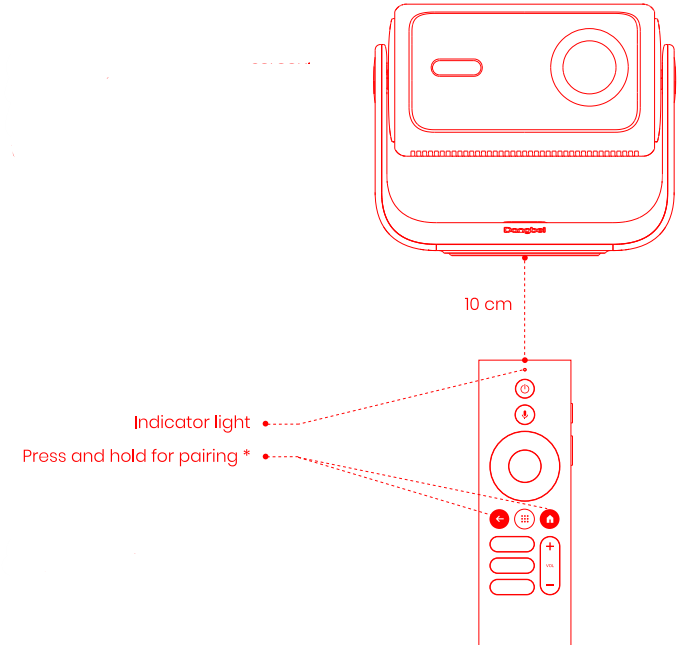
Remote Control Pairing
- Turn on the projector and wait for the Bluetooth pairing prompt on the screen.
- Bring the remote control within 10 cm / 0.33 ft of the projector.
- Simultaneously press and hold the © and © keys.
- Release the keys after the indicator light starts flashing.
- Wait until you hear two “beep” sounds, indicating a successful pairing.
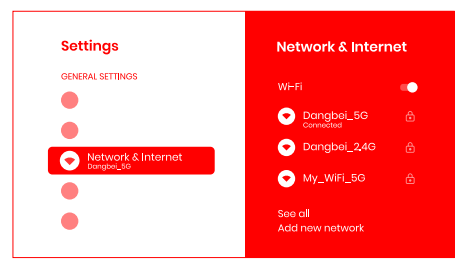
Network Settings
Go to[(Settings], select [Network & Internet], and choose Wi-Fi.
To activate Wi-Fi
- Toggle the Wi-Fi switch to On.
- Select the desired Wi-Fi network from the list.
- Enter the correct password and confirm.
To deactivate Wi-Fi
- Toggle the Wi-Fi switch to Off.

Focus Settings
Method 1: Press the red side key (up) for manual focus. Press and hold for 2 seconds for autofocus. Method 2: Go to [Projector], select [Focus], and choose either manual focus or autofocus.
Autofocus
- Select [Auto Focus] to trigger the autofocus function.
- The image will automatically become clear.
Manual focus
Select [Manual Focus] and use the navigation keys (up/down) on the remote control to adjust the focus distance and make the image clear.
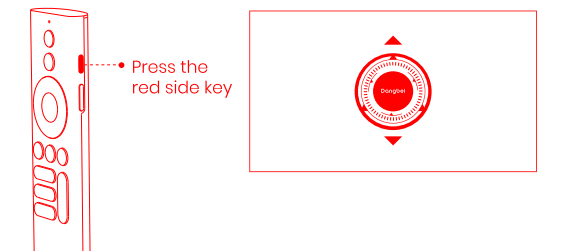
Image Correction Settings
Keystone Correction
- Go to Projector – [Image Correction]
- Select [Auto Keystone Correction], and the screen will automatically be corrected.
Intelligent Screen Fit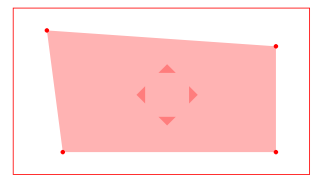
- Go to Projector] — [Image Correction], and turn on [Fit to Screen].
- Follow the on-screen instructions to automatically adjust the projected image to fit the screen.
Intelligent Obstacle Avoidance
- Go to [Projector] – [Image Correction] – [Advanced], and turn on [Avoid Obstacles].
- Follow the on-screen instructions to automatically adjust the projected image to avoid any objects on the projection surface.
Bluetooth Speaker Mode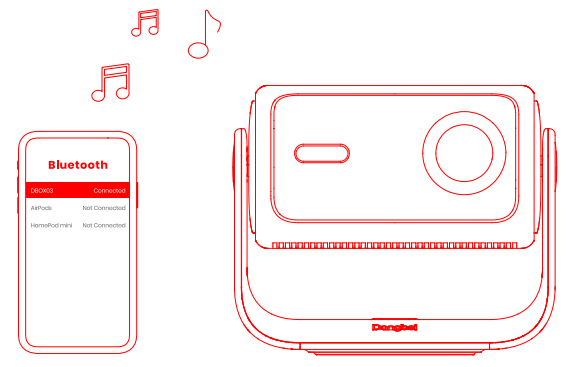
- Go to [Settings], select [Projector, and click on Bluetooth speaker mode.
- When you hear “Bluetooth connection successful”, the projector can play music from your phone.
- Press and hold the key on the remote control for 2 seconds to exit the Bluetooth speaker mode.
Google Assistant
Your TV is more helpful than ever. Use your voice to find movies, stream apps, play music, nd control the TV. Ask Google Assistant to find a specific title, search by genre, or get personalized recommendations. Get answers on screen, control smart home devices, and more. Press the Google Assistant button on the remote to get started.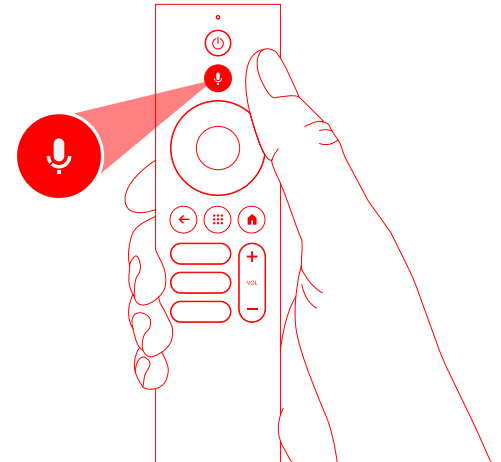
Google Cast™
Easily cast your favorite movies, music, and more to your TV with Google Cast. To cast in-app content:
- Simply tap the Cast button from apps you already know and love.
- No new logins or downloads required.
- Connect your device and the projector to the same wireless network.
- Open the streaming app on your device.
- Play a video and tap the Cast button on the video screen.
Screen Mirroring
- You can project the entire screen from your device to the projector.
To cast the device screen: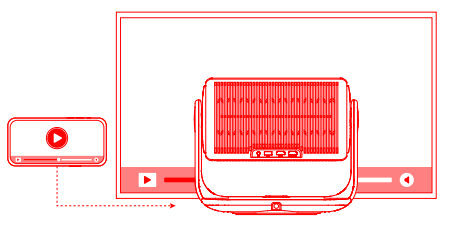
- Ensure that both your device and the projector are connected to the same wireless network.
- Install the AirScreen app on the projector.
- Open the AirScreen app and follow the on-screen instructions to complete the process.
Inputs
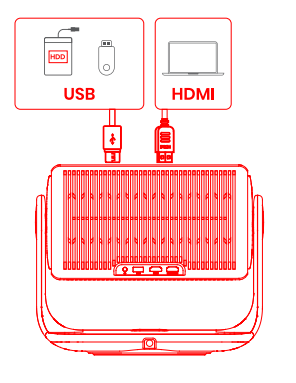
HDMI
- Insert the HDMI device into the HDMI port. Go to [Input], select the HDMI option.
USB Drive
- Download the File Explorer app from Google Play. Insert a USB-A drive into the USB port.
- Open the app and find the USB drive, select the content that you want to play.
- USB format supported: FAT32, NTFS
More Settings
- Projection Mode Go to [Settings] — [Projector)– [Advanced Settings] — [Projection Model to choose the placement method of the projector.
- Zoom Go to [Settings] — [Projector) — (Image Correction] – [Image Adaption] to decrease the image size from 100% to 50%.
- 3D Mode After playing the video, press and hold the Home button, and a dashboard appears in the upper right corner of the screen.
- On the dashboard, go to [Picture] – (3D Mode], according to the format of the 3D video, select the corresponding 3D option.
- System & Product Info: Go to [Settings] — [System] — [About] to check the System & Product information.
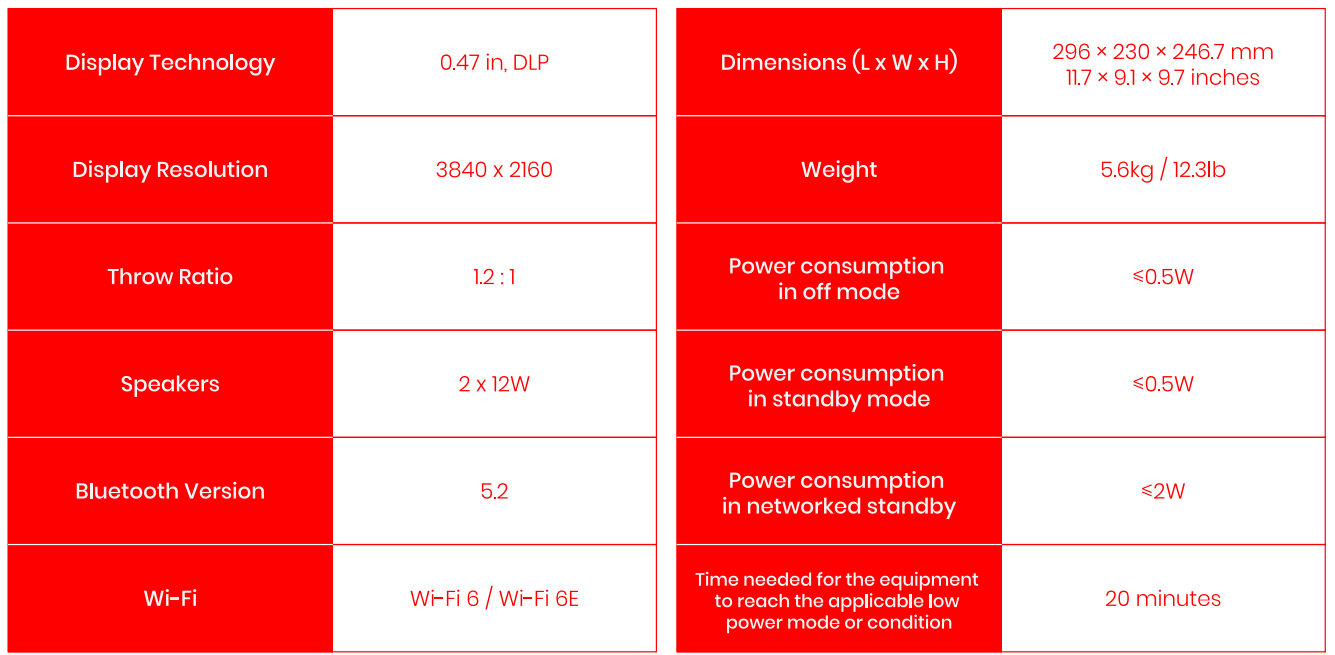
Specifications
Troubleshooting
- No audio output/No image output
- Press the power button located on the projector stand.
- Ensure that the power adaptor has a power output.
- No network
- Enter settings, and check the network connection status in the network option.
- Ensure that the router is correctly configured.
- Blurry Image
- Adjust the focus.
- The projector and screen/wall must be positioned at an effective distance.
- on-rectangular Image
- Use the keystone correction function to adjust the display.
- Automatic keystone correction failed
- Ensure that the Camera/TOF on the front panel is not blocked or dirty.
- The best automatic keystone correction distance is 2.0-4.0m, horizontal +30°.
- Autofocus failure
- Ensure that the Camera/TOF on the front panel is not blocked or dirty.
- The best autofocus distance is 2.0-4.0m, horizontal $20°.
- Smart Eye Protection failed
- Ensure that the Camera/TOF on the front panel is not blocked or dirty
- The optimal sensing range is centered on the image.
- Being too close to the edges may cause the eye protection feature not to trigger.
- Intelligent Screen Fit failure
- Ensure that the projection screen has a colored border/frame on all four sides, so that the projector can recognize the frame.
FCC Statement
This equipment generates and uses radio frequency energy. However, there is no guarantee that interference will not occur in a particular installation.
- Reorient or relocate the receiving antenna.
- Consult the dealer or an experienced radio/TV technician for help.
This device contains licence-exempt transmitter(s)/receivers) that comply with Innovation, Science and Economic Development Canada’s licence-exempt RSS(s). Operation is subject to the following two conditions:
- This device may not cause interference.
- This device must accept any interference, including interference that may cause.
- For projectors only, the distance between the user and the products should be no less than 20cm.
Indoor Client 6XD statement
FCC regulations restrict the operation of this device to indoor use only. The device will only associate and connect with a low-power indoor access point or subordinate device and never directly connect to other client devices. The device will always initiate transmission under the control of a low-power indoor AP or subordinate, except for brief transmissions before joining, the transmissions will be lower than or equal to the power advertised by the indoor low-power access point or subordinate, and never above the maximum output power allowed by the FCC grant for equipment class 6XD. Prohibited for control of or communications with unmanned aircraft systems, including drones.
IC Wi-Fi 6E Statement
Provision of accurate device information is mandatory. The user manual shall also include instructions for the installer or user to input the antenna height as part of device registration.
Customer Support
- Website: https://us.dangbei.com/
- Address:
- North America: 3400 CAPITOL BLVD. SE, SUITE 101, TUMWATER, Washington 98501-3351 United States
- Headquarters: Rm. 207, Blk. C, Bldg. 3, No. 228, Binkang Rd., Xixing St., Binjiang Dist. HANGZHOU, Zhejiang, China