


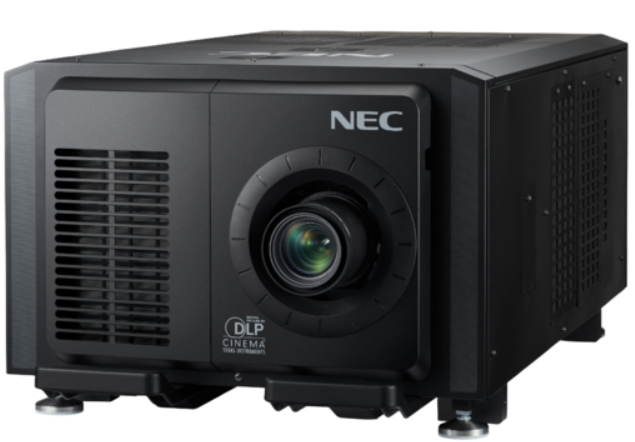
 NEC NP-02HD DLP Cinema Projector
Safety Instructions
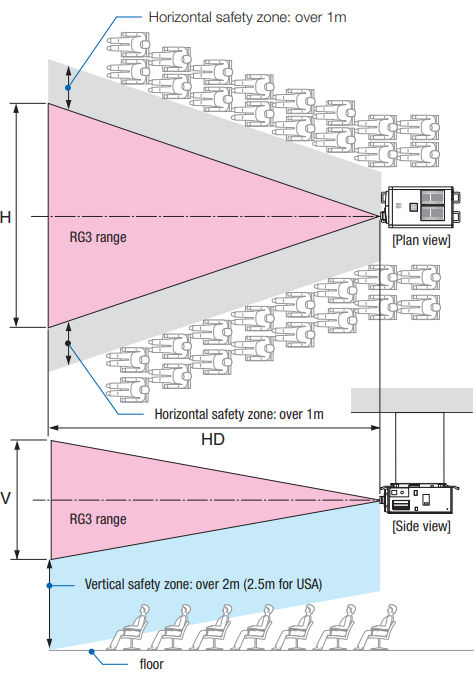
This product is classified as Class 1 of IEC 60825-1, Third edition 2014. This product is classified as RG3 of IEC/EN 62471-5 First edition 2015.
- Do not point the projection beam toward other people or reflective objects.
- Consult your dealer for information about transporting and installing the projector.
- Do not attempt to transport and install the projector yourself.
- Place the projector on a flat, level surface in a dry area away from dust and moisture.
- Tilting the front of the projector up or down from level could reduce laser life.
- Do not put the projector on its side when the laser is on. Doing so may cause damage to the projector.
- Do not place the projector in direct sunlight, near heaters, or heat-radiating appliances.
- Exposure to direct sunlight, smoke, or steam could harm internal components.
- Handle your projector carefully. Dropping or jarring your projector could damage internal components.
- When moving the projector, be sure to remove the lens from the projector before moving it.
Installation Features
- DLP Cinema® projector complies with the strict projection standards defined by the Digital Cinema Initiatives (DCI) industry group in the United States using the leading imaging technology of NEC. It also supports 3D projection and high frame rates (HFR).
- Employs a long-life laser light source. The projector employs a newly developed laser light source offering excellent reliability and redundancy. Since the laser light source has a long life (approx. 30,000 hours), this delivers low-cost operation by removing the need for maintenance such as replacing and adjusting the light module over extended periods of time. Furthermore, it reduces the risk of the light source suddenly shutting off and leaving a black screen.
- Delivers reduced installation space and increased freedom through a more compact and lightweightbody The use of a 0.98″ DLP cinema chip together with integration of the light module into the projector main unit both delivers a reduced installation area as well as improving the degree of freedom of installation, such as removing the need to connect to external ventilation ducting and supporting both pedestal-mounted and ceiling suspended installation.
Functions
- This makes it possible to project using preconfigured settings simply by selecting the signal when projecting multiple different input signals, each with a different screen size and brightness settings (Refer to “6-8. Related products list” for details on the lenses that support the lens memory function).
- Built-in automatic adjustment function that makes the brightness and color of the light source uniform.
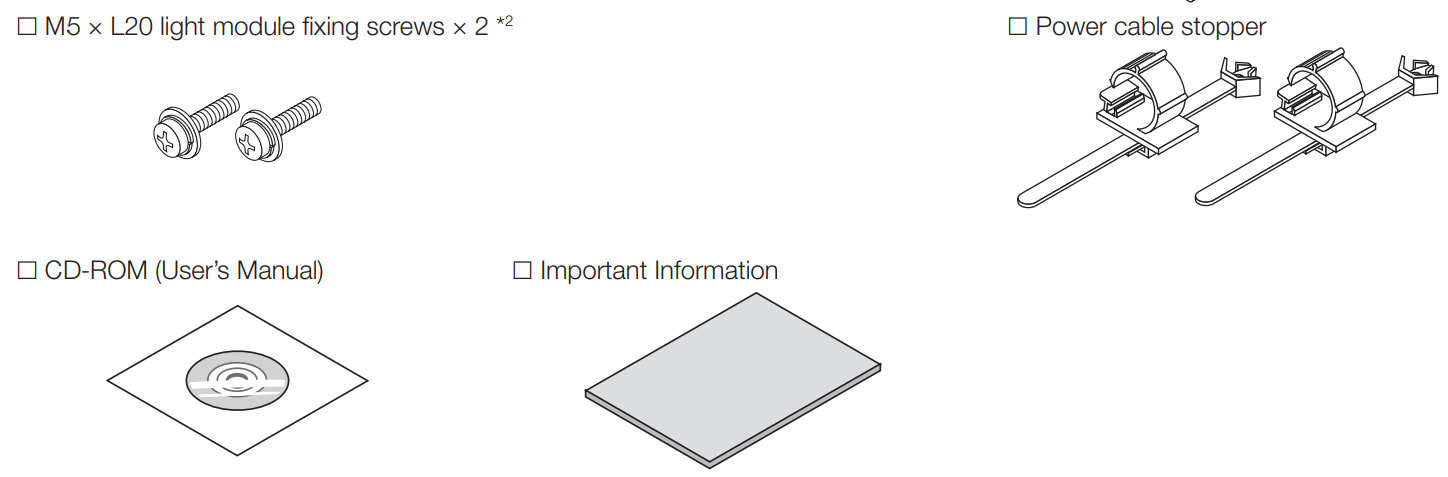
What’s in the Box
Projector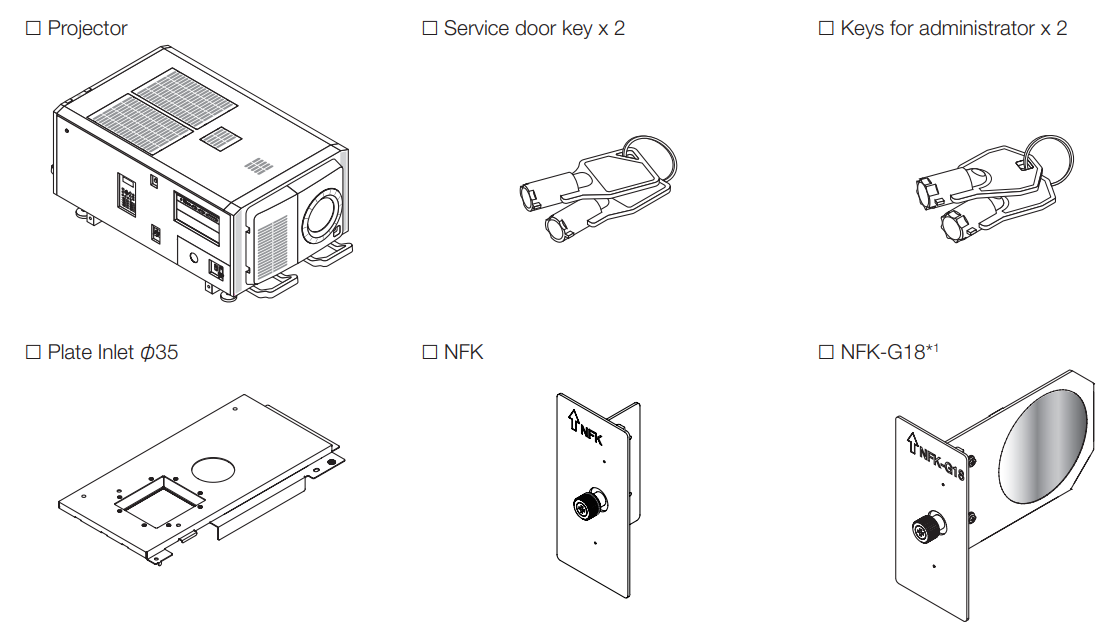
Front of the projector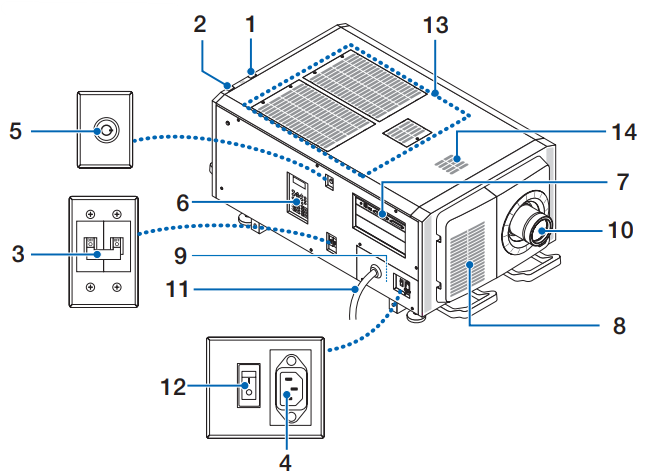
- LIGHT status indicator
Displays the status of the light source. The indicators turn on when the light source is on and turn off when the light source is off. - SYSTEM status indicator
These indicate the status of the projector. When the projector is operating normally, these lights/blink in green or orange. - AC input
Connects to the AC power cable. The AC power cable is not an accessory. - Connection terminals
Various image signal cables are to be connected here. You can expand signal input terminals by installing the optional board. - Air intake
These are air intake ports for introducing external air to reduce the temperature inside the projector. - Exhaust port
The heat inside the projector is expelled from here. Do not block the port.
Rear of the projector
- Air inlet
The air inlet for cooling inside the projector. Do not cover. - Buzzer (inside rear of projector)
The buzzer rings when the power is turned on or an error has occurred. - Air outlet
The air outlet to exhaust heat inside the projector. Do not cover. - Notch filter cover
Remove the cover when installing the notch filter.
Bottom of the projector
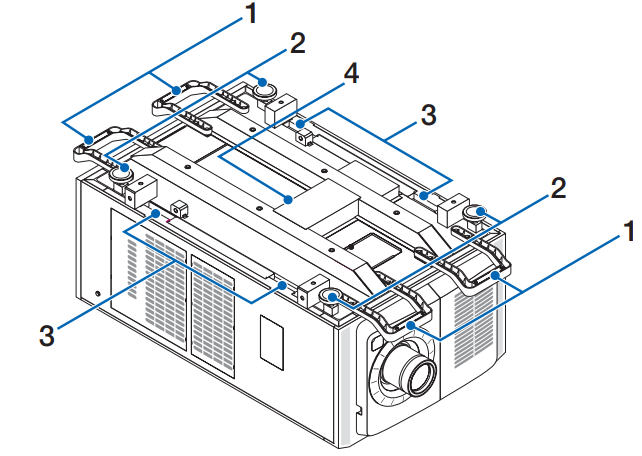
- Handle (4 locations)
Handles for moving the projector. - Level adjusters (in 4 positions)
In the ordinary installation, you can adjust the projector inclination at 4 positions. - Grips
These grips are used when moving the projector. - Exhaust port
The heat inside the projector is expelled from here. Do not block the port.
Connection Terminals

- Service terminal (REMOTE) (Stereo mini)
This terminal is used for service purposes only. - Ethernet port (LAN) (RJ-45)
The port for interfacing with an image signal server or controlling the projector from a PC via a network. - USB port (USB) (type A)
The port for the projector maintenance. - PC control terminal (RS-232) (D-sub 9P)
The terminal for operating the projector from a PC via an RS-232C or for service personnel to set data for the projector. - 3D terminal (3D) (D-sub 15P)
The terminal for connecting a 3D image system to the projector. (See page 80) - External control terminal (GP I/O) (D-sub 37P)
The terminal for externally controlling the projector or connecting a 3D image system to the projector. (See page 75) - Slot
The slot is used for an image media block (IMB). Contact your dealer/distributor for an installation of IMB. Refer to the IMB instruction manual for details on IMB.
Control Panel
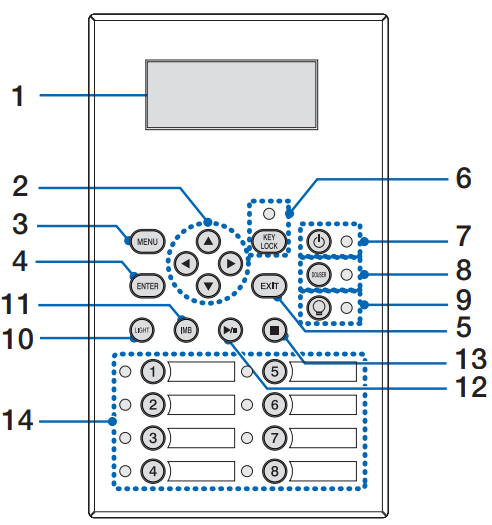
- LCD screen
The LCD screen displays menus and settings for the projector operations. - (UP/DOWN/LEFT/RIGHT) buttons
Press these buttons to select a menu item while a menu is displayed. - MENU button
Press this button to display the menu for various settings and adjustments. (See page 50) - ENTER button
Press this button to select the menu item. - EXIT button
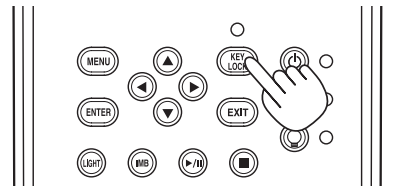
Press this button to return to the previous menu item. - KEY LOCK button
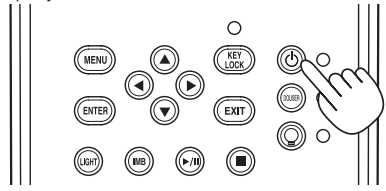
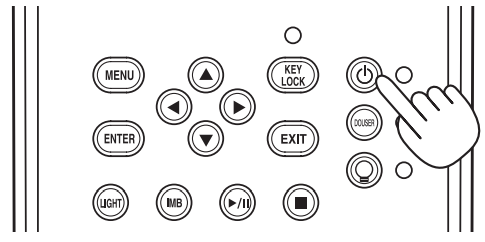
Buttons on the control panel do not function while KEY LOCK is on. - button (POWER button)
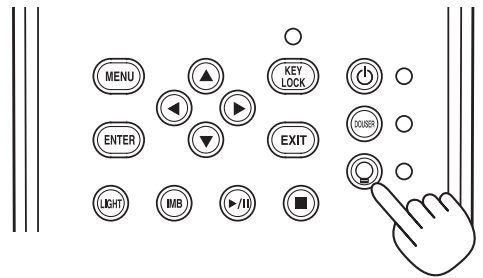
Press this button for more than three seconds to turn on or off (standby) the projector. - DOUSER button
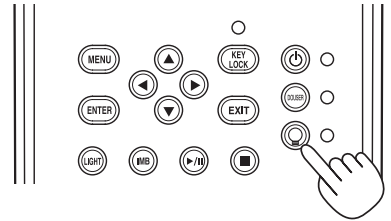
Press this button to open and close the door. - button (LIGHT ON/OFF button)
Press this button for five seconds or longer to turn on or off the light source while the projector is on. - LIGHT button
Press this button to display the light source adjustment menu. - IMB button (planned to be supported in a future update)
This button is operable when the media block is installed in the projector. - Play/pause button (planned to be supported in a future update)
This button is operable when the media block is installed in the projector. - Stop button (planned to be supported in a future update)
This button is operable when the media block is installed in the projector. - Preset buttons
Press the preset button to select a title (input signal) assigned to each button.
Installation and Connection
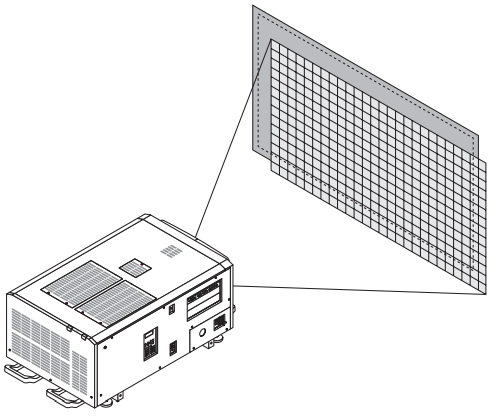
- Step 1
Set up the screen and projector. - Step 2
Connect the power cable to the projector. - Step 3
Connect cables to the image input terminals.
Connect cables to the various control terminals.
Connecting the Power Cable
Consult your dealer for installing the power cable to the projector. If AC power is supplied to the projector and light with one power cable (C1 connection), it is not necessary to connect the cable to the projector or the power supply. The power cable is not included with the projector. Use a power cable that meets the standards and power supply voltage of the country where you are using the projector. Ask your dealer for the power cable to select and purchase.
This completes the connection of the AC power supply cable. Attach the power cord stopper on the opposite side in the same way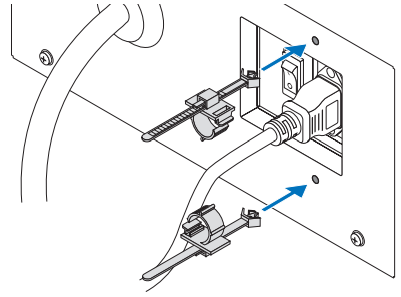
Pass the band through the slits in the power cord stoppers. Use the two bands to wrap the power cord from the left and right sides.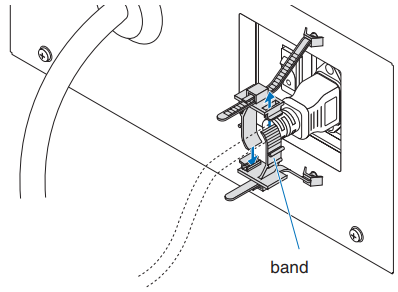
Slide the clamp unit to the base of the power cord. 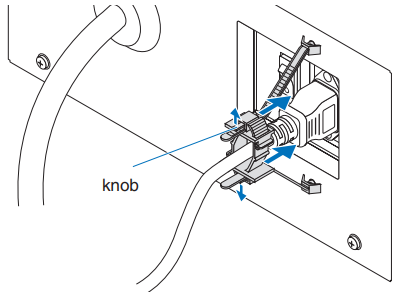
Pull the band to fasten the power cord. The position of the band can be adjusted by pulling the tab in the direction of the arrow.
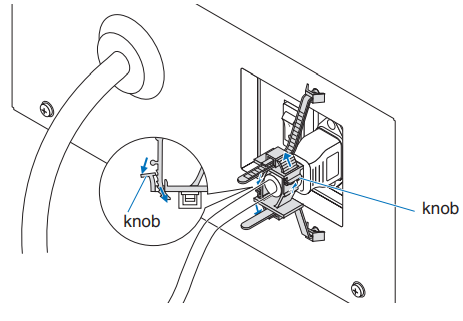
This completes the attachment of the power cable stopper. Pull the knob of each clamp to remove the two bands. 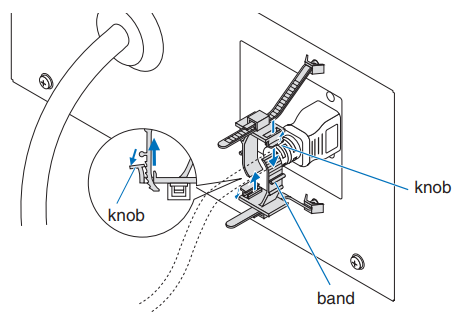
Image Input Terminals
The video input ports that can be used with the IMB are as follows. Refer to the instruction manual of the IMB for details on connecting the video input ports with external equipment.
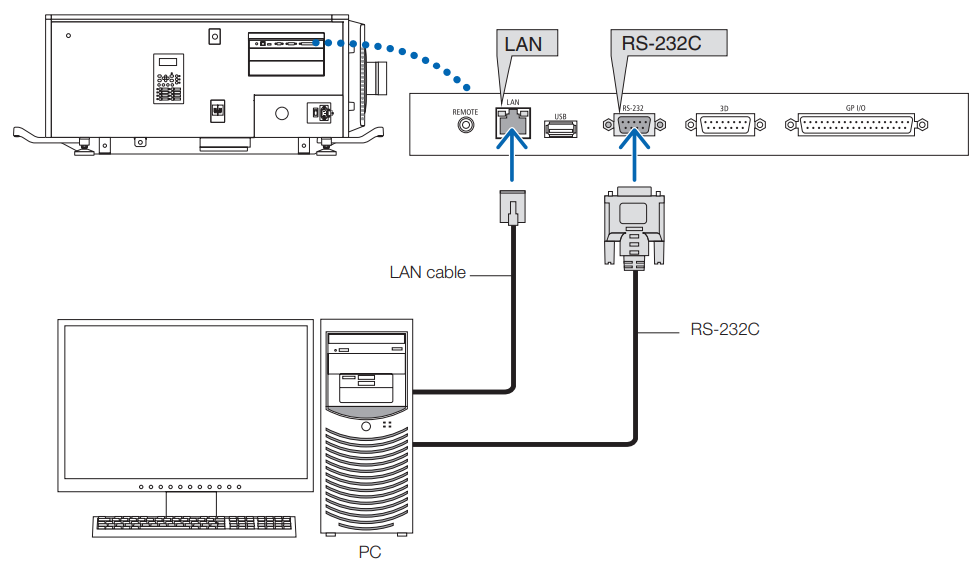
Connecting the various control terminals
For control, your projector comes with such ports as the PC control terminal and the Ethernet port (RJ-45).
- PC control terminal (RS-232) ——— Use this terminal when controlling the projector in a serial connection from a PC.
- LAN port (LAN)————————- Use this port when controlling the projector in a LAN connection from a PC.

Projection of Images
- Step 1
Turn on the power to the projector. (See page 34) - Step 2
Select the title of the input signal. (See page 36) - Step 3
Adjust the position and size of the projected screen. (See page 37) - Step 4
Turn off the power to the projector. (See page 43)
Turning your Projector On
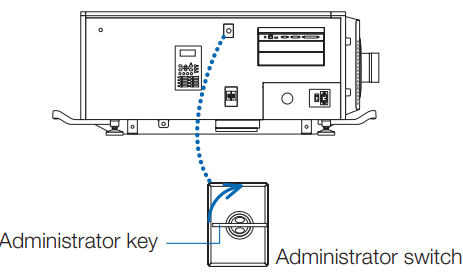
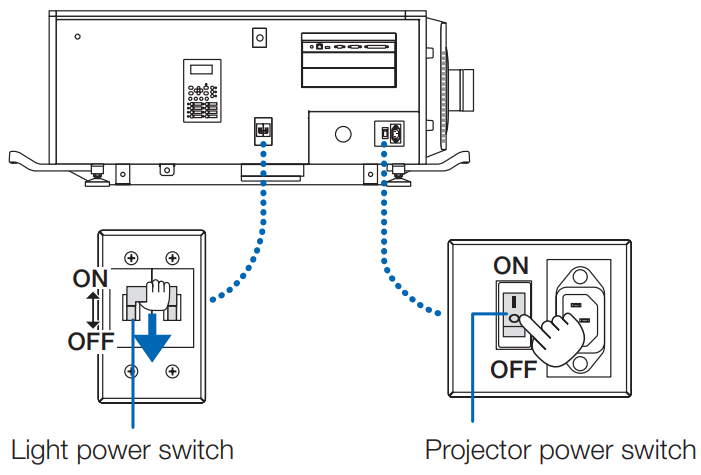
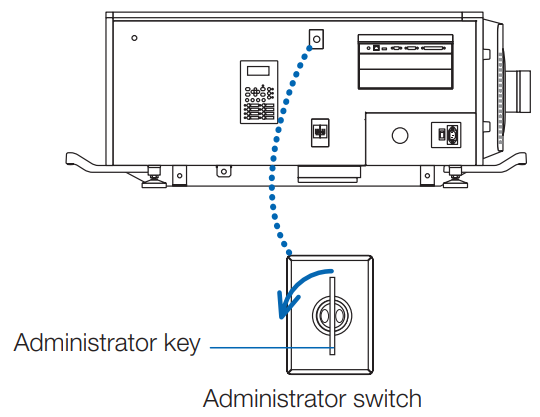
- Remove the lens cap. Insert the administrator key horizontally into the administrator switch and turn it clockwise to the vertical position.

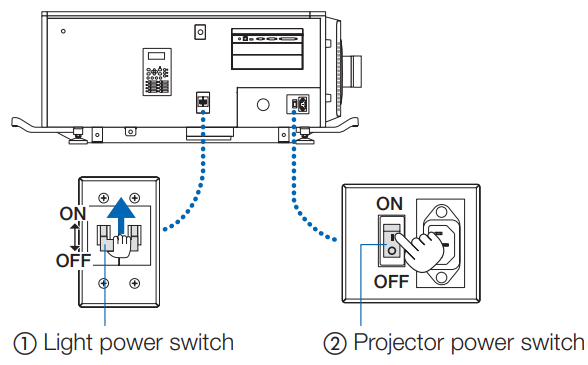
- Turn on the power switches on the side of the projector in this order: first the light power switch ( 1 ), then the projector power switch ( 2 ). A buzzer will ring on the projector.

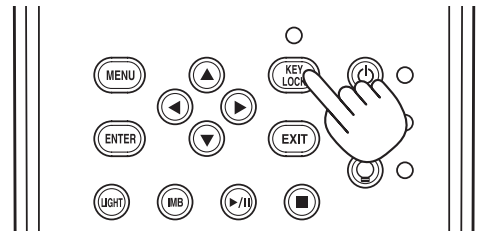
- If KEY LOCK is on, press the KEY LOCK button for one second or longer. The key lock turns off. The KEY LOCK button indicator turns off, and buttons on the control panel become operable. (See page 41)

- Press the POWER button on the control panel of your projector for three seconds or longer. Your projector is turned on.

- Press the LIGHT ON/OFF button on the control panel for three seconds or longer. The light source is turned on, and the screen glows light about 15 seconds later.

Input Signal
This projector allows you to select a pre-registered title (input signal) using the preset buttons on the control panel (up to 16 titles). Request your dealer/distributor for details on registering and changing titles. This section explains the steps for selecting registered titles.
- Turn on the power to the image devices connected to the projector.
- Press the MENU button.
- Press the LEFT/RIGHT button to display “Title Select” on the LCD screen.
- Press the DOWN button. The title of the input signal is displayed.
- When you have made a wrong selection, press the UP button.
Displaying the Test Pattern
- Press the MENU button, or select a test pattern from preset buttons (button <1> to <8>). If you register the test patterns to the preset buttons (<1> to <8> buttons), select the test pattern according to “3-3. Selecting the title of input signal (See page 36)”.

- Press the LEFT/RIGHT button to display “Title Select” on the LCD screen.
- Press the DOWN button. The title of the input signal is displayed.
- Press the LEFT/RIGHT button to display “TEST Pattern” on the LCD screen.
- Press the DOWN button. The LCD screen enters a mode that lets you select a test pattern.
- Press the LEFT/RIGHT button. This switches the test pattern name displayed on the LCD screen.
- Display the name of the test pattern to be projected on the LCD, then press the ENTER button.
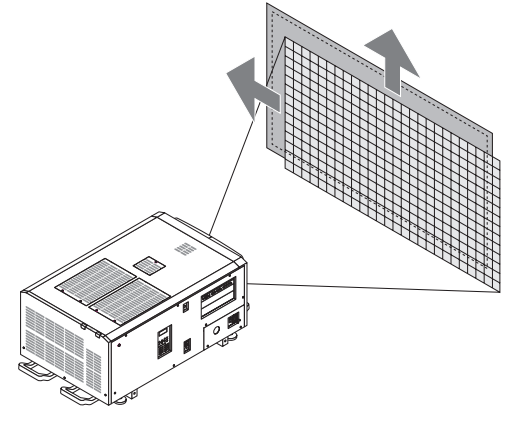
Adjusting the position of the projected screen
- Press the MENU button.
- Press the LEFT/RIGHT button to display “Configuration” on the LCD screen.
- Press the DOWN button.
- Press the LEFT/RIGHT button to display “Lens Control” on the LCD screen.
- Press the DOWN button. The screen (“Lens Position”) to adjust the position of the projected screen is displayed.
- Press the UP/DOWN/LEFT/RIGHT button. The position of the projected screen moves in the selected direction.

- Press the EXIT button when the adjustment is complete. The display will return to a menu one level above (where “Lens Control” is displayed).
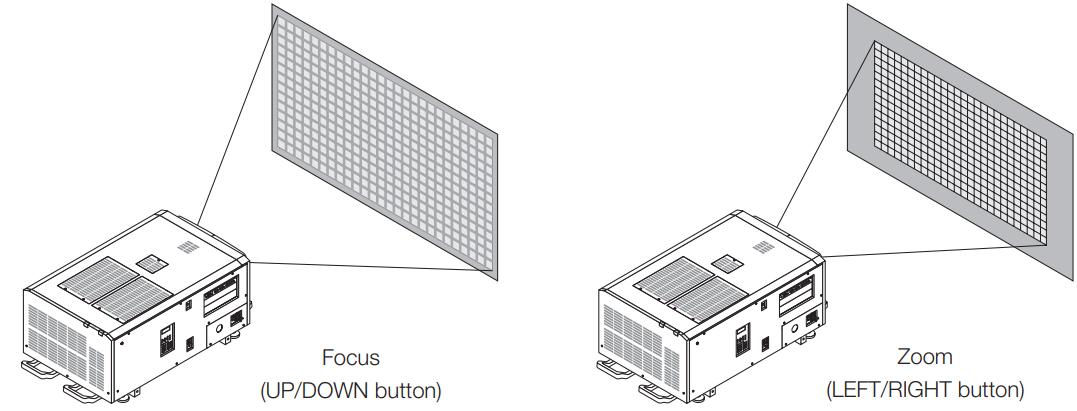
Adjustment of the size (zoom)
- Press the MENU button.
- Press the LEFT/RIGHT button to display “Configuration” on the LCD screen.
- Press the DOWN button.
- Press the LEFT/RIGHT button to display “Lens Control” on the LCD screen.
- Press the DOWN button. The screen (“Lens Position”) to adjust the position of the projected screen is displayed.
- Press the ENTER button. The screen to adjust the size and focus of the projected screen is displayed. Press the ENTER button to switch the display between “Lens Position” and “Focus Zoom” adjustments.
- Adjust the size and focus of the projected screen. Press the UP/DOWN button to adjust the focus. Press the LEFT/RIGHT button to adjust the size.

- Press the EXIT button when the adjustment is complete. The display will return to a menu one level above (where “Lens Control” is displayed).
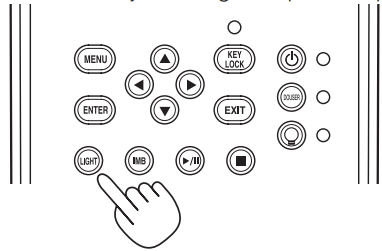
Adjusting the brightness (Light output)
- Press the LIGHT button. The screen to adjust the light output is displayed.

- Press the LEFT/RIGHT button to adjust the light output. The specified adjustment value is applied.

Preventing misoperations
Buttons on the control panel can be locked (KEY LOCK) to prevent misoperations. Buttons on the control panel do not function while KEY LOCK is on. The key lock must be off to operate these buttons.
KEY LOCK setting
-
-
- Press the KEY LOCK button on the control panel for one second or longer. The key lock becomes on. The KEY LOCK button indicator lights orange. When you press a button on the control panel of the projector while KEY LOCK is on, “Panel is Locked(KEY LOCK)” is displayed, and the button will not function. (See page 46)

- Press the KEY LOCK button for one second or longer while KEY LOCK is on. The key lock comes off. The KEY LOCK button indicator turns off.
- Press the KEY LOCK button on the control panel for one second or longer. The key lock becomes on. The KEY LOCK button indicator lights orange. When you press a button on the control panel of the projector while KEY LOCK is on, “Panel is Locked(KEY LOCK)” is displayed, and the button will not function. (See page 46)
-
Turning on/off the light
- Press the LIGHT ON/OFF button on the control panel for three seconds or longer.

- Press the LIGHT ON/OFF button on the control panel for three seconds or longer.
Turning your projector off
- Press the POWER button on the projector control panel for three seconds or longer. The light is turned off, the POWER button indicator blinks green, and the STATUS indicator blinks orange (cooling state). The fan will continue to rotate while cooling, and the amount of time remaining for cooling is displayed on the LCD screen. The cooling-off time is 90 seconds.


- Turn the administrator key counterclockwise to the horizontal position, then remove it.

- Shut off the AC power supply to the main unit from the circuit breaker, etc.
Basic operation with adjustment menus
To adjust the projector, display the menu on the LCD screen of the projector control panel.
Screen display
The menu display screen is composed of a menu display field (the upper two lines) and a setting item display field (the bottom two lines).
-
-
- Displays the main menu or submenus.
- Displays submenus or selection items.
- Displays settings and selection status.
- Displays settings, selected items, and information on selected menus.
-
The meanings of symbols in the menu display screen are outlined below. 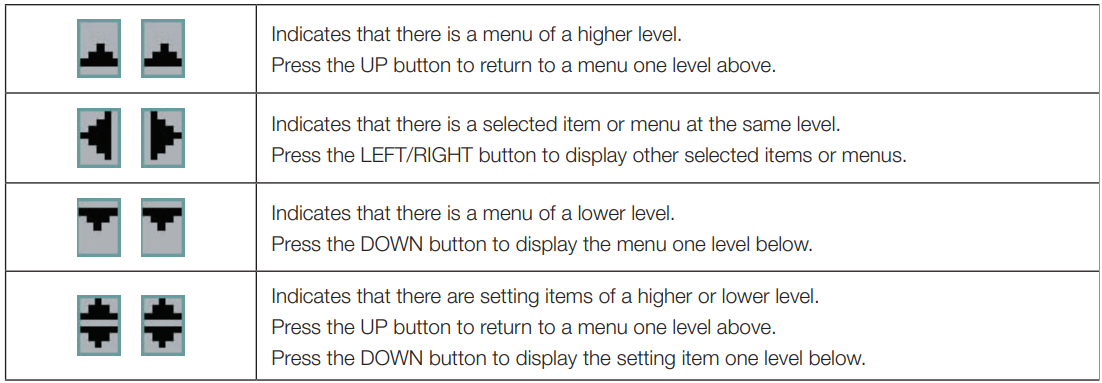
Operating menus
- Press the MENU button on the control panel of your projector. The menu is displayed on the LCD screen.
- Press the LEFT/RIGHT buttons to display “Information.” At each press of the LEFT/RIGHT buttons, the display will cycle as “Title Select” ←→ “Configuration” ←→ “(Title Setup)” ←→ “Information.”
- Press the DOWN button. To return to the previous state, press the UP button or the EXIT button.
- Press the LEFT/RIGHT button to select the submenu “Version.” At each press of the LEFT/RIGHT button, the display will cycle as “Light” ←→ “Lens Type” ←→ “Preset Button” ←→ “Usage” ←→ “Error Code” ←→ “Version” ←→ “IP Address” ←→ “Setup Date” ←→ “Option Status.”
- Press the LEFT/RIGHT button to select the submenu “Release Package.”
- Press the UP button several times. At each press of the UP button, the display will return to a menu one level above.
How to enter alphanumeric characters
Alphanumeric characters are entered for items, such as the log file of the specified period, which is written to USB memory. (See page 66) Characters can be entered by pressing the numeric buttons on the control panel of this projector.
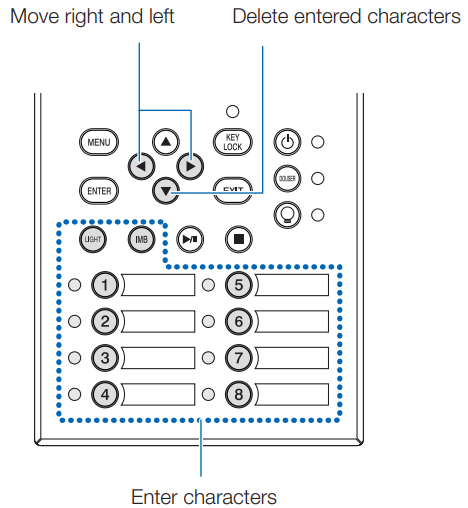
Characters can be entered by pressing each button as shown in the following table.
- To delete a character during entry, press the DOWN button.
Example of Entry
-
-
- Press the “8” button three times. V → W → X
- Press the RIGHT button.
- Press the “3” button. XG
- Press the RIGHT button.
- Press the “1” button. XGA
-
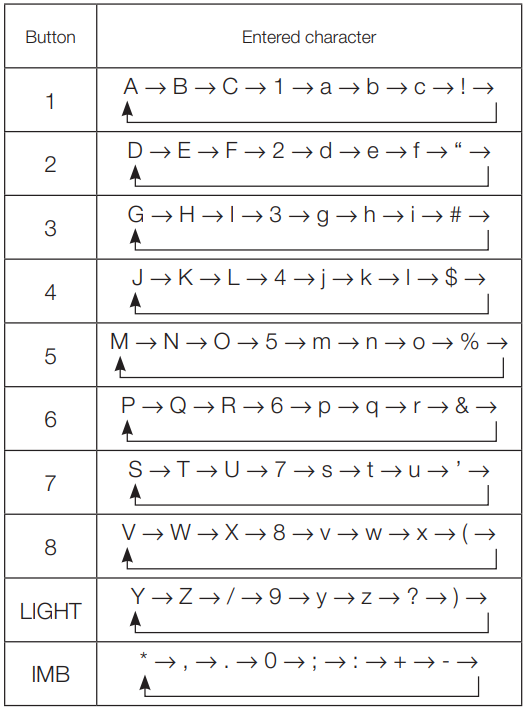
Table of adjustment menus
Menus in parentheses are menus for our service personnel. Normally, these menus cannot be used. 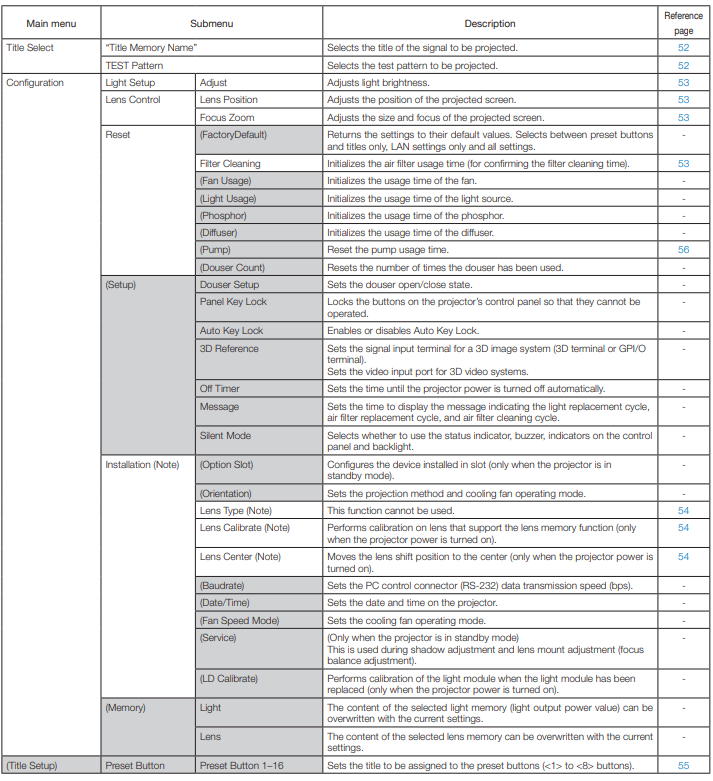
(Note) Requires logging into the projector with Advanced User or higher privileges.
Title select (Title Memory)
Selects the title of the signal to be projected. You can register up to 100 titles. You can also assign registered titles to the preset buttons (<1> to <8> buttons) on the projector’s control panel and call them up directly using those buttons. Request your dealer/distributor for details on registering and changing titles.
Test Pattern
Selects the test pattern to be projected. Please request your dealer/distributor to perform the settings.
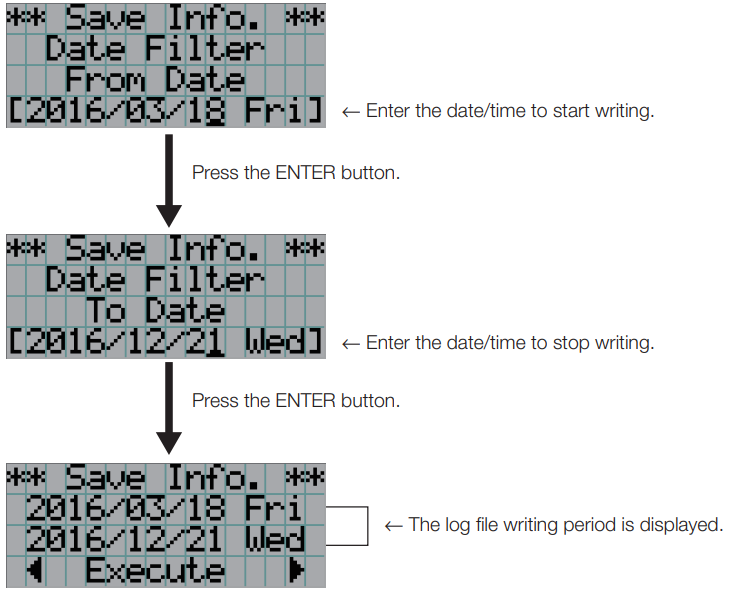
Light Setup
Adjust
Adjusts the light output (brightness).
-
-
- Displays the current output power value (%) when tlight’s rated output is 100%.
-
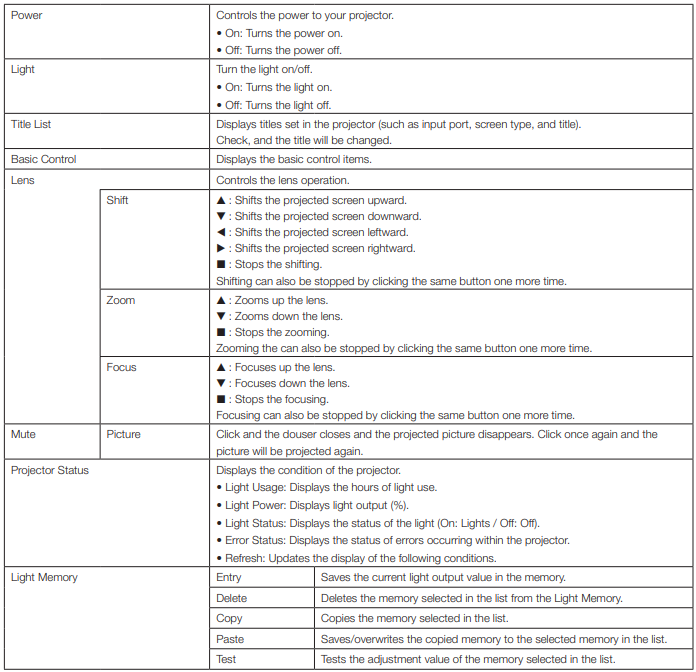
Lens Control
Adjust the position, size, and focus of the projected screen. Press the ENTER button to switch the display between “Lens Position” and “Focus Zoom” adjustments. Press the EXIT button to return to a menu one level above.
Lens Position
Adjusts the position of the projected screen. The projected screen moves in the selected direction as you press the UP/DOWN/LEFT/RIGHT button.
Focus Zoom
Adjusts the size (Zoom) and focus (Focus) of the projected screen. Press the UP/DOWN button to adjust the focus. Press the LEFT/RIGHT button to adjust the size of the projected screen.
Reset
This is used to reset the light and air filter usage times.
Filter Cleaning
Resets the air filter usage time (for confirming the filter cleaning time).
-
-
- Press the ENTER button, and the confirmation screen will appear.
- Select “Yes” in the confirmation screen, and then press the ENTER button to reset the filter usage time.
- Press the ENTER button to display the confirmation screen.
-
Installation
Lens Type
This function cannot be used.
Lens Calibrate
Performs calibration on lenses that support the lens memory function. Once you have attached a lens that supports the lens memory function, always execute calibration. This menu item is available only when the projector power is turned on, and you are logged into the projector with Advanced User or higher privileges.
-
-
- Press the ENTER button to execute calibration.
-
![]()
Lens Center
To move the lens shift to the center position. The center position may slightly shift depending on the mounting conditions of the lens. This menu item is available only when the projector power is turned on, and you are logged into the projector with Advanced User or higher privileges.
-
-
- Press the ENTER button to execute the move.
-
Title Setup
Sets the title to be assigned to the preset buttons (<1> to <8> buttons) (up to 16 titles). Request your dealer/distributor to perform the settings.
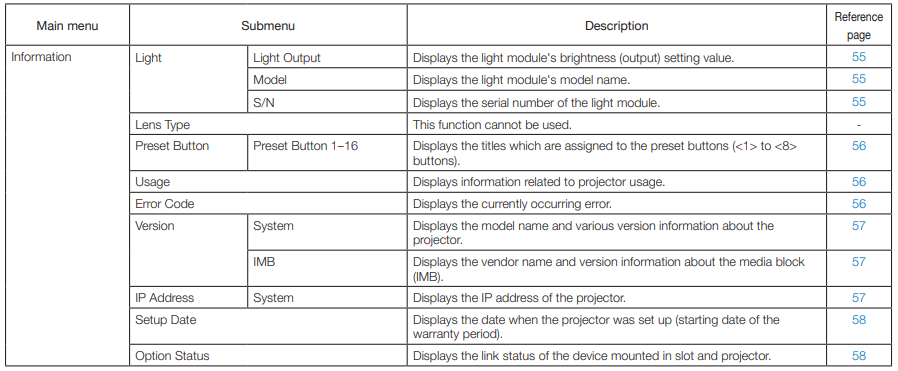
Information
Displays the hours of light use, the version information, and error codes.
Light
Displays the information of the Light module.
-
-
- Displays the current setting (%).
-
![]()
Lens Type
This function cannot be used.
Preset Button
Sets the title to be assigned to the preset buttons (<1> to <8> buttons) on the projector’s control panel.
-
-
- Selects the preset button number whose contents you want to display.
- Displays the assigned title numbers.
- Displays the registered names of the assigned titles.
-
Usage
Displays information related to the projector usage, such as the usage time of the projector, light, air filters, and fan, and information about the light replacement cycle.
-
-
- Selects the item to display.
- Displays information about the selected item.

-

Error Code
Displays the error code when an error occurs.
-
-
- Displays the code of the error currently occurring.
- Displays the name of the error currently occurring.
-
When multiple errors occur, you can display them by pressing the LEFT/RIGHT buttons.
Version
Displays version information about the projector, optional boards, and IMB.
System
Displays the version information of the projector.
-
-
- Selects the item to display.
- Displays the version information.
-
IMB
Displays the vendor name and version information about the media block (IMB). When the projector is in standby mode, the vendor name is blank, and the version information displays “—”.
-
-
- Displays the vendor name.
- Displays the version information.
-
IP Address
Displays the IP address set in the projector.
-
-
- Displays the IP address
-
Setup Date
Displays the date when the projector was set up (starting date of the warranty period).
-
-
- Displays the date when the projector was set up (starting date of the warranty period).
-
Option Status
Displays the link status of the device mounted in the slot on the projector.
Maintenance of Your Projector
Cleaning the Cabinet
- Wipe with a dry, soft cloth without a nap. When you use a chemical dust cloth, follow the instructions in the manual attached to it. Do not use a solvent, such as thinner or benzene. The coating may deteriorate or peel off.
- When removing dust from the ventilation opening, suck it off using an adapter with a brush on a vacuum cleaner. Never allow the cleaner without an adapter to come into direct contact or use a nozzle adapter in cleaning.
- Clean the ventilation opening at regular intervals. Dust, if allowed to accumulate there, may cause heating inside, which leads to functional trouble. The interval, which can vary with the location of your projector, is about 100 hours.
- Do not damage the cabinet by scratching it or allowing hard objects to hit it. This can scratch the projector.
- Consult your dealer/distributor about cleaning the inside of the projector.
Maintenance of Your Projector
Clean the lens the same way as with a camera lens (using a commercially available camera blower or cleaning paper for glasses). Take care not to damage the lens when cleaning.
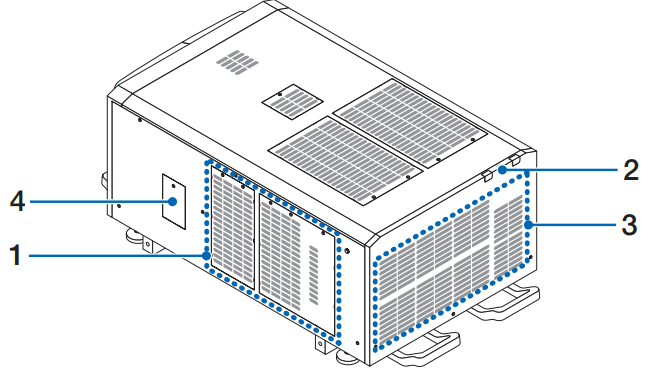
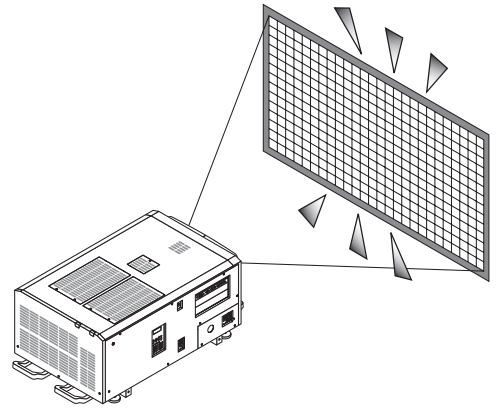
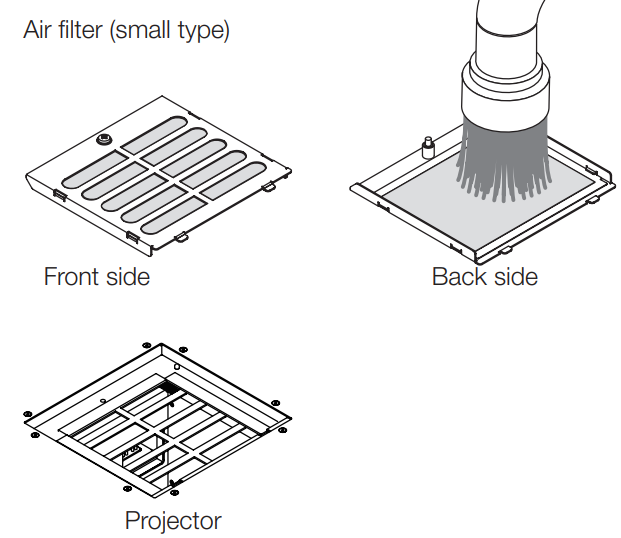
Cleaning the Air Filters
Air filters are provided on the projector’s air intakes to prevent dust from entering the projector. Clean the air filters regularly to maintain the performance of the projector.
- The usage time of the air filters can be checked at “Information” – “Usage” (page 55) on the adjustments menu.

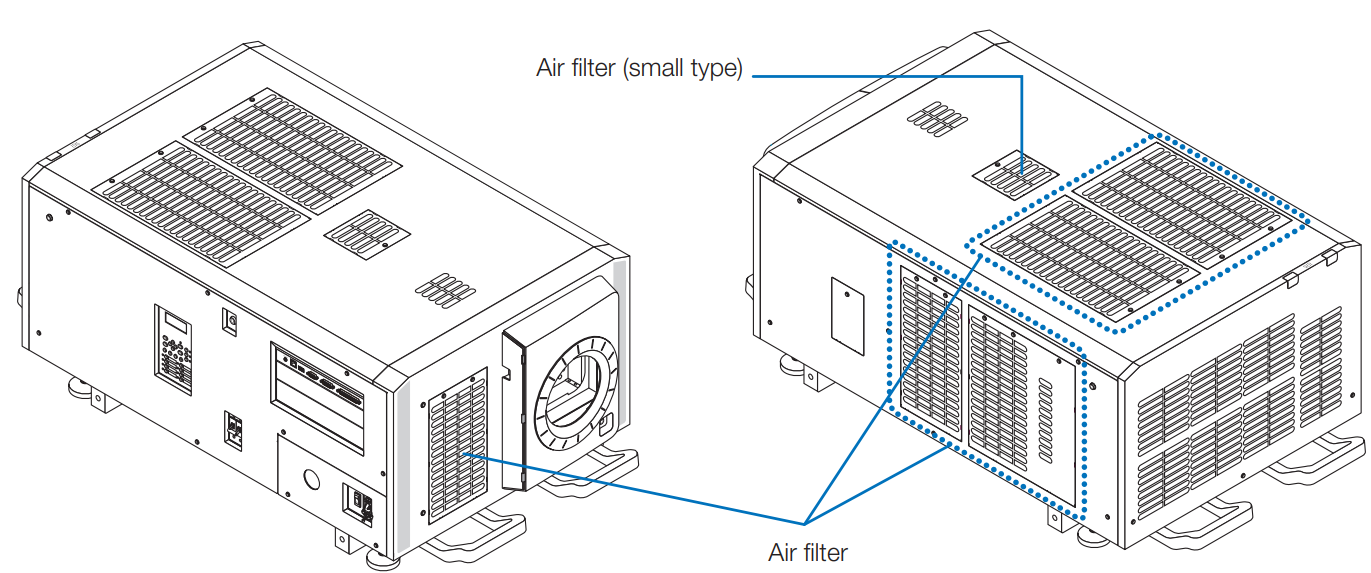
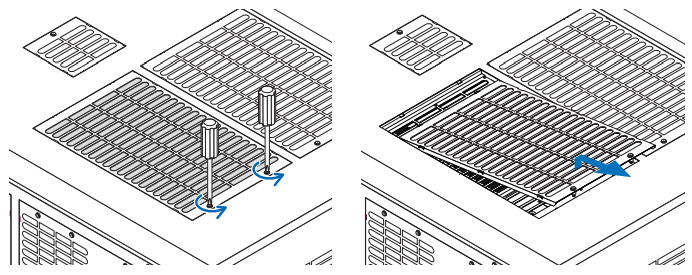
To remove the front air filter, pull the filter cover in the direction of the arrow. To install, insert the catches in the filter cover into the grooves in the lens cover, close the cover, then push it in.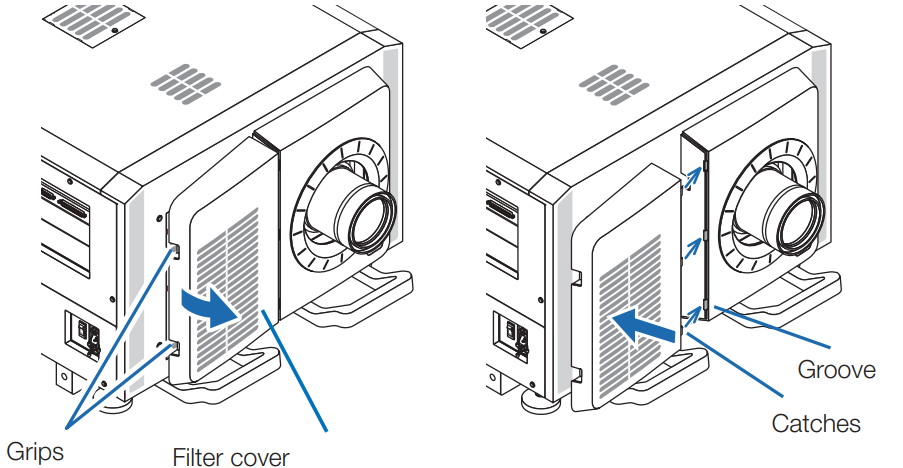
The illustration in this explanation shows how to clean the air filters on the top panel. Clean the other filters in the same way as these air filters (small type).
- Remove the air filter. The screws do not come off. The number of screws differs depending on the air filter.

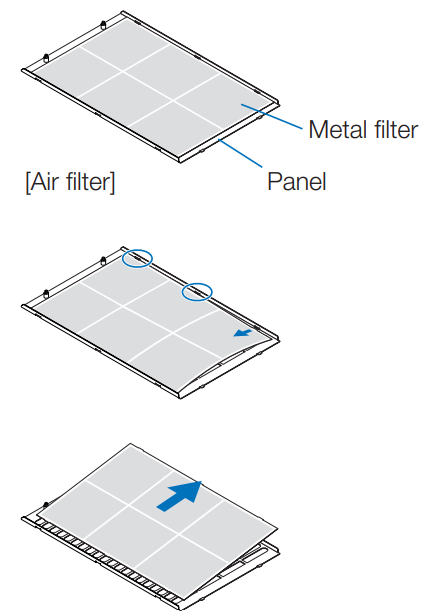
- Remove the metal filter. Note: The metal filter does not come off the small type air filters. See “For small type air filters” on the next page.
- Turn the air filter upside down. [Air filter] Panel Metal filter
- Slowly bend the metal filter a little to unlatch the three catches from the grooves in the panel one by one. Remove the metal filter from the panel.

- Use a vacuum cleaner to remove the dust. Use a vacuum cleaner to remove the dust from both sides of the metal filter, the projector, and the panel. Note: Do not wash the metal filter in water. Doing so will cause the dust to clog the holes, reducing intake performance.

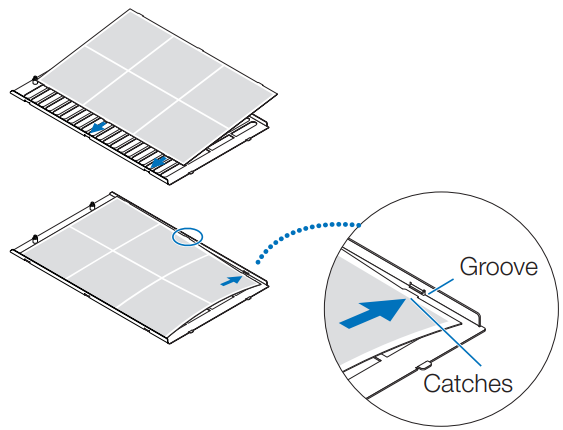
- Attach the metal filter.
- Insert the three catches on the metal filter into the grooves in the panel.
- Bend the metal filter a little and insert the three projecting parts on the opposite side into the grooves in the panel, one by one.


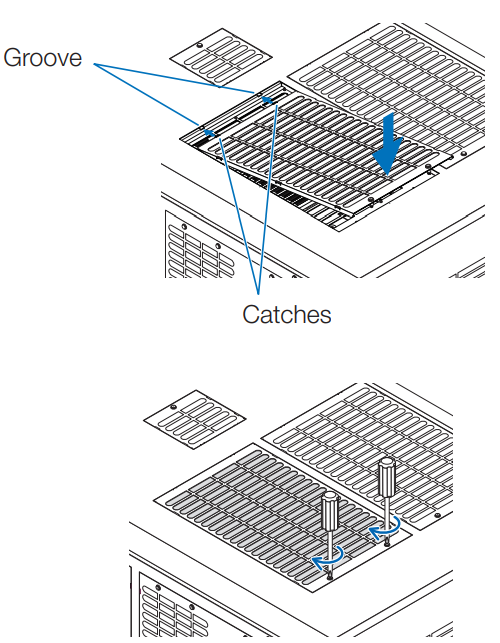
Attach the air filter to the projector
- Insert the catches in the air filter into the grooves in the projector.
- Turn the two screws clockwise to tighten them. The number of screws differs depending on the air filter.

For small-type air filters
- Use a vacuum cleaner to remove the dust. Use a vacuum cleaner to remove the dust from both the front and back sides of the filter and from the projector.

- Using the procedure in step 5, turn one screw clockwise to tighten it.
Indicator display list
The projector also has a warning function that uses a buzzer. 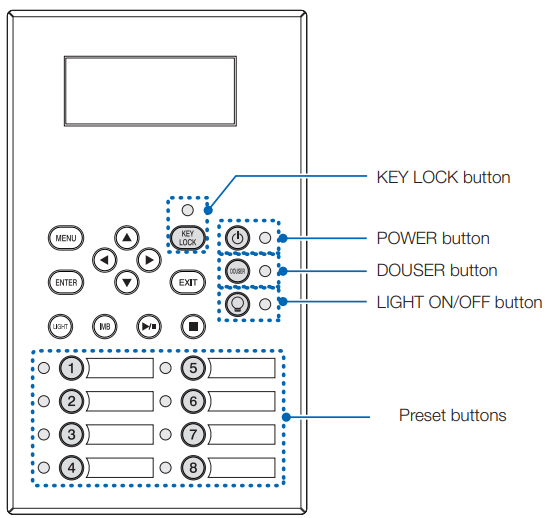
Preset buttons
KEY LOCK button
POWER button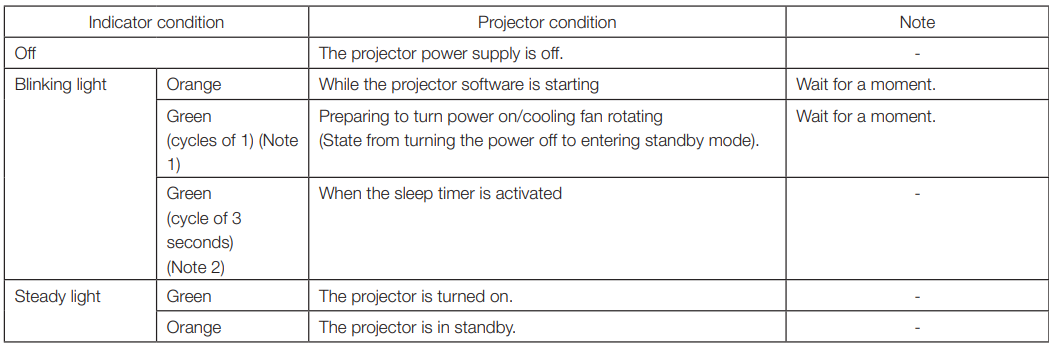
DOUSER button
LIGHT ON/OFF button
STATUS indicator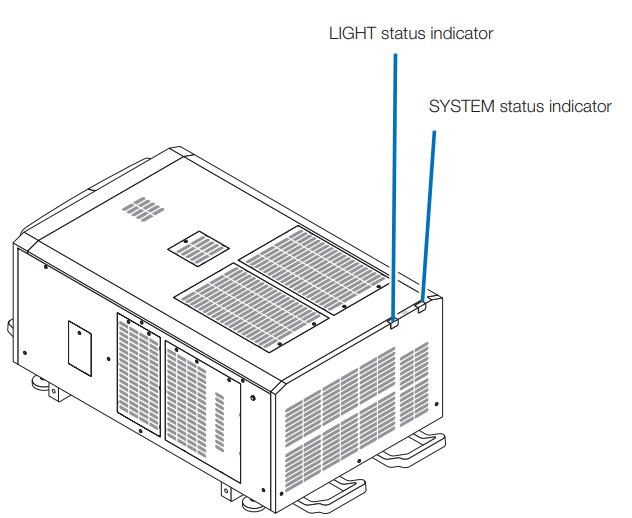 SYSTEM status indicator
LIGHT status indicator
Operation using an HTTP browser
Overview
The use of HTTP server functions will allow control of the projector from a web browser. Please be sure to use “Microsoft Internet Explorer 4.x” or a higher version for the web browser. The setting method will vary depending on the version of the browser. Please refer to the help files and the other information provided in your software.
Preparation before use
Make network connections, set up the projector, and confirm that it is complete before engaging in browser operations. Operations with a browser that uses a proxy server may not be possible, depending on the type of proxy server and the method of setting it.
Structure of the HTTP server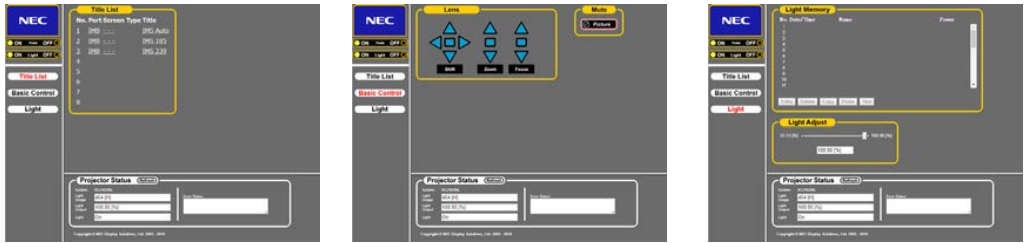
Writing of the log file
Log files saved on the main unit can be written to a USB memory connected to the USB port of the main unit. To perform the writing of the log file, use the following procedure.
- Connect the USB memory to the USB port of the main unit. For details, refer to the instruction guide of the USB memory.
- Simultaneously press the UP button and ENTER button.
- Press the LEFT/RIGHT button, and select the log file writing period.

- Press the ENTER button. For how to enter numerals, refer to “4-1-3. How to enter alphanumeric characters” (See page 49). If you press the ENTER button, the display advances to the following screen.

- Confirm the log file writing period, press the LEFT/RIGHT button to select “Execute”, and press the ENTER button.
- Press the ENTER button.
- Remove the USB memory from the USB port of the main unit.

Names of log files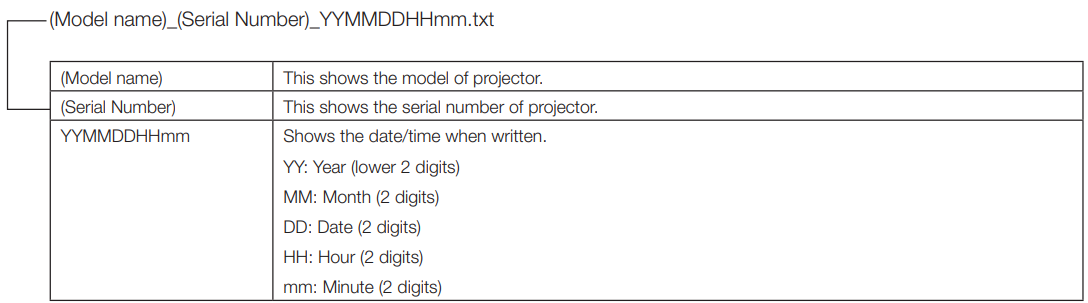
Outline Drawing
Projector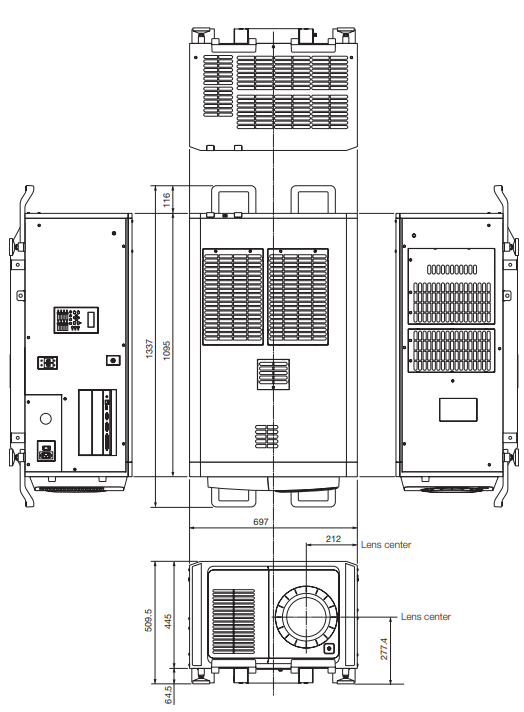
Specifications
Projector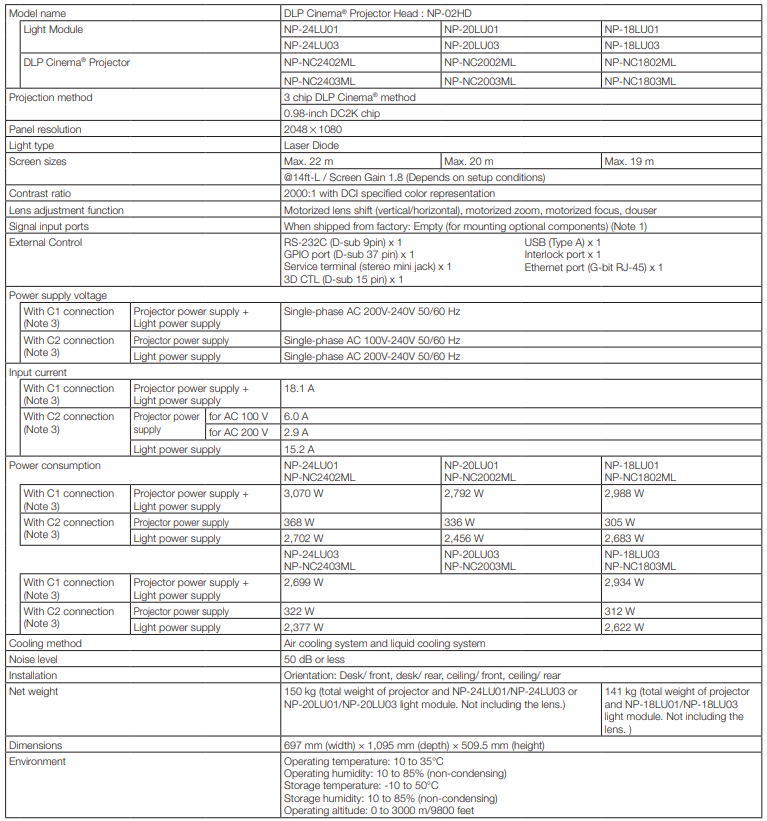
- For the standards related to laser products to which this projector conforms, see the section “To ensure safe use of this unit, be sure to read this before using the unit” (page 2).
- Note that these specifications and designs change without prior notice.
Pin Assignment and Functions of Terminal
PC CONTROL connector
This is an RS-232C interface for controlling the projector from a PC. The projector operates as a DCE (Data Communication Equipment), so use a straight cable when connecting to a PC.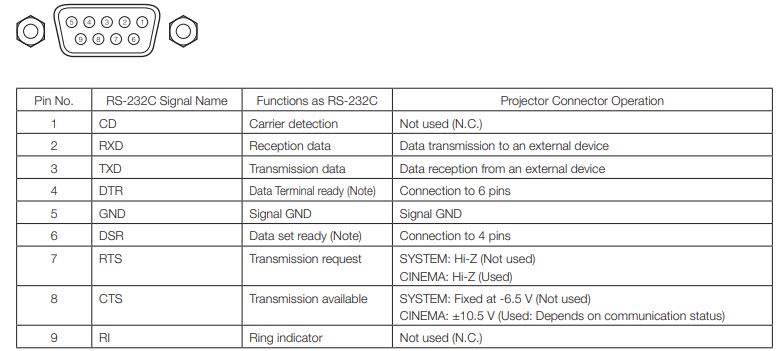
External control connector
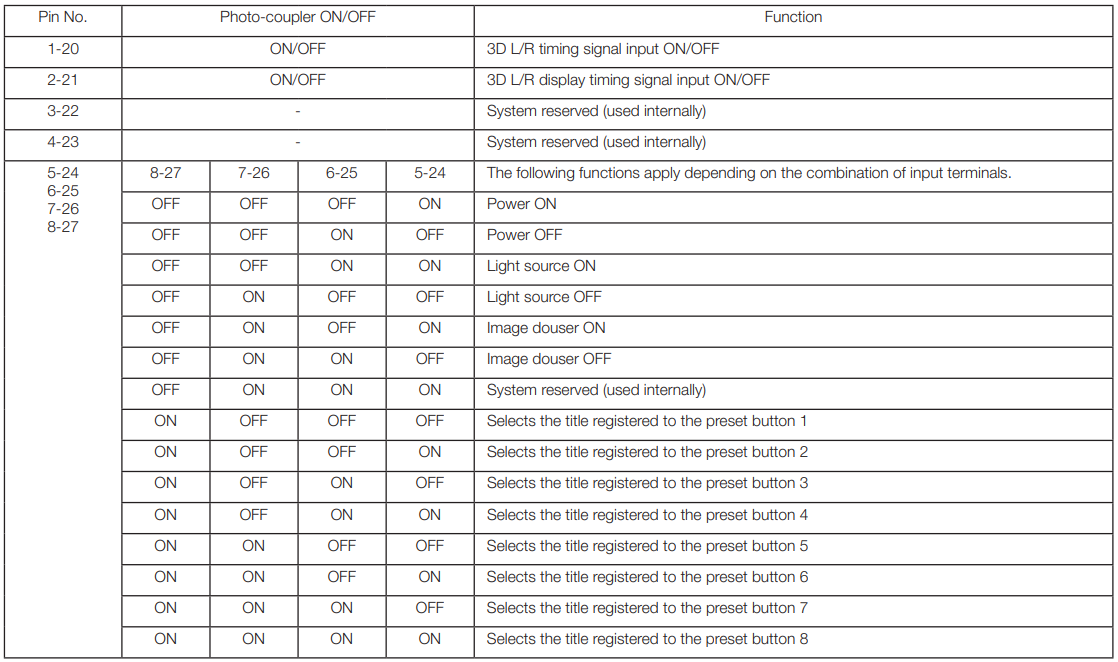
It is possible to control the projector with an external device and to control the external device from the projector using an external control connector (GPIO: General Purpose I/O Ports). 8-port input and 8-port output are available. Please contact your dealer/distributor regarding how to use and to operate them.
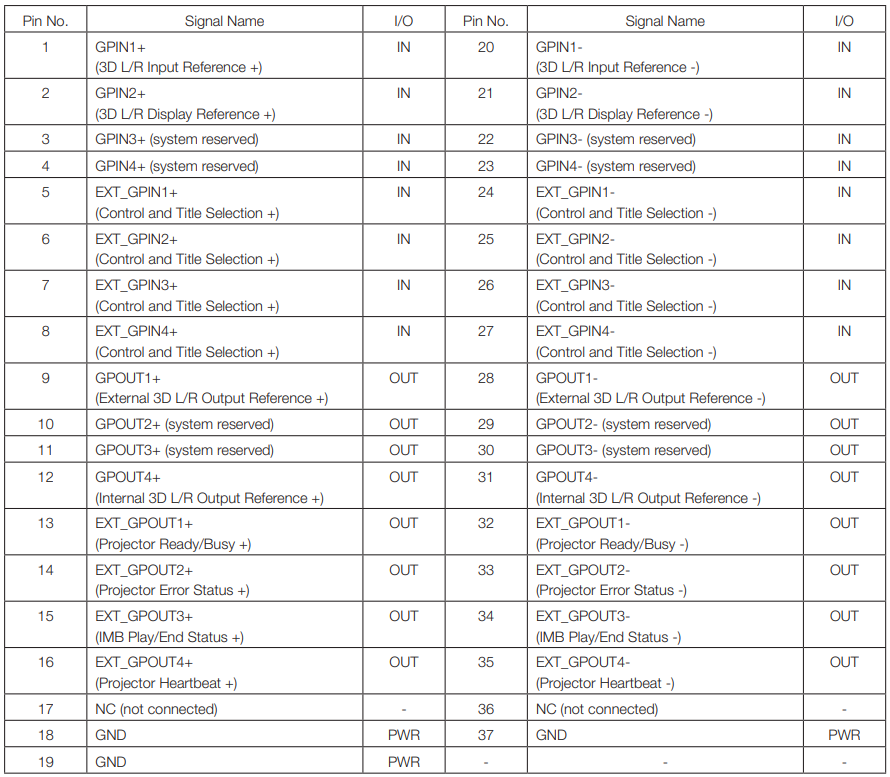
Input Connector
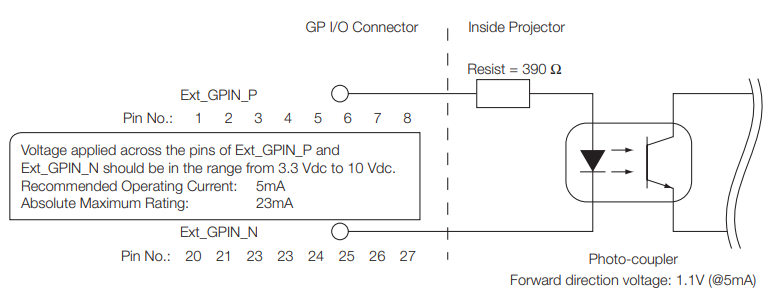
Using GPIO Control
Momentary “ON” pulse enables you to control the projector. To enable the “ON” pulse, hold it for at least 500 ms. Hold “OFF” for at least 500 ms before “ON”. (See page 77) Here is a function list to control the projector by using the GPIO port.
Timing chart of GPIO control
Select Preset Button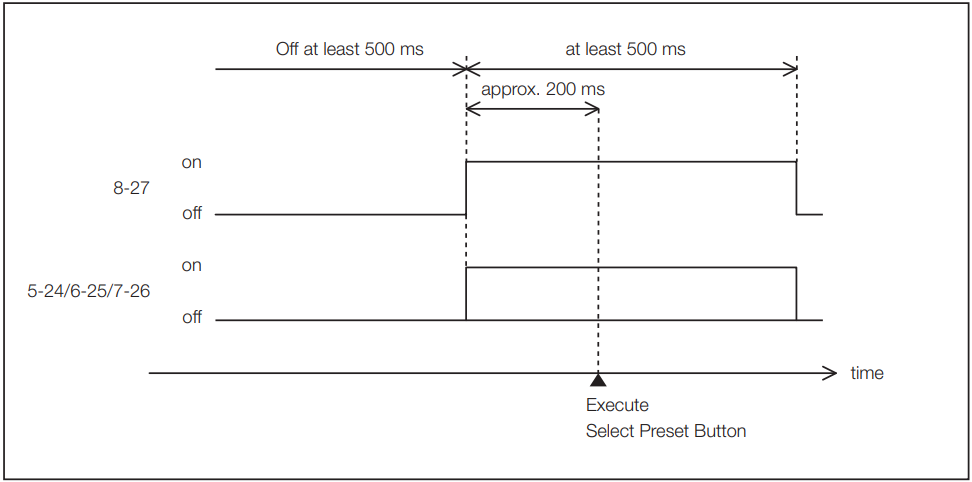
Turning the image douser (Douser) on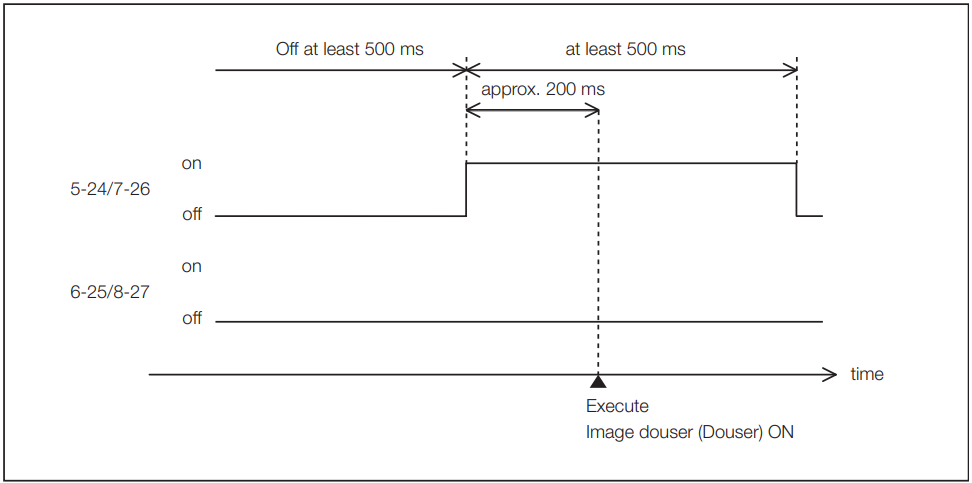
Light source On
Turning the power off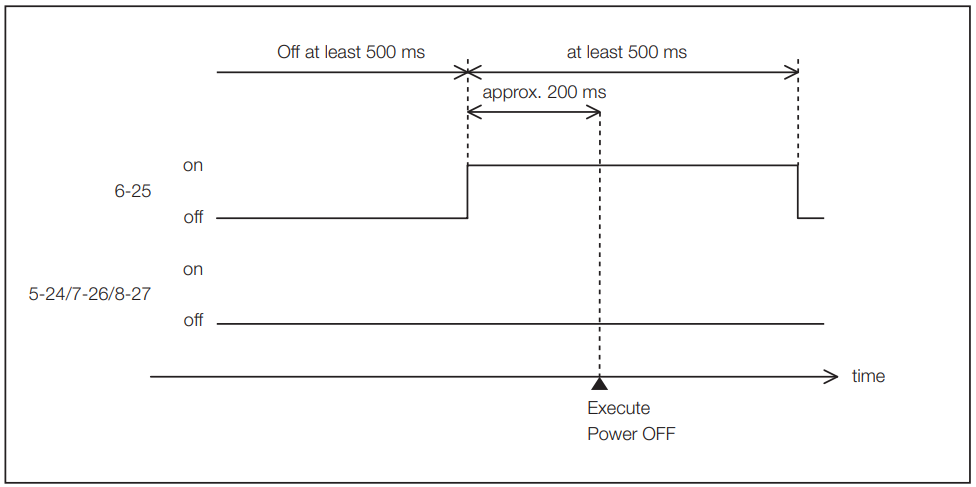
Output Connector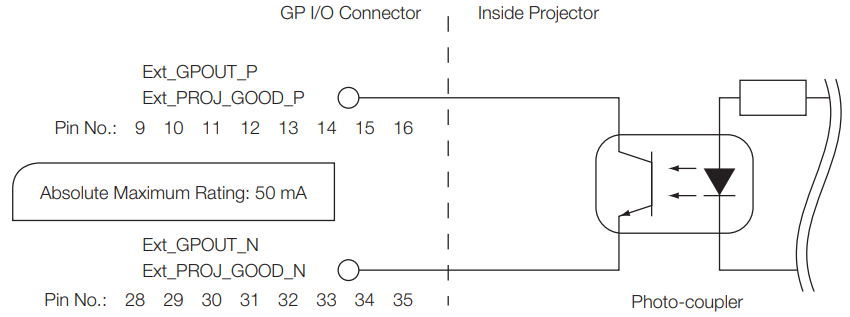
Using GPIO Control
You can use GPIO control for the projector’s health check and error check. Also, you can use the output as the trigger to control external devices. You can change the assigned functions.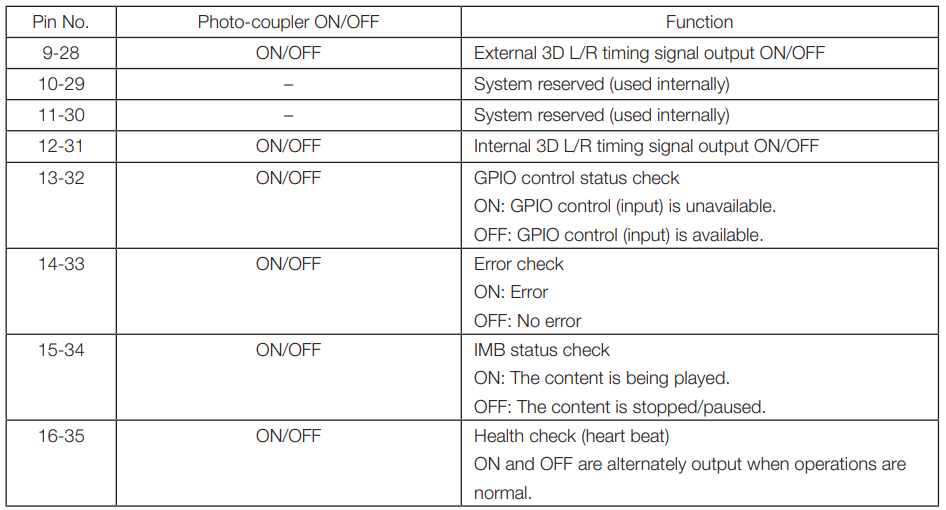
3D connector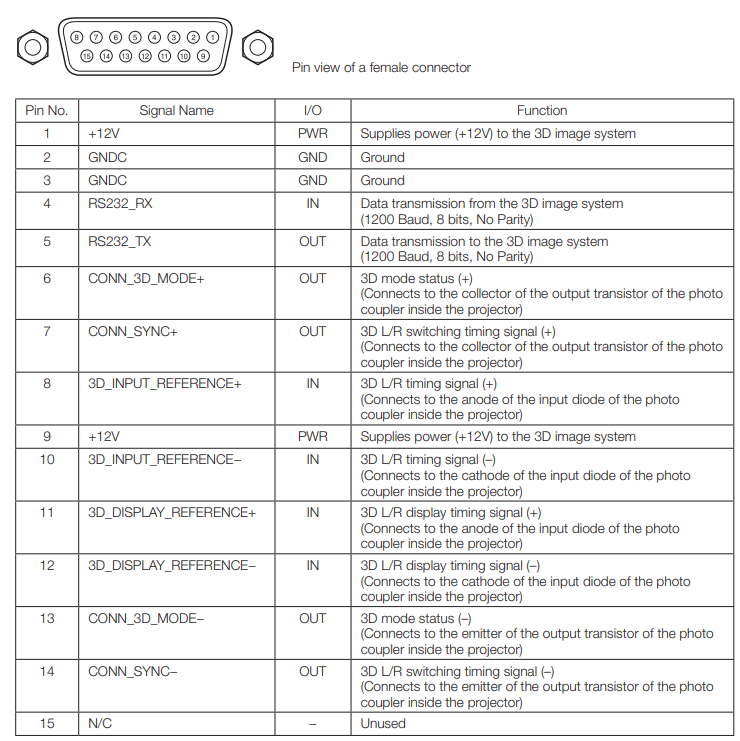
Related products list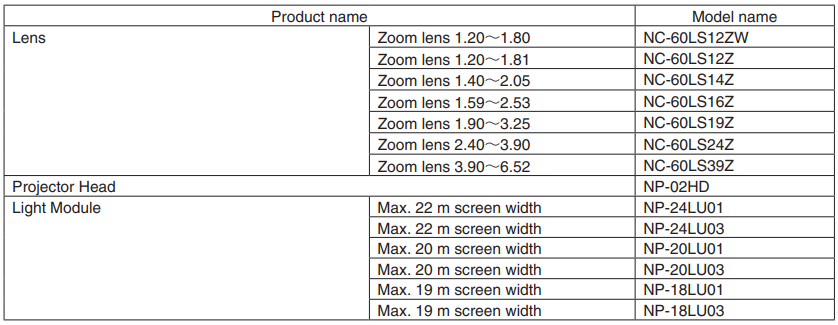
Troubleshooting
Before asking for repair, please check your connection, settings, nd operation once again. 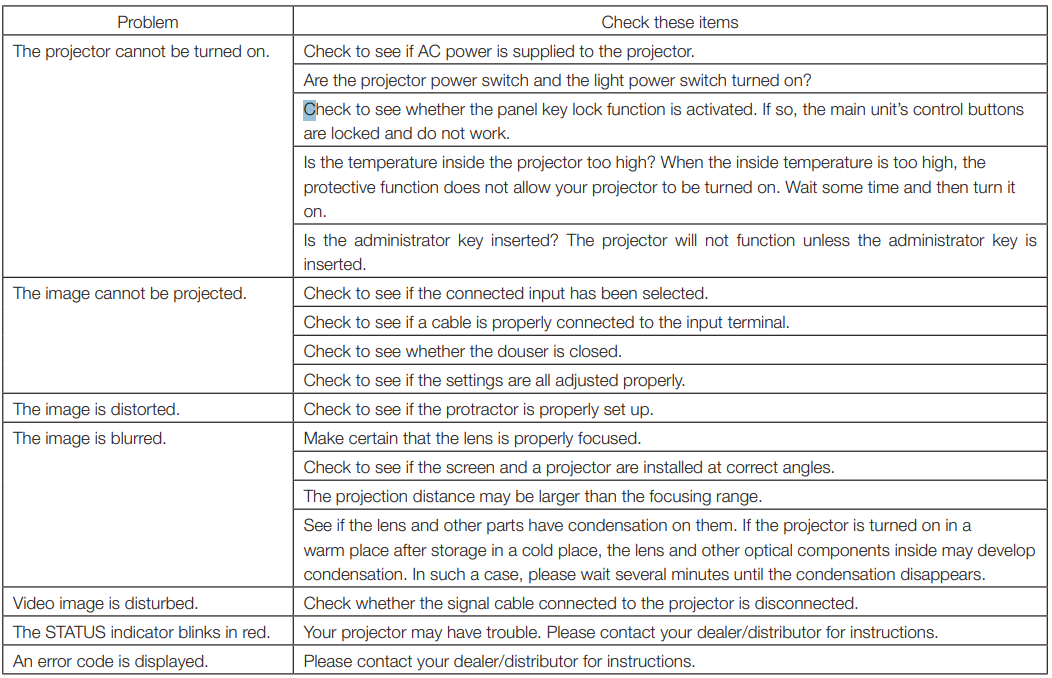
Customer Support
- Website: https://nec.org
- Tel: 03-111-123-632