
YABER V2 Portable Mini WiFi Projector
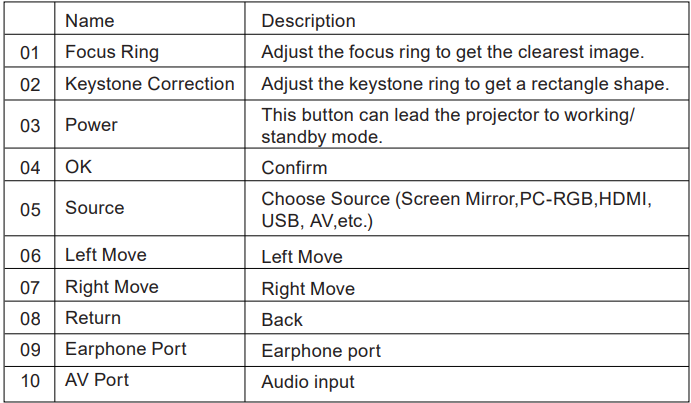
Product Description
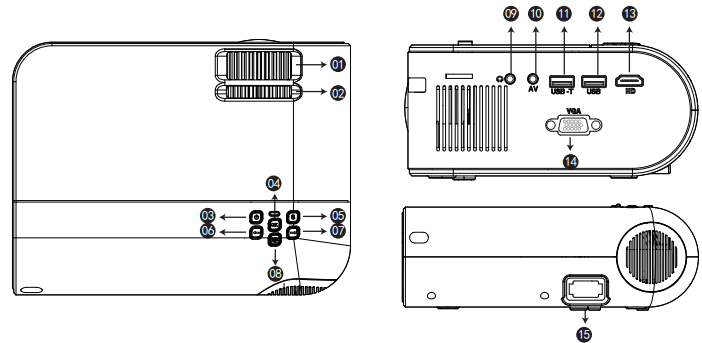
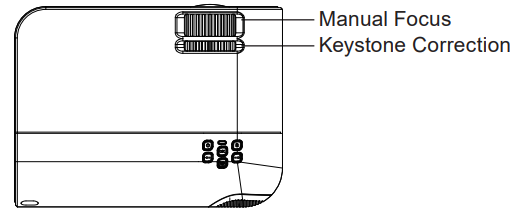
- Focus Ring
- Keystone Ring
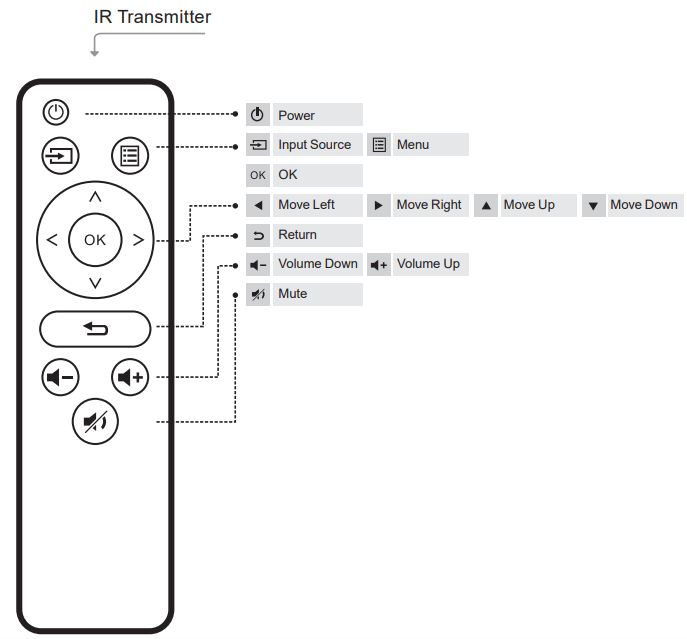
- Power
- OK
- Source
- Left Move
- Right Move
- Return
- Earphone Port
- AV Port
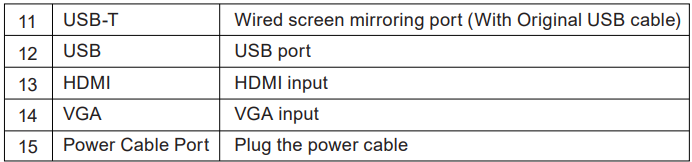
- USB-T
- USB
- HDMI
- VGA
- Power Cable Port
Pictures shown are for illustrative purposes only. Actual product may vary due to product enhancement.
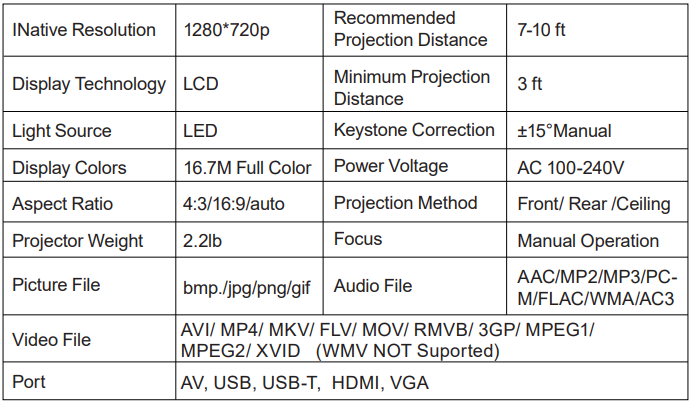
Projector Specification
Remote control
Replace the remote control battery.
- Push to open the battery cover.
- Remove both old batteries and install new ones (AA). Make sure that the polarity of the batteries (+/-) is correctly aligned.
Important safeguards
These safety instructions are to ensure the long life of the projector and to prevent fires and shocks. Read them carefully and pay attention to all warnings.
Installation
- For best results, use the projector in a dark room.
- Place the projector on a flat, level surface in a dry area away from dustand moisture.
- Exposure to direct sunlight, smoke, or steam may damage internal components.
- Handle the projector carefully. Falling or shaking can damage internal components.
- Do not place heavy objects on top of the projector.
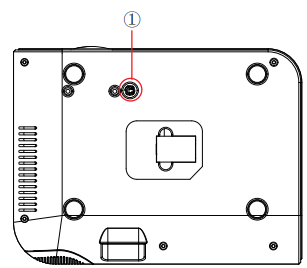
Adjust the Tilt Base and Hang Ceiling
Adjust the tilt base: Install the screws (included in the package) to place ①, lift the front edge of the projector to the desired height, turn the presser foot, and release the button to lock the tilt base to the appropriate position.
Hang ceiling
Please purchase the projector stand and M5 screw additionally. Install the projector stand to place ①, and hang the projector on the ceiling. ( Note: You can install the Tripod Stand at place ① )
Supply
- The projector is designed to operate with a 110-240 V ~ 50/60 Hz AC adapter. Ensure that the power supply meets this requirement before attempting to use the projector.
- Handle the power cord carefully and avoid bending it too much. A damaged cord can cause electric shock or fire.
- If the projector will not be used for a long time, unplug the power cord from the outlet.
Cleaning
- Unplug the projector before cleaning it.
- Periodically, clean the cabinet with a damp cloth. If it is very dirty, use a mild detergent. Never use strong detergents or solvents such as alcohol or thinners.
- Use a blower or lens paper to clean the lens, and be careful not to scratch or damage the lens.
STARTING PROJECTOR
Turn on the projector
- Install two AAA batteries in the remote control before using.
- Press the Power key on the remote or panel, and the indicator light will turn red.
- Remove the lens cover of the projector, and the lamp will start working 2 seconds later. When an image is projected on the screen, the machine is working smoothly. If the first projection screen is not the start-up screen, press the “S” button on the remote and select USB source.
- Adjust the keystone ring to get a rectangular shape.
- Adjust the focus ring or rotate the lens of the projector to get the best image performance. (If it is still blurry, please try to adjust the projection distance.)
- If you connect other devices, be sure to select the corresponding source. If you do not select the correct source, the projector will not be able to detect the signal.
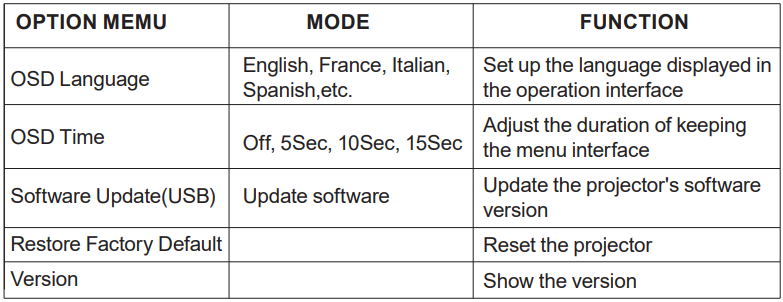
- Press the Menu button on the remote control to enter the OSD Language to set your preferred language.
Turn off the projector.
- Press the Power button when the projector is in use; this will cause it to switch to standby mode.
- When the projector switches into standby mode, the light will blink red.
Keystone and Focus
If the projected image is trapezoidal, it can be resolved by Keystone correction. ( Do Manual Keystone Correction )
Note: If the Keystone correction fails to resolve the image shape, please reduce the vertical height of the projector in relation to the center of the screen.

The projected image may be blurry or difficult to see. This is due to a lack of Focus adjustment with the lens. Please follow the processes below to adjust the Focus. ( Do Manual Focus, find the sharpest picture on the screen )

Note: It is normal when there is sharpness in the central, blur in the edge.
Setting the Main Menu
The projector’s normal start-up screen is as follows. If the first projection screen is not this one, press the “ ” button on the remote control to select the USB source.

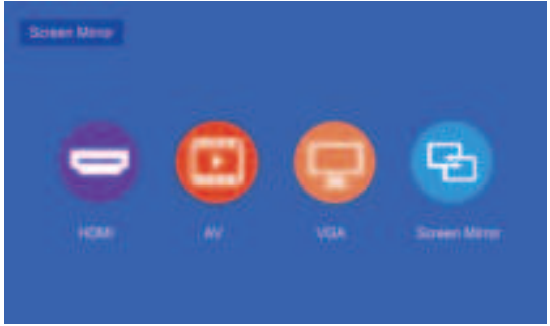
Select the Input Source
When the “No Signal” prompt appears, you need to select the input source:
- Press the “ ” button on the remote control to select the desired signal, then press the OK button on the remote control.
- Once the signal is detected, the selected source information will be displayed on the screen after a few seconds.
Menu Setting Method
- Press the “ ” on the remote, then the menu picture will display on the screen. Or you need to select the “ ” key on the projector to enter the 4 menus without the remote control.
- Press“◀/▶” key, the menu will move to “PICTURE”>“SOUND” >“TIME”>“OPTION”.
- Select the adjust interface, use the “▲/▼” key to choose the wanted item.
- Press“OK” or “◀/▶” to adjust the item parameter.
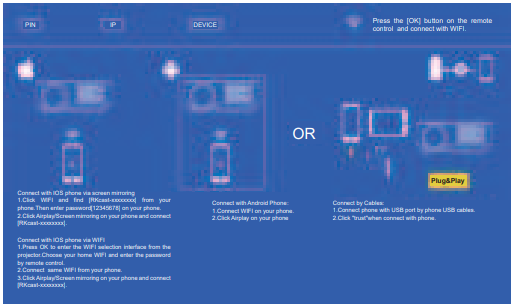
Wireless Projection Method
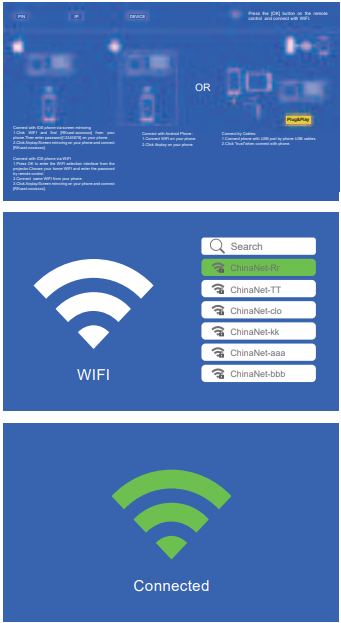
Step 1
Press the OK button to enter the WIFI list – Select your home WIFI from the list – Connect the V2 projector to your home WIFI.
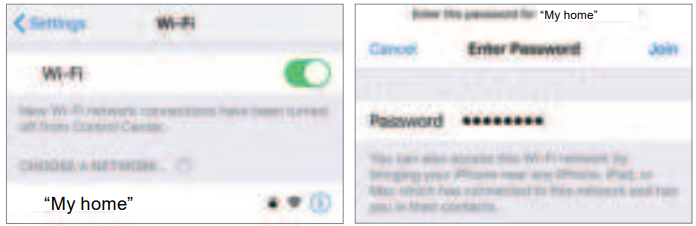
Step 2
Select the [Settings] menu on your IOS device – Turn on the [WIFI] function – Connect your IOS device to the same home network as the projector.
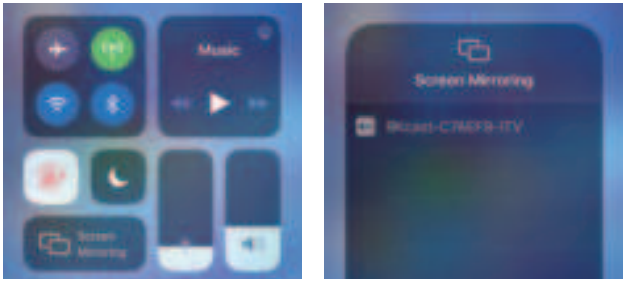
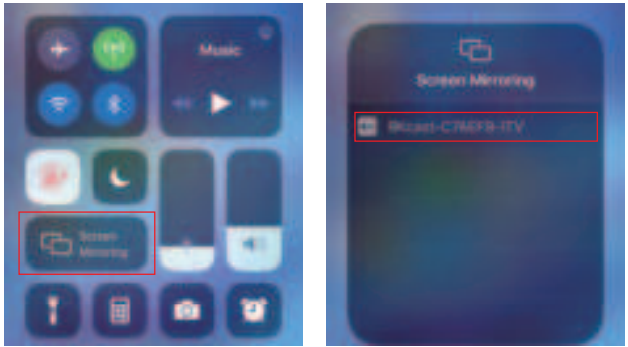
Step 3
Open Control Center- Tap the Screen Mirroring button-Connect [RKcast-xxxxxx]
- Open the control center.
- Tap on Screen Mirroring-Select the Device name [RKcast-xxxxxx]
Step 1
On your iOS device, tap [Settings] -[Wi-Fi] -Turn [Wi-Fi] ON. Available networks are shown. Choose the WiFi name like [RKcast-xxxxxx], connect it, and enter the password [12345678], which is on the Projector’s menu.
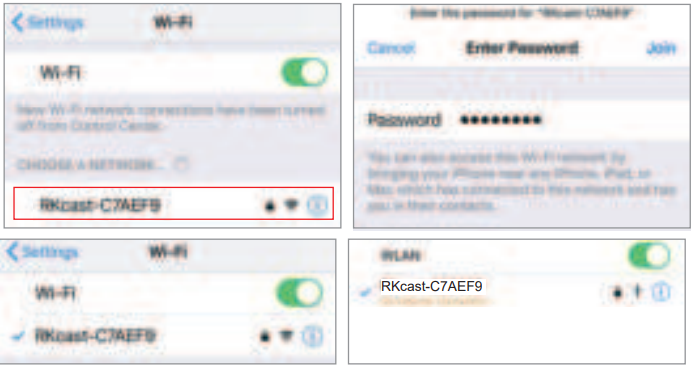
Note: After connecting, if “No Internet Connection” is displayed, please ignore it because it will not affect the use.
Step 2
Open Control Center- Tap the Screen Mirroring button-Connect [RKcast-xxxxxx]
- Open the control center.
- Tap on Screen Mirroring-Select the Device name [RKcast-xxxxxx]
Home Network Connection Mode
Step 1
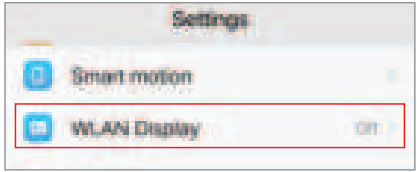
On your Android device, tap [Settings] -[WLAN Display] -Turn [Wi-Fi] ON. Available networks are shown.
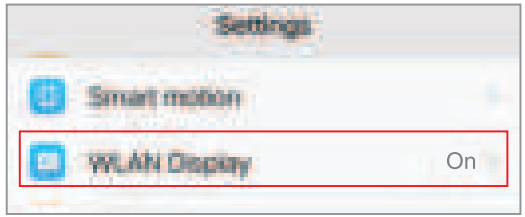
Note: different brands of Android phones have different operations for select WLAN Display, please refer to your phone’s manual.
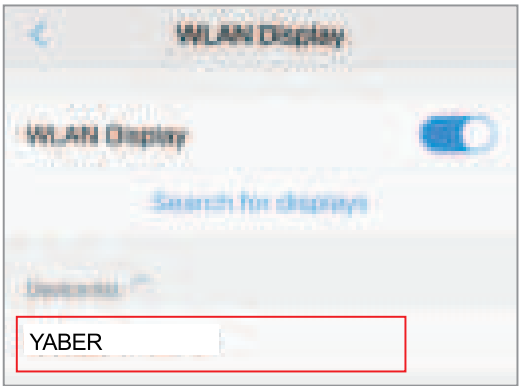
Step 2
Choose your home WiFi name (Ex, YABER), connect it, and enter your password [XXXXXXXX].
Step 3
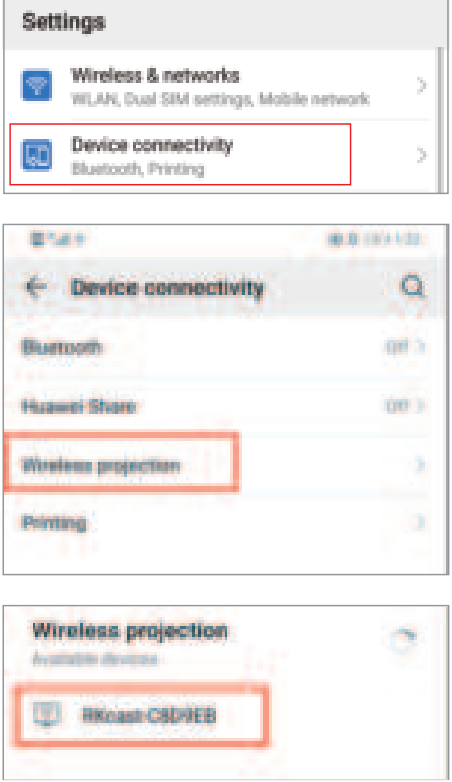
Tap [Settings] -[Device connectivity] -Turn [Wireless projection] ON

Cellular Network Connection Mode(From your mobile phone card)
Step 1
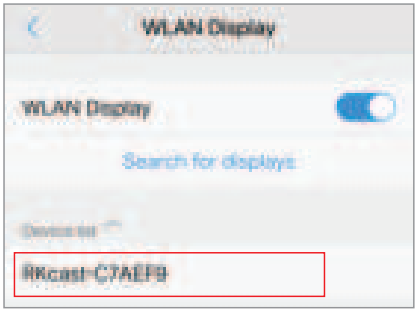
On your Android device, tap [Settings] -[WLAN Display] -Turn [Wi-Fi] ON. Available networks are shown.
Note: different brands of Android phones have different operations for select WLAN Display; please refer to the phone’s manual.
Step 2
Choose the WiFi name like [RKcast-xxxxxx], connect it, and enter the password [12345678], which is on the Projector’s menu.
Step 3
Tap [Settings] -[Device connectivity] -Turn [Wireless projection] ON-Select the projector name like [RKcast-xxxxxx]
Wired Screen mirroring (With Original USB cable)
- Turn on the projector — Press the “S” button on the remote — “Input Source” — Select “Screen Mirroring” — Press the “OK” button.

- Plug the original cable of your IOS equipment into the USB-T Port.
- Show with “Do you trust this equipment?”, tap “Trust”.
For Android
- Turn on the projector — Press the “S” button on the remote — “Input Source” — Select “Screen Mirroring” — Press the “OK” button.
- Plug the original cable of your Android equipment to the USB-T Port.
- On the “Do you allow debugging via USB?” Prompt, tap “OK”.
- After a while, the Android screen will be displayed on the projector.
PROJECTOR CONNECTIONS
Connecting to the Computer
Using the HDMI or VGA cable to connect with projector. (An HDMI connection is recommended for projecting movies, videos, and other files thatneed to be HD.)
- Turn on your computer and the projector.
- Connect the HDMI/VGA cable to your computer’s HDMI/VGA port.
- Connect the other end to any available HDMI/VGA port on your projector.
- Press the “Source” button to enter the interface of the Input Source.
- Select the HDMI/ PC-RGB source to project any files on your. computer;
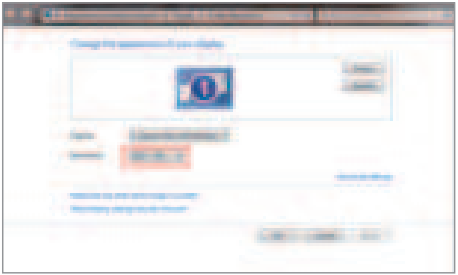
- On your laptop, hold down the keyboard keys to change your display mode:

Computer only: is the default option – only displays on the main monitor.
Duplicate: makes all of the monitors display the same thing, duplicating the desktop on each monitor.
Extend: makes all of your monitors act like one big monitor, extending the desktop across all of them.
Projector only: Displays only on the secondary monitor like a projector
- You can change your screen resolution: Choose Start→Control Panel→Appearance and Personalization → Adjust Screen Resolution
(Note: VGA connection can only transmit an analog signal of video, not audio. An external speaker is required when the device is connected via a VGA cable.)

Connecting to the DVD player
- Use the supplied AV cable to connect the DVD player to the projector.
- Turn on the projector and DVD player.
If your player has an HDMI output, it is best to use it over the analog (AV) option. Audio output must be configured from the DVD player menu if external speakers are installed.

Connecting to the soundbar
- Use the supplied AV cable to connect the soundbar to the projector.
- Turn on the projector and the sound bar.

PROJECTOR IMAGE SETTING
Picture Menu

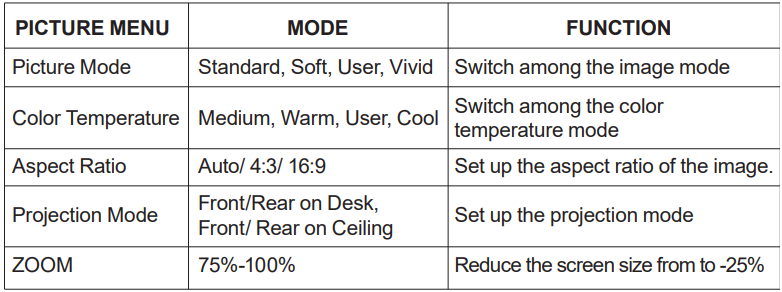
When playing an image or video, if you want to reduce the size of the projected image or video, you can use the remote control to select the ZOOM to adjust the projection size: You can reduce the height and width of the original size up to -25%.

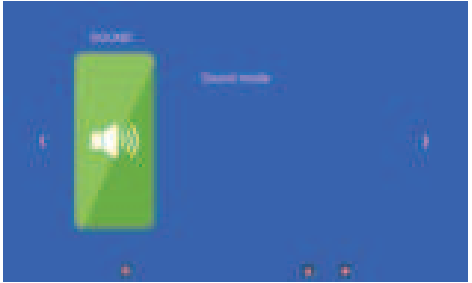
Sound Menu

Time Menu


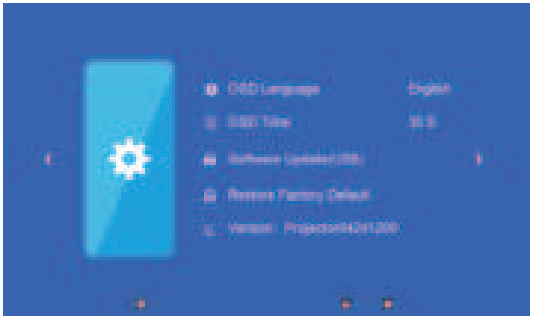
Option Menu
PROJECTION DISTANCE AND SIZE
Please follow the data in the chart belowto adjust the image size and the distance. (Aspect Ratio: 16: 9, Default)
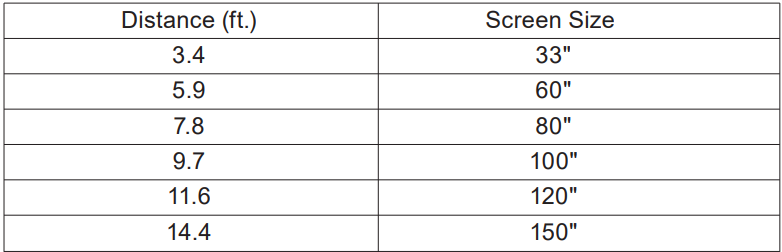
The image size depends on the distance between the projector andthe screen; there may be 3% deviation among above listed data. Different settings cause various distances.
Thank you very much for purchasing the YABER V2 projector. Please read this instruction manual carefully before use. Also, please keep it handy so you can check it at any time.
If you have any problem, please feel free to contact us (Email: Support@yabertech.com). We will always try to offer you a satisfactory solution.
FCC Radiation Exposure Statement
This equipment complies with FCC radiation exposure limits set forth for an uncontrolled environment. This equipment should be installed and operated with a minimum distance of 20cm between the radiator & your body.
WARRANTY AND SERVICE
We guarantee the unit TO BE free from defects in material or workmanship for a period of one (1) year from the date of purchase. Should this unit be operated under conditions other than those recommended or at voltages other than the voltage indicated on the unit, or any attempts be made to service or modify the unit, this will render WARRANTY VOID. The product you buy may sometimes differ slightly from the illustration.
FCC STATEMENT
- This device may not cause harmful interference, and
- This device must accept any interference received, including interference that may cause undesired operation
YABER Lifetime Professional Support
Dear Customer,
Woohoo! Your projector is already in your hands! Let’s get started! Do you have any questions on how it works? Please read this manual thoroughly before using the projector. Are you satisfied with your projector? If you have any issues, emailyour order number and description of your issue to: Support@yabertech.com. Send your email ASAP, as we want to fix your issues the first time you have them. Customers sometimes can experience some confusion when using the projector. Rather than trying to communicate directly with us, many buyersinstead just leave a review on the product page. However, most negative reviews are caused by non-standardized use rather than a defect in the product itself. Actually, many problems can be easily solved by setting, such as no signal, no sound, etc. We promise that all the projectors have been carefully checked and packaged before shipping. Therefore, if you have any questions, please contact us and give us an opportunity to improve. We guarantee that we will provide you more satisfactory solution.
- Thanks for your understanding!
- Best regards,
- YABER TEAM