



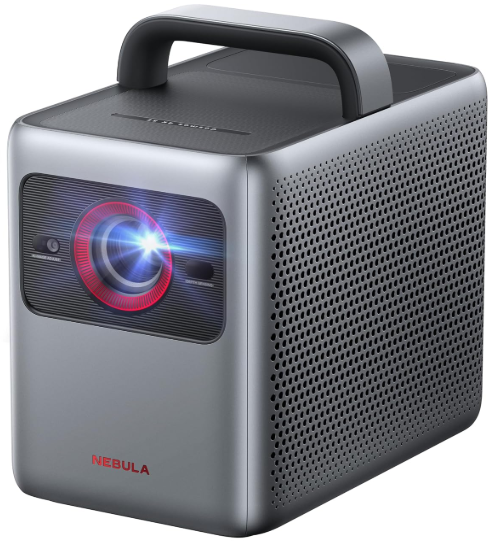
NEBULA Cosmos 4K SE Smart Projector
What’s Included
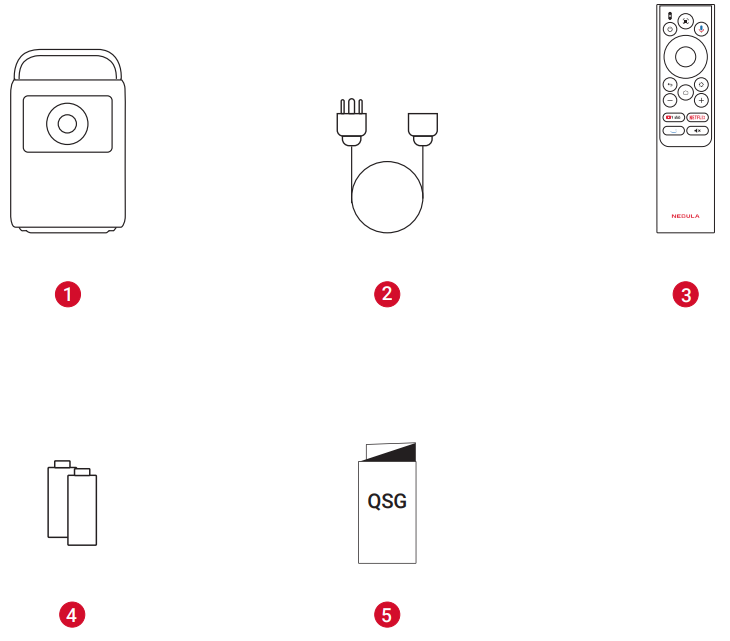
- NEBULA Cosmos 4K SE
- AC Cable *The number of cables provided and the type of plug may vary by
- region.
- Remote Control
- AAA Batteries
- Quick Start Guide
At a Glance
- Projector
Front View
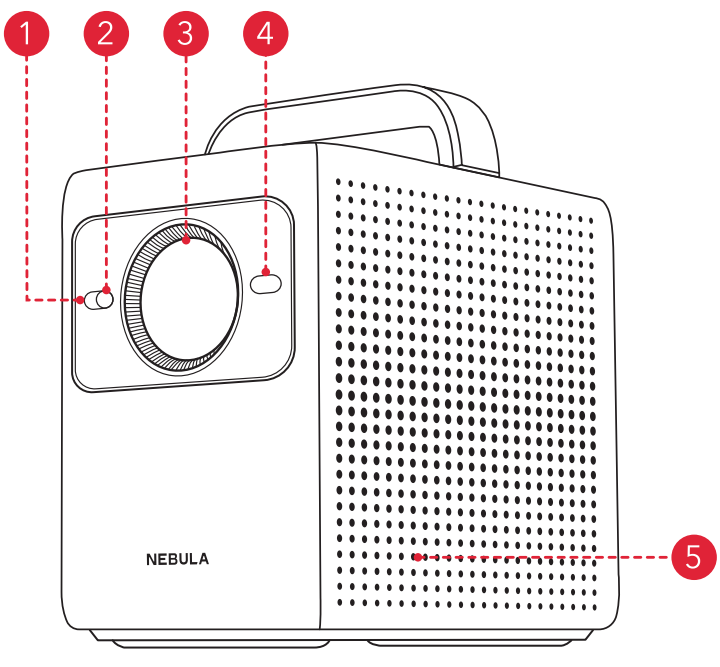
- Illuminance Sensor
- Image Sensor
- Lens
- ToF (Time of Flight)
- Speak
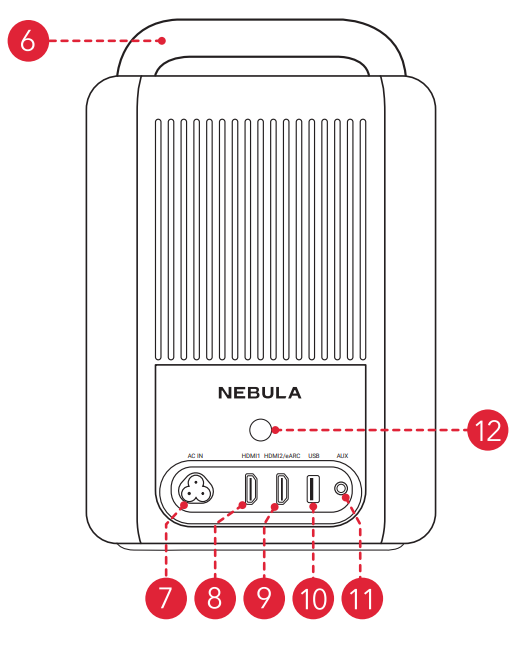
- Handle
- AC IN
- Connect to the power supply.
- HDMI 1
- Connect to a playback device with HDMI output.
- HDMI 2 / eARC
- Connect to a playback device with an HDMI output and support external devices, such as sound systems, for audio return.
- USB-A
- Connect to a USB storage device.
- AUX
- Connect to headphones or an external speaker.
- Infrared Receiver
- Receive infrared control signals from the remote control.

- Receive infrared control signals from the remote control.
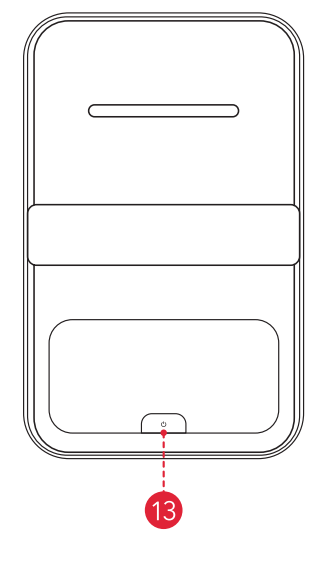
- Power Button

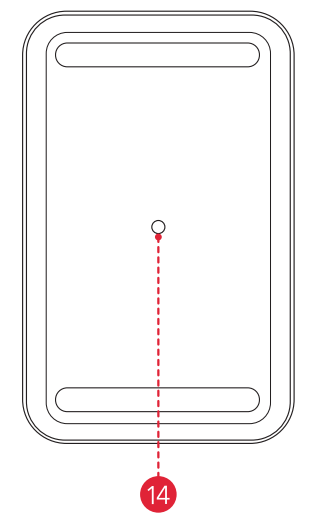
- Tripod Socket

- The 1/4″ Tripod Socket can be used to connect a tripod, stand, ceiling mount, etc.
Remote Control
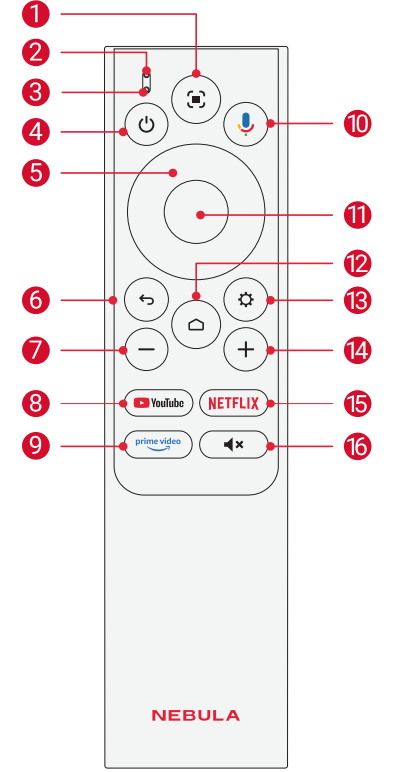
- Auto image adjustment
- Status indicator
- Microphone
- Power on / off / switch to standby mode
- Navigation
- Return button
- Volume down
- Open YouTube
- Open Prime Video
- Activate the Google Assistant. Confirm a selection/pause/resume
- Access the home menu
- Access more options
- Volume up
- Open Netflix
- Press to mute or unmute the sound
LED Light Guide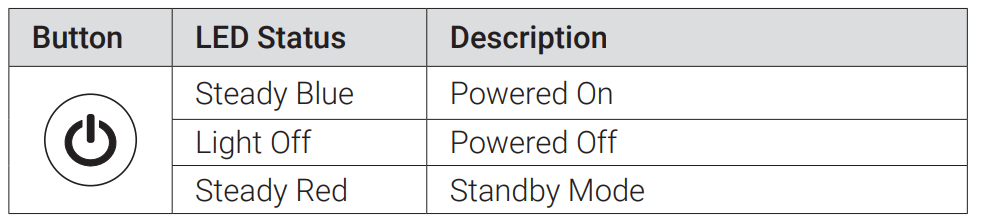
Getting Started
Prepare Your Projector
You can position your projector in the following ways.
- Front: The projector is placed on the table in front of the screen. This is the most common way to position the projector for quick setup and portability.
- Rear: The projector is placed on the table behind the screen. A special rear projector screen is required.
- Front Ceiling: The projector is suspended upside-down in front of the screen. The ceiling/wall mount kit is required.
- Rear Ceiling: The projector is suspended upside-down from behind the screen. A special rear projector screen and ceiling/wall mount kit are required.
Connect to Power
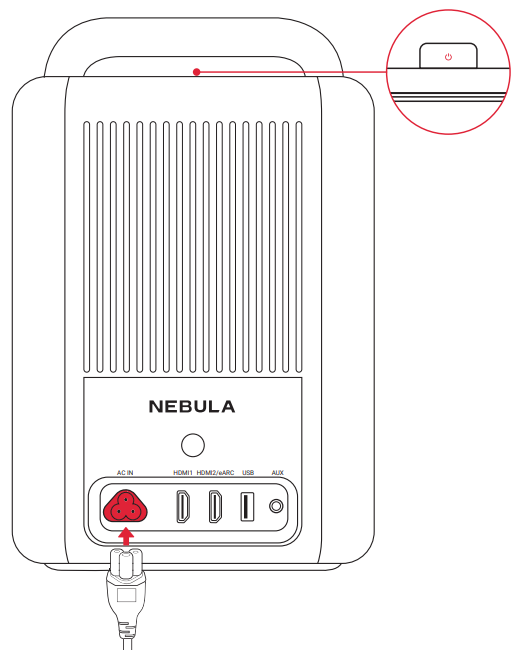
Connect the power cord to NEBULA Cosmos 4K SE and then to the power supply. When successfully connected to the power supply, the power button on the projector will light up in red.
Power On/Off
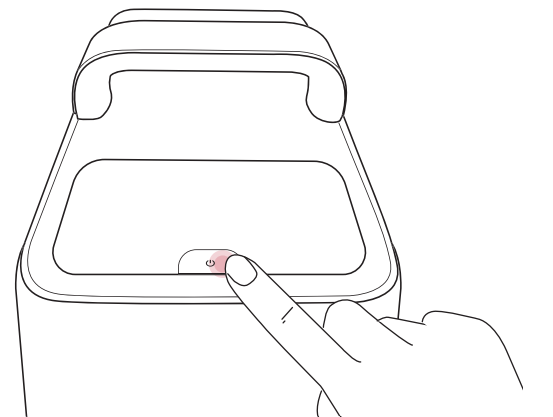
- Power On: Press the power button once. *When the projector is powered on, the power button will turn steady blue.
- Power Off: Step 1: Press and hold the power button for 3 seconds (wait for on-screen prompt). Step 2: Confirm power off with the remote control or wait 20 seconds for automatic power off.
- Standby Mode: Short-press the power button to enter standby mode.
Prepare the Remote
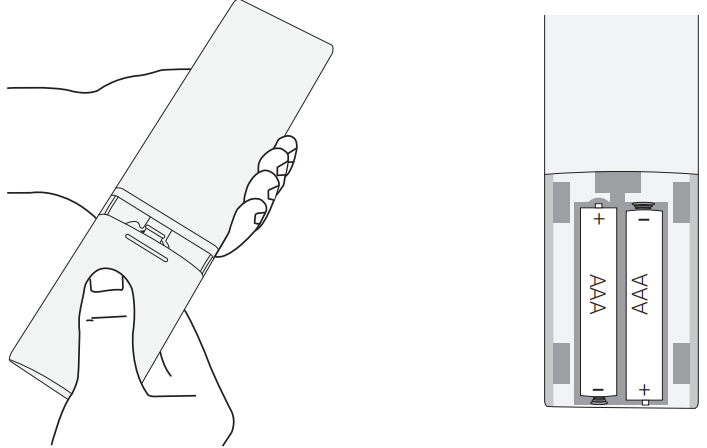
- Slide to open the battery compartment.
- Insert new batteries matching the polarity (+/-) and close the battery compartmen

- For first-time use, follow the on-screen instructions to pair the remote with your projector.
Connect the Projector with the Remote Control
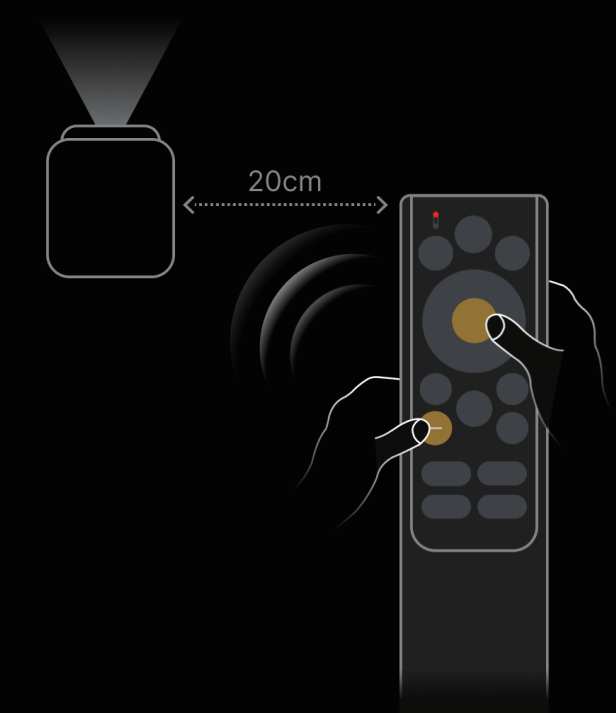
After powering on the projector, follow the on-screen instructions to pair
your remote control with the projector.
- Place the remote control within 20cm of the projector.
- Press and hold the confirm and volume down buttons for several seconds until the prompt of successful Bluetooth connection appears.

Auto Focus and Auto Keystone Correction
How to trigger auto focus:
- a. Press the [Auto image adjustment] button on the remote control.
- b. Auto-trigger upon powering on.
- c. Auto-trigger after moving the projector.
How to perform manual focus:
Go to [Settings] > [Projector] > [Focus Settings] > [Manual Focus
Correction].
How to trigger Auto Keystone Correction:
After enabling Auto Keystone Correction in [Settings] > [Projector]
> [Image Correction] > [Auto Keystone Correction Settings], Auto Keystone Correction will be triggered in the following scenarios:
- a. Pressing the [Auto image adjustment] button on the remote control.
- b. Auto-trigger upon powering on.
- c. Auto-trigger after moving the projector
How to perform manual keystone correction:
Go to [Settings] > [Projector] > [Image Correction] > [Perform Manual Keystone Correction].
Nebula Connect App
To easily control the projector, we recommend you download the Nebula Connect app.
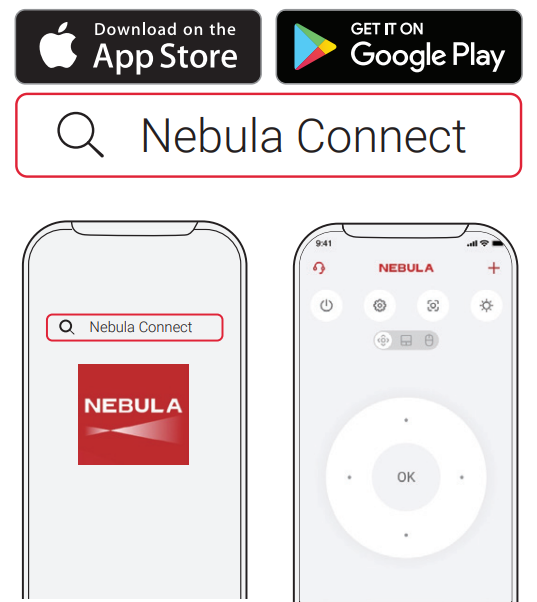
- Download the Nebula Connect app from the App Store (iOS devices) or Google Play (Android devices).
- Enable Bluetooth on your smartphone.
- Open the Nebula Connect app and select [NEBULA Cosmos 4K SE] as the device to be connected.
- Follow the on-screen instructions to complete the connection setup
Settings
Go through the setup process when you power on the projector for the first time.
Network
This projector can be connected to the Internet via a wireless (Wi-Fi) connection.
- On the home page, select [Settings] > [Network & Internet] and press confirm.
- Follow the on-screen instructions to complete the network
Projector
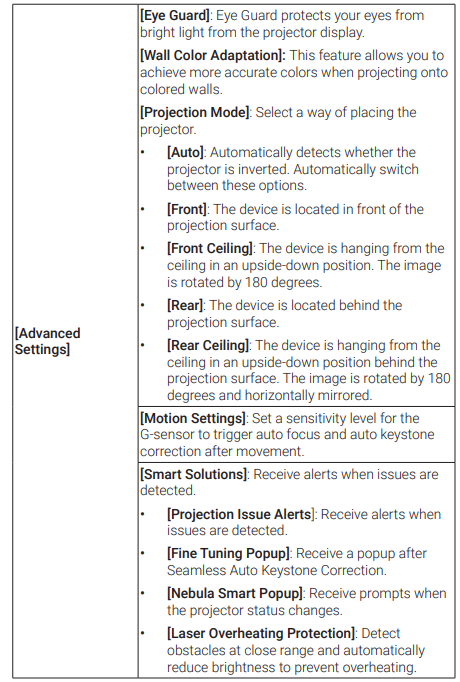
On the home page, select [Settings] > [Projector] and press confirm.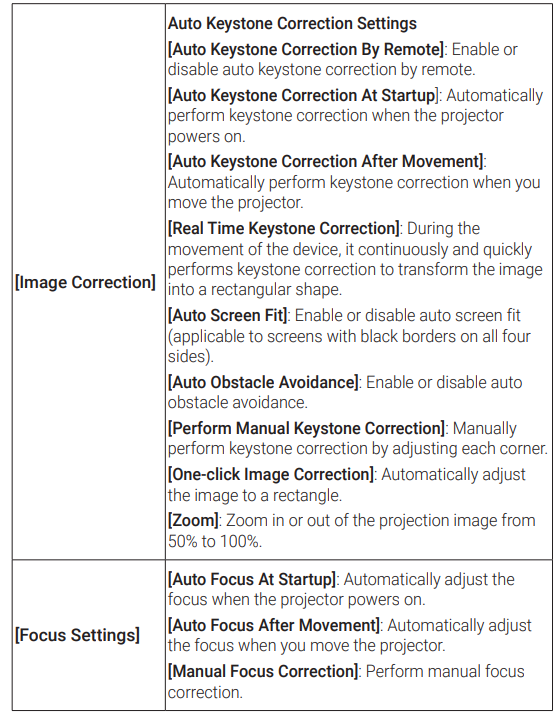
Apps
- On the home page, select [Settings] > [Apps], and press confirm.
- Select an app and check the current version, open or force stop the app, check the storage used, clear data or cache, uninstall the app, or enable or disable notifications and permissions.
System
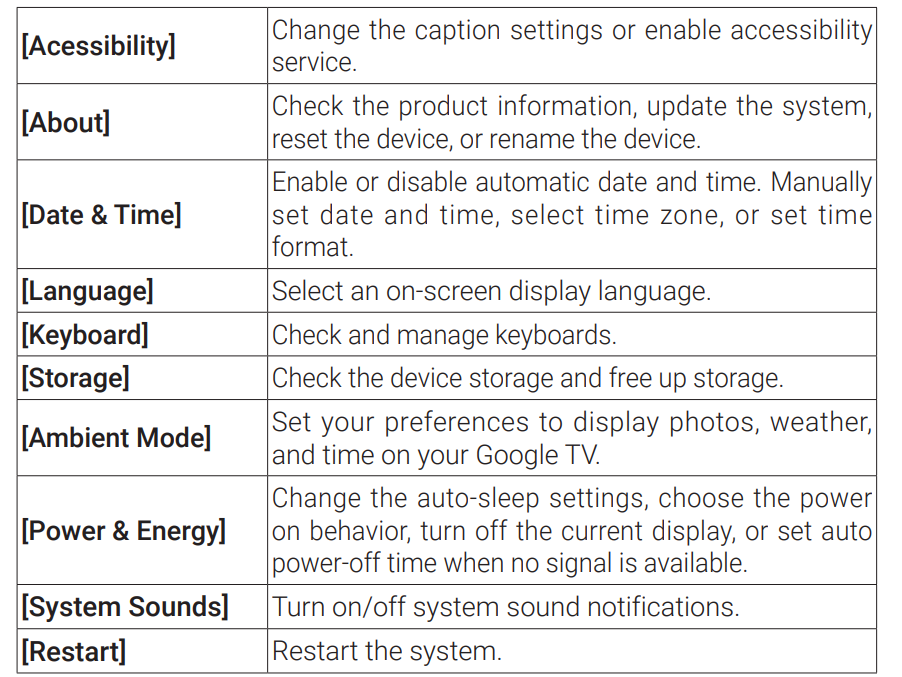
On the home page, select [Settings] > [System] and press confirm.
Others
On the home page, select [Settings] to find more settings options.


Using Your Projector
Select an App
Once connected to a wireless network, you can access online services, enjoy movies, music, and pictures, and browse online. You can download more apps from Google Play.
- Press the home page icon to access the home page.
- Select [Apps] > [Search for apps and games].
Voice Assistant
After pairing your remote control with the projector via Bluetooth, press the Google Assistant button on the remote. You can speak to the Google Assistant and request your commands.
Wireless Casting
You can wirelessly cast movies, games, music, and the entire screen from your iOS, macOS, Android, or Windows device to NEBULA Cosmos 4K SE.
Cast In-App Content
You can cast content from apps that support Chromecast, such as YouTube and Prime Video.
- Connect your device and projector to the same wireless network.
- Open the streaming app on your device.
- Play a video clip and tap the cast icon on the video screen.
- Select NEBULA Cosmos 4K SE to connect. The projector will mirror the video screen on your device.
Cast Device Screen
You can cast the entire screen from your device to the projector. Before that, please ensure NEBULA Cosmos 4K SE and your device are connected to the same wireless network
For iOS devices:
- Install the Nebula Cast app on your projector.
- Open the Nebula Cast app and follow the on-screen instructions to complete the process.
- Access the Control Center of your device and click the Screen Mirror icon.
- Click on “NEBULA Cosmos 4K SE” in the device list.
For Android devices:
- Enter the Google Home APP and select “NEBULA Cosmos 4K SE”.
- Tap the [Cast my screen] icon on the page.
Play from HDMI / USB Devices
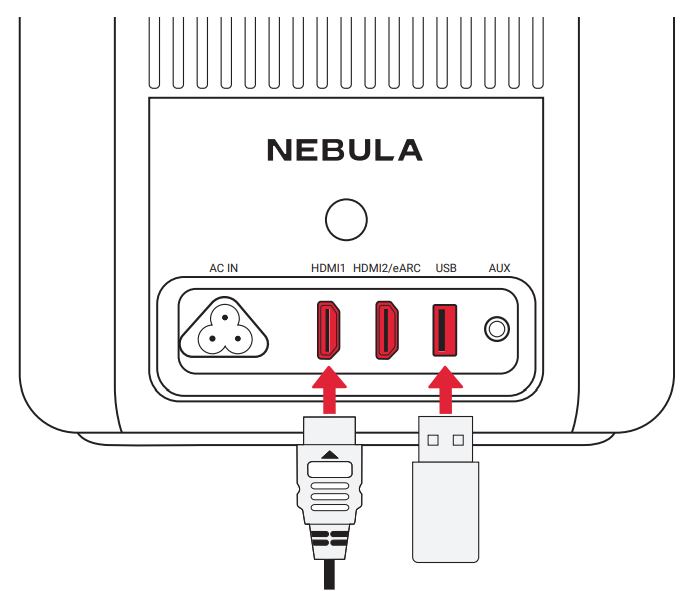
This projector supports connections with various HDMI playback devices such as TV sticks, TV boxes, DVD players, set-top boxes (STB), game consoles, or other devices. With this projector, you can also enjoy music, video, and pictures that are stored on a USB storage device (not included).
Bluetooth Speaker Mode
The projector can also be used as a Bluetooth speaker.
- Go to [Settings] > [Display & Sound] > [Sound] > [Bluetooth Speaker Mode] to switch your Nebula projector from Projector Mode to Bluetooth Speaker Mode.
- Enable Bluetooth on your smartphone and select [NEBULA Cosmos 4K SE] as the device to be connected
Connect the Projector to an External Bluetooth Speaker
- Turn on your Bluetooth speaker and set it to pairing mode (refer to your speaker’s manual for specific instructions, as the process may vary).
- Go to [Settings] > [Remotes & Accessories] in the project’s settings. Find your Bluetooth speaker’s name and select it to pair.
- Once paired successfully, the projector’s audio will be output through the external Bluetooth speaker. Other Bluetooth accessories can also be connected to the projector using the process above.
System Update
To fully enhance your experience with this product with the latest features, you are recommended to update the system from time to time. To update the system, go to [Settings] > [System] > [About] > [System update].
Troubleshooting
- Cannot Charge
- Use the included adapter and charging cable to charge the projector.
- Cannot Connect to a Wi-Fi Network
- Place your projector within 16 ft / 5 m of the router and reconnect.
- Set your router to 2.4 GHz or 5 GHz and retry.
- Restart your projector and router and retry.
- Try a different Wi-Fi network or your phone’s hotspot.
- Blurry Image
- Slightly move the projector or press the auto focus icon on the remote to start auto focus.
- To manually adjust the focus, go to [Settings] > [Projector] > [Focus Settings] > [Manual Focus Correction], and use left and right on the remote.
- Adjust the projection angle and direction, as well as the height of the projector, if necessary.
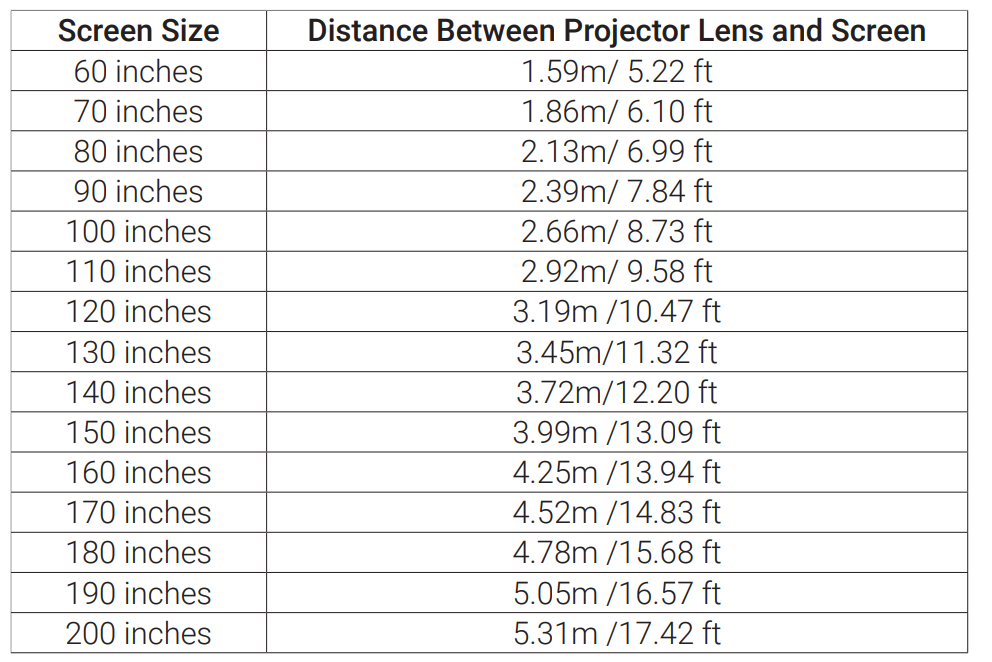
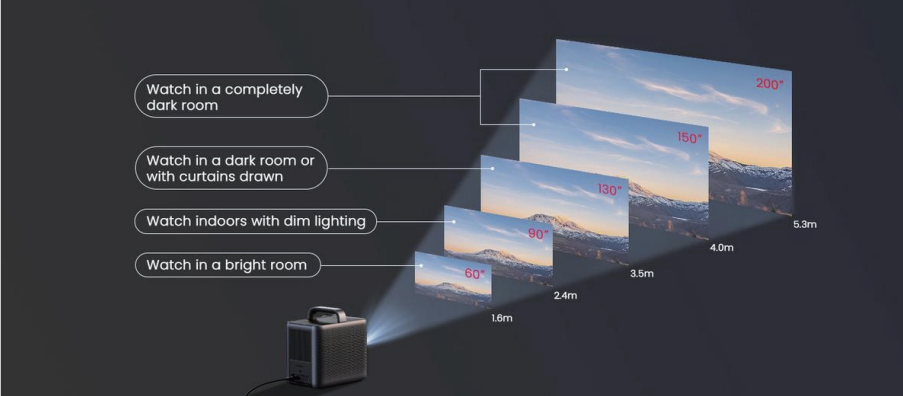
- For auto-focus to function properly, the distance between the projector and the screen should be between 1.5 and 4 meters.
Trademarks
HOMI
HDMI, the HDMI logo, and High-Definition Multimedia Interface are trademarks or registered trademarks of HDMI Licensing LLC in the United States and other countries.
Dolby AUDIO
Dolby, Dolby Audio, Dolby Vision, and the double-D symbol are trademarks of Dolby Laboratories Licensing Corporation. Manufactured under license from Dolby Laboratories. Confidential unpublished works. Copyright © 1992–2024 Dolby Laboratories. All rights reserved.