

AVANTCO #178SSPT27HC SS Series Prep Tables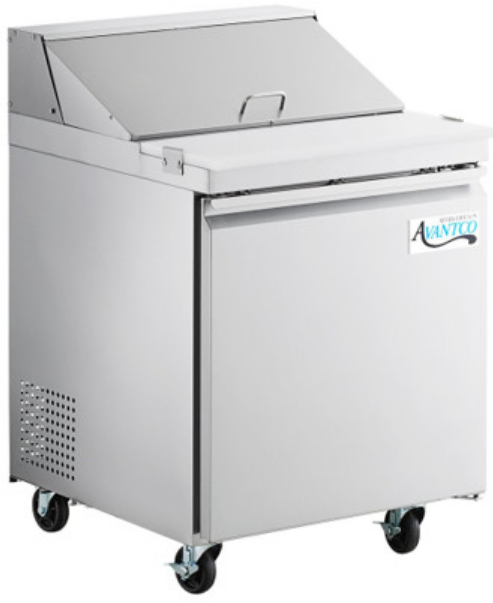
WARNING
- DANGER – RISK OF FIRE OR EXPLOSION. FLAMMABLE REFRIGERANT USED. TO BE REPAIRED ONLY BY TRAINED SERVICE PERSONNEL. DO NOT PUNCTURE REFRIGERANT TUBING.
- CAUTION – RISK OF FIRE OR EXPLOSION. FLAMMABLE REFRIGERANT USED. CONSULT REPAIR MANUAL/ OWNER’S GUIDE BEFORE ATTEMPTING TO SERVICE THIS PRODUCT. ALL SAFETY PRECAUTIONS MUST BE FOLLOWED.
- CAUTION – RISK OF FIRE OR EXPLOSION DUE TO PUNCTURE OF REFRIGERANT TUBING; FOLLOW
HANDLING INSTRUCTIONS CAREFULLY. FLAMMABLE REFRIGERANT USED. - CAUTION – RISK OF FIRE OR EXPLOSION DUE TO FLAMMABLE REFRIGERANT USED.
FOLLOW HANDLING INSTRUCTIONS CAREFULLY IN COMPLIANCE WITH LOCAL GOVERNMENT
REGULATIONS.
Sandwich Prep Tables
| Standard Top | ADA Height | Extended
Cutting Board |
Both | Standard Top with workstation | ADA Height | Extended
Cutting Board |
Both |
| 178SSPT27HC | 178SSPT27A | 178SSPT27C | 178SSPT27AC | — | — | — | — |
| 178SSPT36HC | 178SSPT36A | 178SSPT36C | 178SSPT36AC | — | — | — | — |
| 178SSPT48HC | 178SSPT48A | 178SSPT48C | 178SSPT48AC | 178SSPT488 | 178SSPTA488 | 178SSPTC488 | 178SSPTAC488 |
| 178SSPT60HC | 178SSPT60A | 178SSPT60C | 178SSPT60AC | 178SSPT6010 | 178SSPTA6010 | 178SSPTC6010 | 178SSPTAC6010 |
| 178SSPT71HC | 178SSPT71A | 178SSPT71C | 178SSPT71AC | 178SSPT7112 | 178SSPTA7112 | 178SSPTC7112 | 178SSPTAC7112 |
Mega Top Prep Tables
| Mega Top | ADA Height | Extended
Cutting Board |
Both | Mega Top
with workstation |
ADA Height | Extended
Cutting Board |
Both |
| 178SSPT27MHC | 178SSPT27MA | 178SSPT27MC | 178SSPT27MAC | — | — | — | — |
| 178SSPT36MHC | 178SSPT36MA | 178SSPT36MC | 178SSPT36MAC | — | — | — | — |
| 178SSPT48MHC | 178SSPT48MA | 178SSPT48MC | 178SSPT48MAC | 178SSPTM4812 | 178SSPTAM4812 | 178SSPTCM4812 | 178SSPTACM4812 |
| 178SSPT60MHC | 178SSPT60MA | 178SSPT60MC | 178SSPT60MAC | 178SSPTM6015 | 178SSPTAM6015 | 178SSPTCM6015 | 178SSPTACM6015 |
| 178SSPT71MHC | 178SSPT71MA | 178SSPT71MC | 178SSPT71MAC | 178SSPTM7118 | 178SSPTAM7118 | 178SSPTCM7118 | 178SSPTACM7118 |
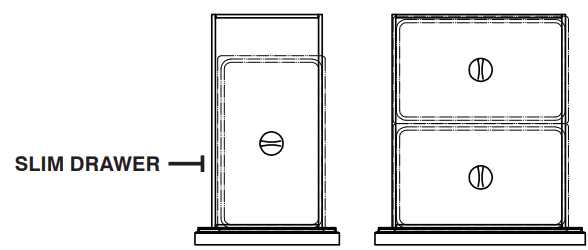
Pizza Prep Tables
| Base Model | Left | Middle | Right | Corresponding Models |
| 178SSPPT1 | Drawer | 178SSPPT1A | ||
| Slim Door | Drawer | 178SSPPT260B | ||
| 178SSPPT260 | Slim Drawer | Drawer | 178SSPPT260C | |
| Slim Drawer | Door | 178SSPPT260D | ||
| 178SSPPT2 | Door | Drawer | 178SSPPT2B | |
| Drawer | Drawer | 178SSPPT2C | ||
| Drawer | Door | 178SSPPT2D | ||
| Door | Door | Drawer | 178SSPPT3E | |
| Door | Drawer | Door | 178SSPPT3F | |
| Door | Drawer | Drawer | 178SSPPT3G | |
| 178SSPPT3 | Drawer | Drawer | Drawer | 178SSPPT3H |
Granite Top Pizza Prep Tables
| Standard | Kit with Refrigerated Topping Rail, Sneeze Guard |
| 178SSPPT60GHC | 178SSPPT60GK |
| 178SSPPT80GHC | 178SSPPT80GK |
Installation
This unit is intended for use in a temperature-controlled environment less than 75 degrees Fahrenheit and 60% relative humidity. IMPORTANT – Please read before installation:
- If the shelf has a raised lip, the lip needs to be installed facing up towards the rear of the cabinet to
Promote proper air flow. Failure to install the shelves properly is considered user error and is not covered by warranty. - If the unit has recently been transported on its side, please let the unit stand upright for a minimum of 24 hours before plugging it in.
- Make sure that the unit has reached the desired temperature before loading the unit with products.
This unit is meant for keeping cold products cold, not chilling warm products. - Make sure that there is proper ventilation around the unit in the area where it will operate.
- Make sure all accessories are installed (i.e., shelves, shelf clips, casters) before plugging the unit in.
- Do not attempt to remove or repair any component of the unit. Consult an authorized service technician for servicing/repair.
- Do not hang on doors or stand inside the unit.
- Do not store flammable, explosive, or corrosive liquids or gases in or near the cooler.
- Please read through the manual in its entirety.
- This unit is designed to perform in a temperature-controlled environment at 60% relative humidity. The unit should be located away from doors, air ducts, and fans that could disrupt airflow and negatively impact performance.
Cabinet Location Guidelines
- Install the unit on strong and level surfaces.
- If the surface is uneven, the unit may be noisy.
- The unit may malfunction if the surface is uneven.
- Keep the cooler stable to avoid vibration and noise.
- Install the unit in an indoor, well-ventilated area.
- For best performance, please maintain clearance of 3” on the back of the unit.
- Do not use outdoors. For indoor use only.
- Avoid direct sunlight.
- The unit should be placed far from any heating source to avoid a decrease in refrigeration efficiency.
- Avoid installation in a high-humidity and/or dusty area.
- Humidity above 60% can cause the unit to rust, to collect condensation, and may decrease efficiency.
- Dust collected on the condenser coil will cause the unit to malfunction.
- For optimal performance, 3” of clearance is required around all louvered or vented panels to allow for proper air flow.
- Component failure due to improper installation is not covered under the warranty.
- Select a location away from heat and moisture-generating equipment.
- Ambient temperatures above 75 degrees Fahrenheit may cause the compressor to malfunction.
- For optimal performance, this unit should not be used in environments with ambient temperatures exceeding 75 degrees Fahrenheit.
- The unit should not be placed in areas with an ambient temperature over 90 degrees Fahrenheit.
- Equipment malfunctions due to ambient temperatures above 90 degrees could void the warranty.
- Do not install this unit inside a closet or alcove.
Electrical
- Please ensure that the required voltage is being supplied at all times.
- The unit should be plugged into a grounded and properly sized electrical outlet with appropriate
over-current protection. Please refer to the electrical requirements on the unit’s nameplate. - This unit should have its dedicated outlet.
- Do not use extension cords.
- Ensure the unit is not resting on or against the electrical cord.
- If the unit is not in use for a long period of time, please unplug the unit from the outlet.
- To avoid shock and fire hazards, do not plug in or unplug the unit with wet hands.
- After unplugging the unit, wait at least 10 minutes before plugging it back in. Failure to do so could cause damage to the compressor.
Adjusting the Temperature
Your new refrigerator is already factory-set to run at optimum temperatures for food safety and should require no adjustments. Refrigerators are set to cycle between a minimum temperature of 33 degrees Fahrenheit and a maximum temperature of 40 degrees Fahrenheit.
Adjusting the temperature changes the minimum temperature your unit will run at. Your unit will not run constantly at this setting. To change it, follow these instructions:
Digital Control Units
- Hold “SET” for 1 sec. The display will flash the current minimum temperature.
- Use the arrow buttons to adjust the minimum temperature you want it to run at.
- Press “SET” again to save your settings.
Always remember to calculate the differential if you change the minimum temperature setting. The cabinet temperature will fluctuate up to +7 degrees over your set minimum temperature as the compressor runs and shuts off. Setting the temperature too high will result in unsafe maximum temperatures and possible health code violations.
Defrost System
Refrigerator coils are kept below the freezing point (32 degrees Fahrenheit). During compressor downtime,
the evaporator fan continues to circulate air through the evaporator coil. This air circulation raises the coil
temperature above the freezing point, melting any accumulated frost. Run-off water is drained into the evaporator pan and evaporated. Automatic defrost timers automatically initiate at pre-set intervals and for a pre-determined duration.
Running a Manual Defrost Cycle
This unit is pre-programmed to run automatic defrost cycles at preset intervals. However, if you would like to
run a manual defrost cycle at any time. Please follow the steps below.
Refrigerators:
- Press the defrost button (snowflake symbol and down arrow) for approximately 3 seconds.
- Repeat to stop the defrost cycle.
Loading Food Pans
Pizza prep units and sandwich prep units are designed to function with all pans in place, even if some pans are to be left empty. For maximum food freshness, fill the pans only with an amount that can be used in a specific usage period. During non-use, please close the insulated lid cover.
Safety / Warning
Please pay close attention to the safety notices in this section. Disregarding these notices may lead to
serious injury and/or damage to the unit.
ATTENTION
- • To minimize shock and fire hazards, be sure not to overload the outlet. Please designate one outlet for your unit.
- Do not use extension cords.
- Do not put your hands under the unit while it is being moved.
- When the unit is not in use for a long period of time, please unplug the unit from the outlet.
- After unplugging the unit, wait at least 10 minutes before plugging it back in. Failure to do so could cause damage to the compressor.
UNPLUG CORD
- To minimize shock and fire hazards, please do not plug or unplug the cord with wet hands.
- During maintenance and cleaning, please unplug the unit.
PROPER GROUNDING REQUIRED
- To minimize shock and fire hazards, make sure that the unit is properly grounded.
WARNING
- Do not attempt to remove or repair any component unless instructed by the factory.
- Make sure that the unit is not resting on or against the electrical cord and plug.
- To minimize personal injury, do not hang on the doors.
- Do not store any flammable or explosive gases or liquids inside the unit.
- Do not attempt to alter or tamper with the electrical cord.
Operation / Maintenance
WARNING: DISCONNECT THE POWER CORD BEFORE CLEANING ANY PARTS OF THE UNIT.
NOTE: We strongly recommend that any servicing be performed by an authorized service technician.
Loading Product
- Make sure there is at least 4″ of clearance from the evaporator.
- Ensure all shelves are sitting level and properly secured before loading products.
- Do not store flammable and explosive gases or liquids inside the unit.
Cleaning the Condenser Coil
- For efficient operation, keep the condenser surface free of dust, dirt, and lint.
- We recommend cleaning the condenser coil at least once per month.
Cleaning the Fan Blades and Motor
- If necessary, clean the fan blades and motor with a soft cloth.
- If it is necessary to wash the fan blades, cover the fan motor to prevent moisture damage.
Cleaning the Interior of the Unit
- When cleaning the cabinet interior, use a solvent of warm water and mild soap.
- Do not use steel wool, caustic soap, abrasive cleaners, or bleach that may damage the interior finish.
- Wash door gaskets regularly, preferably weekly. Simply remove the door gasket from the
frame of the door, soak it in warm water and soap for thirty (30) minutes, dry it with a soft cloth, and replace it. - Check door gaskets for proper seal after they are replaced.
- Periodically, remove the shelves and pilasters from the unit and clean them with mild soap and warm water. To remove the pilasters first, remove the shelves and shelf brackets. Then, simply lift the pilaster up and out.
Cleaning the Exterior of the Unit
- A soft cloth and clean warm water should always be the first choice for mild stains and loose dirt. A
final rinse with clean water and a dry wipe will complete the process and eliminate the possibility of water stains. - Only use soft cloths, microfiber sponges, or plastic scouring pads. – Avoid anything that might scratch the surface.
- Clean with the polished lines by wiping parallel to the grain lines.
- Use cleaning chemicals such as alkaline, alkaline chlorinated, and non-chlorinated chemicals. Chlorine-free cleaning options include acetone, methyl alcohol, and mineral spirits. – Noble Chemical offers Excel, a water-based aerosol cleaner and polish.
- If you are looking to sanitize your stainless steel, Noble’s QuikSan is a ready-to-use sanitizer that won’t damage stainless steel.
NEVER USE THE FOLLOWING PRODUCTS TO CLEAN STAINLESS STEEL
| What | Why |
| Chloride-Based Cleaners | Using chlorine/bleach could result in pinholes. |
| Sharp Objects | Sharp edges can puncture the surface. |
| Onion / Olive Juice | A galvanic chemical reaction transfers to the metal and causes pin holes. |
| Scouring Pads | These will scratch the surface. |
| Hard Water | This may leave hard water spots and deposits that break down the stainless steel. |
Condenser Coil Cleaning Instructions:
A dusty condenser may lead to high energy consumption, less cooling effectiveness, and compressor damage. The condenser coil is located at the bottom behind the panel.
- Disconnect the electrical power from the unit.
- Remove the front cover and base cover with a screwdriver.
- Using a soft brush and/or vacuum, remove the dirt, lint, etc. from the finned condenser coil in a vertical direction.
- Clean the condenser with a commercial condenser coil cleaner, available from any kitchen equipment retailer. Ex. Noble Chemical Tech Line.
- After cleaning, straighten any bent condenser fins with a fin comb.
- When finished, be sure to reinstall the front cover and base cover.
- Reconnect the electrical power to the unit.
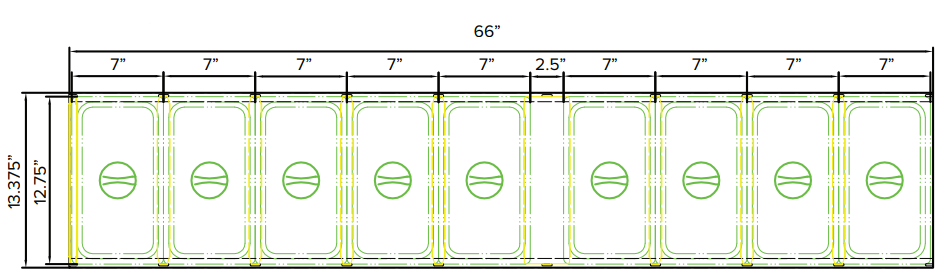
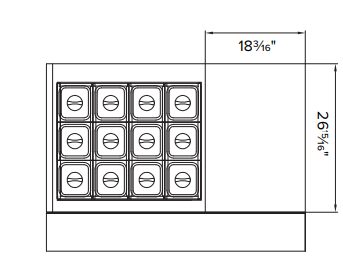
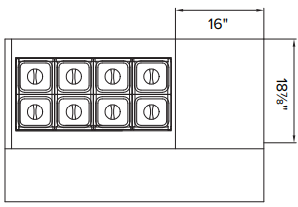
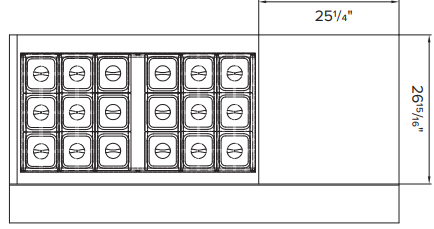
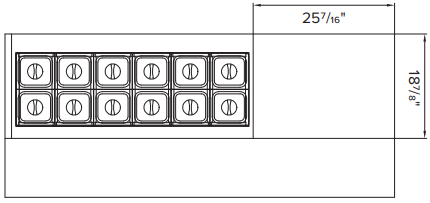
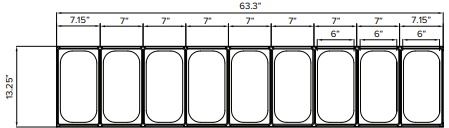
Food Pan Layouts: SSPT
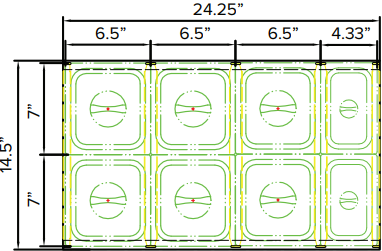
- 178SSPT27 (6) 1/6 Size, (2) 1/9 Size
- 178SSPT36 (10) 1/6 Size

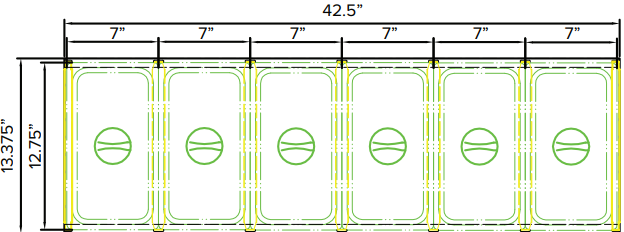
- 178SSPT48 (12) 1/6 or (6) 1/3 Size
- 178SSPT60 (16) 1/6 or (8) 1/3 Size
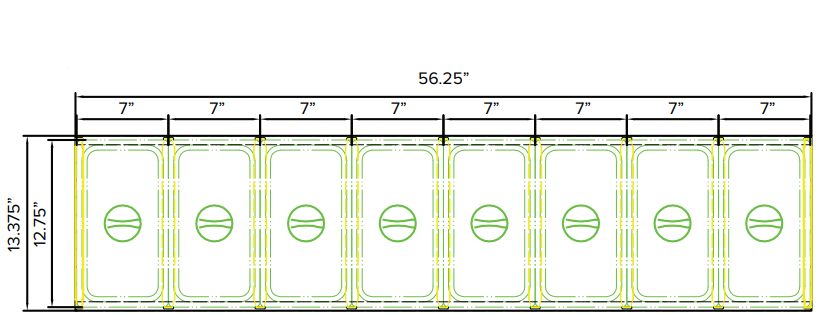
- 178SSPT71 (18) 1/6 or (9) 1/3 Size
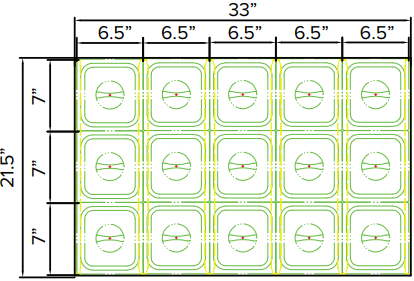
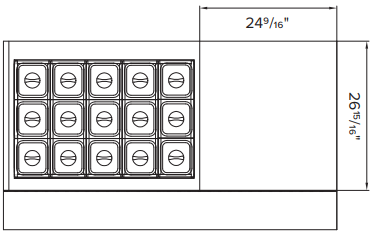
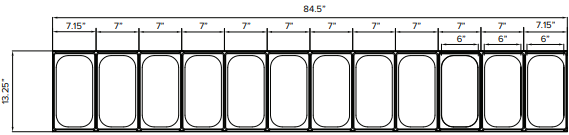
Food Pan Layouts: SSPT-M
- 178SSPT27M (9) 1/6 Size, (3) 1/9 Size

- 178SSPT36M (15) 1/6 Size
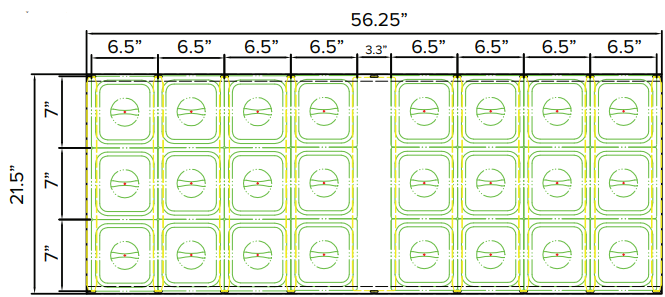
- 178SSPT48M (18) 1/6 Size

- 178SSPT60M (24) 1/6 Size
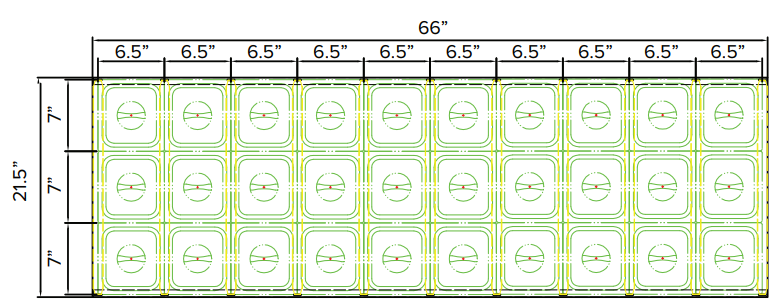
- 178SSPT71M (30) 1/6 Size
Prep Tables: SSPTM-SSPT
- 178SSPTM4812 (12) 1/6 Size
- 178SSPT488 (8) 1/6 Size
- 178SSPTM6015 (15) 1/6 Size
- 178SSPT6010 (10) 1/6 Size
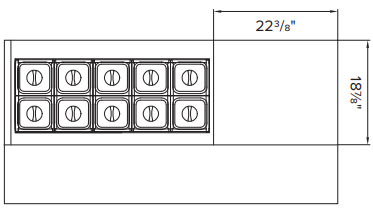
- 178SSPTM7118 (18) 1/6 Size
- 178SSPT7112 (12) 1/6 Size
Food Pan Layouts: SSPPT
- 178SSPPT1 (5) 1/3 size
- 178SSPPT260 (7) 1/3 size
- 178SSPPT2 (5) 1/3 size
- 178SSPPT3 (5) 1/3 size
Drawer Pan Layouts: SSPPT
- 178SSPPT1
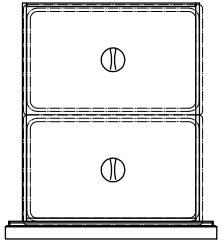
- 178SSPPT260
- 178SSPPT2
- 178SSPPT3
Food Pan Layouts: SS-PT
| Item # | Size | 178SSPT27HC | 178SSPT36HC | 178SSPT48HC | 178SSPT60HC | 178SSPT72HC |
| 178SCLB15354 | 1315/16″ x 9/16″ | 2 | 2 | |||
| 178SCLB15327 | 127/8″ x 9/16″ | 2 | 2 | 2 | ||
| 178SCLB25354 | 1315/16″ x 1″ | 3 | 4 | |||
| 178SCLB25327 | 127/8″ x 1″ | 5 | 7 | 7 | ||
| 178SCLB90354 | 127/8″ x 39/16″ | 1 |
Food Pan Divider Bars: SS-PT-M
| Item # | Size | 178SSPT27MHC | 178SSPT36MHC | 178SSPT48MHC | 178SSPT60MHC | 178SSPT72MHC |
| 178SCLB15532 | 2015/16″ x 9/16″ | 2 | 2 | |||
| 178SCLB25532 | 2015/16″ x 1″ | 3 | 4 | 6 | 8 | 11 |
| 178SCLB9032 | 2015/16″ x 39/16″ | 1 | ||||
| 178SCLB10853 | 2015/16” x 41/4” | 1 |
Food Pan Divider Bars: SSPPT
| Item # | Size | 178SSPPT1 | 178SSPPT260 | 178SSPPT2 | 178SSPPT3 |
| 178PICB15331 | 13″ x 9/16″ | 2 | 2 | 2 | 2 |
| 178PICB25331 | 13″ x 1″ | 3 | 5 | 6 | 10 |
| Large Divider Bar | 13″ x 211/16″ | 1 | 1 ( 13” x 41/4”) | 1 ( 13” x 51/4”) | 1 |
Troubleshooting
| Problem | Possible Cause | Possible Solution |
| Fuse blown or circuit breaker tripped. | Replace the fuse or reset the circuit breaker. | |
| The compressor is not. | Power cord unplugged. | Plug in the power cord. |
| Running. | Thermostat set too high. | Set the thermostat to a lower temperature. |
| The cabinet is in defrost cycle. | Wait for the defrost cycle to finish. | |
| Condensing units run for long periods of time. | An excessive amount of warm product is placed in the cabinet. | Allow adequate time for the product to cool down. |
| Prolonged door opening or door ajar. | Ensure doors are closed when not in use. Avoid opening doors for long periods. | |
| Door gasket(s) are not sealing properly. | Ensure gaskets are snapped in completely.
Remove the gasket and wash with soap and water. Check the condition of the gasket and replace it if necessary. |
|
| Dirty condenser coil. | Clean the condenser coil. (Page 8) | |
| Evaporator coil iced over. | Unplug the unit and allow the coil to defrost. Make sure the thermostat is not set too cold. Ensure that door gasket(s) are sealing properly. | |
| The cabinet temperature is too warm. | The thermostat is set too warm. | Set the thermostat to a lower temperature. |
| Air flow blocked. | Re-arrange the product to allow for proper air flow. Make sure there is at least 4″ of clearance from the evaporator. | |
| An excessive amount of warm product is placed in the cabinet. | Allow adequate time for the product to cool down. | |
| Fuse blown or circuit breaker tripped. | Replace the fuse or reset the circuit breaker. | |
| Dirty condenser coil. | Clean the condenser coil. (Page 8) | |
| Evaporator coil iced over. | Ensure doors are closed when not in use. Avoid opening doors for long periods. | |
| Low refrigerant levels. | Contact a service technician to check refrigerant levels. | |
| The door is slightly ajar. | Make sure the door is completely closed. | |
| Condensation is | The gasket is not sealing properly. | Clean, repair, or replace the gasket as necessary. |
| Collecting on the cabinet and/or floor. | Relative humidity is above 60%. | Move the unit to an area with a relative humidity or a lower humidity level. |