
Close Menu
onyxguides.comonyxguides.com

    Subscribe to Updates

    Get the latest creative news from FooBar about art, design and business.

    What's Hot

    Sony HDIH-1200 HD Projection Head Instruction Manual

    May 11, 2026

    Do Ceiling Fans Use a Lot of Electricity

    May 11, 2026

    Which Retro Gaming Console Is Best

    May 8, 2026
    Facebook X (Twitter) Instagram
    onyxguides.comonyxguides.com
    Facebook X (Twitter) Instagram Pinterest
    • Home
    • About us
    • Terms & Conditions
    • Privacy Policy
    • FAQs
    • Contact us
    onyxguides.comonyxguides.com
    Home » Awol ALR D100 Ambient Light Rejecting Projector User Guide

    Other

    Awol ALR D100 Ambient Light Rejecting Projector User Guide

    By Gabriel SmithMarch 25, 2026Updated:March 28, 20261 Comment3 Mins Read
    Facebook Twitter Pinterest LinkedIn Tumblr WhatsApp Telegram Email
    Awol-ALR-D100-Ambient-Light-Rejecting-Projector-featured
    Share
    Facebook Twitter LinkedIn Pinterest Email

    AWOL LOGO

    Awol ALR D100 Ambient Light Rejecting Projector

    Awol-ALR-D100-Ambient-Light-Rejecting-Projector-product

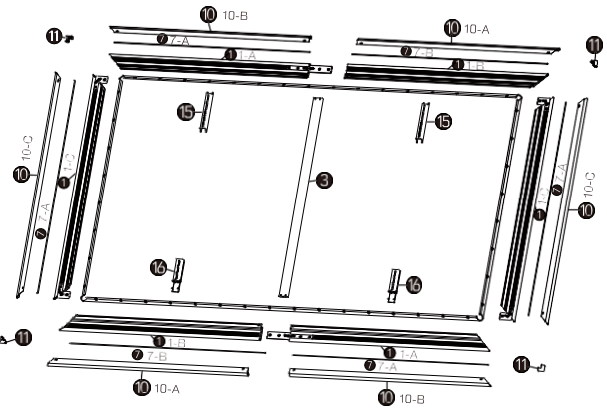
    Overview

    Awol-ALR-D100-Ambient-Light-Rejecting-Projector-figure-1

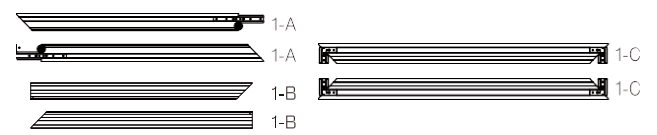
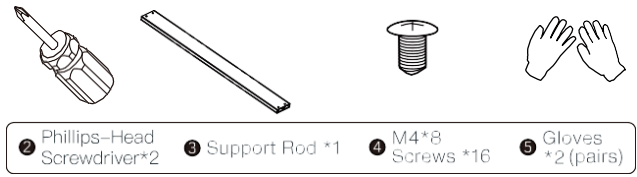
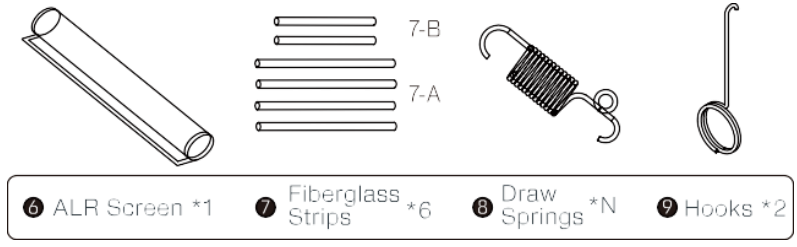
    Package Contents

    Awol-ALR-D100-Ambient-Light-Rejecting-Projector-figure-2

    • Inner Frames *4
    • Inner Frames *2Awol-ALR-D100-Ambient-Light-Rejecting-Projector-figure-3

    Awol-ALR-D100-Ambient-Light-Rejecting-Projector-figure-4

    Awol-ALR-D100-Ambient-Light-Rejecting-Projector-figure-5

    Awol-ALR-D100-Ambient-Light-Rejecting-Projector-figure-6

    Inner Frames

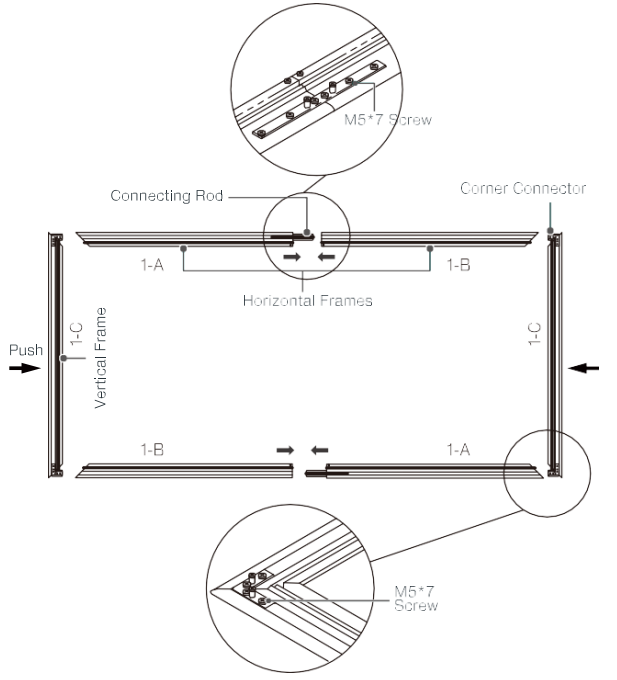
    1. Connect the horizontal frames and fasten the M5*7 screws.
    2. Insert the four corner connectors into the horizontal inner frames, and attachthe corners with M5*7 screws as shown below.Awol-ALR-D100-Ambient-Light-Rejecting-Projector-figure-7
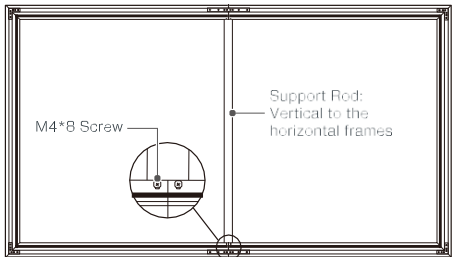
    3. Install the support rod as shown below.Awol-ALR-D100-Ambient-Light-Rejecting-Projector-figure-8
    Assemble the Screen
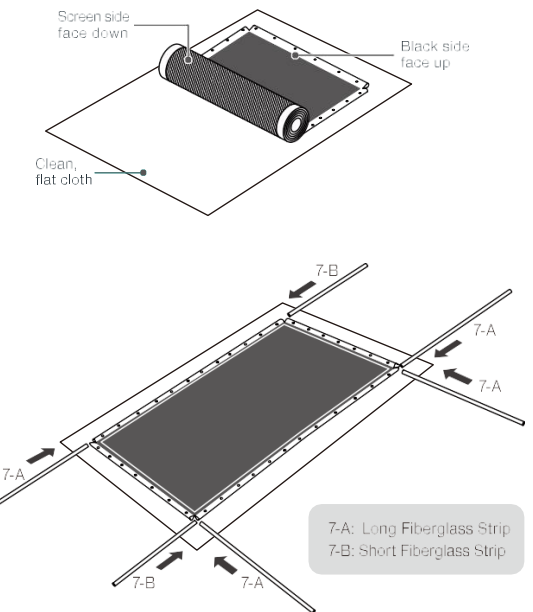
    1. Put on gloves and place a clean cloth (or use the packaging material for the screen) on a flat, clean, and level surface.Awol-ALR-D100-Ambient-Light-Rejecting-Projector-figure-9
    2. Unroll the screen, place it face down on the cloth, then insert the fiberglass strips into the screen sides.Awol-ALR-D100-Ambient-Light-Rejecting-Projector-figure-10
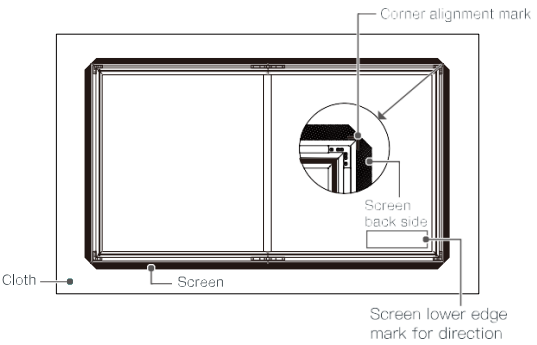
    3. Put the assembled frames on the back side of the screen.
      Awol-ALR-D100-Ambient-Light-Rejecting-Projector-figure-11
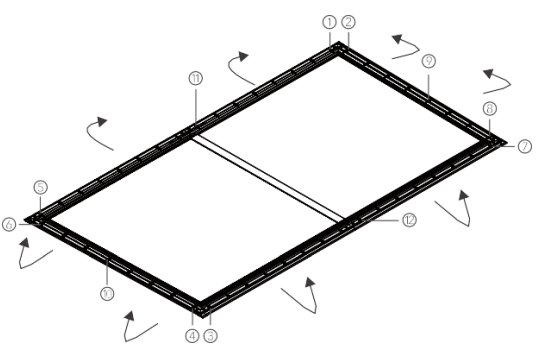
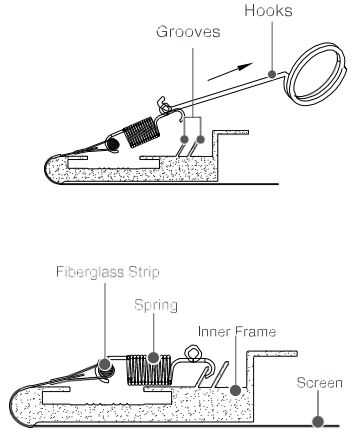
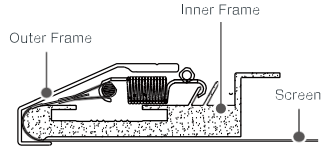
    4. Fix the screen onto the frame with all the springs in order as indicated below (corners, short sides, then long sides).Awol-ALR-D100-Ambient-Light-Rejecting-Projector-figure-12Awol-ALR-D100-Ambient-Light-Rejecting-Projector-figure-13
    5. Hold the screen upright and ensure that it is taut and flat. Adjust the springs until no creases are observed.

    Outer Frames
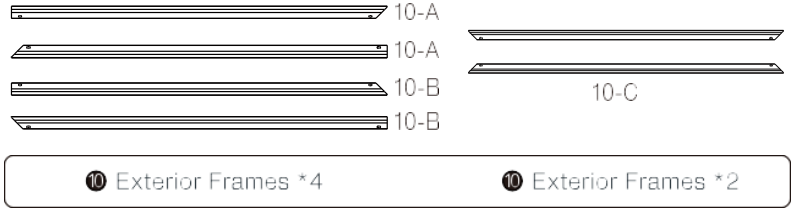
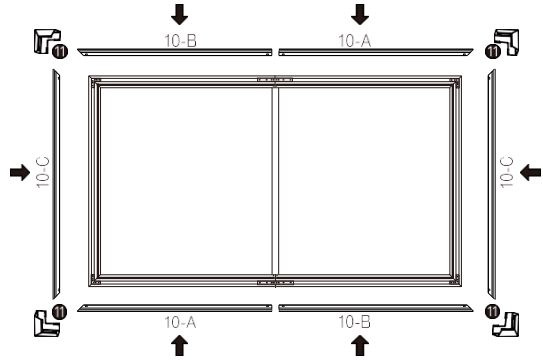
    1. Place the outer frames against the inner frames, align the four corners, and attach with the included M4*8 screws.
    2. Attach the plastic corner protectorstoo the four corners.Awol-ALR-D100-Ambient-Light-Rejecting-Projector-figure-14

    Awol-ALR-D100-Ambient-Light-Rejecting-Projector-figure-15

    Mount on the Wall
    1. Estimate the wall mount area for the screen. The height between the ground and the lower edge of the screen should be confirmed by your preferred UST projector throw distance using the throw distance chart. (As shown below).
    2. Measure the distance between the spots where the wall brackets will be mounted with the included level ruler.

    Recommended DistanceAwol-ALR-D100-Ambient-Light-Rejecting-Projector-figure-16
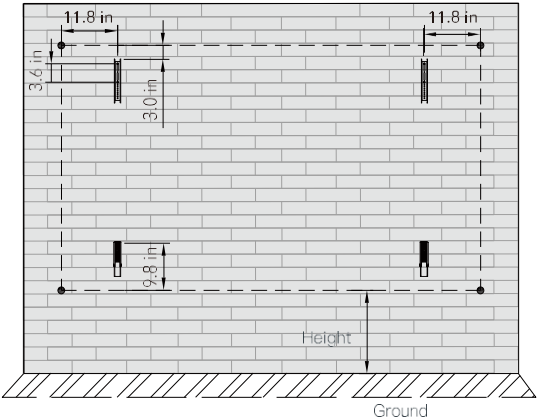
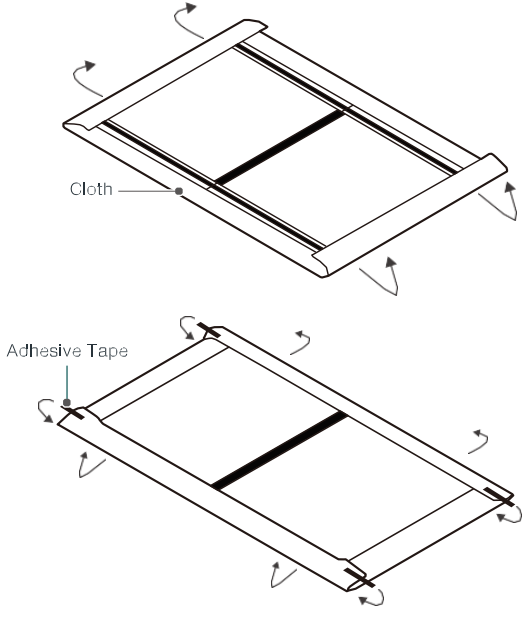
    • Make sure the screen is correctly assembled, then wrap the screen front with the cloth to prevent it from being damaged or scratched.Awol-ALR-D100-Ambient-Light-Rejecting-Projector-figure-17
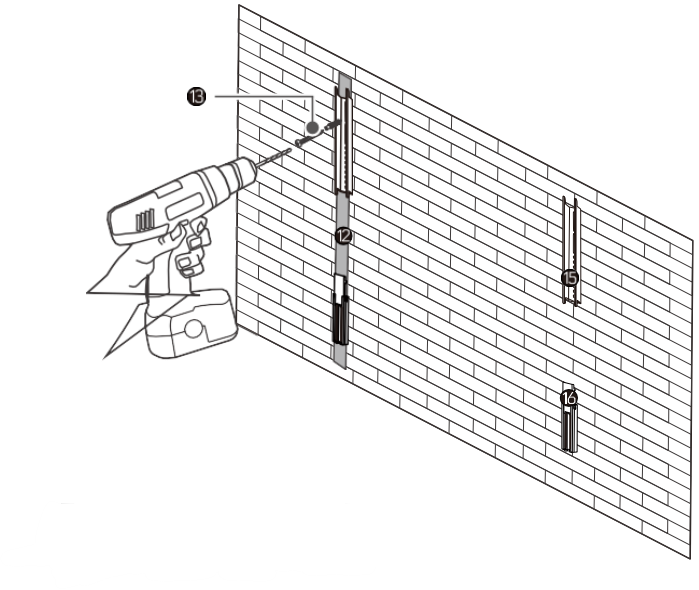
    • Drill holes respectively and install the four wall brackets using the wall anchors with screws. Note: Make sure the brackets are level with the level ruler.Awol-ALR-D100-Ambient-Light-Rejecting-Projector-figure-18
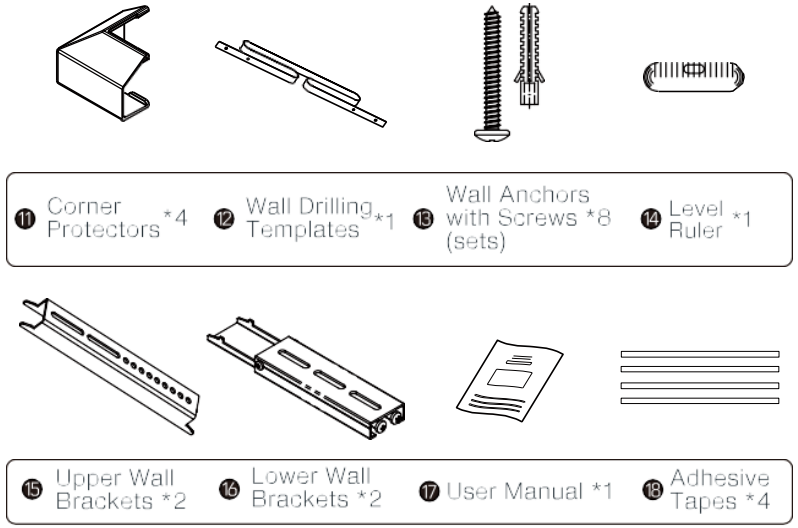
    • Wall Drilling Templates
    • Wall Anchors with Screws
    • Upper Wall Brackets
    • Lower Wall Brackets
    Screen Height Adjustment
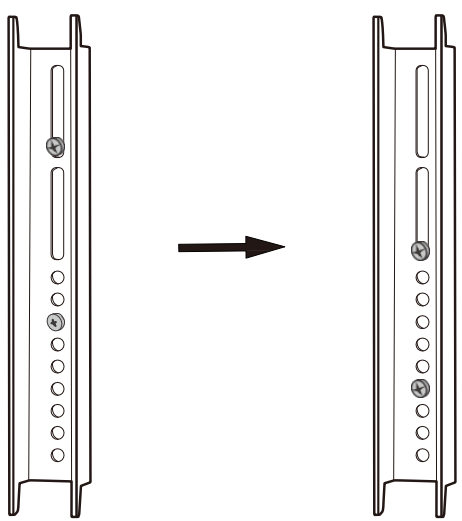
    Awol-ALR-D100-Ambient-Light-Rejecting-Projector-figure-19

    You can fine-tune the installation height of the screen without drilling new holes based on the screw holes in the upper wall bracket and the lower wall bracket spring range. ( Adjustable height range: 0-2.0 inches)

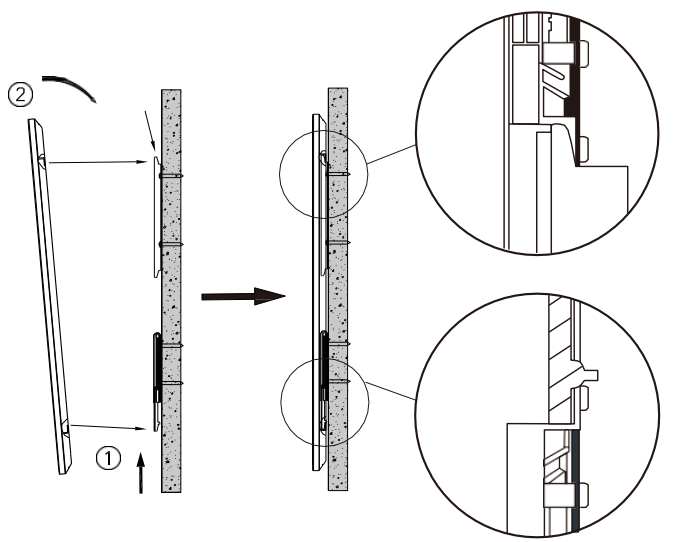
    • Mount the screen onto the wall as shown below.
    • Insert the lower side of the screen into the lower wall bracket, then push upwards to compress the lower wall bracket spring.
    • Insert the upper side of the screen into the upper wall bracket, then release.Awol-ALR-D100-Ambient-Light-Rejecting-Projector-figure-20

    Maintenance 

    Dust, dirt, and scratches on the projection screen surfacewilll affecthehc quality and performance of the projection image. For optimal regultg we advise paying attention to the following instructions.

    1. The screen surface has a horizontal structure.
    2. DO NOT wipe the screen up and down or in a circular motion.
    3. Wipe from left to right only. a microfiber cloth (rough towel or cloth may damage the screen’s surface).
    4. Gently wipe the screen with a moistened microfiber cloth with mild soap diluted in water.
    5. Don’t touch the screen material to avoid leaving fingerprints. Use gloves when handling the material.
    6. Don’t scratch the material, as it will leave permanent markings on the screen’s surface.
    7. Don’t use acetone, benzene, alcohol, or any other organic solvents to clean the screen material.
    8. Using such chemicals will permanently damage the screen.

    Specification
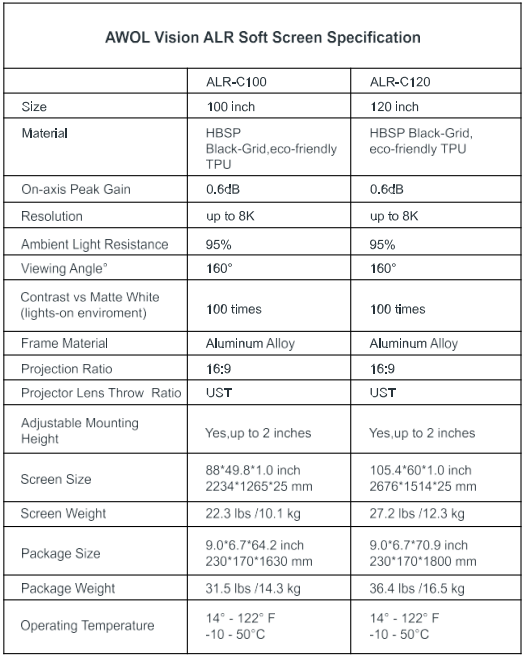
    Awol-ALR-D100-Ambient-Light-Rejecting-Projector-figure-21


    Customer Service

    • Tel: +1 (888) 891-6866
    • Customer Service Hours: Monday–Friday, 9 AM–6 PM
    • Website: https://awolvision.com/
    Share. Facebook Twitter Pinterest LinkedIn Tumblr Email
    Gabriel Smith

    Related Posts

    Sony HDIH-1200 HD Projection Head Instruction Manual

    May 11, 2026

    Do Ceiling Fans Use a Lot of Electricity

    May 11, 2026

    How to Use Lexar Portable SSD

    May 8, 2026

    Which Retro Gaming Console Is Best

    May 8, 2026

    Case Android Phone User Manual

    May 7, 2026

    How To Use Phone Gaming Controller

    May 7, 2026
    View 1 Comment

    1 Comment

    1. Pingback: How a Projector Works Simple Guide to Projector Technology

    Leave A Reply Cancel Reply

    Don't Miss
    Other

    Sony HDIH-1200 HD Projection Head Instruction Manual

    May 11, 2026

    Sony HDIH-1200 HD Projection Head THIS APPARATUS MUST BE EARTHED IMPORTANT The wires in this…

    Do Ceiling Fans Use a Lot of Electricity

    May 11, 2026

    Which Retro Gaming Console Is Best

    May 8, 2026

    How to Use Lexar Portable SSD

    May 8, 2026
    Stay In Touch
    • Facebook
    • Twitter
    • Pinterest
    • Instagram
    • YouTube
    • Vimeo

    Subscribe to Updates

    Subscribe to Updates

    Follow us

    Facebook X-twitter Instagram Pinterest

    © 2025 All rights reserved Onyx Guide.