


Garmin Reactor Autopilot Remote Control Installation
Safety Instructions
- See the Important Safety and Product Information guide in the product box for product warnings and other important information.
- You are responsible for the safe and prudent operation of your vessel.
- The autopilot is a tool that enhances your capability to operate your boat.
- It does not relieve you of the responsibility of safely operating your boat.
- Avoid navigational hazards and never leave the helm unattended.
- You are responsible for the safe and prudent operation of your vessel.
- Sonar is a tool that enhances your awareness of the water beneath your boat.
- It does not relieve you of the responsibility of observing the water around your boat as you navigate.
- Learn to operate the autopilot on calm and hazard-free open water.
- The autopilot system continuously adjusts the steering of your boat to maintain a constant heading.
- You can operate the autopilot system using the helm control device.
- Using the helm control, you engage and steer, set up, and customize the autopilot system.
- In addition to the basic heading-hold functionality, the system allows manual steering and several modes of automatic steering functions and patterns.
Overview

- Select to place the autopilot in standby mode and return to the heading screen.
- Select to open a menu or perform the function listed above the key.
- Select to open the display settings menu.
- Press twice to adjust the backlight. Hold to turn off the device.
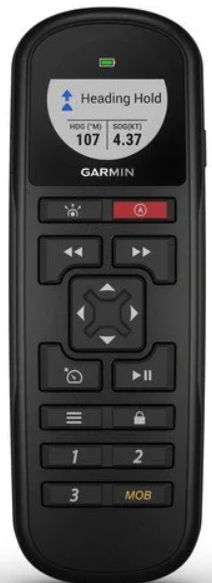
Heading Screen
The heading screen displays the status of the autopilot
- Autopilot status/autopilot status indicator. Standby appears in yellow, and the autopilot status indicator appears in yellow when the device is in standby mode.
- Heading Hold appears in green, and the autopilot status indicator appears in green when the device is in heading hold. Heading trend indicator.
- Actual heading (in standby mode) Intended heading (with the autopilot engaged)
- Rudder position indicator (This functionality is available only when a rudder sensor is connected.)
Standby Mode
The autopilot does not steer the boat in standby mode. You are responsible for controlling the helm when in standby mode. In standby mode, you can engage the autopilot and adjust settings. “Standby” appears in yellow, and the yellow LED indicator appears in the upper-right corner of the screen when the device is in standby mode.
Operation
Heading Hold
You can engage the autopilot heading hold function to maintain your current heading without steering the helm.
Engaging the Autopilot
When you engage the autopilot, the autopilot takes control of the helm and steers the boat to maintain your heading. From the heading screen, select Engage. “Heading Hold” appears in green at the top of the heading screen, and a green icon appears in the upper-right corner of the screen when the device is in heading hold. Your intended heading shows in the center of the heading screen.
Heading Adjustment
When the autopilot is engaged, you can adjust the heading using the keys on the helm control or using the helm if your autopilot is equipped with Shadow Drive™ technology.
Adjusting the Heading with the Helm
With the autopilot engaged, manually steer the boat. The autopilot activates Shadow Drive mode. When you release the helm and manually maintain a specific heading for a few seconds, the autopilot resumes a heading hold at the new heading. The heading trend indicator appears, and the autopilot status indicator turns green to indicate the autopilot has control of the boat.
Selecting the Steering Mode
Rudder steering mode turns the boat in 1° increments when you select a key. Step steering mode turns the boat in increments of 10°. You can customize step turn size increments (Adjusting the Step Steering Increment, page 2).
- Select Menu. Select Steering Mode to toggle between rudder steering mode and step steering mode.
Adjusting the Heading with the Keys
Before you can steer your boat using the keys at the bottom of the helm control, you must have the autopilot engaged.
- Select oo use of rudder steering mode.
- Hold 1°> 10°>> or <<10° <1° to use step steering mode.
Adjusting the Step Steering Increment
- Select Menu > Steering Mode > Step Turn Size.
- Select or.
- Select Done.
Direction Control
Direction control informs the autopilot which direction the boat is moving (forward or reverse) using the helm control. Enabling Direction Control
- Select Menu > Setup > User Autopilot Setup > Direction Control.
- Select Enabled.
Using Direction Control
Before you can use direction control, you must enable the direction control functionality (Enabling Direction Control, page 2). When traveling in standby mode, select Direction. Appears in the upper-right corner.
Steering Patterns
You are responsible for the safe operation of your boat. Do not begin a pattern until you are certain that the water is clear of obstacles.
The autopilot can steer the boat in preset patterns for fishing, and it can also perform other specialty maneuvers such as U-turns and Williamson turns. Pattern steering is not based on GPS, and it can be used without a GPS device connected to the autopilot.
Zigzag Pattern
The zigzag pattern steers the boat from port to starboard and back, over a specified time and angle, across your current heading.
Setting Up the Zigzag Pattern
You can modify the amplitude and period of the zigzag pattern. The default values are 30° and 1.5 minutes.
- Select Menu > Pattern Steering > Zigzag > Setup > Zigzag
Amplitude. - Select or set the amplitude in increments of 5°.
- Select Done.
- Select Setup > Zigzag Period.
- Select or set the period.
- Select Done.
Circles Pattern
The circular pattern steers the boat in a continuous circle, in a specified direction, and at a specified time interval. Setting Up the Circles Pattern
- Select Menu > Pattern Steering > Circles > Time.
- Select or set the time.
- Select Done.
Following the Circles Pattern
- Select Menu > Pattern Steering > Circles > Engage.
- Select an option:
- Select to begin a clockwise turn.
- Select to begin a counter-clockwise turn.
U-Turn Pattern
The u-turn pattern turns the boat around 180° and maintains the new heading. There are no settings to adjust the U-turn pattern.
Following the U-Turn Pattern
- Select Menu > Pattern Steering > U-Turn > Engage.
- Select an option:
- Select to begin a starboard turn.
- Select to begin a port turn.
Williamson Turn
The Williamson turn pattern turns the boat around with the intent of running alongside the location where the Williamson turn pattern was initiated. There are no settings to adjust the Williamson turn pattern.
The Williamson turn pattern can be used in man overboard situations. Following the Williamson Turn Pattern
Cancelling a Steering Pattern
- Physically steer the boat. NOTE: Shadow Drive must be enabled to cancel a steering pattern by physically steering the boat.
- Select or cancel a pattern using rudder steering mode.
- Select <<10° <1° or 1°> 10°>> to cancel a pattern using step steering mode.
- Select Standby.
GPS Steering Patterns
Following a GPS Steering Route
The autopilot can steer the boat according to a route defined on a compatible GPS device.
- Create and navigate a route on your GPS device.
- Select Menu > GPS Steering > Follow Route.
Orbit Pattern
The orbit pattern steers the boat in a continuous circle around the active waypoint. The size of the circle is defined by your distance from the active waypoint when you begin the orbit pattern. Following an Orbit Pattern
- Select Menu > GPS Steering > Orbit > Engage.
- Select an option:
- Select to begin a clockwise turn.
- Select to begin a counter-clockwise turn.
Cloverleaf Pattern
The cloverleaf pattern steers the boat to repeatedly pass over an active waypoint. When you begin the cloverleaf pattern, the autopilot drives the boat toward the active waypoint and begins the cloverleaf pattern. Setting Up the Cloverleaf Pattern. You can adjust the distance from the waypoint at which the autopilot turns your boat for another pass over the waypoint. The default setting turns the boat at a range of 1000 ft. (300 m) from the active waypoint. Between the waypoint and the location where the autopilot turns the boat
- Select Menu > GPS Steering > Cloverleaf > Length.
- Select or set the range.
- Select Done.
Following the Cloverleaf Pattern
- Select Menu > GPS Steering > Cloverleaf > Engage.
- Select an option:
- To begin a starboard turn, select.
- To begin a port turn, select
Search Pattern
The search pattern steers the boat in increasingly larger circles outward from the active waypoint, forming a spiral pattern. When you begin the search pattern, the autopilot drives the boat to the active waypoint and begins the pattern.
Setting Up the Search Pattern Y: You can adjust the distance between each circle in the spiral. The default distance between circles iis50 ft. (20 m).
- Select Menu > GPS Steering > Search > Spacing.
- Select or set the distance.
- Select Done.
Following the Search Pattern
- Select Menu > GPS Steering > Search > Engage.
- Select an option:
- To begin a starboard turn, select.
- To begin a port turn, select
Sailboat Autopilot Operation
Wind Hold
You can set the autopilot to maintain a specific bearing relative to the current wind angle. Your device must be connected to a NMEA 2000 or NMEA 0183 compatible wind sensor to perform a wind hold or a wind-based tack or gybe.
Setting the Wind Hold Type
Before you can enable the wind hold type, you must connect a
NMEA 2000 or NMEA 0183 wind sensor to the autopilot.
For advanced autopilot configuration, see the installation
Instructions included with your autopilot.
- Select Menu > Setup > User Autopilot Setup > Wind Hold
Type. - Select Apparent or True.
Engaging Wind Hold
Before you can enable the wind hold type, you must connect a NMEA 2000 or NMEA 0183 wind sensor to the autopilot. When the autopilot is in standby mode, select Wind Hold.
Engaging Wind Hold from Heading Hold
Before you can enable the wind hold type, you must connect a NMEA 2000 or NMEA 0183 wind sensor to the autopilot. With heading hold engaged, select Menu > Wind Hold.
Adjusting the Wind Hold Angle with the Autopilot
You can adjust the wind hold angle on the autopilot when wind hold is engaged.
- To adjust the wind hold angle in increments of 1°, select <<10° <1° or 1°> 10°>>.
- To adjust the wind hold angle in increments of 10°, hold <<10° <1° or 1°> 10°>>.
Tack and Gybe
You can set the autopilot to perform a tack or gybe while heading hold or wind hold is engaged.
Tacking and Gybing from Heading Hold
- Engage heading hold (Engaging the Autopilot, page 1).
- Select Menu > Tack/Gybe.
- Select or choose a direction.
The autopilot steers your boat through a tack or gybe, and “Tacking” displays on the heading screen until the maneuver is complete.
Tacking and Gybing from Wind Hold
Before you can engage wind hold, you must have a wind sensor
installed.
- Engage wind hold (Engaging Wind Hold, page 3).
- Select Menu > Tack/Gybe.
- Select Tack or Gybe.
The autopilot steers your boat through a tack or gybe, and information about the progress of the tack or gybe appears on the screen.
Setting a Tack and Gybe Delay
The tack and gybe delay allows you to delay steering a tack and gybe after you initiate the maneuver.
- Select Menu > Setup > User Autopilot Setup > Sailing
- Configuration > Tack/Gybe Delay.
- Select the length of the delay.
- If necessary, select Done.
Enabling the Gybe Inhibitor
- Select Menu > Setup > User Autopilot Setup > Sailing Configuration > Gybe Inhibitor.
- Select Enabled.
Adjusting the Autopilot Response
When in sailboat mode, the Response setting allows you to adjust the rudder gain quickly to account for varying wind conditions.
- From the autopilot screen, select Menu > Response.
- Adjust the rudder response. If you need the rudder to be more responsive and move quickly, increase the value.
- If the rudder Garmin GHC20 autopilot control guide is moving too much, decrease the value.
Device Configuration
User Autopilot Settings
Select Menu > Setup > User Autopilot Setup.
- Power Mode: Sets the device power mode to normal or economy mode. Economy power mode allows you to set the percentage of power used to run the autopilot.
- Power Saver: Controls the aggressiveness of the autopilot. The autopilot makes fewer adjustments in power saver mode.
- Wind Limiter: Slows the rate of turn as the wind direction approaches the stern, when in sailboat mode during a gybe. If the rate of turn is too slow, decrease this value. If the rate of turn is too fast, increase this value.
Configuring the Remote Control
Searching for a Remote Control
Select Menu > Setup > Remote > Search for Remote.
Pairing a Remote
- Search for a remote control (Searching for a Remote Control, page 4).
- Begin pairing the remote control according to the instructions that came with that accessory. A message appears on the helm control after the remote has been paired successfully.
- Select Connect. Assigning Garmin GHC20 autopilot control guide Remote Button Actions
- Select Menu > Setup > Remote.
- Select a remote button to assign an action to.
- Select a button action.
- If necessary, repeat steps 2 and 3 for the remaining buttons.
Disconnecting a Remote Control
- Select Menu > Setup > Remote.
- Select Disconnect Remote.
Display Settings
Select Menu > Setup > Display.
Color Mode: Sets the device to display Garmin GHC20 autopilot control guide day or night colors. Configure Colors: Sets the color configuration for each color mode. For day color mode, you can select a full color or a high contrast color configuration. For night color mode, you can select a full color, red and black, or green and black color configuration.
Backlight: Sets the backlight level.
Network Sharing: Allows you to share color mode, color configuration, and backlight settings with other devices across the NMEA 2000 network.
System Settings
Select Menu > Setup > System.
- Units: Sets the units of measure. Heading: Sets the reference used in calculating heading information.
- Variance: Adjusts the variance from true north. This setting is only available when the heading is set to True.
- Beeper: Sets if and when audible sounds are used.
- Auto Power: Enables the device to turn on automatically when the NMEA 2000 network turns on.
- GHC Low Volt. Alarm: Sounds an alarm when the voltage of the power supply connected to the device drops below a specified level.
- Language: Sets the on-screen language.
- Operating Mode: Allows you Garmin GHC20 autopilot control guide to set the operating mode to normal or store demo mode.
- System Information: Allows you to view software information.
- Factory Defaults: Resets the unit to factory defaults.
Selecting the Preferred Heading Source
If you have more than one heading Garmin GHC20 autopilot control guide source on the network, you can select your preferred source. The source could be a compatible GPS compass or a magnetic heading sensor.
Customer Service
- Website: https://support.garmin.com/
- Ph: 00 886 2 2642 9199