


Optoma DS316L DLP Projector
Instruction Safety
Please follow all warnings, precautions, and maintenance as recommended in this user’s guide. To avoid electric shock, the unit and its peripherals must be properly grounded (earthed). This equipment is equipped with a three-pin grounding-type power plug. Do not remove the grounding pin on the power plug. This is a safety feature. If you are unable to insert the plug into the outlet, contact an electrician. Do not defeat the purpose of the grounding plug.
- Do not block any ventilation openings.
- To ensure reliable operation of the projector and to protect it from overheating,
- it is recommended to install the projector in a location that does not block ventilation.
- As an example, do not place the projector on a crowded coffee table, sofa, bed, etc.
- Do not put the projector in an enclosure such as a bookcase or a cabinet that restricts air flow.
- To reduce the risk of fire and/or electric shock, do not expose the projector to rain or moisture.
- Do not use under the following conditions
- In extremely hot, cold, or humid environments.
- Ensure that the ambient room temperature is within 5°C ~ 40°C (41°F ~ 104°F)
- Relative humidity is 10% ~ 85%
- In areas susceptible to excessive dust and dirt.
- Near any appliance generating a strong magnetic field.
Operation Conditions
This device complies with Part 15 of the FCC Rules. Operation is subject to the following two conditions:
- This device may not cause harmful interference and
- This device must accept any interference received, including interference that may cause undesired operation.
Declaration of Conformity for EU countries
- EMC Directive 2014/30/EC (including amendments)
- Low Voltage Directive 2014/35/EC
- R & TTE Directive 1999/5/EC (if product has RF function)
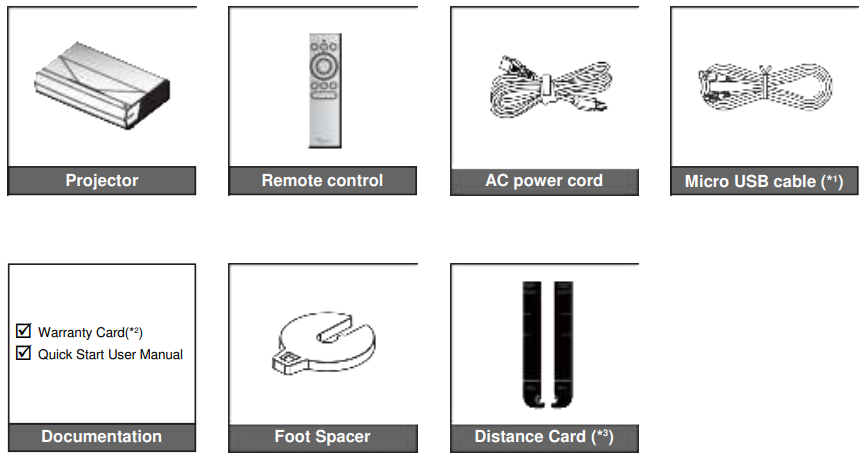
Package Overview
Carefully unpack and verify that you have the items listed below under standard accessories. Some of the items under optional accessories may not be available depending on the model, specification, and your region of purchase. Please check with your place of purchase. Some accessories may vary from region to region. The warranty card is only supplied in some specific regions. Please consult your dealer for detailed information.
Standard accessories
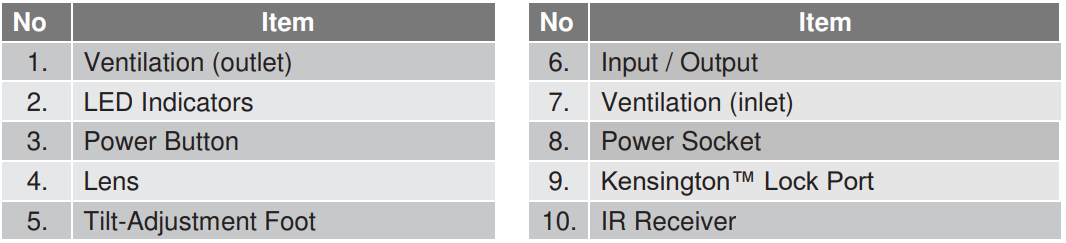
Product Overview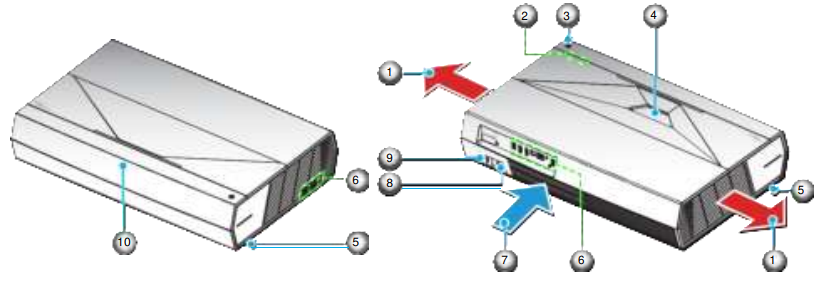
- Do not block the projector intake and exhaust vents.
- When operating the projector in an enclosed space, allow at least 50cm (19”) clearance around the intake and exhaust vents.

Connections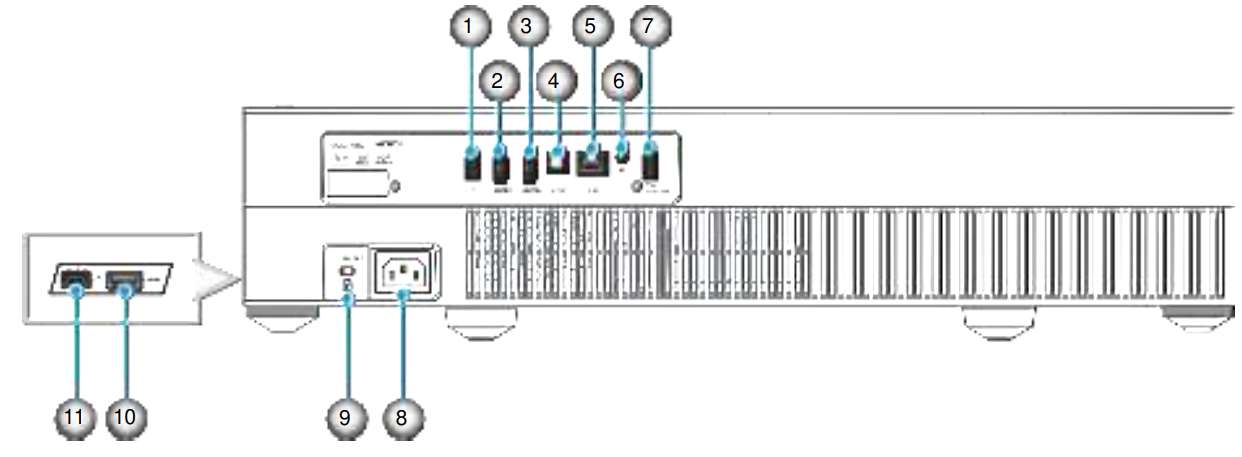
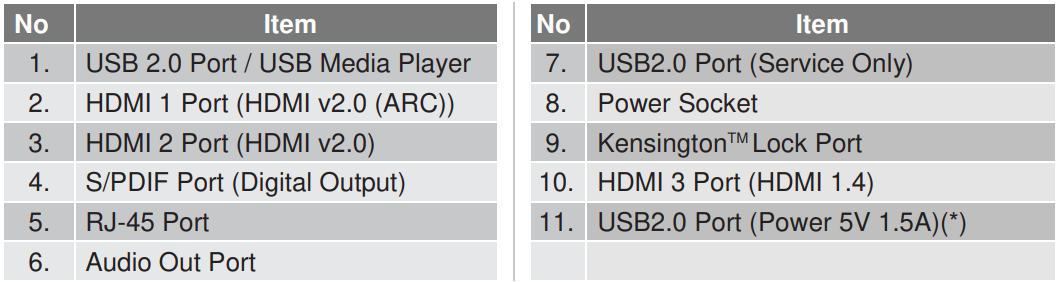
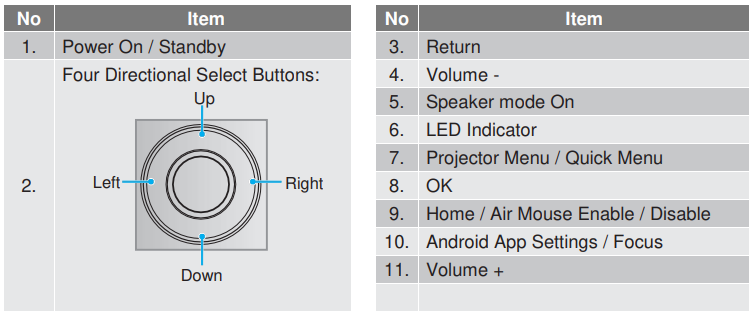
Keypad and LED indicators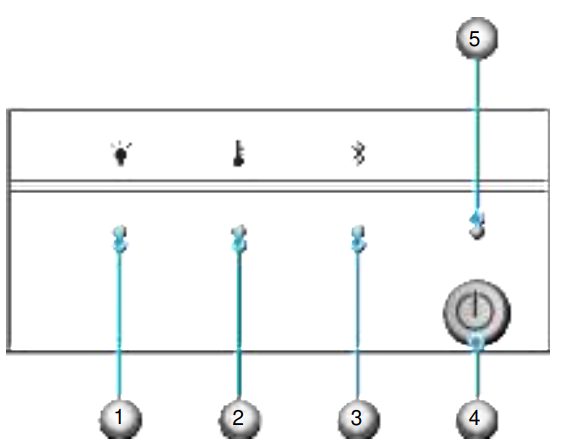

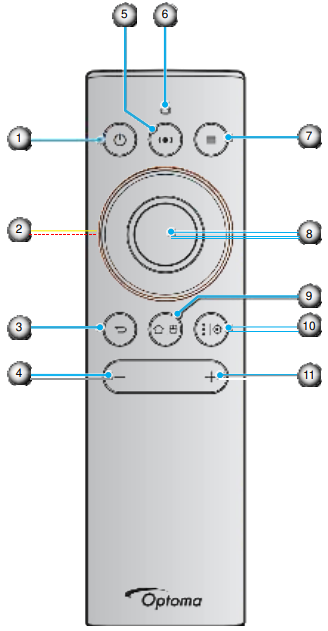
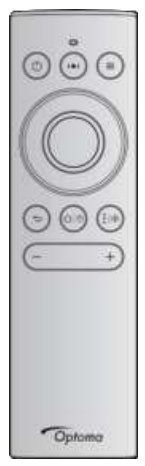
Remote control
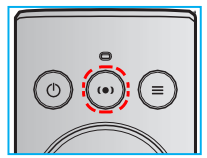
Pairing your Bluetooth remote control with the projector
Long-press the “ ” and “ ” buttons at the same time for 5 seconds. The device is in pairing mode if the status LED on the Bluetooth remote control is flashing blue.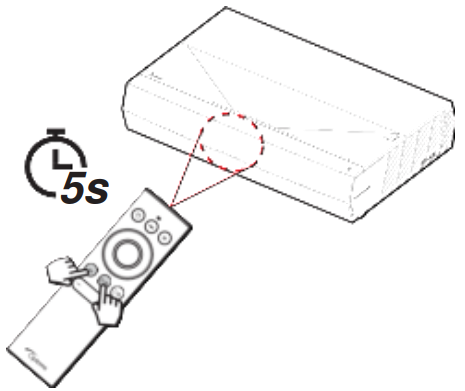
The pairing process will take approximately 20 seconds. If the pairing is successful, the status LED on the Bluetooth remote control will turn solid blue when a button is pressed. Otherwise, the status LED on the Bluetooth remote control will turn green when a button is pressed. If the Bluetooth remote control is left idle for 10 minutes, it will automatically enter sleep mode, and the Bluetooth will be disconnected.
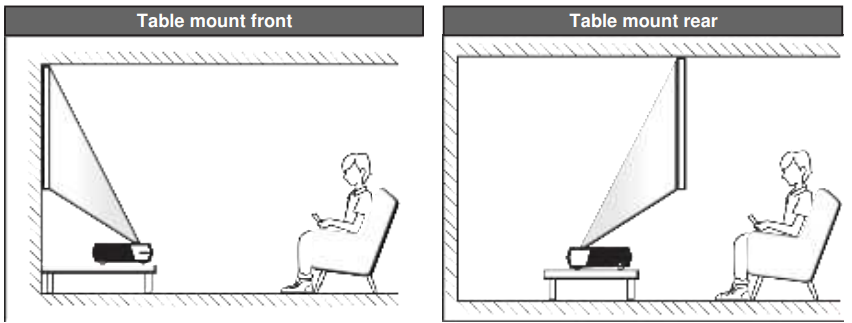
Installing the projector
Your projector is designed to be installed in one of two possible positions. Your room layout or personal preference will dictate which installation location you select. Take into consideration the size and position of your screen, the location of a suitable power outlet, as well as the location and distance between the projector and the rest of your equipment.
- How to determine projector location for a given screen size, please refer to the distance table on page 56.
- How to determine screen size for a given distance, please refer to the distance table on page 56.
Connecting sources to the projector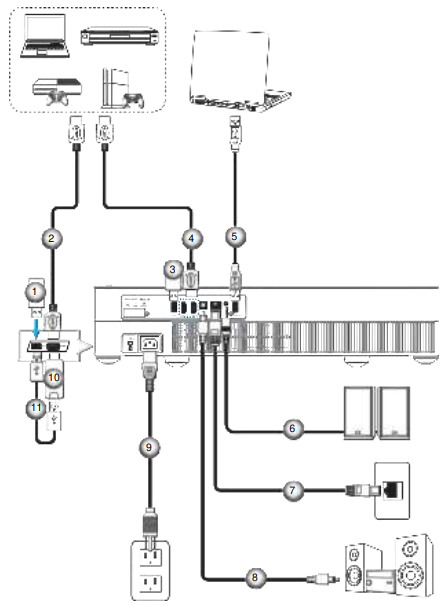

Adjusting the Projector Image
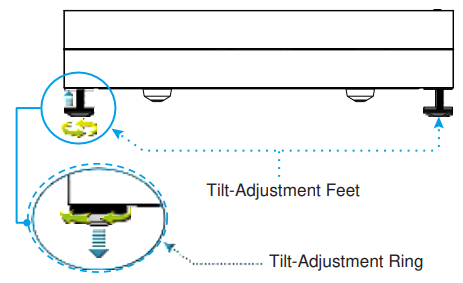
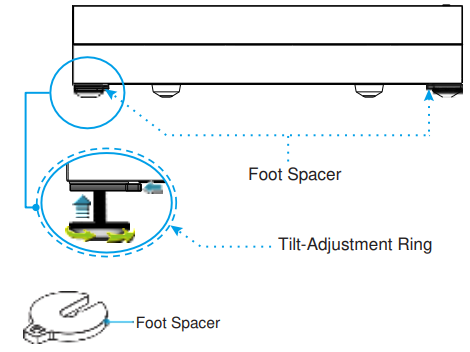
Image height
The projector is equipped with elevator feet for adjusting the image height.
- Locate the adjustable foot you wish to adjust on the underside of the projector.
- Rotate the adjustable foot clockwise or counterclockwise to raise or lower the projector.
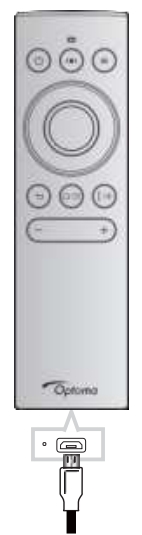
Charging the Remote Control
To charge the remote control, connect one end of the micro USB cable to the USB port on the bottom of the remote control and the other end to a USB port of a device that supports charging. For example, to the USB 2.0 port on the side of the projector.
About the air mouse
- To enable or disable the air mouse, long-press
- Charge the remote control when the battery power drops below 20% and the LED indicator starts flashing red.
Powering on
- Connect one end of the AC power cord to the power socket on the projector and the other end to the electrical outlet. When connected, the power LED will turn red.
- Turn on the projector by pressing the “ ” button either on top of the projector or on the remote control.
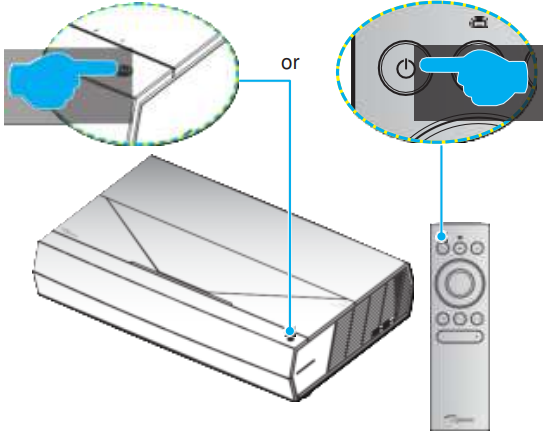
During startup, the power LED is flashing white, and during normal operation, the power LED is solid white.
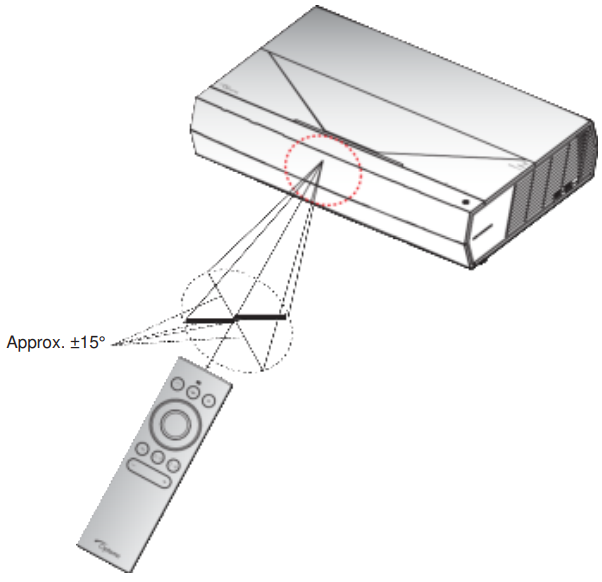
Effective range
The infra-red (IR) remote control sensor is located on the front of the projector. Ensure to hold the remote control at an angle within ±15° perpendicular to the projector’s IR remote control sensor to function correctly. The distance between the remote control and the sensor should not be longer than 7 meters (~22 feet). You can also operate the remote control by pointing it at the projected image.
- Make sure that there are no obstacles between the remote control and the IR sensor on the projector that might obstruct the infrared beam.
- Make sure the IR transmitter of the remote control is not being shone on by sunlight or fluorescent lamps directly.
- Please keep the remote controller away from fluorescent lamps for over 2 meters, or the remote controller might malfunction.
- If the remote control is close to Inverter-Type fluorescent lamps, it might become ineffective from time to time.
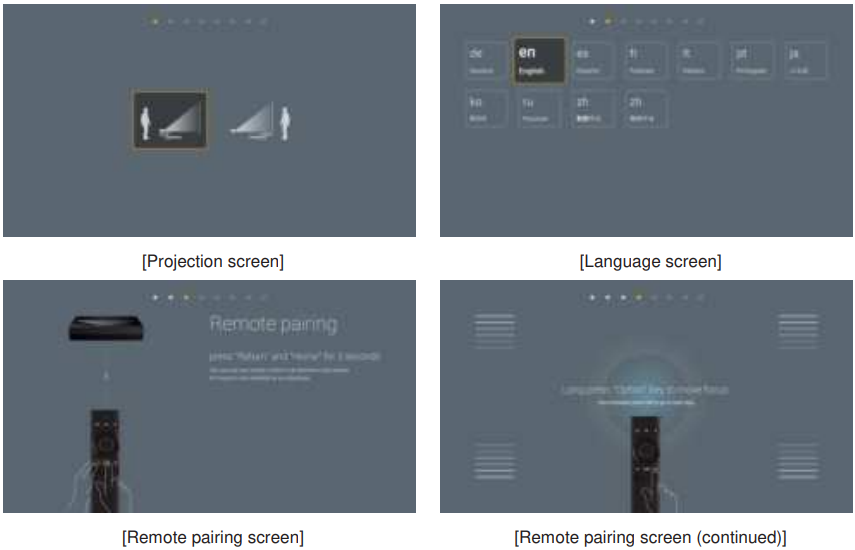
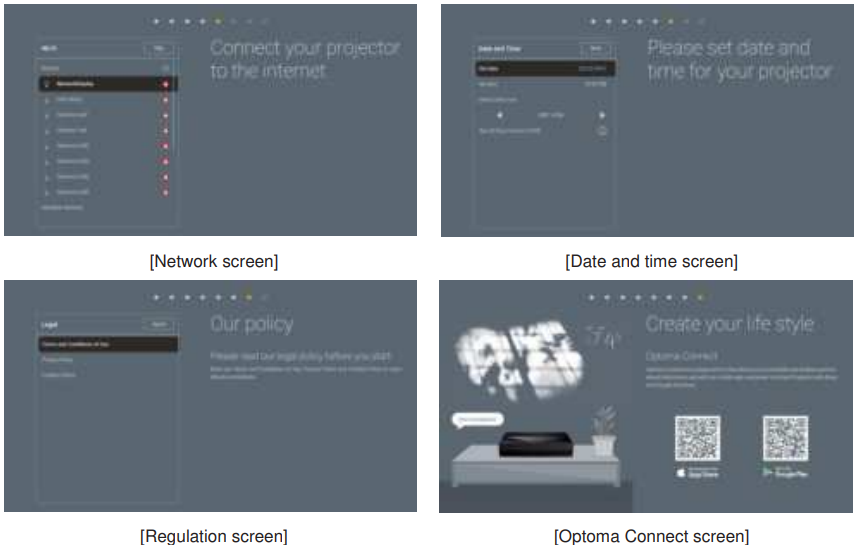
Using the Projector
The first time the projector is turned on, you will be prompted to do the initial setup, including selecting the projection orientation, preferred language, configuring network settings, and more. Once the Setup Complete! The screen appears, indicating the projector is ready to use.
Powering off
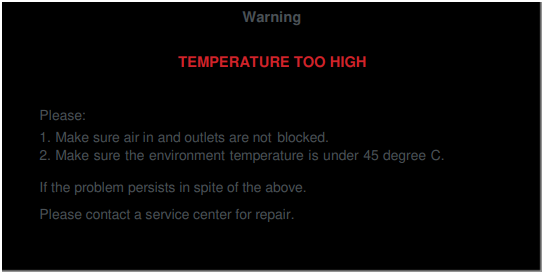
- Turn off the projector by pressing the “ ” button either on top of the projector or on the remote control. The following message will be displayed.

- The cooling fans will continue to operate for about 10 seconds for the cooling cycle, and the power LED is flashing white. When the power LED turns red, this indicates the projector has entered standby mode. If you wish to turn the projector back on, you must wait until the cooling cycle has finished and the projector has entered standby mode. When the projector is in standby mode, simply press the “ ” button either on top of the projector or on the remote control again to turn on the projector.
- Disconnect the power cord from the electrical outlet and the projector.

Using the projector as a wireless speaker
With the built-in Bluetooth module, you can listen to your music wirelessly from your phone, tablet PC, or other Bluetooth-enabled device.
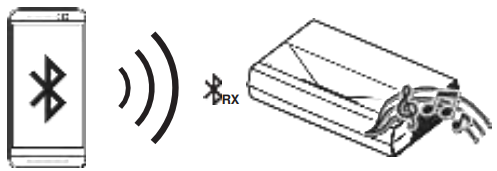
Pairing your Bluetooth device with the projector
- Set the projector standby power mode to “Smart Home” in “System Settings Power menu Power Mode (Standby)”.
- Short-press the “ “ button on the remote control to toggle the projector into Speaker mode.

- While pairing your Bluetooth device with the projector, the Bluetooth LED indicator on the projector is flashing white.
- On your Bluetooth device, tap Settings and enable the Bluetooth function. Then search for the projector.

- Tap on the projector name and start pairing.
- After successful pairing, the projector will show a solid white light.
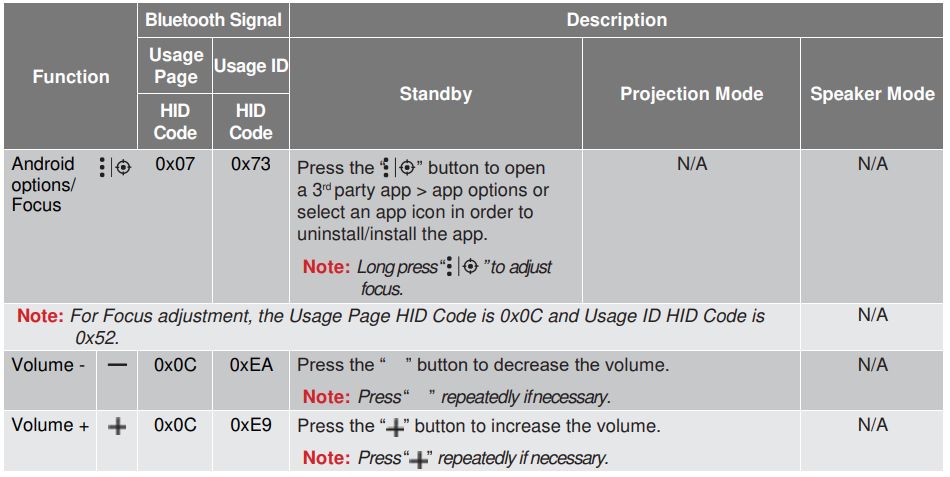
- On your Bluetooth device, browse and select the song to play. You can use the “ ” and “ ” buttons on the remote control to adjust the volume level.
Home screen overview
The Home screen is displayed every time you start the projector. It contains system date and time, system status, icons to access the OSD menu, the projector settings menu, apps, input sources, and more. To navigate the Home screen, simply use the buttons on the remote control. You can return to the Home screen at any time by pressing “ ” on the remote control, regardless of your position in the user interface.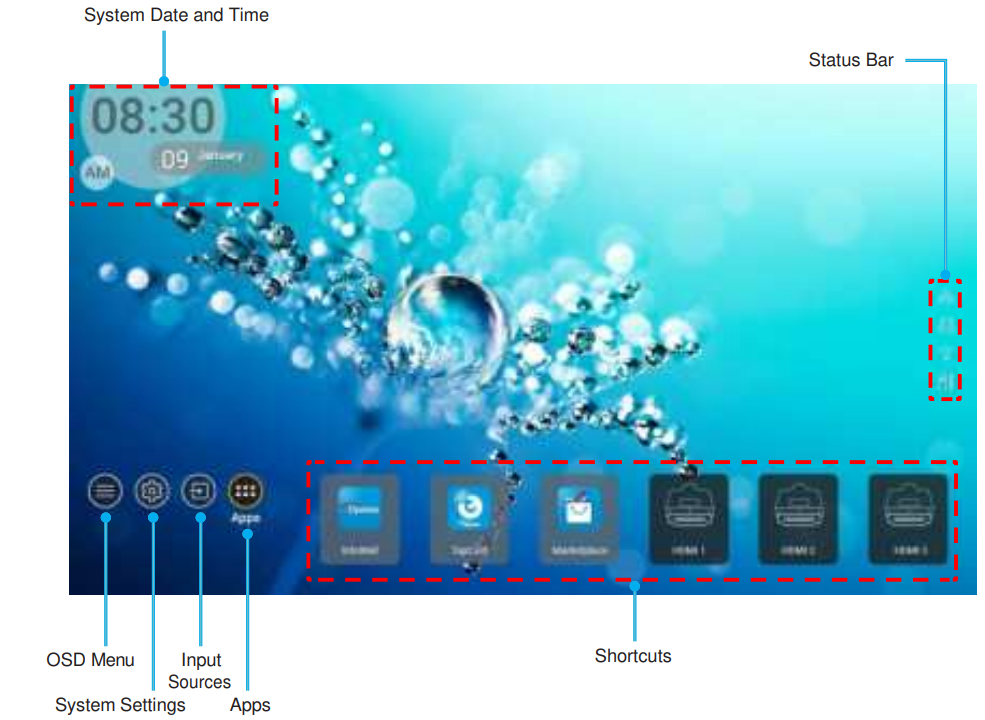
System date and time
Date and time are displayed on the Home screen if the projector is connected to the network. The default setting is 10:00 am, 2019/01/01. AM/PM will appear only if the 24-hour format is off. To modify date and time parameters, select the respective field on the screen. The Date and Time settings page opens automatically. Then perform the modifications.
Projector settings menu (OSD)
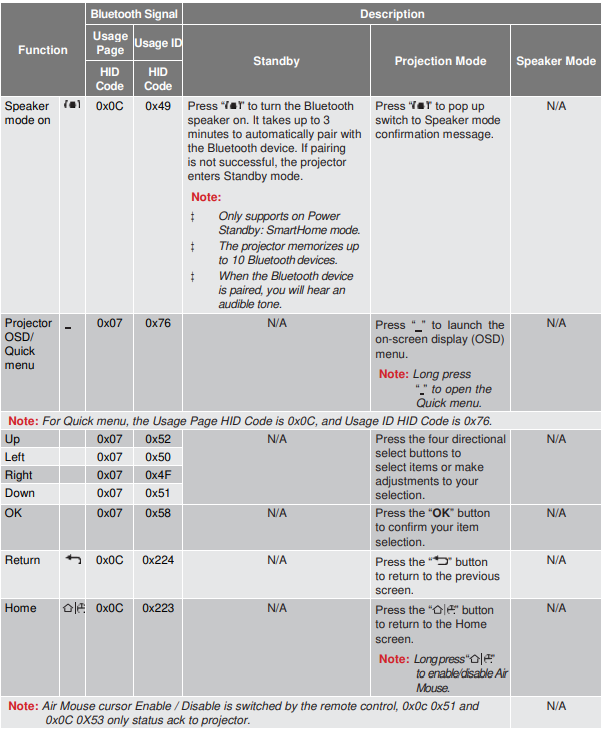
Press “ ” on the remote control or on the Home screen, select the OSD menu “ ” to review projector information or manage various settings related to the image, display, 3D, audio, and setup.
General menu navigation
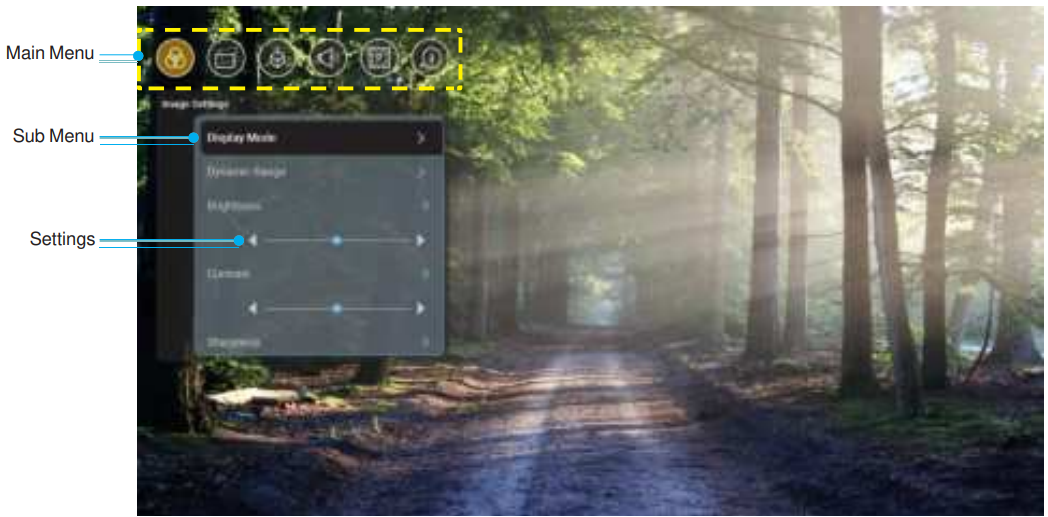
- When OSD is displayed, use the up and down navigation buttons to select any item in the main menu. While making a selection on a particular page, press “OK” to enter the submenu.
- Press the “Left” and “Right” buttons to select the desired menu item. Then press “OK” to open its sub-menu.
- Press the “Up” and “Down” buttons to select the desired item in the sub menu.
- Press the “OK” button to enable or disable a setting, or press the “Left” and “Right” buttons to adjust a value.
- Select the next item to be adjusted in the sub menu and modify as described above.
- To exit, press “ ” (repeatedly if necessary). The OSD menu will close, and the projector will automatically save the new settings.
Using the Projector
OSD Menu tree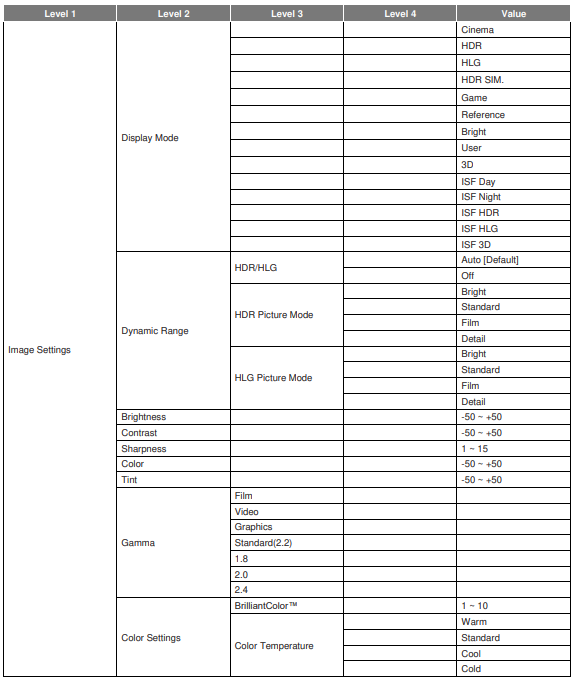
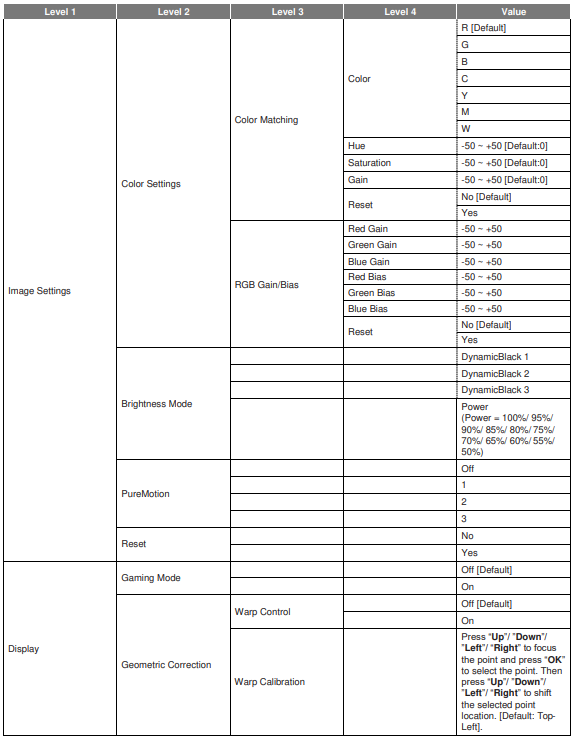
Image settings menu
There are many factory presets optimized for various types of images.
- Cinema: Provides the best colors for watching movies.
- HLG: For HDR movies with Hybrid Log content.
- Game: Select this mode to increase the brightness and response time level for enjoying video games.
- Bright: Maximum brightness from PC input.
- User: Memorize user’s settings.
- 3D: To experience the 3D effect, you need to have 3D glasses. Make sure a Blu-ray 3D DVD player is installed.
- ISF HLG: Optimize the image with the ISF HLG mode to be perfectly calibrated and have high picture quality.
- ISF 3D: Optimize the image with the ISF 3D mode to be perfectly calibrated and have high picture quality.
Dynamic Range
Configure the High Dynamic Range (HDR) / Hybrid Log Gamma (HLG) setting and its effect when displaying video from 4K Blu-ray players and streaming devices.
HDR/HLG
- Auto: Auto-detect HDR/HLG signal.
- Off: Turn off HDR/HLG processing. When set to Off, the projector will NOT decode HDR/HLG content.
HDR Picture Mode / HLG Picture Mode
- Bright: Choose this mode for brighter, more saturated colors.
- Standard: Choose this mode for natural-looking colors with a balance of warm and cool tones.
- Film: Choose this mode for improved detail and image sharpness.
- Detail: Choose this mode for improved detail and image sharpness in dark scenes.
Brightness
- Adjust the brightness of the image.
Contrast
- The contrast controls the degree of difference between the lightest and darkest parts of the picture.
Sharpness
- Adjust the sharpness of the image.
Color
- Adjust a video image from black and white to fully saturated color.
Tint
- Adjust the color balance of red and green.
Gamma
Set up the gamma curve type. After the initial setup and fine-tuning are completed, utilize the Gamma Adjustment steps to optimize your image output.
- Film: For home theater.
- Video: For video or TV source.
- Graphics: For PC / Photo source.
- Standard(2.2): For a standardized setting.
- 1.8 / 2.0 / 2.4: For specific PC / Photo source.
Colour Settings
Configure the color settings.
- BrilliantColorTM: This adjustable item utilizes a new color-processing algorithm and enhancements to enable higher brightness while providing true, more vibrant colors in the picture.
- Color Temperature: Select a color temperature from Warm, Standard, Cool, or Cold.
- Color Matching: Adjust hue, saturation, and gain for the R (red), G (green), B (blue), C (cyan), Y (yellow), M (magenta), or W (white) color.
Brightness Mode
Select the brightness mode setting.
PureMotion
Select the PureMotion setting to make the video filmed in 24fps to be more smooth and to compensate for motion blur. To disable PureMotion, select “Off”.
Display menu
Gaming Mode
Enable this feature to reduce response times (input latency) during gaming.
Aspect ratio
Select the aspect ratio of the displayed image.
- 4:3: This format is for 4:3 input sources.
- 16:9: This format is for 16:9 input sources, like HDTV and DVD,, enhanced for wide-screen TV.
- Auto: Automatically selects the appropriate display format.
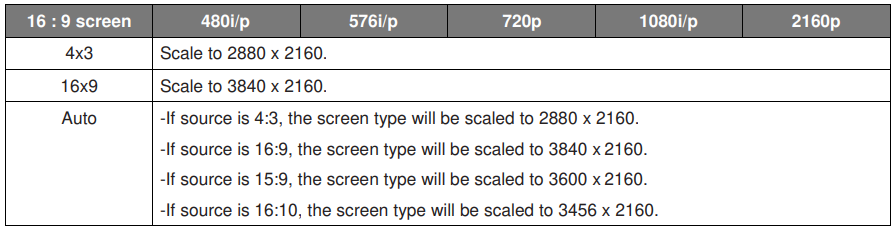
Auto mapping rule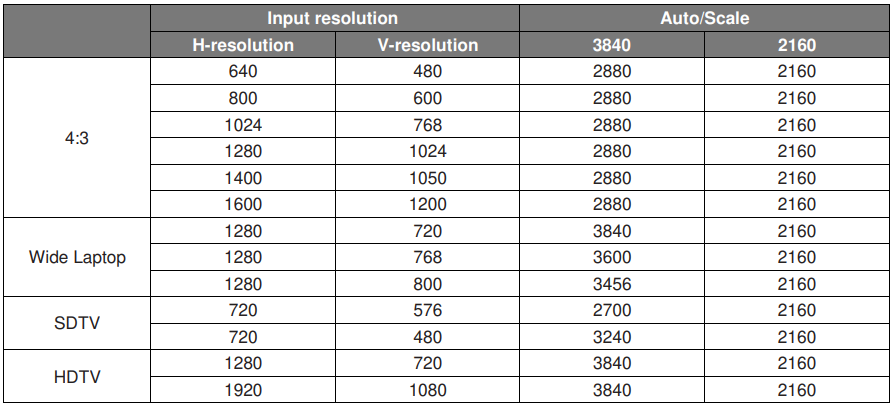
Frame Delay
Set the projection delay.
HDMI Settings
Configure the HDMI settings.
Menu Settings
Set the menu location on the screen and configure menu timer settings.
- Menu Location: Select the menu location on the display screen.
- Menu Timer: Set the duration for which the OSD menu stays visible on the screen.
3D menu
3D Tech
Set the 3D tech. parameter to “DLP-Link” or “3D-Sync”.
3D Format
Use this option to select the appropriate 3D format content.
- Auto: When a 3D identification signal is detected, the 3D format is selected automatically.
- SBS: Display 3D signal in “Side-by-Side” format.
- Top and Bottom: Display 3D signal in “Top and Bottom” format.
- Frame Sequential: Display 3D signal in “Frame Sequential” format. Frame Sequential encoding method is commonly used on PC content.
Audio menu
Internal Speaker
- Choose “On” or “Off” to turn on or off the internal speaker.
Mute
Use this option to temporarily turn off the sound.
- On: Choose “On” to turn mute on.
- Off: Choose “Off” to turn the mute off.
Digital Output
- Select the digital audio output format between “Bitstream”, “PCM”, and “Auto”.
Sound Effect
- Select the sound effect between “Movie”, “Music”, “Sport”, “Game”, and “Night”.
Internal Speaker Delay (ms)
- Set the internal speaker delay in milliseconds.
Setup menu
Projection Mode
- Select the preferred projection between “Front” and “Rear”. Refer to page 15.
Test Pattern
- Select the test pattern from “Green Grid”, “Magenta Grid”, “White Grid”, “White”, and “Yellow Border”. Press “ ” to exit the Test Pattern menu.
High Altitude
- When “On” is selected, the fans will spin faster. This feature is useful in high-altitude areas where the air is thin.
Focus
- Press the “Left” or “Right” button on the remote control to focus the projected image.
Eye Protection Sensor
Enable the eye protection sensor to temporarily switch off the lens when objects are too close to the projector beam.
Information menu
View the projector information as listed below:
- Display
- Hardware
- Input Source
- About
System settings menu
On the Home screen, select the system settings menu to configure various system settings.
General menu navigation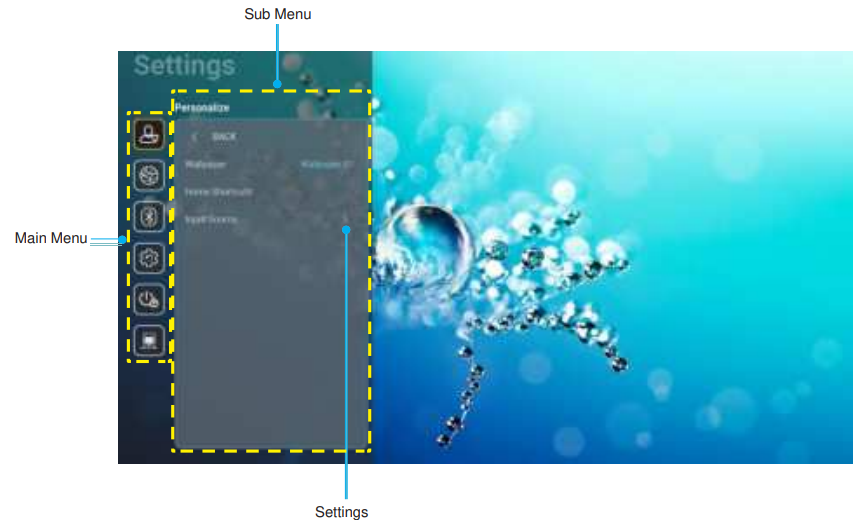
- When the system settings menu is displayed, use the up and down navigation buttons to select any item in the main menu. While making a selection on a particular page, press the “OK” or the “Right” button on the remote control to enter the submenu.
- Press the “Left” and “Right” buttons to select the desired menu item.
- Then press “OK” to open its sub-menu.
- Press the “Up” and “Down” buttons to select the desired item in the sub menu.
- Press the “OK” or “Right” button to access the selected sub-menu item settings.
- Press the “Up”, “Down”, “Left”, or “Right” button to select the setting or press the “Left” and “Right” buttons to adjust the value (if necessary).
- Press “OK” to confirm the setting.
- Select the next item to be adjusted in the sub menu and modify as described above.
System settings menu tree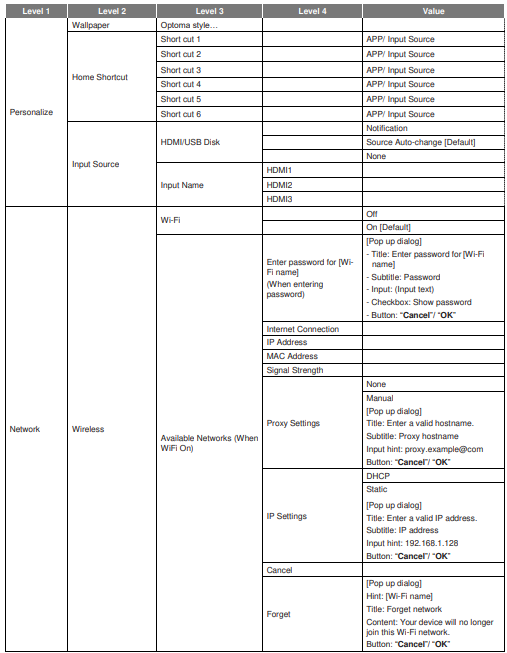
Personalize menu

Home Shortcut
Review Home screen shortcuts of all opened apps in each input source. The items cannot repeat except for the “Automatic” option, which means the system will remember up to six latest apps that have been opened and then will replace app shortcuts so that the latest app will be the first app in the apps list, while other apps in the list are shifted by one position.
Hdmi/usb Disk
Define how the system will react when one of the input sources (HDMI/USB flash drive) is connected to the projector.
- Notification: Choose “Notification” to display the input switching confirmation message when an input source is detected.
- Source Auto Change: Choose “Source Auto Change” to automatically switch to the currently detected input source.
- None: Choose “None” to manually switch the input source.
Input Name
Rename the input source if necessary.
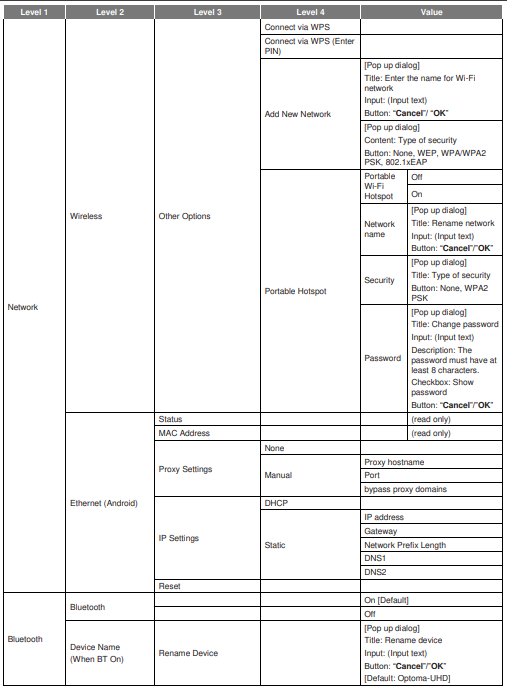
Network menu

Wireless
Configure wireless network settings.
- Wi-Fi: Set the Wi-Fi option to “On” to enable the wireless network feature.
- Available Network SSID: Select your desired wireless access point and enter or configure the necessary connection parameters (if required), for example, password, proxy settings, and IP address. For information, you can review the signal strength. Choose “Cancel” to return to the Network menu without saving settings. Choose “Forget” to delete the wireless network profile.
- Other Options: Configure advanced wireless network settings, such as “Connect via WPS”, “Connect via WPS (Enter PIN)”, “Add New Network” (manually enter network name), and “Portable Hotspot” (configure the projector to behave as a wireless access point for other devices).
Ethernet (Android)
Configure wired network settings.
- Network Status: Display the network connection status (read-only).
- MAC Address: Display the MAC address (read-only).
- Proxy Settings: Provide proxy hostname, connection port, and bypass proxy domains information manually if requested.
- IP Settings: Enable DHCP if you want the projector to obtain an IP address and other connection parameters automatically from your network. Disable DHCP if you want to assign an IP address, gateway, network prefix length, and DNS parameters manually.
- Reset: Return the factory default settings for network settings.
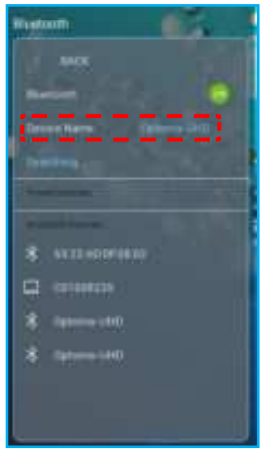
Bluetooth menu

Bluetooth
- Set the Bluetooth option to “On” to enable the Bluetooth feature.
Device Name
- Review or modify the projector name.
- Whenever you need to enter symbols, the system will automatically display an onscreen keyboard.
Scan Again
- Search for available Bluetooth devices.
Paired Devices
- Review and manage paired devices.
Available Devices
- Review all available Bluetooth devices.
System menu
Language
Select your preferred system language between English, German, French, Italian, Spanish, Portuguese, Russian, Traditional Chinese, Simplified Chinese, Japanese, and Korean.
Keyboard
Select the keyboard language.
Date and Time
Configure date and time settings.
- Select time zone: Select the time zone in your location.
- Use 24-hour format: Set to “On” to display time in 24-hour format. Set to “Off” to display time in 12- hour format (AM/PM).
- Choose date format: Choose your preferred date format.
System Update
- The system will look for updates automatically every time the projector is connected to the Internet (OTA).
Internal Storage
- View the internal storage usage.
Legal
- Review legal documents, including “Terms and Conditions of Use”, “Privacy Policy”, and “Cookies Policy”.
Reset
- Reset all settings, including data (“Reset all settings”) or reset settings to the factory defaults only (“Reset to Default”). Select “Cancel” to exit the menu and keep the current configuration.
Power menu
Direct Power On
Choose “On” to activate Direct Power mode. The projector will automatically power on when AC power is supplied, without pressing the “Power” button on the projector keypad or on the remote control.
Auto Power Of f (min.)
Set the countdown timer interval. The countdown timer will start when there is no signal being sent to the projector. The projector will automatically power off when the countdown has finished (in minutes).
Sleep Timer (min.)
Set the countdown timer interval. The countdown timer will start, with or without a signal being sent to the
projector. The projector will automatically power off when the countdown has finished (in minutes).
Power Mode (Standby)
Configure power mode settings in standby.
- Smart Home: Choose “Smart Home” to return to normal standby (LAN on, Wi-Fi on).
- Eco: Choose “Eco” to save power dissipation further < 0.5W.

Controlmenu
- IoT: Set to “Off” to turn off all control via “IoT”, including “InfoWall”.
Hdmi Link Settings
Configure HDMI link settings
- Power On Link: Enable this function to let both the HDMI Link and the projector be automatically turned on simultaneously.
- Power Off Link: Enable this function to let both the HDMI Link and the projector be automatically turned off at the same time.
- The HDMI link function is supported only if the source is connected to the HDMI1 or HDMI2 port.
- The projector can be controlled by other devices, but cannot be used to control other devices.
- If your downstream audio device (AVR, Soundbar) supports HDMI ARC, you can use the HDMI ARC port to output digital audio.

Selecting an input source
You can select any input source directly on the Home screen using an input shortcut.

If the desired input source is not visible on the Home screen, select “ ” to view all input options. Then select your input source or select “HOME” to return to the Home screen.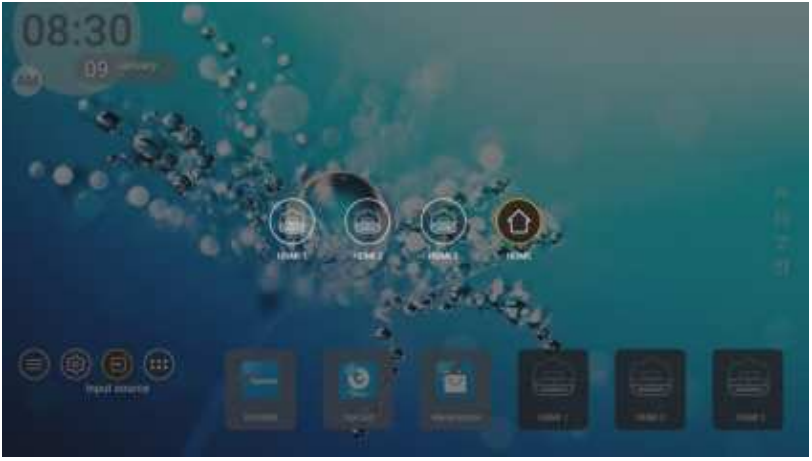
Selecting an app
You can select any app directly on the Home screen using an app shortcut.

If the desired app is not visible on the Home screen, select “ ” to view all installed apps. Then select your desired app.
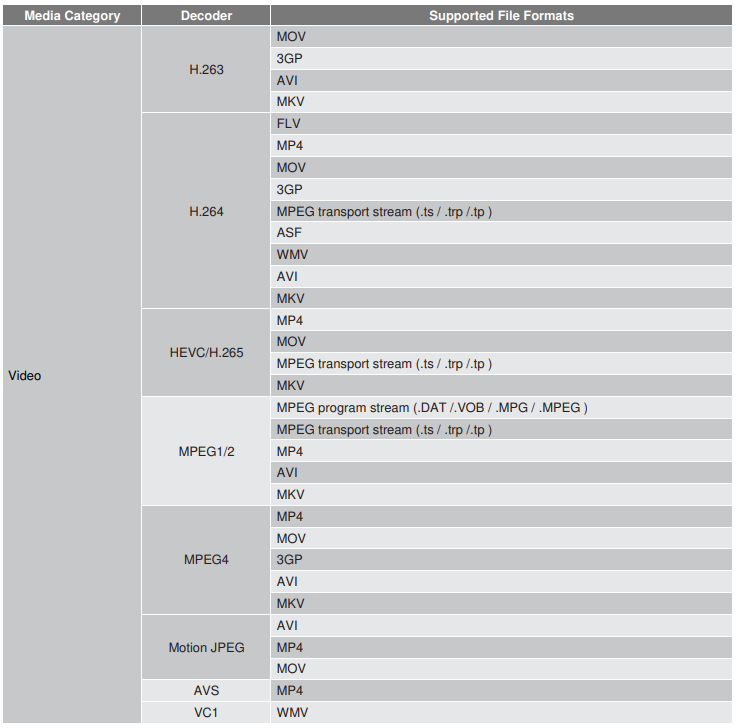
Supported multimedia formats
If you want to play multimedia files, connect a USB storage with multimedia content to the projector. Then open the multimedia player app and select the desired files to play. The projector supports the following multimedia formats.
Picture

Doc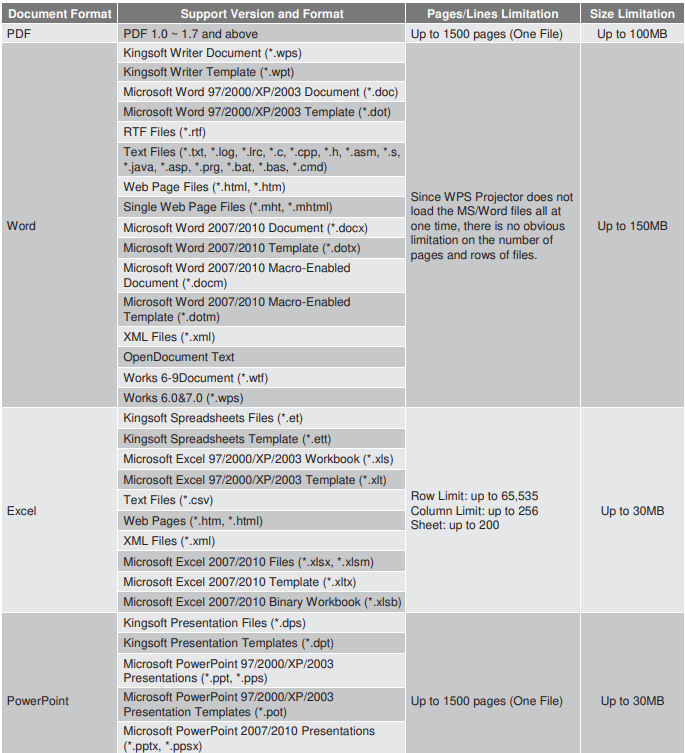
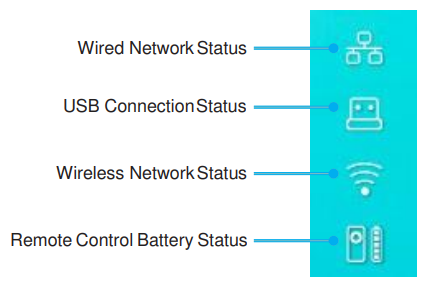
Viewing the status bar
By default, the Status Bar on the Home screen contains icons indicating connection status regarding wired network, USB, and wireless network, and remaining battery status of the remote control (if applicable). You can select any of the icons to open the associated menu, except for the remote battery. Selecting the wired or wireless status icon results in opening the network configuration menu, while selecting the USB status icon results in opening the browser and displaying the content of the connected USB device.
About the Quick menu
In the Quick menu, you can find shortcuts to the OSD menu items.
To access the Quick menu, long-press the “ ” button on the remote control.
Compatible resolutions
Digital (HDMI 1.4)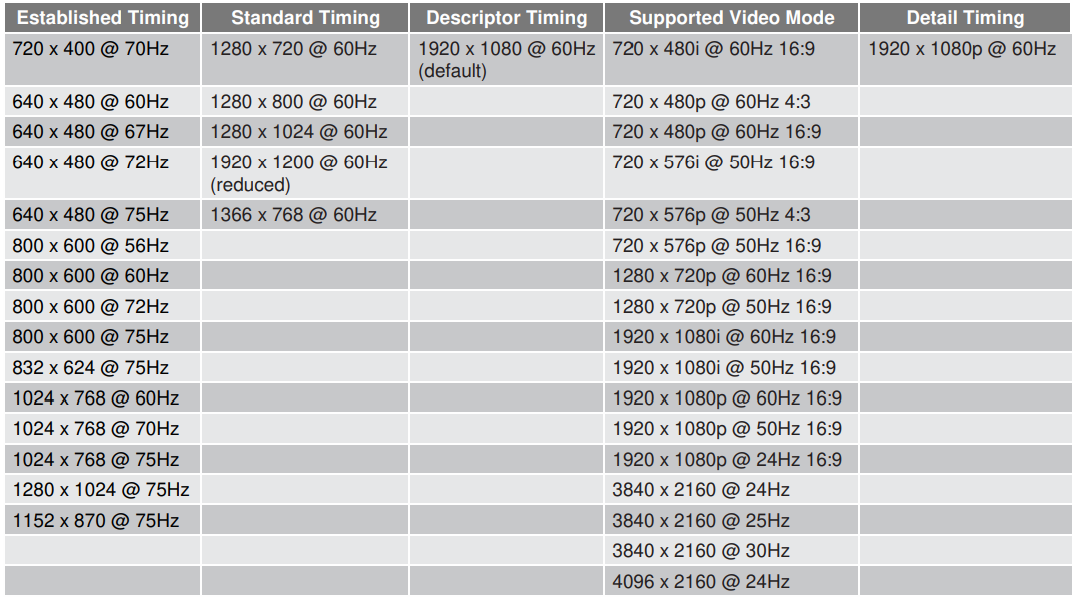
Digital (HDMI 2.0)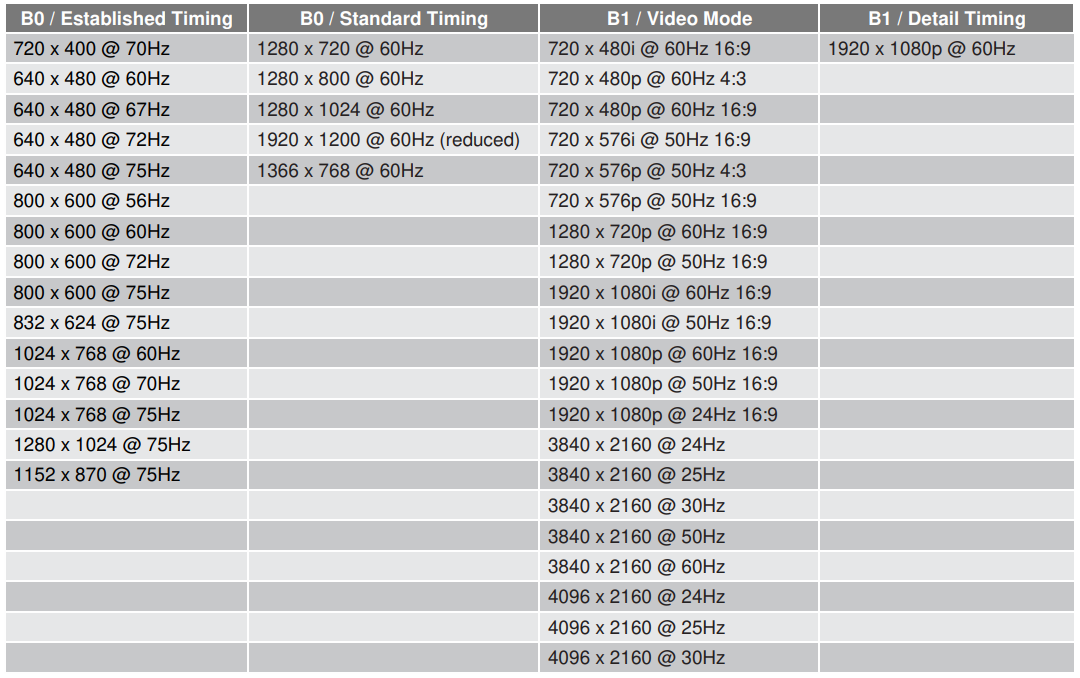
ADDITIONAL INFORMATION

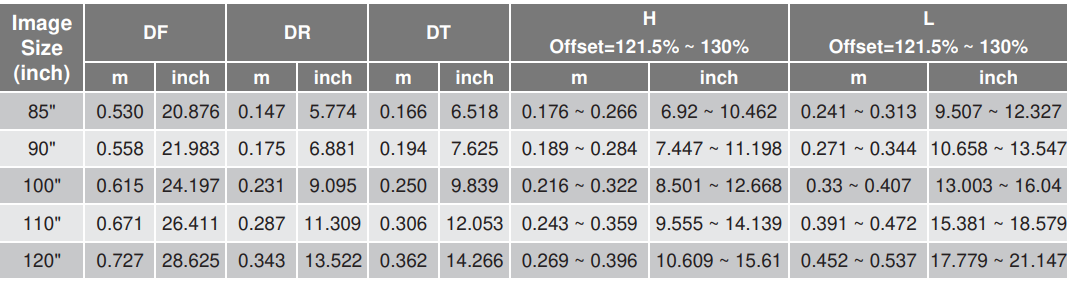
Image size and projection distance

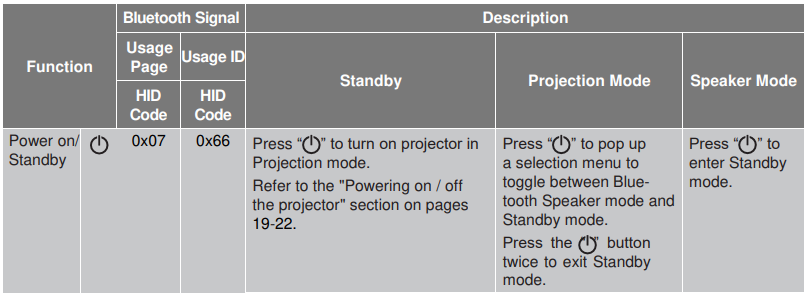
Remote control
Troubleshooting
If you experience a problem with your projector, please refer to the following information. If a problem persists, please contact your local reseller or service center.
Image problems
- Ensure the pins of the connectors are not crooked or broken.
- Make sure the projection screen is at the required distance from the projector. Refer to page 56
- Use the remote control to adjust focus. Refer to page 36.
- When you play an anamorphic DVD or a 16:9 DVD, the projector will show the best image in 16: 9 format on the projector side.
- If you play a 4:3 format DVD title, please change the format to 4:3 in the projector OSD.
- Please set up the display format as 16:9 (wide) aspect ratio type on your DVD player.
- Move the projector closer to or further from the screen.
- Press ” ” on the remote control, go to “OSD menu Display Aspect Ratio”. Try the different settings.
- Press “ ” on the remote control, go to “OSD menu Display Geometric Correction Warp Calibration”. Try the different settings. The image has slanted sides.
- Select “OSD menu Setup Projection Mode” and adjust the projection direction.
- Please refer to the supported audio file format on page 50.
- Refer to page 35.
- Select “OSD menu Audio Digital Outpu Bitstream/ PCM/ Auto”.Try the different settings.
Abnormal HDMI image
- Select “OSD menu Display HDMI 1 EDID/ HDMI 2 EDID” to “1.4” or “2.2”.
Blurry double image
- Make sure “OSD menu 3D 3D Tech.” is not on to avoid the normal 2D image appearing blurry double
image.
Two images, side-by-side format
- Set the “OSD menu 3D “3D Format to “SBS”.
Other problems
The projector stops responding to all controls.
- If possible, turn off the projector, then unplug the power cord and wait at least 20 seconds before reconnecting power.
Remote control problems
If the remote control does not work
- Make sure there are no obstructions between the remote control and the projector.
- Make sure to operate the remote control only in front of the projector.
- Try to operate the remote control by pointing it at the projected image.
LED lightning messages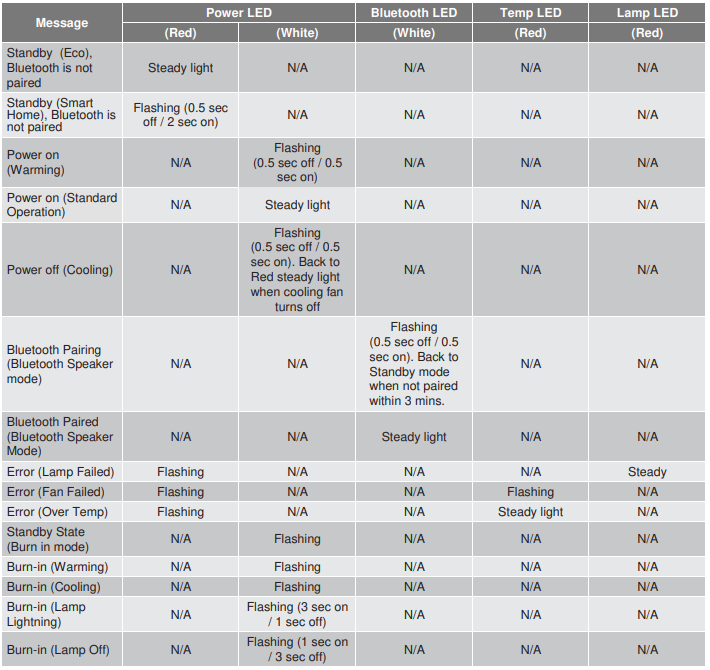
Power off
Fan failed
- Temperature warning

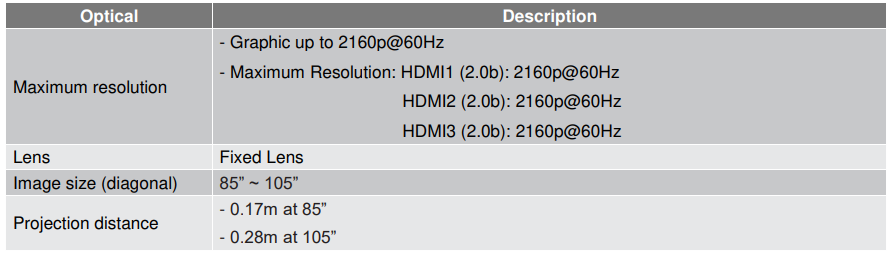
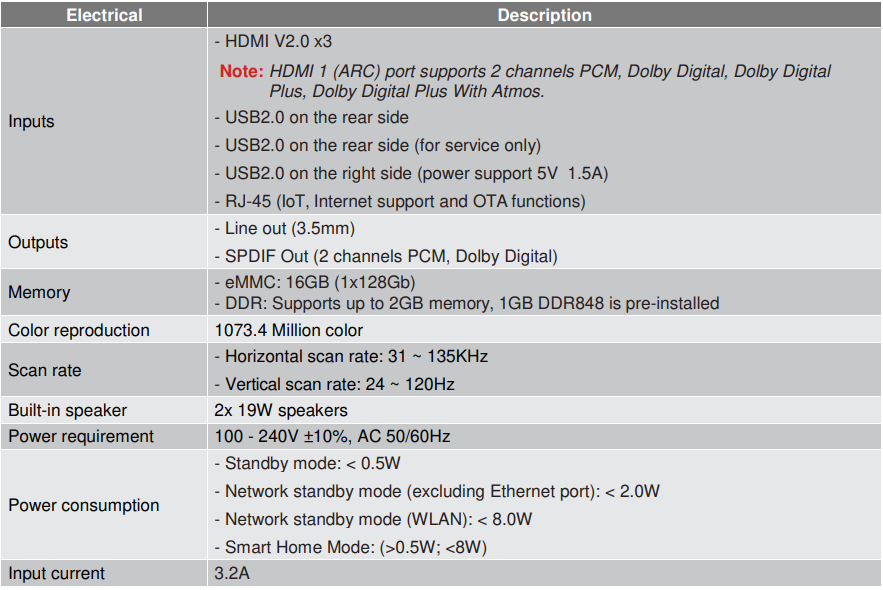
Specifications

Cleaning the Lens
- Before cleaning the lens, be sure to turn off the projector and unplug the power cord to allow it to completely cool down.
- Use a compressed air tank to remove the dust.
- Use a special cloth for cleaning the lens and gently wipe the lens. Do not touch the lens with your fingers.
- Do not use alkaline/acid detergents or volatile solvents such as alcohol for cleaning the lens. If the lens is damaged due to the cleaning process, it is not covered by the warranty.
FCC Statement
This device has been tested and found to comply with the limits for a Class B digital device pursuant to Part 15 of the FCC rules. These limits are designed to provide reasonable protection against harmful interference in a residential installation. This device generates, uses, and can radiate radio frequency energy and, if not installed and used in accordance with the instructions, may cause harmful interference to radio communications. However, there is no guarantee that interference will not occur in a particular installation. If this device does cause harmful interference to radio or television reception, which can be determined by turning the device off and on is encouraged to try to correct the interference by one or more of the following measures:
- Reorient or relocate the receiving antenna.
- Increase the separation between the device and receiver.
- Connect the device into an outlet on a circuit different from that to which the receiver is connected.
- Consult the dealer or an experienced radio/television technician for help.
Customer Service
- Tell: 888-289-6786
- Website: services@optoma.com