


Russell Hobbs N26680 Toaster Oven

Safety Instructions
When using this appliance, basic safety precautions should always be followed, including but not limited to the following:
- Do not use in the bathroom or near any source of water.
- Do not use outdoors.
- Always use the appliance’s handles or use oven gloves/mitts, as some parts will be hot.
- Children should be supervised to ensure they do not play with the appliance.
- Do not leave this appliance unattended when in use.
- Always switch off and unplug from the power outlet when not in use.
- Do not use on an inclined plane or unstable surface.
- Do not move the toaster oven while it is switched on.
- Do not cover the toaster oven when in use.
- Oven gloves should be used when removing food items.
- Always take care when removing hot food items from the toaster oven.
- Food may burn. Always monitor when using this appliance.
- Do not use the toaster oven near or below any curtains or other combustible materials.
- Do not cook food items too large for the toaster oven.
- Do not use the toaster oven without the crumb tray fitted.
- Do not cook food wrapped in plastic film or polythene bags. It will cause a fire hazard.
- Do not place on or near any heat sources. Do not clean with metal scouring pads.
- Pieces can break off the pad and touch electrical parts, creating a risk of electric shock.
- Follow the instructions when cleaning this appliance.
- Do not use the appliance for anything other than its intended purpose.
- Do not place any of the following materials in the oven: paper, cardboard, plastic, and the like.
- Clean the toaster oven and crumb tray regularly. Failure to do so may cause a fire hazard.
- Do not cover the crumb tray or heating elements with metal foil.
- This appliance is not intended to be operated by means of an external timer or separate remote control system.
Parts
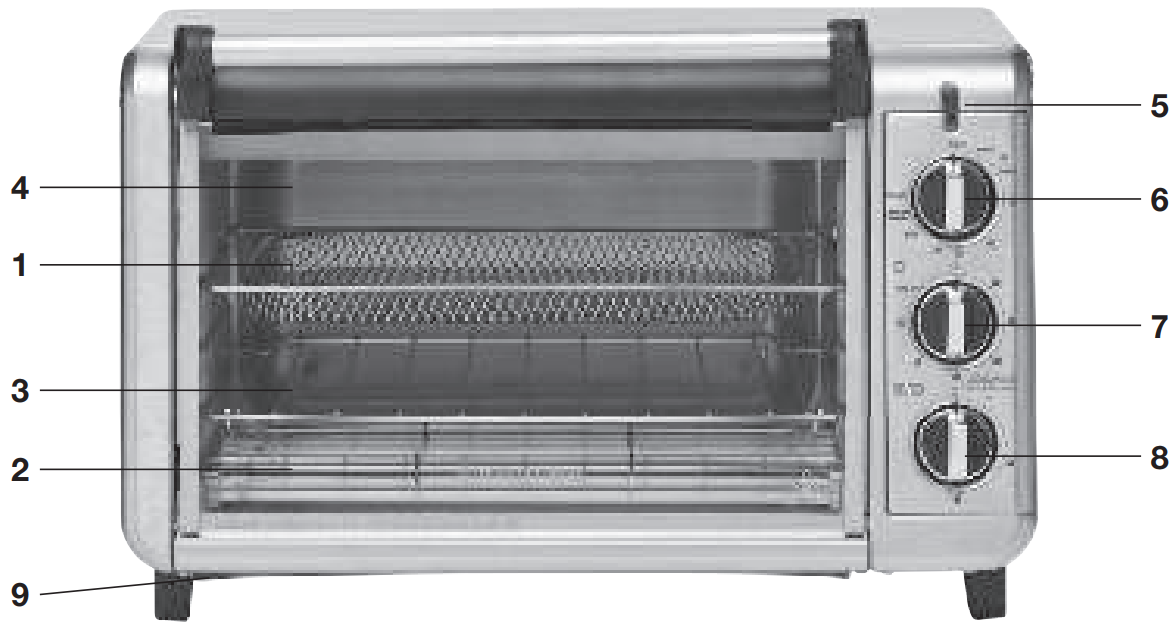
- Air fry mesh cooking rack
- Bake pan/Drip tray
- Wire rack
- Easy-view glass door
- Power indicator light
- Temperature/Cooking function control
- Timer 1 – Warm/Bake/Grill/Air Fry
- Timer 2 – Toast
- Crumb tray
Power On/Off
There are two ways to turn the toaster oven ON
For cooking functions, use the top control to select a bake temperature, AirFry mode or Grill mode. Then, using ‘Timer 1’, select a cooking time or set to ‘Stay On’. For toasting, set the top control to ‘Toast’. Then, rotate ‘Timer 2’ to the desired toast shade.
To turn OFF the toaster oven: Rotate the timers to the ‘O position and the top control to the ‘Min’ position.
Before First Use
- Read all of the instructions included in this manual.
- Remove all packing material and any stickers.
- Wash all removable parts in warm soapy water.
- Thoroughly dry all parts before reassembling.
- Position your toaster oven in a well-ventilated area, on a firm, level, heat-resistant surface, clear of curtains, drapes, overhead cupboards and other combustible materials.
- Leave enough space (≈150mm/6 inches) around the unit to allow heat to flow without damage to adjacent cabinets and walls.
- Plug the unit into the power outlet and switch the outlet on.
Using the Appliance
- This toaster oven gets hot. When in use, always use oven mitts or pot holders when touching any outer or inner surface of the toaster oven.
- During the first few minutes of use, you may notice smoke and a slight odour.
- This is normal and should cause no concern.
- Temperatures in the toaster oven will be lower than your set point.
- This is due to the advanced heating elements used in this toaster oven.
- You must set the timer or select Stay On for the toaster oven to function.
- Be sure the food or baking dish does not come within 1½ inches of the top heating elements.
- You can cook your food 3 ways: Use the bake pan/drip tray placed on the slide rack.
- Place the bake pan/drip tray under the slide rack/grilling rack.
- Place food on the Air Fry mesh rack with the bake pan/drip tray underneath
Toast
It is not necessary to preheat the oven for toasting.
- Set the Temperature/Cooking function control to the TOAST position.
- Open the toaster oven door and insert the wire rack in the bottom slot.
- Place items to be toasted directly onto the wire rack and close the door.
- Turn the TIMER 2 control to the middle and then turn back or forward to set the desired toast shade.
- 5. The power indicator light will illuminate and remain on until the toasting cycle is complete.
- When the toast cycle is complete, there will be an audible signal.
- The oven and the power indicator light will turn off.
- Open the toaster oven door. Unplug the appliance when not in use.
- Using oven mitts, slide the wire rack outward, just far enough to remove the toast.
Grill
When grilling, preheat the oven until it is warm. For optimal results, use the op rack position. Be sure the food or baking dish does not come within 40mm (1 1/2 inches) of the top heating element.
- Set the temperature selector knob to GRILL.
- Set the TIMER 1 selector control to 20, then turn back or forward to the desired grilling time.
- Select Stay On to bake longer than 60 minutes or to control cooking time yourself.
- The power indicator light comes on and remains on during the entire grilling time.
- Once the oven is preheated, open the oven door and insert the food. Close the toaster oven door.
- If using the oven timer, there will be an audible signal once the grilling cycle is complete.
- Open the oven door. Using oven mitts or pot holders, slide the rack out to remove the cooked food.
- Unplug the appliance when not in use
AIr Fry
It is not necessary to preheat the toaster oven in the air fry function, as it may cook slightly faster than recommended cooking times.
- Place food on the Air Fry mesh rack.
- Open the door and slide the Air Fry mesh rack with food into the middle or lower rack position.
- Set the Temperature selector knob to the AIR FRY position.
- Turn TIMER 1 selector control to 20 and then turn to the desired Air Frying time.
- Select Stay On to air fry longer than 60 minutes or to control cooking time yourself.
- The power indicator light comes on and remains on during the entire Air Frying time.
- If using the toaster oven timer, there will be an audible signal once the Air Fry cycle is complete.
- The toaster oven turns off, and the power indicator light goes out.
- If not using the toaster oven timer, turn the toaster oven off once the cooking cycle is complete.
- Open the toaster oven door. Using oven mitts or pot holders, slide the rack out to remove the cooked food. Unplug the appliance when not in use.
Bake
For best results, when baking or cooking, always preheat the oven for at least 10 minutes at the desired temperature setting. For optimal results, use the middle or lower rack position.
- Set the temperature selector knob to the desired temperature.
- Turn TIMER 1 selector control to 20 and then turn to the desired baking time.
- Select Stay On to bake longer than 60 minutes or to control cooking time yourself.
- The power indicator light comes on and remains on during the entire baking time.
- Once the toaster oven has preheated, open the oven door and insert the food.
- Close the toaster oven door.
- If using the toaster oven timer, there will be an audible signal once the baking cycle is complete.
- The oven turns off, and the power indicator light goes out.
- If not using the toaster oven timer, turn the oven off once the cooking cycle is complete.
- Open the toaster oven door. Using oven mitts or pot holders, slide the rack out to remove the cooked food. Unplug the appliance when not in use.
Care & Cleaning
- Clean the glass door with a damp cloth or sponge dipped in warm to hot soapy water.
- Do not use a spray glass cleaner.
- Wipe clean with a soap-free, damp cloth to remove residual suds and streaks from the glass.
- Wash the wire rack in warm to hot soapy water. Rinse and dry thoroughly.
- Wash the bake pan/drip tray in warm to hot soapy water. Rinse and dry thoroughly.
- Use a sponge or soft cleaning brush to remove stains. Rinse and dry thoroughly.
- If any food is baked onto the wire rack or bake pan/drip tray, soak in warm to hot soapy water for 1 hour before cleaning.
Exterior Surfaces
Clean the exterior with a damp cloth or sponge. A mild dishwashing detergent can be used to remove difficult marks. Do not use any abrasive material or sharp utensils on the exterior of the oven, as it will damage the surface and finish. Dry thoroughly.
Cooking Containers
Metal, ovenproof glass or ceramic bake ware without glass lids can be used in your toaster oven. Follow the manufacturer’s instructions. Be sure the top edge of the container is at least 40mm (1½ inches) away from the upper heating elements.
Disposal/Recycling
Legislation in some localities mandates that e-waste (anything with a plug, battery or cord) is disposed of through controlled recycling facilities and must not be disposed of in general household waste. For more information about the recycling of electrical and battery-operated appliances, please contact your local council or your local household waste disposal service.
Warranty Information
(Applies only in the United States and Canada) For service, repair, or any questions regarding your appliance, please call our Customer Service. Please DO NOT return the product to the place of purchase. Also, please DO NOT mail the product back to the manufacturer, nor bring it to a service centre.
What does it cover?
Any defect in material or workmanship provided; however, the liability of Spectrum Brands, Inc. will not exceed the purchase price of the product.
How long is the warranty valid?
- In the United States: Two years from the date of original purchase with proof of such purchase.
- In Canada: Two years from the date of original purchase with proof of such purchase.
What will we do to help you?
- Provide you with a reasonably similar replacement product that is either new or factory refurbished.
How do you get service?
- Save your receipt as proof of the date of sale.
What does your warranty not cover?
- Damage from commercial use
- Damage from misuse, abuse, or neglect
- Shipping and handling costs associated with the replacement of the unit
- Consequential or incidental damages (Please note, however, that some states do not allow the exclusion or limitation of consequential or incidental damages, so this limitation may not apply to you.)
How does state law relate to this warranty?
- This warranty gives you specific legal rights.
- You may also have other rights that vary from state to state or province to province.
Customer Service
- Website: www.prodprotect.com/russellhobbs
- Tel: 1-800-947-3744
1 Comment
Pingback: Russell Hobbs RHMC50 Cook Home | Full Tips & Instructions