


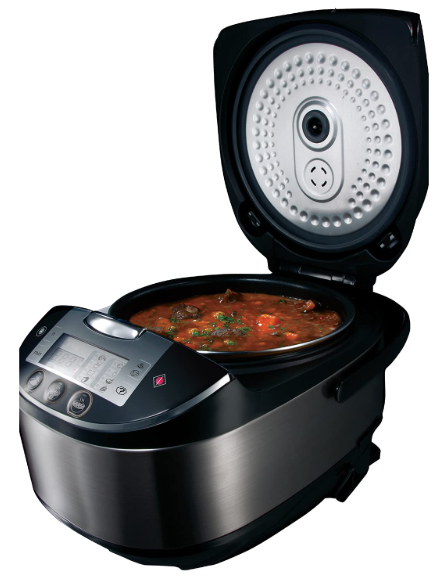
Russell Hobbs RHMC50 Cook Home Multi-cooker
Safety Instructions
When using the Russell Hobbs RHMC50 Cook Home appliance, basic safety precautions should be followed, including but not limited to:
- Do not use outdoors. Never pull by the cord.
- Do not use the appliance near or below any curtains or other combustible materials.
- Always use appliance handles and do not touch the hot cooking surfaces.
- The temperature of accessible surfaces/parts may become very hot when the appliance is operating, and heated surfaces are subject to residual heat for some time after the unit has switched off.
- This appliance generates heat and escapes steam during use.
- To avoid the risk of burns, stay clear of the steam vent while cooking.
- This appliance is not intended for use by persons (including children) with reduced physical, sensory, or mental capabilities, or a lack of experience and knowledge, unless they have been given supervision or instruction concerning use of the appliance by a person responsible for their safety.
- Always turn off and unplug from the power outlet when not in use and before cleaning the appliance.
- To disconnect, turn off the wall power outlet, then grasp the plug and remove it from the wall power socket.
- When using this appliance, basic safety precautions should always be followed.
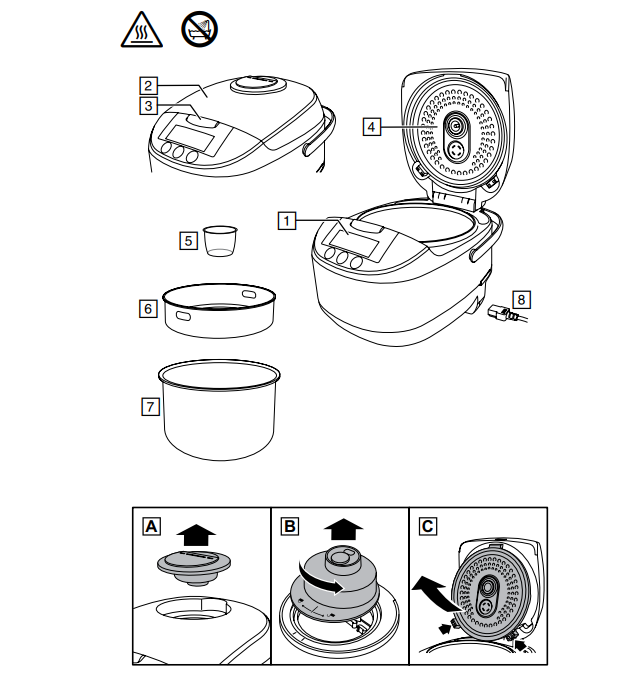
Features
- Control panel
- Lid
- Lid Lock
- Inner Lid
- Measuring cup
- Basket
- Bowl
- Connector

Prepation
- Set the appliance on a stable, level, heat-resistant surface.
- Don’t use the appliance near or below curtains, shelves, cupboards, or anything else likely to be damaged by the escaping steam.
- Use oven gloves or a cloth, and a heat-resistant mat or dinner plate to put the bowl on after cooking.
- Place the bowl inside the cooker
- Give the bowl a quarter of a turn each way to ensure the bottom of the bowl makes good contact with the element.
Rice
For smaller portions or simpler rice cooking, you can also check the Russell Hobbs 27020-56 Rice Cooker for an easy alternative.
- Use the measuring cup to put the rice into the bowl.
- Don’t use more than 10 cups of rice.
- Use the scale on the left, inside the bowl, which is marked from 2 to 10.
- Fill the bowl with water up to the number corresponding to the number of cups of rice used.
- Close the lid. Press the button. The button will light up.
- The outer segments of the display will blink while the food heats up.
- The display will then show the remaining cooking time (13 minutes), and count down.
- At the end of the cooking time, the appliance will go into “keep warm” mode.
- The light will come on. Open the lid.
- Lift out the bowl and set it down on a heat-resistant mat or dinner plate. Press the button.
- Use the spatula to turn and mix the rice, to let all the steam escape.
- Sometimes the layer of rice that is in contact with the bowl will form a crust.
Slow Cooking
- Brown meat and vegetables (see “BROWN/SAUTE/SOFTEN/BOIL”).
- Boil the cooking liquid (see “BROWN/SAUTE/SOFTEN/BOIL”).
- Put the solid ingredients into the bowl, then add the cooking liquid.
- Close the lid. Press the button. The button will light up
- The display will show 8 hours and count down.
- At the end of the cooking time, the appliance will go into “keep warm” mode.
- The light will come on.
- Press the button. Open the lid. Remove the food.
Meat
- Rub the meat all over with cooking oil
- Rub any seasonings over the surface of the meat.
- Put a tablespoon of cooking oil in the bowl.
- Put the meat in the bowl. Close the lid.
- Time depends on the size of the meat.
- Don’t cook more than about 500g of meat at a time.
- We suggest cooking times of 10 minutes + 10 minutes per 100g of weight for beef.
- Don’t cook pork or poultry for less than 5, 10, 15, 20, 25, or 30 minutes.
- Use the button to select in the menu.
Soup
- Brown meat and vegetables (see “BROWN/SAUTE/SOFTEN/BOIL”).
- Put the solid ingredients into the bowl, then add the cooking liquid.
- Close the lid.
- Use the button to select in the menu
- Choose the cooking time. The default time is 1 hour.
- You can only use the h and min buttons while the display time is blinking.
- Use the min button to move the display through the options (10, 15, 20, 25, 5, 10, 15, 20,
25, 30, 35, 40, 45, 50, and 55). - Use the h button to move the display through the options (1, 2, 3, 4, and 5).
- To undo the 5-hour setting, press the h button again while the display time is blinking. If you do nothing for 2 minutes, the appliance will revert to standby mode.
- You have the option of using the timer with this program (see TIMER)
Making Yogurt
- While you are heating the milk, let the yoghurt culture get to room temperature. Open the lid.
- Use the STEAMING (BROWN/SAUTE/SOFTEN/BOIL) program to heat the milk to just below boiling.
- Let the milk heat till it begins to bubble at the edges
- Let the milk cool to between 37°C and 45°C.
- Stir the yoghurt culture into the milk.
- They must be thoroughly mixed, or the yoghurt will be lumpy.
- Close the lid. Use the button to select g in the menu.
- Choose the cooking time. The default time is 8 hours.
- You can only use the h and min buttons while the display time is blinking.
- Use the h button to move the display through the options (6, 7, 8, 9, and 10).
- To undo the 10 hour setting, press the h button again, while the display time is blinking.
- If you do nothing for 2 minutes, the appliance will revert to standby mode.
- You have the option of using the timer with this program (see TIMER).
- Press the button. The time on the display will count down.
- At the end of the cooking time, the appliance will go into standby mode.
- It will not keep the yogurt warm.
- Press the button. Open the lid. Remove the food.
Bread
- Defrost frozen dough thoroughly before use.
- Don’t cook more than about 500g of dough at a time.
- Wipe the bowl with cooking oil.
- Put the dough into the bowl. Close the lid.
- Use the button to select in the menu.
- Choose the cooking time. The default Russell Hobbs RHMC50 Cook Home time is 3 hours.
- You can only use the h and min buttons while the display time is blinking.
- Use the h button to move the display through the options (1, 2, 3, 4, 5, and 6).
Steaming
- Fill the bowl with cold water up to the 6 mark.
- Put the basket on top of the bowl and put the food into the basket.
- For uniform cooking, cut all pieces of food to roughly the same size.
- For peas, or anything that’ll break up or drop into the water, make a parcel with aluminium foil.
- Take care when removing the parcel – wear oven gloves and use plastic tongs/spoons.
- Close the lid. Use the button to select in the menu.
- Choose the cooking time. The default time is 30 minutes.
- These should cook within the default time:
- You can only use the h and min buttons while the display time is blinking.
- Use the min button to move the display through the options (5, 10, 15, 20, 25, 30, 35, 40, 45, 50, and 55).
Brown/Saute/Soften/Boil
- You may use the STEAMING S program at its default setting, with the lid open, as a high-temperature pan for 5, 10, 15, 20, 25, or 30 minutes, before cooking with another program.
- Use it with a small amount of oil to brown meat and vegetables, to sautée, to soften onions, celery, leeks, etc. Use it with water or stock to pre-heat cooking liquids.
- When you switch to the main program, the appliance is warmed up, and some or all of your ingredients will already be in the bowl. You don’t have to wash the pan you would have used during preparation.
Porridge
- Use the scale on the right, inside the bowl, which is marked from ½ to 1½
- Don’t fill above max
Congee
- Use the scale on the centre, inside the bowl, which is marked from 1 to 3.
- Don’t fill above max
- Fill the bowl with water up to the number corresponding to the number of cups of grain.
- Close the lid. Use the button to select in the menu.
- Choose the cooking time. The default time is 1 hour.
- You can only use the h and min buttons while the display time is blinking.
- To undo the 4-hour setting, press the h button again while the display time is blinking.
- If you do nothing for 2 minutes, the appliance will revert to standby mode. Press the button.
Care & Maintainance
- Unplug the appliance and let it cool.
- With the lid closed, grip the top of the filter and lever it out of the lid. (FIG A).
- Turn it over to expose the markings on the front edge.
- Hold the filter lid fast, and turn the rest of the filter towards the open padlock (FIG B).
- Press on the tabs at the bottom of the inner lid, and pull it off the appliance. (FIG C).
- Hand-wash the removable parts.
- Wipe all surfaces with a clean, damp cloth.
- Don’t put any part of the appliance in a dishwasher.
- Reassemble the filter, and replace it in the lid.
- Replace the inner lid in the lid.
Warranty Information
(Applies only in the United States and Canada) For service, repair, or any questions regarding your appliance, please call our Customer Service. Please DO NOT return the product to the place of purchase. Also, please DO NOT mail the product back to the manufacturer, nor bring it to a service center.
What does it cover?
Any defect in material or workmanship provided; however, the liability of Spectrum Brands, Inc. will not exceed the purchase price of the product.
How long is the warranty valid?
- In the United States: Two years from the date of original purchase with proof of such purchase.
- In Canada: Two years from the date of original purchase with proof of such purchase.
What will we do to help you?
- Provide you with a reasonably similar replacement product that is either new or factory refurbished.
How do you get service?
- Save your receipt as proof of the date of sale.
What does your warranty not cover?
- Damage from commercial use
- Damage from misuse, abuse, or neglect
- Shipping and handling costs associated with the replacement of the unit
- Consequential or incidental damages (Please note, however, that some states do not allow the exclusion or limitation of consequential or incidental damages, so this limitation may not apply to you.)
How does state law relate to this warranty?
- This warranty gives you specific legal rights.
- You may also have other rights that vary from state to state or province to province.
Customer Service
- Website: www.prodprotect.com/russellhobbs
- Tel: 1-800-947-3744
Frequently Asked Questions
Q: Can I sauté ingredients before slow cooking?
Indeed! Before transferring to Slow Cook mode, you can use the Sauté/Brown function to brown seasonings, meat, or onions right in the pot. This eliminates the need for different pans and adds flavour while saving time.
Q: Is the inner pot dishwasher-safe?
Yes, you can use the top rack of the dishwasher or wash the non-stick inner pot, steaming tray, and lid in warm, soapy water. To preserve the coating, stay away from metal scouring pads and harsh cleaners.
Q: How do I clean the multi-cooker base?
After unplugging the device, allow it to cool fully. Use a moist towel to wipe the outside and heating plate. Electrical parts and the main body should never be submerged in water.
Q: What is the capacity of the RHMC50 Cook@Home Multi-Cooker?
With its 5-liter capacity, the RHMC50 is perfect for large gatherings or bulk cooking. It can make four to six servings of a one-pot stew, a large curry, or up to ten cups of rice.
Q: Can I bake cakes or bread in the RHMC50?
Indeed! After choosing the Bake option, add your batter, cover, and bake for the amount of time your recipe calls for. For easier removal, you can also use heatproof cake tins that fit within the pot. If you want to bake smaller batches or need precise browning, the Russell Hobbs N26680 Toaster Oven is a handy complement to your multi-cooker.
Q: How does the “Keep Warm” feature work?
The cooker automatically transitions to Keep Warm mode after a cooking program is complete, keeping your food at a safe serving temperature for up to two hours without overcooking it.
Q: Can I use the multi-cooker to reheat leftovers?
Of course. Pre-cooked meals can be gently reheated using the Keep Warm or Steam modes. For uniform heating, use the multi-cooker rather than the microwave inside the nonstick pot.