
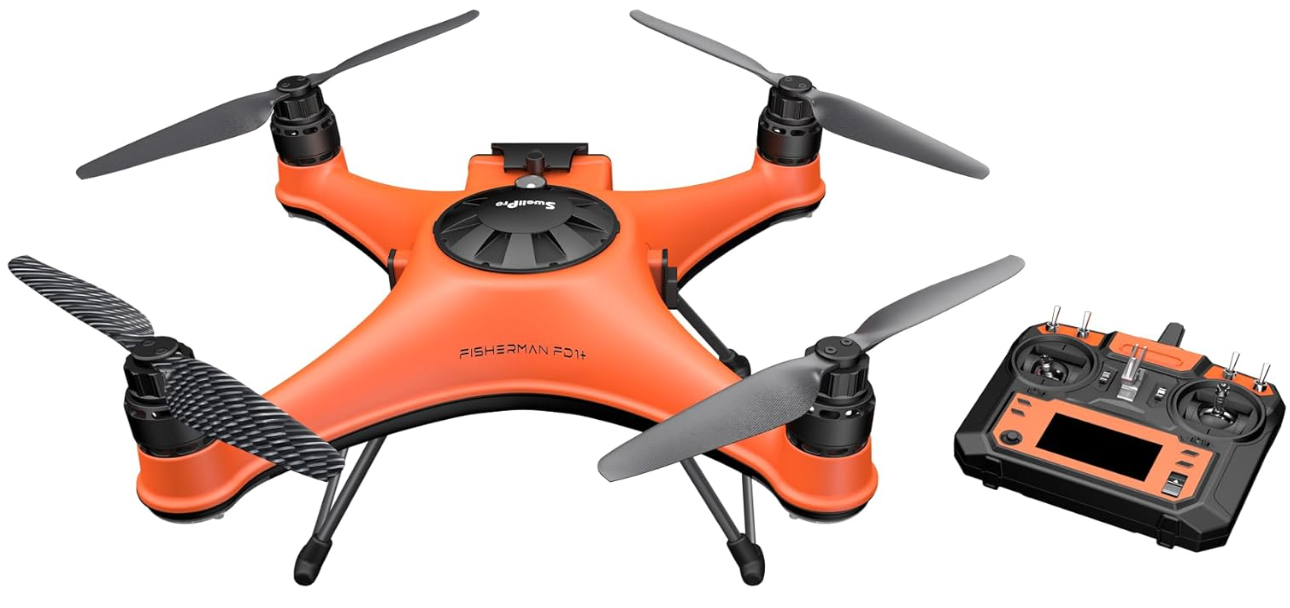
SwellPro FD1 Fisherman Fishing Drone
Safety instructions
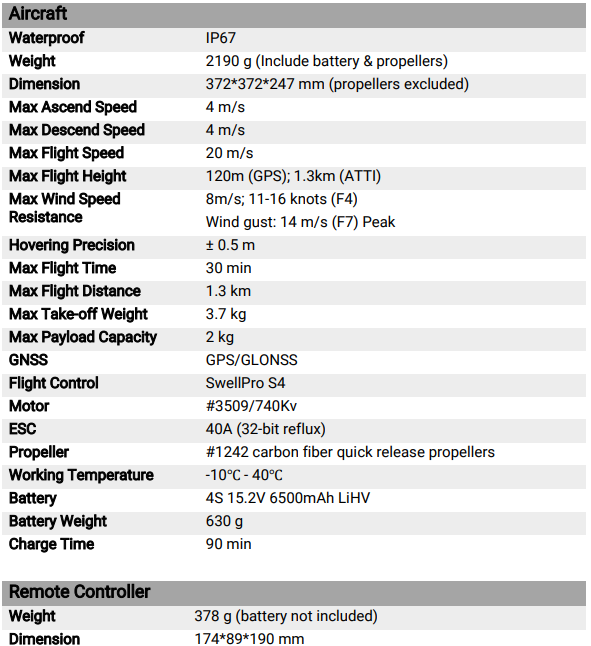
SwellPro Fisherman (FD1) is specifically designed by SwellPro for fishing enthusiasts and the drone fishing community. SwellPro has been focusing on making the world’s first and best waterproof drones since 2015. Now, we put our focus on making the best fishing drone. FD1 was designed solely for drone fishing from day one. We simplify the design for easy operation and maintenance of the drone, yet retain the powerful propulsion system for swift flying and great payload capacity. Together with the FPV camera, payload release, and TrollSafe modules, SwellPro Fisherman is going to be your best fishing partner.
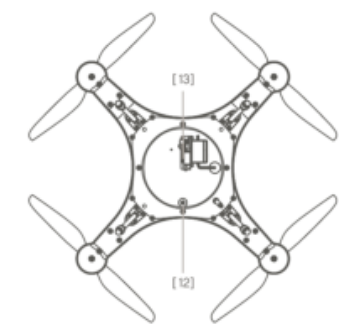
Aircraft Diagram
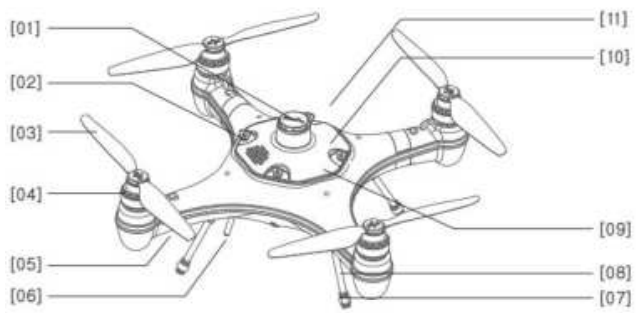
- Barometric Membrane Cover
- GPS Cover Lock
- Propeller
- Motor
- Aircraft Status Indicator
- Antenna
- Rubber Foot
- Landing Gear
- GPS Cover
- Flight Control LED Indicator
Remote Controller Diagram
- Antenna
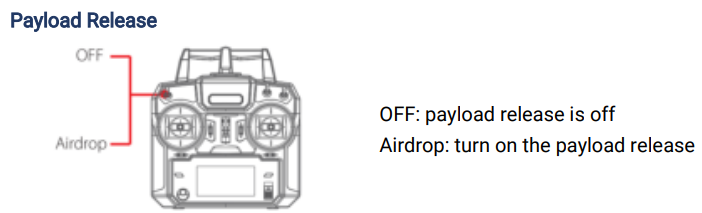
- Payload Release Toggle
- Throttle Rudder Adjustment
- Left Joystick (Throttle/Yaw)
- Yaw Calibration Adjustment
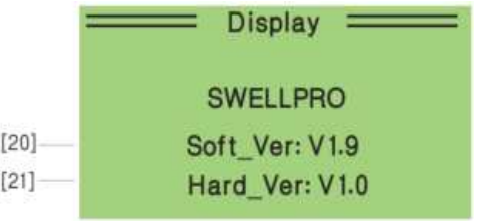
- Display[
- Display Page Up
- Pairing Button
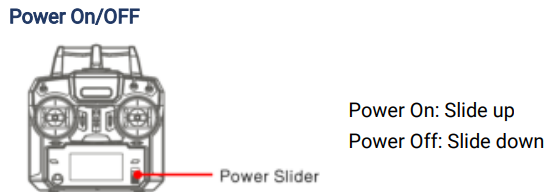
- Power Slider
- Display Page Down
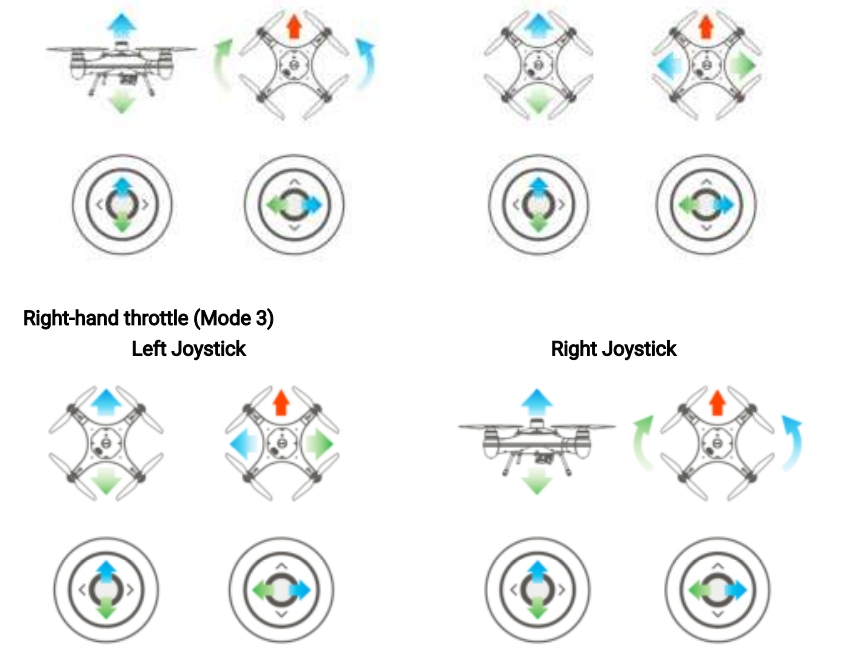
To reconfigure throttle modes
- Hold the left and right throttle to the lower left, then turn on the remote control to enter the factory setting page.
- Press [10] to select “Def sticks mode”. Then turn [5] to the left to enter.
- Press [7] or [10] to switch throttle mode. The default throttle mode is Model 2.
- After switching to the desired throttle mode, turn [11] to the right to exit the page. Restart the remote control to finish the reconfiguration.
Remote Controller
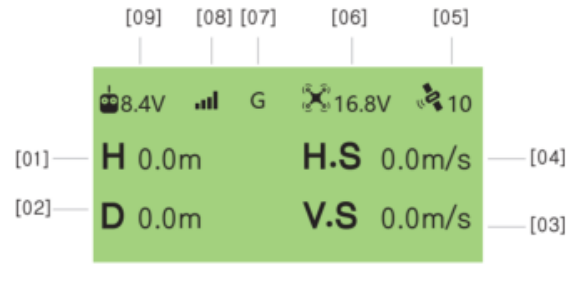
- Drone Height
- Drone Distance
- Vertical Speed
- Horizontal Speed
- Satellite Signal
- Drone Battery Voltage
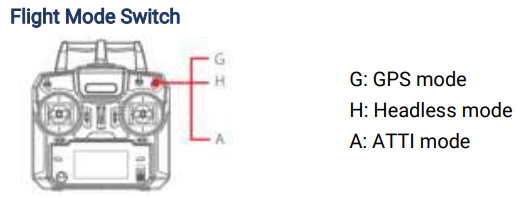
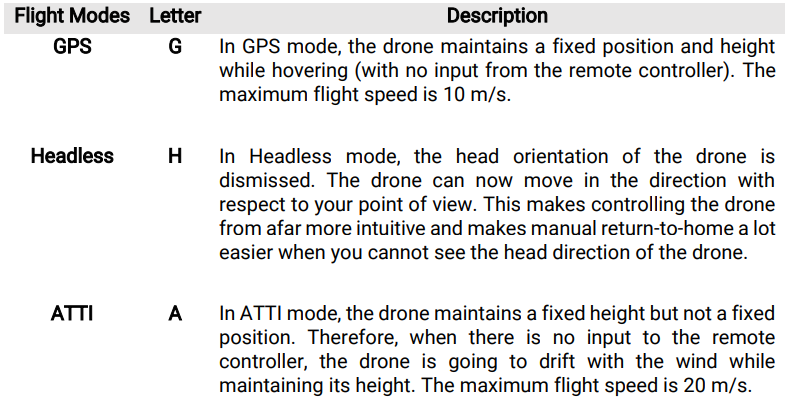
- Flight Mode (G: GPS/ H: Headless/ A: ATTI)
- Remote Controller Signal
- Remote Controller Battery Voltage
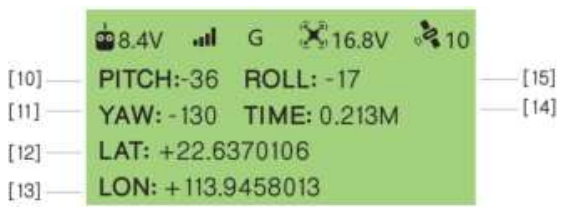
- Pitch Angle
- Yaw Angle
- Latitude
- Longitude
- Flight Time
- Roll Angle

- Roll Channel
- Pitch Channel
- Throttle Channel
- Pan Channel
Install the Aircraft
The SwellPro Fisherman has two pairs of propellers – two clockwise propellers and two counterclockwise propellers. The hub of each motor shows the type of propeller used for that motor. Propellers should not be attached to the wrong motors.
Install Propellers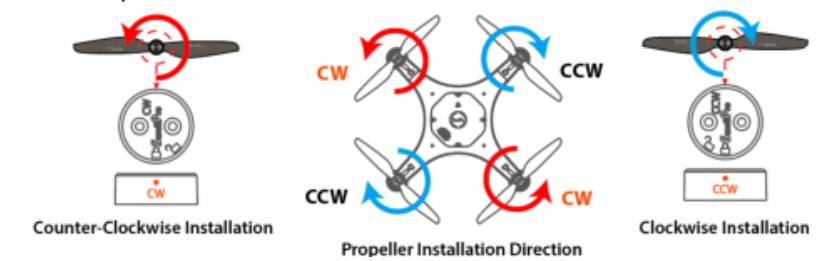
- Check the propeller’s marking (CW/CCW) to see if it matches the motor. CCW propellers to CCW motors, same for CW.
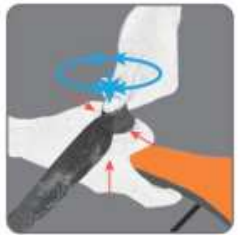
- Place the propeller on the motor, and rotate the propeller in the hub for 1/8th of a turn until it engages.
- Hold the arm of the aircraft tight with one of your hands.
- Rotate the propellers in the direction indicated by the lock signs with your other hand.
- To remove the propeller, repeat steps 3 and 4.
Install the Battery
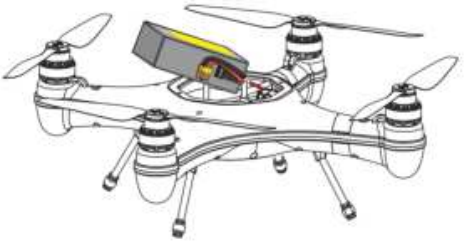
To install the battery
- Fold the cables to the right side of the battery.
- Insert the battery into the aircraft chamber at an angle as shown above.
- Tightly strap the battery with the Velcro strap.
- Plug the yellow plug into the power port.
RC Sand-Proof Cover
SwellPro Fisherman comes with a sand-proof silicone cover for the remote controller. Put the sand-proof cover on the remote controller to prevent sand and water splashes from getting into the remote.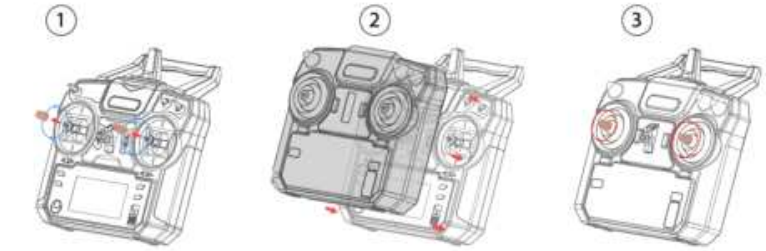
To install the sand-proof cover on the remote controller
- Take off the tips of the control sticks.
- Place and cover the remote controller with the sand-proof cover.
- Reinstall the tips on the control sticks.
Aircraft
Aircraft Status Indicator
There are two types of aircraft status indicators:
- Aircraft status indicators (red), which are on the front arms.
- GPS signal status indicators (green), which are on the rear arms.
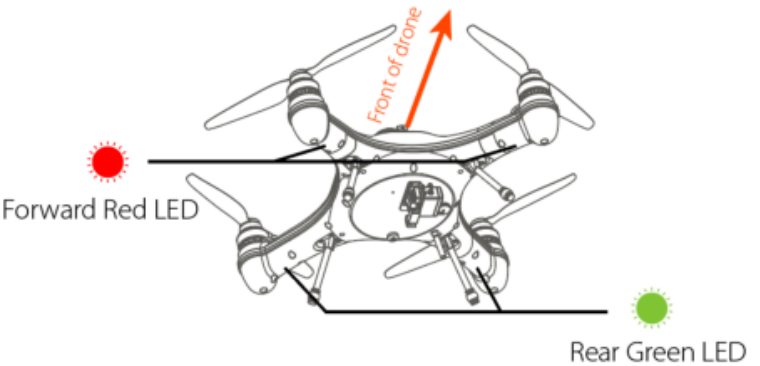
- The red LED indicators are used to identify the head of the drone.
- All the status indicator messages are going to be displayed on the remote controller screen.
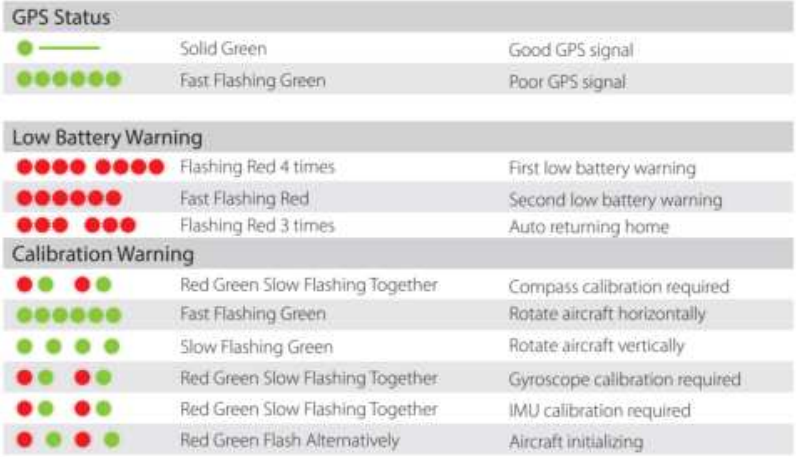
Low Battery Warning
The FD1 has two low battery warnings to help the pilot manage the drone’s battery life. Each time a battery level alarm is activated, the remote controller will beep and vibrate to alert the pilot.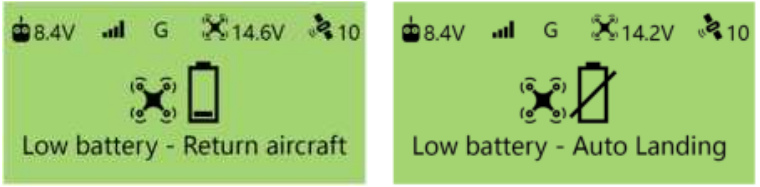
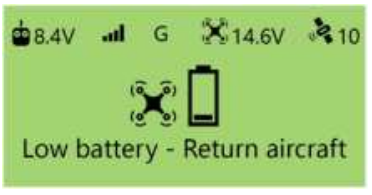
- Level 1 alarm: The drone battery level has reached 14.6V. The remote controller screen will prompt “LOW BATTERY; Return Aircraft”. Front drone status indicators will flash a pattern of 3 red lights. The aircraft is going to proceed with auto payload release, then proceed to auto return-to-home.
- Level 2 alarm: The drone battery level has reached 14.2 V. The battery icon on the remote controller screen will flash. The battery level is now below 10%, and you should plan to land the drone safely. The remote controller screen will prompt “Low battery – Auto Landing”.
After 10 seconds, the drone will initiate an in-place auto-landing to protect the drone and battery. The front aircraft status indicators are going to flash red constantly. During auto-landing, you can control the joystick to overwrite the auto-landing and regain control of the drone. However, flying the drone below 14.2 V is highly dangerous since the battery will not be able to maintain the flight and will result in the aircraft crashing.
Waterproof Barometric Membrane
The waterproof barometric membrane is SwellPro’s featured technology. It allows air to pass through the internal chamber of the aircraft to ensure the barometer’s proper functioning, yet keeps the water from getting in to ensure the Fisherman’s all waterproof design. The waterproof barometric membrane is delicate yet an extremely important part for proper flying and waterproofing. Therefore, you should pay special attention to the proper use of the waterproof barometric membrane during your operation. If the aircraft is not flying stably during hovering, or the aircraft is not flying normally during ascent or descent, the waterproof barometric membrane might be damaged. Please take off the top barometric membrane cover and replace the waterproof barometric membrane.
To replace the waterproof barometric membrane
- Use a sharp tool (such as a knife) to remove the adhesive, then take off the top cover.
- Peel off the old waterproof barometric membrane. Clean the surface barometric vent and make sure there is no residue on the surface.
- Remove the 3M paper from the waterproof barometric membrane and press it firmly on the barometric vent to ensure a tight seal
Attach the adhesive to the top cover and press it down over the waterproof barometric membrane. 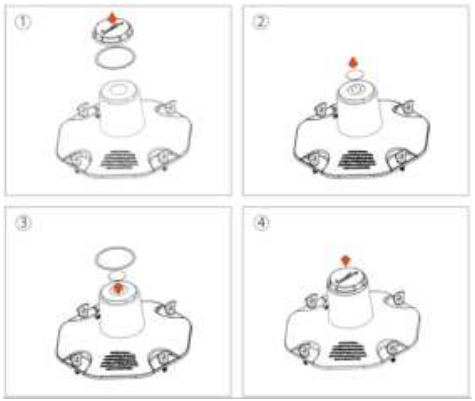
Remote Controller
Using the Remote Controller
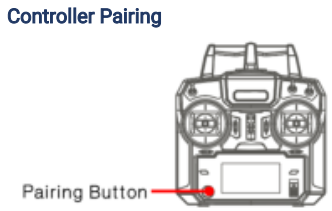
To re-pair the remote controller and the aircraft
- Press the aircraft pairing button, then press the power button together to turn on the aircraft.
- Press the remote controller pairing button, then slide up the power slider together to turn on the aircraft.
- The aircraft and the remote controller will start pairing automatically.
Control the Aircraft
The default throttle mode is mode 2

Flight
The drone relies on sensitive sensors to control flight positioning and stability. The SwellPro Fisherman is flight tested before shipment; however, an initial calibration of the compass is required for your first use.
Flight Safety and Environment
- Please make sure you have a comprehensive understanding of the FD1 and all the
necessary measures required to implement a successful return home function in theIn the
event of an emergency. - If this is your first time flying a drone, please read this manual thoroughly and watch
the tutorial videos on our website www.swellpro.com, or our YouTube channels. - We recommend taking professional training and guidance. When flying, choose an
appropriate environment according to your skills. Check all calibrations and choose a
large open area to practice. - It is recommended for all drone pilots to become familiar with flying in ATTI mode in
case of GPS or magnetic interference, which may result in a malfunction when flying on
GPS mode. - Please be well prepared before each flight, and avoid any violent or excessive operations.
- Please maintain strict compliance with the local laws; any flying in NO-FLY ZONES is
prohibited. - Any illegal & improper use or operation of this product is prohibited.
- Any invasion & violation of another person’s right to privacy is not allowed. Before
using this product, it remains the duty of the drone pilot to comply with the local laws
regarding privacy protection. - Any invasion or flying over another person/s property is not allowed, please agree with
Any person regarding any potential breach of privacy before the proposed flight. - DO NOT fly the FD1 under the influence of alcohol, drugs, or any other physical or
mental impediment.
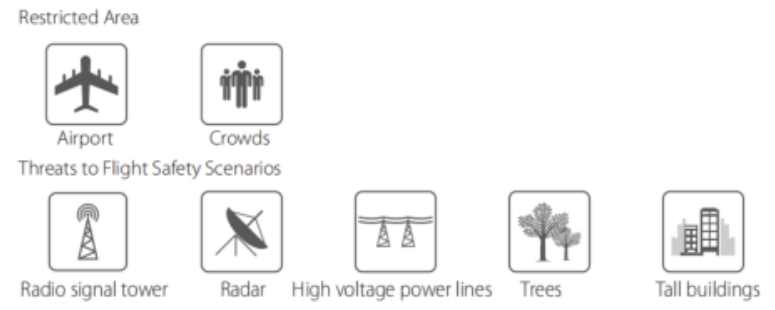
Flight Restrictions
According to provisions of the International Civil Aviation Organisation and many national air traffic regulations, drones must be operated in specified airspaces. Please strictly follow the local air traffic regulations accordingly.
Pre-Flight Checklist
- Check all propellers are in good condition and correctly installed.
- Ensure the propeller nuts are tightly screwed.
- Manually rotate the 4 motors to ensure they can spin smoothly.
- The payload module is tightly mounted to the aircraft.
- Ensure the bottom cable connector is tightly screwed.
- The drone is brand new.
- The drone has been repaired.
- The drone has been subjected to strong magnetic fields.
- The drone has crashed or been subjected to heavy shaking.
- The drone sways or drifts excessively during hovering in GPS mode.
- Place the drone on a level surface, power on the remote controller, then the drone. Wait for the aircraft to connect to the remote controller.
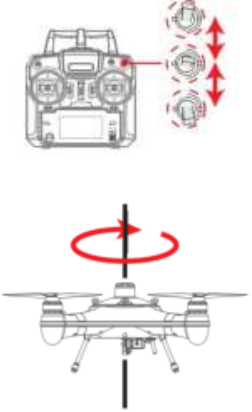
- After the connection finishes, fast switch the Flight Mode toggle back and forth until the aircraft’s rear status indicators flash green, or the remote controller screen prompts “HORIZONTAL CALIBRATION Rotate Drone Clockwise”. The drone will now perform compass calibration.
- Pick up the aircraft and hold the drone horizontally and rotate clockwise about 2~3 turns until the rear indicators slowly flash green or the remote controller screen prompts “VERTICAL Calibration Clockwise NOSE DOWN”.
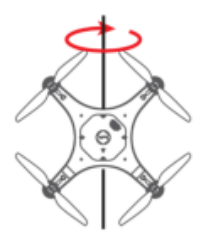
- Hold the drone nose-down and rotate clockwise about 2~3 turns until the remote controller screen prompts “Initialising
- Place the drone on a level surface for 30 seconds. When the prompt disappears, power off and restart the drone.
- The compass calibration is complete.
Gyroscope Calibration
The gyroscope provides stability data to the flight controller. If the gyroscope is not well calibrated, the aircraft will tilt to one side when it takes off, and the tilted angle will increase until the aircraft can no longer fly. Process gyroscope calibration for the following situations
- The drone trembles significantly during hovering in GPS mode.
- The drone’s tilt range is too large during ascent in ATTI mode.
- The drone drifts during ascending or descending in GPS mode.
- The drone has crashed or been subjected to heavy shaking.
- The remote controller screen prompts “WARNING Gyroscope error Calibrate Gyroscope”.
Gyroscope Calibration Process
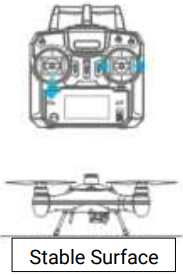
- Place the drone on a level surface, power on the remote controller, then the drone. Wait for the aircraft to connect to the remote controller.
- Hold the left joystick down to its lowest position, then quickly move the right joystick left to right, back and forth, until the front and rear status indicators flash alternately, or the remote controller screen prompts “WARNING aircraft Initialising, Please Wait”. The drone will now perform gyroscope calibration. Now release the joysticks. This process will be completed in 20 seconds. Do not move the drone during this process.
- When the front status indicators flash re,d and the rear status indicators turn solid gre,en or the “Initialising…” prompt disappears, power off and restart the drone. Gyroscope calibration is complete.
IMU Calibration
The Inertial Management Unit (IMU) provides the raw data of the aircraft’s attitude in space in nine dimensions. The IMU accelerometer sensor is critical to balance the aircraft in flight. Proceed with IMU calibration for the following situations.
- The drone cannot arm (unlock) the motors after the compass calibration.
- The drone sways or drifts excessively during hovering in GPS mode.
- The drone has crashed or been subjected to heavy shaking.
- The remote controller screen prompts “WARNING IMU error – Calibrate IMU”.
IMU Calibration Process
- Place the drone on a level surface, power on the remote controller, then the drone. Wait for the aircraft to connect to the remote controller.
- Hold the left joystick up to its highest position, then quickly move the right joystick left to right, back and forth, until the front and rear status indicators flash alternately, or the remote controller screen prompts “Initialising…”. The drone will now perform IMU calibration. Now release the joysticks. This process will be completed in 20 seconds. Do not move the drone during this process.
- When the front status indicators flash red, and the rear status indicators turn solid green,n or the “Initialising…” prompt disappears, power off and restart the drone. IMU calibration is complete.
Basic Flight Steps
- Check that the aircraft is correctly assembled.
- The propellers are correctly mounted and secure.
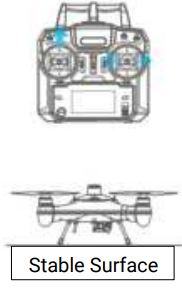
- Place the aircraft on flat, open ground.
- Power on the remote controller, followed by the drone.
- Check the following flight data: flight battery > 16.0V; remote controller battery > 5V; satellite > 5.
- For your safety, you should stand upwind and at least 3 meters away from the drone.
- Novice pilots should always take off in GPS mode.
- Arm the drone.
- Push the left(throttle) joystick up slowly, allowing the drone to take off smoothly. Release the throttle when the drone is approximately 1.5 m high. Allow the drone to hover for a moment to ensure flight stability.
- When you need to descend, gently pull down the left(throttle) joystick, allowing the drone to descend and land on a flat surface.
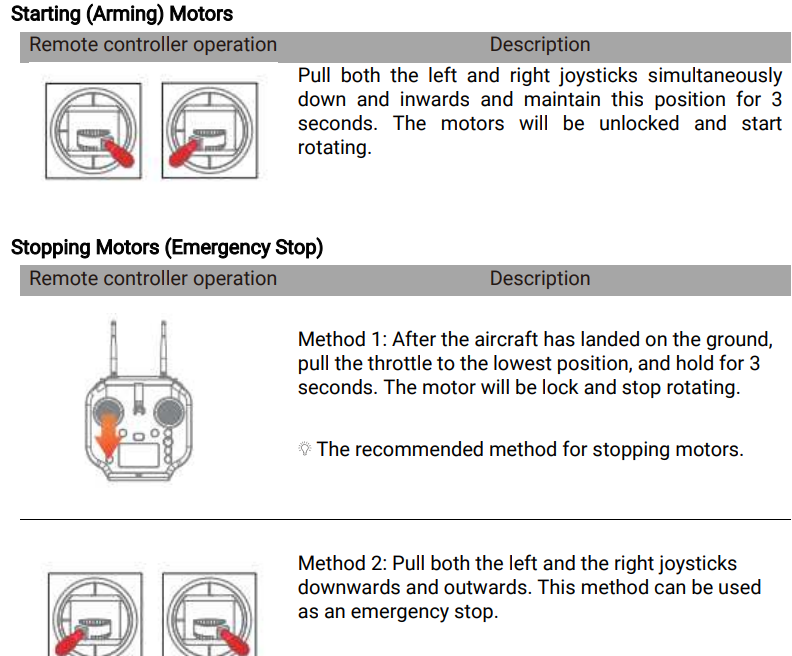
Starting/Stopping Motors
- Place the aircraft in an open area 3 meters away from yourself and others.
- Novice users should fly in GPS mode.
- Also, keep in mind that taking off the aircraft with no GPS signal will lead to the aircraft not returning to the home point.
Water Takeoff and Landing
- When taking off from choppy water, ascend quickly from the surface to prevent the drone from being affected by a passing wave.
- When landing on water, descend vertically to the surface. If the drone lands with horizontal speed, it may flip and be inverted. The flight controller will shut down the motors if the drone becomes inverted on the water.
Boat Takeoff and Landing
- There should be enough space for the drone to take off or land on the boat.
- If there is not enough space on the boat, taking off and landing on the water can be a safer alternative option, as there is sufficient space for the drone to operate.
- When the boat is rocking, the drone may not arm its motors in GPS mode. In this case, carefully take off in ATTI mode and then switch to GPS mode if the satellite signal is back.
- Always be aware of the direction of the wind relative to the boat for take-off and landing. Stand in the upwind position relative to the aircraft to prevent the aircraft from drifting toward you when taking off or landing in windy conditions.
- The Smooth+ controls are useful to finely control and balance the drone’s position during this operation.
- For your safety, it is not recommended to launch or land the SwellPro Fisherman from your hands.
- After initiating return-to-home on the boat, always regain control and land manually when the aircraft is approaching you.
Power Flip
If the drone becomes inverted on the water, the Power-Flip feature enables the drone to flip back to its upright position.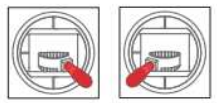
When the drone is floating upside-down on the water, pull both the left and right joysticks simultaneously down and inwards and maintain it for 3 seconds. The drone will flip itself automatically to its upright position.
Flight Mode
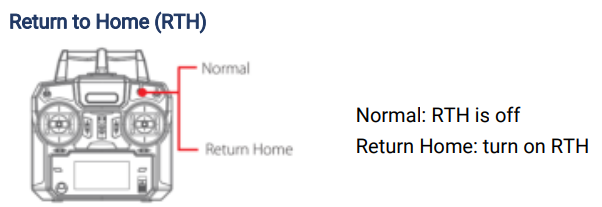
Return to Home (RTH)

Low Battery Auto Return to Home
Low battery auto RTH will initiate when the drone’s intelligent battery reaches Level 1 low battery warning.
- Level 1 alarm: The drone battery level has reached 14.6V. The remote controller screen will prompt “LOW BATTERY; Return Aircraft”. Front drone status indicators will flash a pattern of 3 red lights. The aircraft is going to proceed with auto payload release, then proceed to auto return-to-home.
On level 1, low battery warning, the aircraft will automatically release the payload, then initiates low battery auto Return-to-Home process.
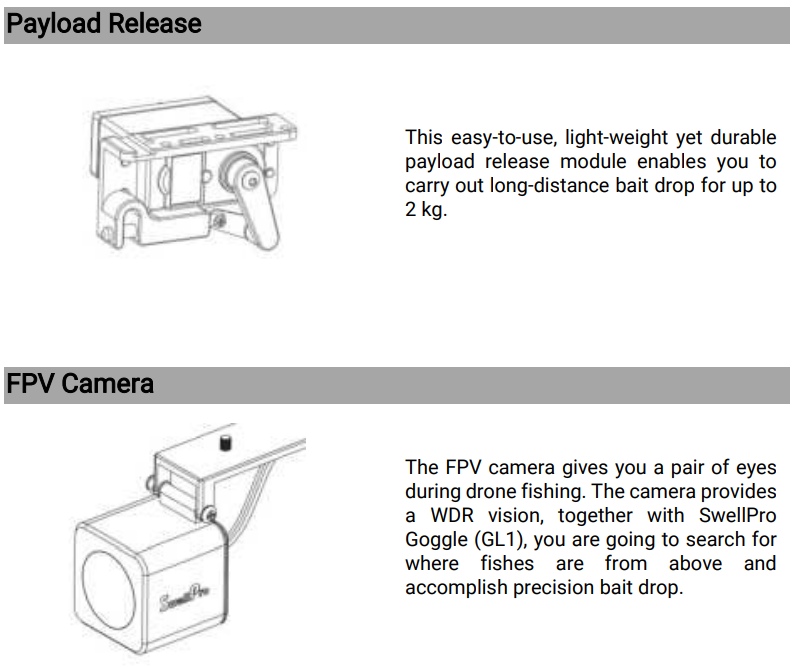
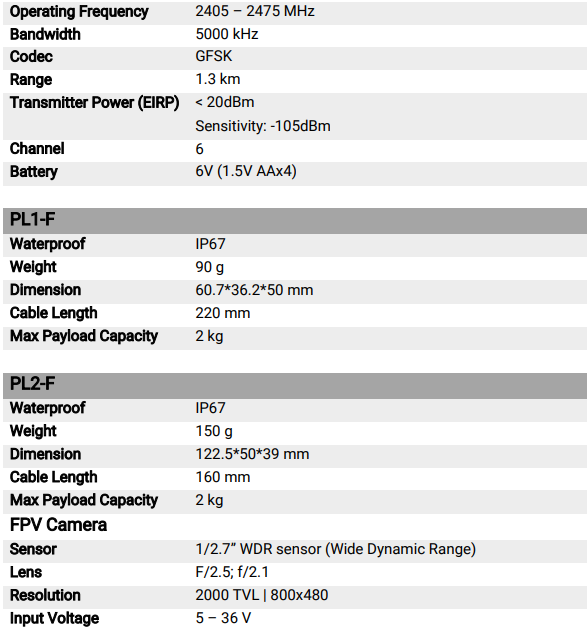
Payload Module
 Specification
Flying Guide
- Many regulations require the pilot to fly a drone within line of sight. Take particular care when flying a drone out of sight.
- Unless it is an emergency, NEVER lock or STOP the motors in flight, as this will cause the drone to fall to the ground and crash.
- The Return Home function can be used to reorient the drone towards the Home Point. By activating the Return Home function, the drone will rise to the return altitude (20m) and then turn towards the Home Point before starting its return.
- If you crash your drone, lock the motors to prevent damage to the motors and propellers.
- Do not attempt to touch the motors until they have stopped rotating completely.
- When landing on water, avoid abrupt landings to avoid damage to the drone.
- When flying over water, avoid the drone dropping or crashing into the water from a high altitude, as this could cause major damage to the drone.
- Do not expose the drone & battery to direct sunlight for long periods, as this can raise the internal temperature of the drone to well above the operating temperature range.
- If the drone does not appear to be responding to the remote controller, as usual, switch the drone to ATTI flight mode and fly the drone to a safe landing location.
Maintenance
- Avoid prolonged exposure to the sun.
- Before putting the aircraft into storage, turn off the power, disconnect the battery plug, and clean the aircraft.
- Store all the aircraft parts and accessories together.
- Store the aircraft in a dry, ventilated, cool temperature (20°C – 28°C).
- If not planning to use a drone in the near future, be sure to discharge the battery to about 50% (flight battery voltage at 15.8V)
Battery Care
- Do not allow the batteries to come into contact with any kind of liquid.
- Do not drop the battery into the water.
- Do not leave batteries out in the rain or near a source of moisture. If the inside of the battery comes into contact with water, chemical decomposition may occur, potentially resulting in the battery catching on fire, and may even lead to an explosion.
- Never use or charge swollen, leaky, or damaged batteries. If your batteries are abnormal, please contact SwellPro or a SwellPro authorised dealer for further assistance.
- The battery can be used in temperatures ranging from -10°C to 40°C. The use of the battery in environments above 50°C can lead to a fire or explosion. The use of the battery below -10°C can lead to permanent damage.
- Never disassemble or penetrate the batteries with sharp objects; otherwise, this may result in the battery catching fire or even lead to an explosion.
- Electrolytes in the battery are highly corrosive. If any electrolytes make contact with your skin or eyes, immediately wash the affected area with fresh running water for at least 15 minutes, and then see a doctor immediately.
- Do not heat batteries. A battery fire can be extinguished using sandor a dry powder fire extinguisher.
- Do not put batteries in a microwave oven or a pressurised container.
- Do not put the loose battery cells onto any conductive surface, such as a metal table.
- Do not put any conductive cables or metal objects together with batteries, where they may short-circuit against each other.
- Do not drop or strike batteries.
- Do not place heavy objects on the batteries or the battery charger.
Precautions for low-temperature use
- In a low-temperature environment, it is recommended to preheat the battery to above
- before flying, and it is better to preheat to above 20°C
Battery Charging
- Always use a SwellPro-approved charger to charge the battery of the droneand the radio controller. SwellPro takes no responsibility if the battery is charged using a non-SwellPro charger.
- To avoid any potential accidents happening, please do not leave the battery charging unattended.
- Do not charge the battery near flammable materials, or on flammable surfaces, such as carpet or wood.
- Disconnect the charger when not in use.
- Do not clean the charger with denatured alcohol or other flammable solvents.
- Never use a damaged charger.
- Keep batteries out of the reach of children and pets.
- Do not leave the battery near heat sources, such as a furnace, heater, or exposure to strong direct sunshine, for example, in cars.
- The ideal storage temperature is 22°C ~ 28°C.
- Keep the battery in a dry and ventilated environment
- Never drop the battery into the water, or store it in places where there is a possibility of water leakage.
- Do not drop, strike, impale, pierce, or manually short-circuit the battery.
- Keep the battery away from metal objects, such as watches, jewellery, and hairpins.
Dispose of the battery in specific recycling boxes only after a complete discharge. DO NOT place the battery in regular trash containers. Strictly follow your local regulations regarding the disposal and recycling of batteries.
- Damage or injuries incurred when the user/s are under the influence of alcohol, drugs, or medication.
- Any malfunction caused by operators’ failure to follow the guidance of the manual to assemble and set up or operate the drone as described and designed.
- Damage or injuries incurred as a result of the use or installation of any unauthorised third-party accessories or counterfeit parts, which were not provided or approved by SwellPro.
- Damage or injuries as a result of flying the drone out of eyesight range, or more than 300m away from the controller.
- Damage or injuries caused by flying the drone in areas of magnetic fields & radio interference.
- Damage or injuries, including crashes, loss of control, or water ingress, caused by abusing or modifying the original drone structure,
- Damage or injuries caused by using broken & aging components.
- Damage or injuries caused by failure to wash the components with fresh water after flying over or near the sea & corrosive waters.
- Damage or injuries incurred by intentionally dropping or crashing the FD1 into the water from a high altitude, especially water ingress into the drone fuselage and gimbal malfunction.
- Damage or injuries incurred by intentionally dropping or crashing the FD1 to the ground or water from a high altitude, especially water leakage into the drone fuselage and gimbal frame as a result of this collision.
Warranty
Please visit the SwellPro website https://www.swellpro.com/news/after–salessupport.html Look for the After-sales Service Policy” and submit a service request if needed
Csumtore Support
- Website:https://store.swellpro.com/