


ASKO HG1355GD Premium 33cm Gas Hob
Safety Instructions
- NEVER try to extinguish a fire with water. Instead, switch the appliance off and then cover the flames with, for example, a lid or a fire blanket.
- Ensure that there is adequate clearance of a few centimetres between the bottom of the hob and the contents of any drawers.
- Do not use or store flammable materials in the appliance storage drawer or near this appliance.
- Do not use this appliance as a space heater.
- Never open the casing of the appliance.
- Never use a steam cleaner for cleaning the appliance. Only clean the appliance when switched off.
- The steam of a steam cleaner could reach the conducting parts and cause an electrical short.
- Do not modify this appliance.
- Do not spray aerosols in the vicinity of this appliance while it is in operation.
Description/Control knob 

- Rapid burner
- Wok burner
- Pan support
- Glass top
- Wok selector ring
- Control knob
- Semi-rapid burner
- Zone indication
- 0 position
- High setting
- Low setting
- Wok setting (wok burner)
- Roasting setting (wok burner)
Use
Pans
- Always ensure that the flames remain under the pan. The handles could also become too hot.
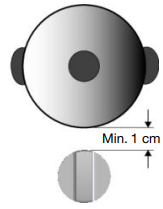
- The distance between the pan and a knob or non-heat-resistant wall should always be greater than one centimetre. In case of smaller distances, the high temperature may cause the knobs or wall to discolour and/or deform.
Suitable cookware
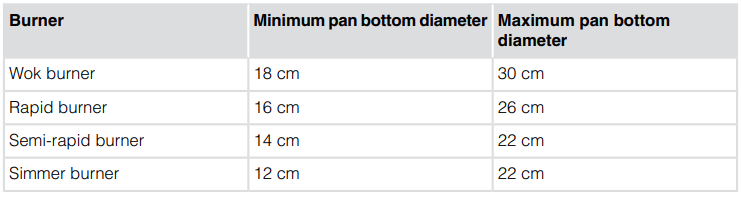
- Only use cookware with a suitable diameter. The cookware must not protrude over the edge of the hob. Never use small cookware on large burners. The flames must not touch the sides of the cookware. Refer to the table.
Wok ring and simmer grid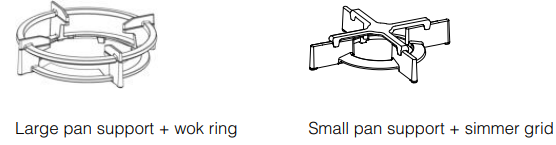
- The wok ring for use with the wok burner supplied or obtainable as an accessory provides extra
stability for a wok with a round base. The small pan grid-supplied or obtainable as an accessory makes it possible to use very small pans.
Pan support
- Place the pan support vertically, without sliding it over the glass top. Use the positioning notches to position the pan support on the glass top.
Burner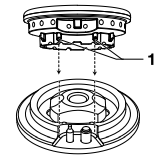
- Use the leads (1) to put together the burner parts.
Wok burner position
- Correctly place the wok burner. Placing the wok burner parts incorrectly can result in a poorly functioning burner.
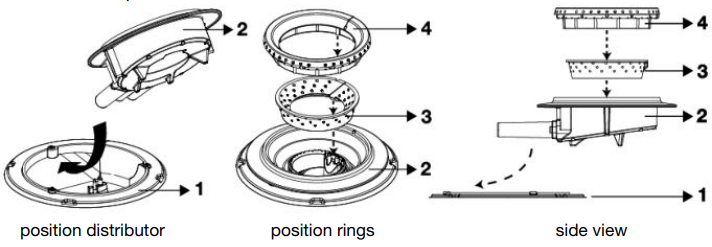
- Place the burner distributor (2) in the burner housing (1).
- Use the positioning notches to place the inner ring (3) on the burner distributor (2).
- Use the positioning notches to place the outer ring (4) on the burner distributor (2).
Installation
Safety regulations
- If the supply cord is damaged, it must be replaced ASKO HG1935AD 90cm Natural Gas Cooktop by the manufacturer, its service agent, or similarly qualified persons in order to avoid a hazard.
- Installation, maintenance, or repairs should only be carried out by professionals who are authorised by the manufacturer, as failure to do so will void the warranty.
- Before installation, ensure that the local distribution conditions (voltage, frequency, nature of the gas, and gas pressure) and the adjustment of the ASKO HG1935AD 90cm Natural Gas Cooktop appliance are compatible.
- Faulty parts may only be replaced by original ASKO HG1935AD 90cm Natural Gas Cooktop parts. The manufacturer can only guarantee that original parts meet safety requirements.
Electrical connection
- This appliance must be earthed.
- The electrical connection must comply with national and local regulations.
- The wall plug socket and plug should always be accessible.
- Do not use an adapter or an extension lead to connect the device to the electrical mains. Safe use of the device cannot be guaranteed with these accessories.
- Use a (flexible) cable that is flame-retardant, made from PVC, suitable for 300/500V in a 0…70 ºC environment.
- Means providing full disconnection under overvoltage category III conditions must be incorporated in the fixed wiring following AS/NZS 3000.
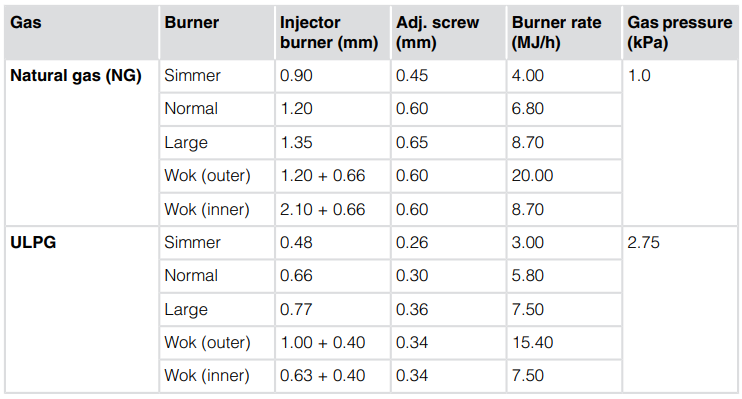
Gas connection
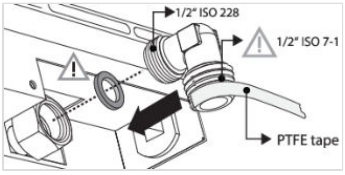
- Gas connection 1/2″ ISO 228 / ISO 7-1
- The gas connection must comply with national and local regulations. See appliance label for technical gas data.
- We recommend that the gas hob be connected through a fixed pipe.
- A safety hose may not be bent and must not come into contact with moving parts of kitchen units.
- The connection point for the appliance must always be placed in an easily accessible position.
- The hotplate can be connected with a rigid pipe as specified in AS/NZS5601 – current edition.
Preparations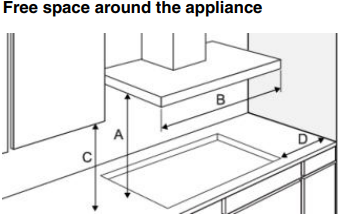
- Rangehoods and exhaust fans shall be ASKO HG1935AD 90cm Natural Gas Cooktop installed under the manufacturer’s instructions.
For an overhead exhaust fan A>800 mm!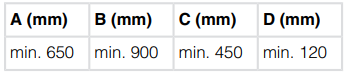
Accessibility Built-in
Appliance dimensions Cut-out in the worktop
Sealing tape
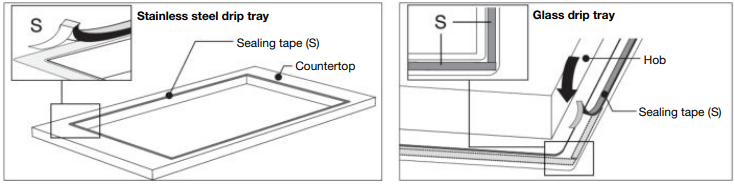
Install the appliance in the worktop.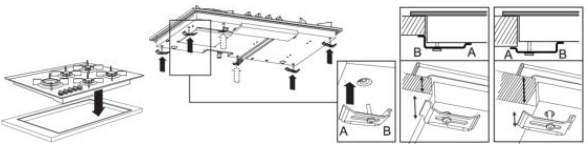
Gas connection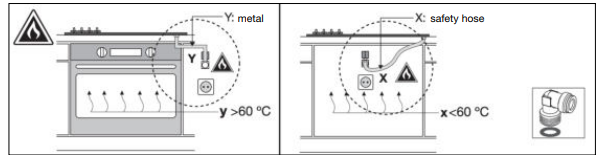
- The hotplate can be connected with a rigid pipe as specified in AS/NZS 5601.1, current edition.
- Fitting of appliance regulator for Natural gas or test point adaptor for LPG.
- Check and set the gas pressure while the appliance is operating!

Connecting & testing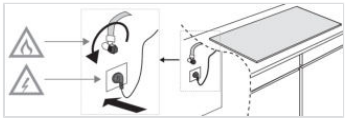
Operation
Ignition and adjustment
- The burner is fully adjustable between high and low settings.
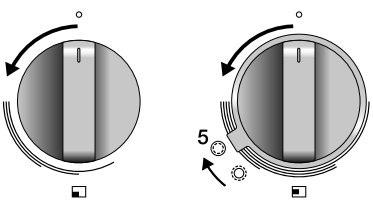
- Press the control knob and turn it anticlockwise. The burner will ignite.
- Keep the control knob fully depressed for at least 3 seconds between high and low settings.
- If desired, turn the wok selector ring to the roasting setting (5). The inner ring (wok setting) will switch off, and the outer ring (roasting setting) will switch on.
Maintenance
Daily cleaning
- Regular maintenance after use prevents spilled food from setting too long and creating stubborn stains. Use a mild detergent for this.
- This prevents the drip tray or glass cover from becoming dirty again after cleaning.
Stubborn stains
- Never use scouring powder, scouring pads, sharp objects, or aggressive cleaning products.
Persistent stains on the glass cover
- Clean the glass cover with a special cleaning product for ceramic hobs.
Persistent stains on the stainless steel (drip trays)
- Always wipe with the structure of the steel to prevent scraping away the protective layer (damage caused in this way does not fall under the guarantee!) The surface of stainless steel drip trays can discolour slightly over time.
Brass wok burner parts
- It is not unusual to see a change in the colour of the brass as a result of the high temperatures involved in wok use.
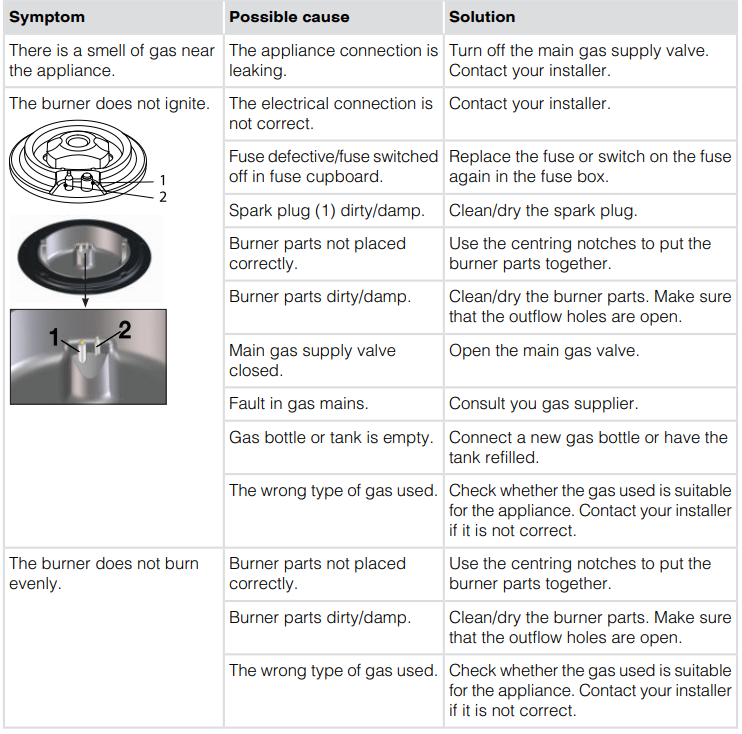
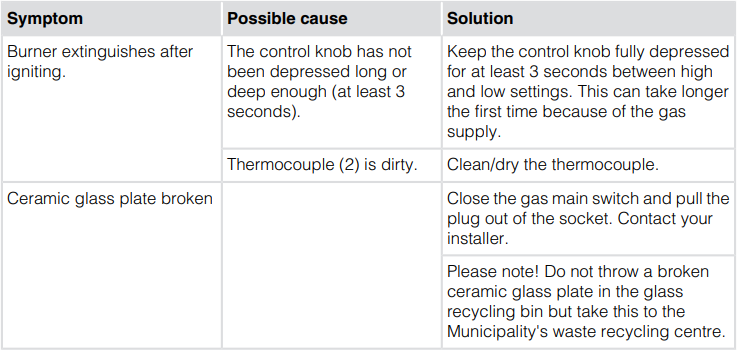
Troubleshooting
Disposal
Ask your local authorities for more information about how to do this. A separate collection of household appliances helps to prevent any potential negative impact on the environment and human health caused by improper disposal.
- cardboard;
- polyethylene film (PE);
- CFC-free polystyrene (PS rigid foam).
Customer Service
- Address: ASKO Appliances Pty Ltd – 35 Sunmore Close – MOORABBIN VIC 3189
- Phone: 1300 00 2756
- Fax: 03 8551 2220
- Email: sales@asko.com.au – https://au.asko.com