


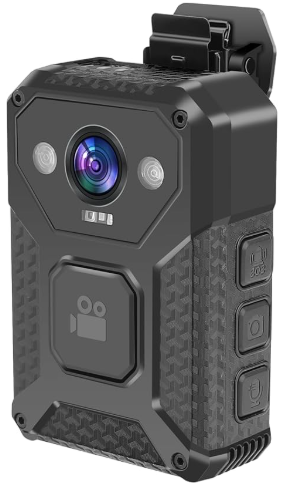
Pyle PPBCM10 Portable Wireless HD Body Camera
Overview
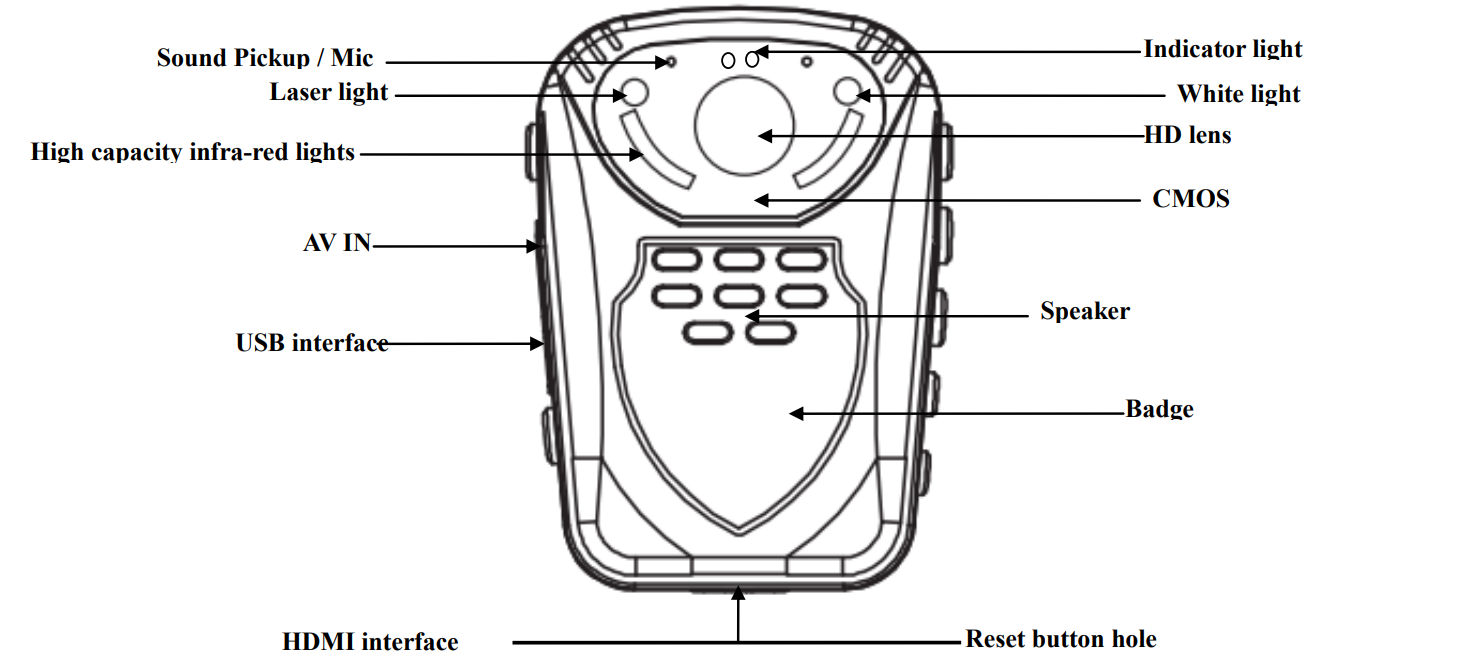
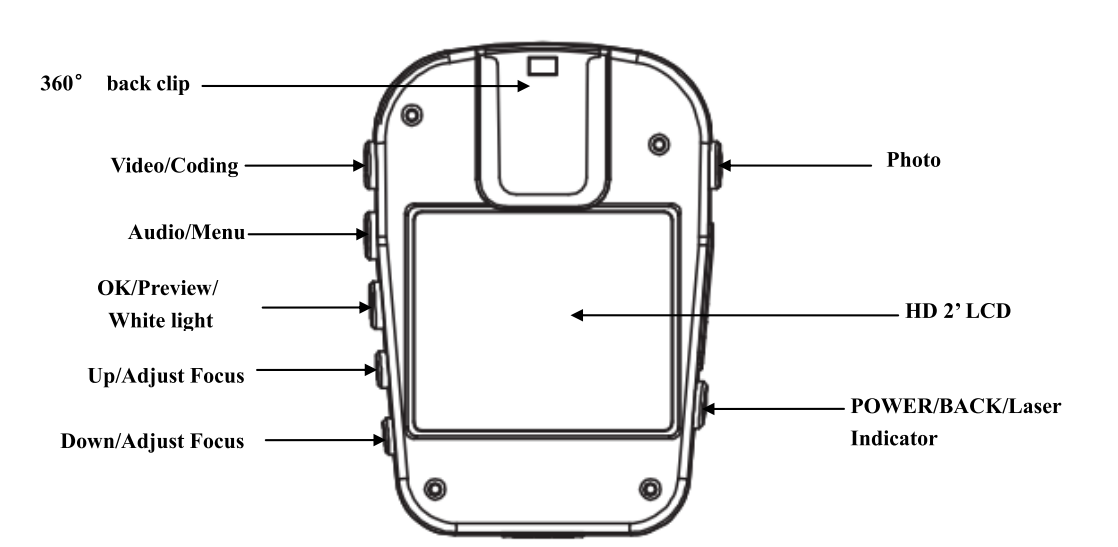
Structure
Remote Control
 Remote control light indicator
- Camera button
- video recording button
- Sound recording button
LCD Screen

- Memory card recording time remaining
- State icon. In video preview state, it is a film mark; in recording state, it is a red dot; in photo preview state, it is a camera mark.
- The ID number of the device and/or the police officer.
- Displays the memory card identification.
- Battery level icon.
- Display the system date and time.
- Display the remaining storage space of the memory card.
Charging
Low battery indication: when the battery voltage is too low, the battery icon in the top right corner of the LCD will turn red and flash; the warning tone will beep, and the device will automatically shut down in five minutes. Please charge the device before the time runs out to avoid inconvenience.
Two types of charging methods

Connect the device to a computer or to the charging station through the USB port as indicated by the above arrow. The state of charge can be reflected by the icon on the LCD (charging while it is powered on) or by the LED (charging while it is powered off). The red light indicator is on while charging. The red light will turn off when it’s fully charged.
Functions
- Turning on
When the device is off, press the power key to power on. A yellow and green light indicator will flash, and the preview screen will appear. If there is no operation for three minutes, the device enters the self-protection mode automatically to save power. - Turning off
When the device is powered on, press and hold the power key for two seconds to power off. The LCD will shut down, and all light indicators will power off. - Standby
If there is no operation for three minutes, the device enters the self-protection mode automatically to save power. The LED light indicator will turn green. - System settings
Press and hold the “Menu” key for three seconds, enter the “System Setting” option, and the LCD will display as follows.

- Resolution: press the “Up” key or “Down” key to select a resolution. Press the “OK” key to confirm the resolution selected.
- Date/Time Press the “Up” key or “Down” key to select the date/time. Press the “OK” key to confirm the date/time selected.
- Video segmentation: press “Up” kethe y or “Down” key to select the length of the video, then press the “OK” key to confirm the video segmentation selected.
- Photo resolution: press the “Up” key or the “Down” key to select photo resolution, and press the “OK” key to confirm the selected photo resolution.
- IPressthe ess the “Up” key or the “Down” key to select the ID, prthe ess “OK” key to confirm the ID selection. Press the“Up” key or the “Down” key to select the switch, and press the “OK” key to confirm the switch selection.
- Delay record: press the “Up” key or the “Down” key to select the switch, press the “OK” key to confirm the switch selected. After the settings are selected and finished, press the “BACK” key to enter er boot state and preview it.
Video Recording
While it is powered on and in the preview screen, press the “Video” key to start recording. In recording mode, the top left corner shows a red LED light indicator; it will begin to flash slowly when it is recording. Press the “video” key again to stop recording (LED light indicator returns to a green color). Video files are saved automatically to your SD memory card. The screen will return to the preview screen. The name of the video will be the current date and time with “MP4” as the suffix, saved on your memory card. Refer to the “Check out/Playback” button to check your recorded video.
Snapshot
While shooting video, press the “Photo” key to take photos, which will save automatically. Snapshots will not interrupt recording video.
Taking pictures
While in the preview screen, press the “Photo” key to take a photo (saves automatically). There will be a picture-taking sound to indicate a photo has been takePressingess the “Photo” key once will take a photo. The name of the photo consists of the date and time with a “JPG” as the suffix, saved on the memory card. Refer to the “Check out/Playback” button to check the photo.
Separate sound recording
In the preview screen, press the “Audio” button to start a separate sound recording. The screen will be blue with the word “recording” in the middle. The LED light indicator is yellow. Press “Audio” again to stop the separate sound recording. The LED light indicator will turn back to green. The audio file is saved in the SD memory card automatically.
Automatic Infra-Red mode
This body camera has automatic infrared-red night vision. When you use the camera in a dark environment, the night vision will be turned on automatically. No need to press any key to start this function
Laser light and white light operation
With the device powered on, press the “Power” button to turn the laser light on/off. The device will transmit a red laser beam, which will help locate the direction of your recording. With the device powered on, press and hold the “OK” button to turn the white light on/off. This device will transmit white light (flash), which will provide light in the dark.
AV output/HDMI output
- USB & TV output
The device is equipped with TV and USB output functions, a dedicated TV and USB output cable connector. This can connect it to the monitor of the TV; audio and video will play while viewing the playback. - HDMI output
The device is equipped with an HDMI output function, a dedicated HDMI output cable conthatr which can connect this device to any TV/Computer with an HDMI connection.
Playback Video/camera/audio
With the power on, press the “power” key to enter the checkout/playback menu.
- In this display screen, press the “Up” or “Down” key to select the desired option: Video / Photo / Audio (Highlight the selected item).
- Press the “OK” key to display all files(Video / Photo / Audio), then press the “up” or the “down” key to select the required playback files.
- Press the “OK” key to display all files (Video / Photo / Audio). While playing, press the “OK” key once to stop playing and then press it again to continue playing.
- In the above process, press the “power” key to return to the previous menu until the normal display appears.
Restart
Because of improper operation or other special reasons that may cause the equipment to crash or stop responding, you may use a small object (a toothpick or something similar) to press the reset button to restart. After the restart key is pressed, the device will automatically shut down and restart. It will save what you have shot before shutting down. The Pyle PPBCM10 Portable Wireless HD Body Camera restart hole is under the bottom of the device. Open the HDMI, and you will see a small hole- this is the reset button.
Indicator instruction
- With the power on, the preview screen LED is green
- With the power on, while you are recording, the LED is red (blinking slowly)
- With the power on, the video recording mode LED is yellow
- In the data connection state, the LED indicator is red
- In a state of charge, the LED indicator is red. After charging, the LED indicator light goes out.
- With the power on, each press of the “Photo” key will take one photo- the LED indicator flashes red.
Remote Control Operation
The machine has an optional remote control and can provide a more convenient way of shooting photos/videos.
Code matching
Press and hold the „picture‟ key on the remote control and the „down‟ key in the camera at the same time. After around 5-10 seconds, you will see a camera icon on the LCD screen. It is now connected.
Please kindly refer to the following pictures.

Remote Control Key
As instructed below key: Photo/Camera button. Press once to take a photo. In video mode, press this key to capture a screenshot of what you are recording. Keyy: Video recording button. Press once to shoot a video, press once again to stop shooting, and save your Keyes. Key: Sound recording button. Press once to start recording, press once again to stop recording, and save your files.
Connected to the computer
Connect the device to the comcomputer h Pylthe e PPBCM10 Portable Wireless HD Body and Camera the included USB cable to transfer your files. You do not have to install any drivers or programs to have it work.
Specifications
| Video Input | Resolution 1920*1080 |
| Display | 2.0 inch 16:9 TFT LCD | 960*240 |
| Lens angle | Built-in Lens: 120° wide-angle |
| Focus range | 0.3~∞ |
| CMOS | 1/2″ Color CMOS Sensor |
| Body Size | 2.3” × 1.1” × 2.5” (length × width × height) |
| Photo | JPG file format up to 1600 million pixels camera |
| Video Camera | Video Format: H.264 compressed format 1920*1080 @ 30fps, 1440*1080 @ 30fps, 1280*720 @ 60fps, 640*480 @ 30fps |
| Video Format | MP4 |
| Remote Control | One key operation (professional wireless remote control) |
| Exposure Mode | Auto Exposure |
| IR night vision | Built-in 6 high-power infrared lights, night photography, and video support, can identify faces in 8 meters |
| Audio | Built-in microphone/speaker |
| Pickup | 64KHZ |
| Memory | Body memory:32M, Standard 16GB TF memory |
| Shutter / Shutter Speed | Electronic Shutter/1/2-1/2000s |
| Filter Switch | Switchable lens filter, suitable for both day and night use |
| White Balance | Automatic |
| USB Interface | Mini USB Interface/USB 2.0 |
| Lithium Battery | High-capacity polymer battery;
3.7V 1500mAh |
| Operating Temperature/ Humidity | 0°-120°F / <90% |
| Operating Current | Power of about 270mA, video is about 370mA, screensaver about 230mA, 420mA IR to open |
Troubleshooting
- Please connect the charger to the Pythe le PPBCM10 Portable Wireless HD Body Camera equipment and charge it for at least 2 hours, then check it again. Please check to see if the charger and/or the connecting line are normal.
- Please press the reset key to restore the device to factory settings, and then check to see if the problem is still occurring. If this does not resolve the problem, please contact customer service staff to return it to the
Red equipment image
The device uses relay control for the infrared filter lens. When it has been hit in the course of transportation or if it falls, this could lead to the infrared filter lens becoming stuck. The magnetic force cannot be reset after the relay is energized. At this time,
please repeatedly press the infrared switch. If this does not work, please shut the device down and lightly tap the device on a soft surface to loosen the magnetic force (then power it back on). If this does not work, please contact customer service staff to return it to the factory for repair.
Customer Support
- Email: support@pyleusa.com
- Tel: (718) 535-1800
- Working Hours: Mon–Thurs 9:00–17:00 EST | Fri 9:00–14:00 EST | Sat–Sun Closed