


Sharkoon SGK50 S3 Wood Barebone

Safety Instructions
- Only use the device indoors in areas with normal humidity.
- Ensure that the device does not come into contact with moisture or liquids.
- Only clean the device with a dry cloth.
- Connect this device only with compatible, intended cables and only to other compatible, intended devices.
- The device does not contain any components that require maintenance. Opening the keyboard housing will result in the loss of the guarantee.
Install Switches
- To install the switches, position the switch so that one tab is at the front and the other tab is at the back.
- Each pin on the underside of the switch should be pointing exactly to its relevant contact in the keyboard socket.
- Make sure that the switch is led vertically into the socket opening (at a 90-degree angle to the socket).
- Installing the switch incorrectly can lead to damage or malfunction of the switch.
- After you have placed the switch in its socket, push very gently on the switch to secure it in place.
- Make sure that you do not use too much force, as this can damage or destroy fragile components.
Remove Switches

- Position the switch puller tool correctly on the tabs of the switch. These are positioned at the front and the back of the switch.
- Before pulling out the switch, make sure that both tabs are securely pressed with the switch puller tool and that the switch can be removed from the socket without resistance.
- If necessary, remove the adjacent keycaps to allow the switch puller tool sufficient freedom of movement.
- Press both tabs of the switch with the switch puller tool and then slowly pull the switch out of the socket.
- Be sure to always pull vertically from the socket in a straight, upward direction.
- Avoid pulling in a slanted direction, as this can result in damage.
Install Keycaps
- To install a keycap, first place it over the installed switch. Make sure that the keycap’s symbol or character is positioned the right way round.
- Now, carefully press the keycap onto the switch until the keycap locks into place.
- Do not use excessive force, as this can damage the keycap and the switch.
- After the correct installation, the switch and keycap should behave as when used for normal typing.
Remove Keycaps
- To remove a keycap, place the arms of the keycap puller tool either to the left and right or to the top and bottom of the keycap, and then pull the keycap upwards with careful but constant pressure.
- Whenever possible, avoid pulling the keycaps from the switch directly with your fingers, as this may damage the switch.
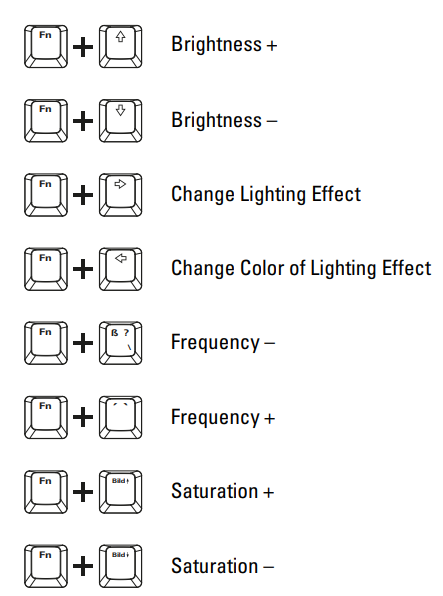
Multimedia Keys

Lighting Effects
 Lighting Profiles
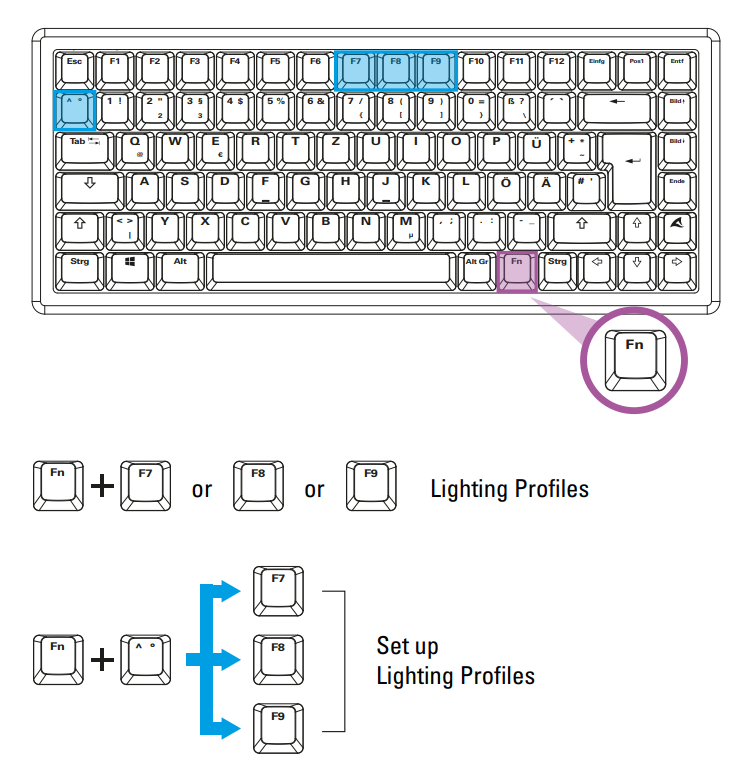
Set up Lighting Profiles
To set up or modify lighting profiles, first press and hold down the function key, and then also press the caret (^) key. Up to three lighting profiles Sharkoon SGK50 S3 Wood Barebone can be accessed separately via the F7, F8, or F9 key. These keys begin to flash. To choose one of these three profiles, press and hold down the function key again and then also choose and press one of the keys that are now flashing.
You can then select and press any keys that you wish to be illuminated. When you have finished with the selection of keys, press and hold down the function key again and then press the caret (^) key once more to save the personalized illumination. This can now be accessed via the previously chosen F7–F9 key.
Macro Keys
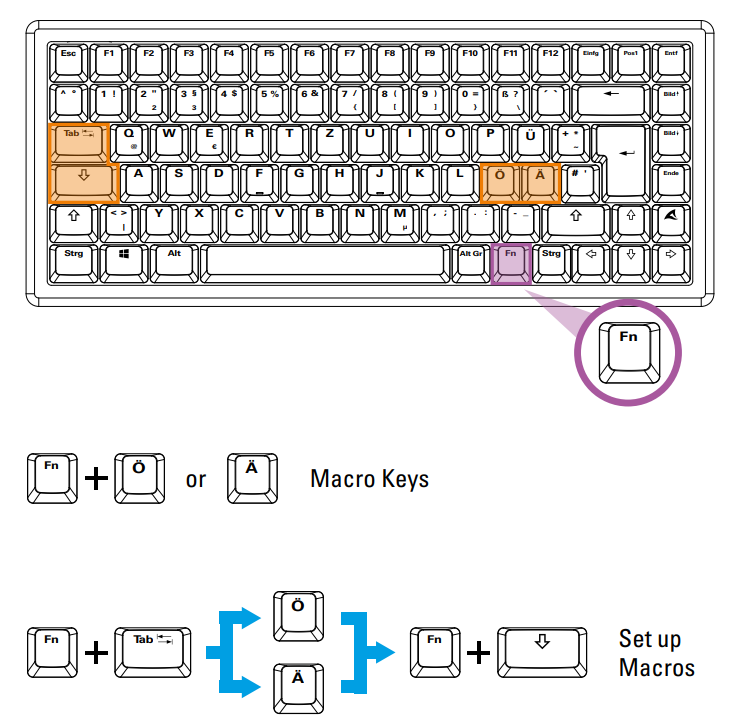
Record Macros
To record macros, first press and hold down the function key and then press the Tab key. Once you have done this, the macro keys Ö and Ä will start flashing. Press and hold down the function key and press one of these two macro keys to select it for macro recording. In the next step, first press and hold down the function key, and then press the Caps Lock key. The macro key you selected will now start to light up continuously.
Choose ISO or ANSI Positioning Plate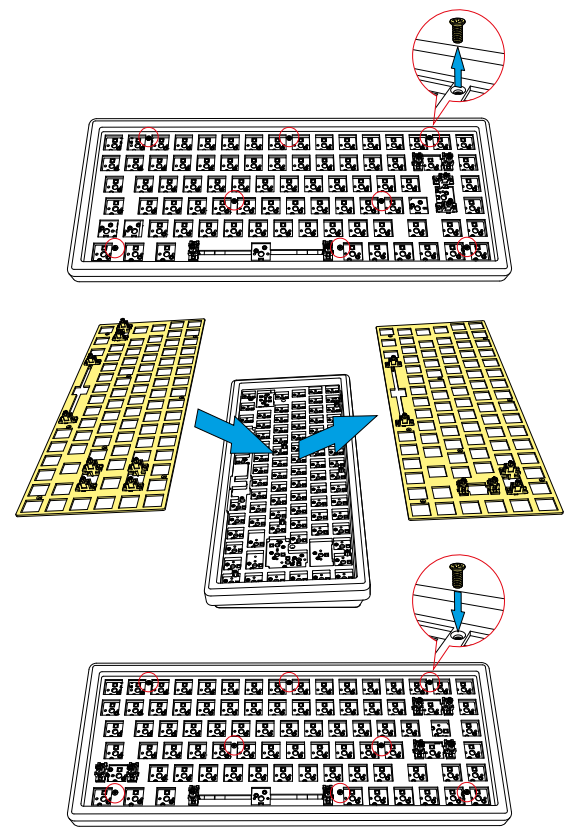
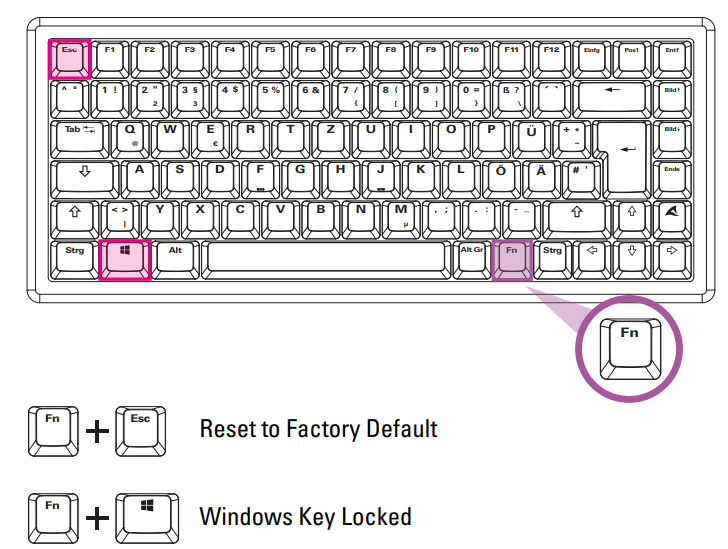
Legal Notices
Legal Disclaimer
- For potential loss of data, especially due to inappropriate handling, Sharkoon assumes no liability.
- As a continuing policy of product improvement at Sharkoon, the design and specifications are subject to change without prior notice.
- National product specifications may vary. All rights reserved, especially (also in extracts) for translation, reprinting, reproduction by copying or other Sharkoon SGK50 S3 Wood Barebone technical means.
- Infringements will lead to compensation. All rights reserved, especially in case of assignment of a patent or utility patent. Means of delivery and technical modifications reserved.
- Please act according to your local rules and do not dispose of your old products with your normal household waste.
- The correct disposal of your old product will help prevent potential negative consequences to the environment and human health.
Customer Support
Website: https://usevia.app