


Beamz BLAZE2200 & 3500 Vertical Fogger 
Safety Instructions
- Unpack and check carefully that there is no transportation damage before using the unit.
- Please read these instructions carefully and follow them.
- Observe all safety warnings. Never remove safety warnings or other information from the equipment.
- Make sure that the power cord is never crimped or damaged.
- Check the unit and the power cord from time to time.
- Always disconnect power from the mains when the unit is not used or before cleaning!
- Only handle the power cord by the plug. Never pull out the plug by tugging the power cord.
- Do not switch the unit on and off in short intervals. Do not connect the unit to a dimmer pack.
- Always allow free air space of at least 50 cm around the unit for ventilation.
- This unit is not designed for permanent operation.
- Consistent operation breaks will ensure that the unit will serve you for a long time without defects.
Installation
- Place the unit on a flat surface and in Beamz BLAZE2200 & 3500 Vertical Fogger a suitable large area with at least 50 cm of open space around the unit.
Operation
When the display shows “READY”, you can start producing haze and adjust the settings via the LCD panel.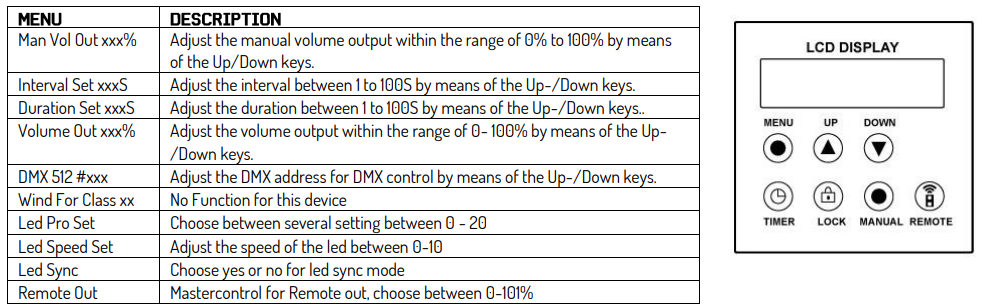
The changes made are not saved until the display is switched back and shows ready to fog.
Power Supply
The label on the backside of the unit indicates the mains voltage to which it must be connected. Check that the mains voltage corresponds to this. Any voltage other than the one indicated may cause irreparable damage to the unit. The unit must also be connected directly to the mains voltage, and no dimmer or adjustable power supply may be used.
The unit has a power connector output on board. Depending on the local conditions, several units can be linked by a power connector in and out. Connect a maximum of four (when using 230V/16A) units in a row. Use an approved three-core cable with a cross-section of at least 1.5 mm². The installation instructions of the manufacturer and the colour coding of the cable must be observed. Do not turn off the unit by turning off the power cthepower on/off switch, or the Schuko!
Rigging
The unit may be set up on a stable and even surface. Using the fixing facilities of the baseplate, the unit can also be mounted upside down to a truss, see picture below. For fixing, certified clamps with the correct safe working load are required. According to the figure, the quick lock bolts of the omega brackets are placed into the openings provided in the base plate and turned clockwise until they lock (to the stop). The mounting place must be of sufficient stability and be able to support a weight of. Secure the unit with a safety cable so that it cannot fall.
When carrying out any installation, always comply with European and national guidelines concerning rigging, truss, and all other safety issues. Always let the installation be checked out by an authorised dealer!
DMX512 Control
If you are using a standard DMX controller, you can connect the DMX output of the controller directly to the DMX input of the first unit in a DMX chain. Always connect the output of one unit with the input of the next unit until all units are connected.
RDM Control
- This unit can communicate using RDM (Remote Device Management) via DMX512. RDM is a bi-directional communication protocol for use in DMX512 control systems. It is the open standard for DMX512 configuration, beamZ BS384 RGBW LED Stroboscoop Comb, and status monitoring.
- The RDM protocol allows data packets to be inserted into a DMX512 line without affecting the existing non-RDM equipment. The system allows a controller or special RDM controller to send and receive commands from specific fixtures.
- The RDM function allows you, for example, to remotely set the DMX start address of your fixtures. This is especially useful when the fixture is installed in an inaccessible location. Each unit has an RDM UID (unique identification number).
Cleaning
The buildup of dust, dirt, and other airborne particles will reduce the unit’s light output. It will also prevent the unit from cooling correctly, and this will reduce the unit’s lifetime. The rate of dirt buildup willvary dependingg on environmental factors such as airborne dust, use of smoke machines, airflow from ventilation systems, etc. The units’ cooling fans will accelerate the buildup, and smoke particles that are present in the atmosphere will increase the tendency for dirt to clog.
To get the best performance and lifetime from the unit, inspect it regularly and clean it as soon as you see signs of dirt buildup. Assess the operating environment each time you begin to use the unit. In dusty or smoky conditions, inspect the unit after a few hours and check it frequently. The unit may attract dirt faster than you expect. Use the following guidelines:
- Disconnect the unit from power and allow it to cool completely before cleaning.
- Do not use solvents, abrasives, or any other aggressive products to clean the unit.
- Vacuum or use low-pressure compressed air to remove dust and loose particles from surfaces and air vents. Prevent the blades of cooling fans from turning before you aim a vacuum or air jet at the fan, or you may spin the fan too fast and damage it.
- Clean glass components by wiping gently with a soft, clean, lint-free cloth moistened with a weak detergent solution. Avoid rubbing glass surfaces.
- Dry the unit with a soft, clean, lint-free cloth or low-pressure compressed air before reapplying power.
Replacing the Fuse
If the fuse is defective, replace it with a fuse of the same type and value. Before replacing the fuse, unplug the mains lead. Procedure:
- Step 1: Open the fuse holder on the rear panel with a fitting screwdriver.
- Step 2: Remove the old fuse from the fuse holder.
- Step 3: Install the new fuse in the fuse holder.
- Step 4: Replace the fuse holder in the housing.
Maintainance
This unit is virtually maintenance-free, but you should check the unit regularly for mechanical and electrical aspects. Assess the operating beamZ BS384 RGBW LED Stroboscoop Combi environment and establish an inspection and cleaning schedule that follows the guidelines below:
- Disconnect the unit from the power supply and allow it to cool completely before inspecting and cleaning.
- Check the housing, fixing points, and installation points; they must not show any signs of deformation, wear, or fatigue.
- Check the mechanically moving parts; these must not show any signs of wear or fatigue.
- Check the electrical power and signal cables; they must not show any damage or fatigue.
- Do not use solvents, abrasives, or other aggressive products to clean the unit.
- Place the solution on the cloth and not on the surface to be cleaned. Avoid rubbing glass surfaces.
- Dry the unit, connectors, and contacts with a soft, clean, lint-free cloth or low-pressure compressed air before re-powering the unit.
Technical Specifications

Troubleshooting
Control Menu
DMX Channels
Customer Service
- Website: https://www.beamzlighting.com/
- Ph: +31 (0)85 105 3155
European Union
Tronios B.V., Bedrijvenpark Twente Noord 18, 7602KR Almelo, The Netherlands
- 2014/35/EU
- 2014/30/EU
- 2011/65/EC
United Kingdom
Tronios Ltd., 130 Harley Street, London W1G 7JU, United Kingdom
- S.I. 2016:1101
- S.I. 2016:1101
- S.I. 2012:3032
130 Harley Street, London W1G 7JU, United Kingdom S.I. 2016:1101 S.I. 2016:1091 S.I. 2012:3032